Azure Autodiscovery
Device42 Azure discovery provides visibility into your Azure resources and services, including virtual machines, databases, storage, networking, Kubernetes clusters, and more. Discovery uses an application service principal in accordance with Microsoft's security recommendations.
This page walks you through creating an application service principal with limited permissions, configuring role-based access, and setting up an Azure discovery job in Device42.
Get Started with Azure
Before you begin discovery in Device42, prepare your Azure environment. Complete the following two preparatory steps in your Azure account before you attempt discovery.
Prepare the Application
- Log in to Azure via https://portal.azure.com.
- Navigate to Azure Active Directory > Enterprise Applications > New Application > Create Your Own Application.
- Name your application and select the Integrate any other application you don't find in the gallery (Non-gallery) option.
- Navigate back to the top-level directory you created the app in and choose App Registrations.
- Select your newly created app and note the Application (client) ID and the Directory (tenant) ID, as both are used for Device42 discovery.
- Select Certificates & Secrets, then New Client Secret.
- Give your secret an optional description and an expiration date, then select Add.
- Note the string in the Value column. This is used as the Client Secret ID for Device42 discovery and will not be visible again once you sign out of the Azure portal.
Prepare the Role
Device42 lets you discover Azure resources at the tenant or subscription level. Tenant discovery is best suited to environments with large numbers of Azure subscriptions. If you only have a few Azure subscriptions, subscription discovery may be preferable.
The assignable scope in the policy below assumes you are performing subscription-level discovery.
If you are performing tenant-level discovery, be sure to change the assignable scope to:
/providers/Microsoft.Management/managementGroups/root-management-group-id-goes-here
Subscription Level
The next step is to create a role with limited permissions that will be applied to this application. If you haven't set up your roles yet, see the Microsoft Assign Azure roles page. The role lets Device42 use the application for discovery purposes while adhering to the principle of least privilege.
Navigate to the Subscriptions section in the Azure portal and select the subscription you would like to allow this application to discover. Take note of the Subscription ID, as it will be used later for Device42 discovery.
The Discover all subscriptions option should be unchecked to enable subscription-level discovery. By default, this option is selected for tenant-level discovery.
Navigate to Subscriptions > Select your Subscription > Access Control (IAM) > Roles > Add > Add Custom Role. Give the custom role a name, and an optional description, then select either Start from scratch or Start from JSON.
- If using the Start from scratch option, manually select each permission needed for this application to access the desired resources. The permissions needed are available in the Device42 cloud discovery documentation. Select Add permissions, search for and select the desired permission, check the relevant box, and choose Add. Repeat this for any desired permissions.
- If using the Start from JSON option, copy and paste the JSON data below to pull in the necessary permissions from the list in the Discovery section and save it as a
.jsonfile. Upload this file on the Basics page when creating the role, and the permissions will be automatically defined.
Click to expand the code block
{
  "properties": {
    "roleName": "D42Discovery",
    "description": "",
    "assignableScopes": [
      "/subscriptions/subscription-id-goes-here"
    ],
    "permissions": [
      {
        "actions": [
          "Microsoft.AAD/domainservices/read",
          "Microsoft.AlertsManagement/smartdetectoralertrules/read",
          "Microsoft.Compute/disks/read",
          "Microsoft.Compute/sshpublickeys/read",
          "Microsoft.Compute/virtualMachines/read",
          "Microsoft.Compute/virtualmachines/extensions/read",
          "Microsoft.Compute/virtualmachinescalesets/read",
          "Microsoft.ContainerService/managedClusters/accessProfiles/listCredential/action",
          "Microsoft.ContainerService/managedClusters/listClusterUserCredential/action",
          "Microsoft.ContainerService/managedClusters/read",
          "Microsoft.DBforMariaDB/servers/databases/read",
          "Microsoft.DBforMariaDB/servers/read",
          "Microsoft.DBforMySQL/flexibleservers/read",
          "Microsoft.DBforMySQL/flexibleservers/databases/read",
          "Microsoft.DBforPostgreSQL/flexibleservers/read",
          "Microsoft.DBforPostgreSQL/serverGroupsv2/*",
          "Microsoft.DBforPostgreSQL/servers/databases/read",
          "Microsoft.DBforPostgreSQL/servers/read",
          "Microsoft.DocumentDB/databaseAccounts/cassandrakeyspaces/read",
          "Microsoft.DocumentDB/databaseAccounts/gremlinDatabases/read",
          "Microsoft.DocumentDB/databaseAccounts/mongodbDatabases/read",
          "Microsoft.DocumentDB/databaseAccounts/privateEndpointConnections/read",
          "Microsoft.DocumentDB/databaseAccounts/read",
          "Microsoft.DocumentDB/databaseAccounts/sqlDatabases/read",
          "Microsoft.DocumentDB/databaseAccounts/tables/read",
          "Microsoft.Insights/actiongroups/read",
          "Microsoft.Insights/components/read",
          "Microsoft.Insights/datacollectionrules/read",
          "Microsoft.Insights/metrics/read",
          "Microsoft.KeyVault/vaults/read",
          "Microsoft.ManagedIdentity/userassignedidentities/read",
          "Microsoft.Migrate/migrateprojects/read",
          "Microsoft.Network/applicationgateways/read",
          "Microsoft.Network/connections/read",
          "Microsoft.Network/dnsresolvers/read",
          "Microsoft.Network/loadBalancers/read",
          "Microsoft.Network/localnetworkgateways/read",
          "Microsoft.Network/networkInterfaces/read",
          "Microsoft.Network/networksecuritygroups/read",
          "Microsoft.Network/networkwatchers/flowlogs/read",
          "Microsoft.Network/networkwatchers/read",
          "Microsoft.Network/privateEndpoints/read",
          "Microsoft.Network/privatednszones/read",
          "Microsoft.Network/privatednszones/virtualnetworklinks/read",
          "Microsoft.Network/publicIPAddresses/read",
          "Microsoft.Network/routetables/read",
          "Microsoft.Network/virtualNetworks/read",
          "Microsoft.Network/virtualnetworkgateways/read",
          "Microsoft.OperationalInsights/querypacks/read",
          "Microsoft.OperationalInsights/workspaces/read",
          "Microsoft.OperationsManagement/solutions/read",
          "Microsoft.RecoveryServices/vaults/read",
          "Microsoft.Resources/subscriptions/resourceGroups/read",
          "Microsoft.Servicebus/namespaces/read",
          "Microsoft.Sql/managedInstances/databases/read",
          "Microsoft.Sql/managedInstances/read",
          "Microsoft.Sql/servers/databases/read",
          "Microsoft.Sql/servers/read",
          "Microsoft.SqlVirtualMachine/sqlVirtualMachines/read",
          "Microsoft.Storage/storageAccounts/blobServices/containers/read",
          "Microsoft.Storage/storageAccounts/privateEndpointConnections/read",
          "Microsoft.Storage/storageAccounts/read",
          "Microsoft.Web/serverfarms/read",
          "Microsoft.Web/sites/functions/read",
          "Microsoft.Web/sites/read"
        ],
        "notActions": [],
        "dataActions": [],
        "notDataActions": []
      }
    ]
  }
}
Tenant Level
If using the Tenant ID for discovery, you must create a single role at the tenant level. Navigate to Management Groups > Select your Azure Tenant Group > Access Control (IAM) > Roles > Add > Add Custom Role. Give the custom role a name and a description, then select Start from scratch or Start from JSON.
- If using the Start from scratch option, manually select each permission needed for this application to access the desired resources. Select Add permissions, search for and select the desired permission, check the relevant box, and choose Add. Repeat this for any desired permissions.
- If using the Start from JSON option, copy and paste the JSON data, pulling in the necessary permissions from the list in the Discovery section, and save it as a
.jsonfile. Change the assignable scope to/providers/Microsoft.Management/managementGroups/root-management-group-id-goes-here. Then, upload this file on the Basics page when creating the role, and the permissions will be automatically defined.
After defining the permissions, select Next to define the scope this application will have access to. You can define the scope at the subscription level or in any of the nested resource groups (this example uses the subscription level). Select Next to review or copy the JSON, then Next and Create.
To apply the role, go back to the Access Control (IAM) > Add > Add Role Assignment. Select your newly created role and choose Next to bring you to the Members tab. Choose the User, group, or service principal > Select members, and choose the application created in the previous steps above. Select Next and then Review + Assign. Your custom role is now applied to your new application and can be used for discovering Azure Resources.
Azure Kubernetes Service (AKS)
When Authentication and Authorization is set to Azure AD authentication with Kubernetes RBAC and Kubernetes local accounts is disabled, ensure that a group is configured within the Cluster admin ClusterRoleBinding that includes the discovery user or service principal.
You can specify multiple groups within the Cluster admin ClusterRoleBinding selection. This can be useful if you want to keep the discovery user or service principal in a separate, dedicated discovery group rather than adding it to an existing group.
Create an Azure Discovery Job
You can now configure an Azure discovery job in Device42 using the application details you noted earlier. The limited role you applied prevents access to unnecessary resources while still allowing visibility and discovery of in-scope resources.
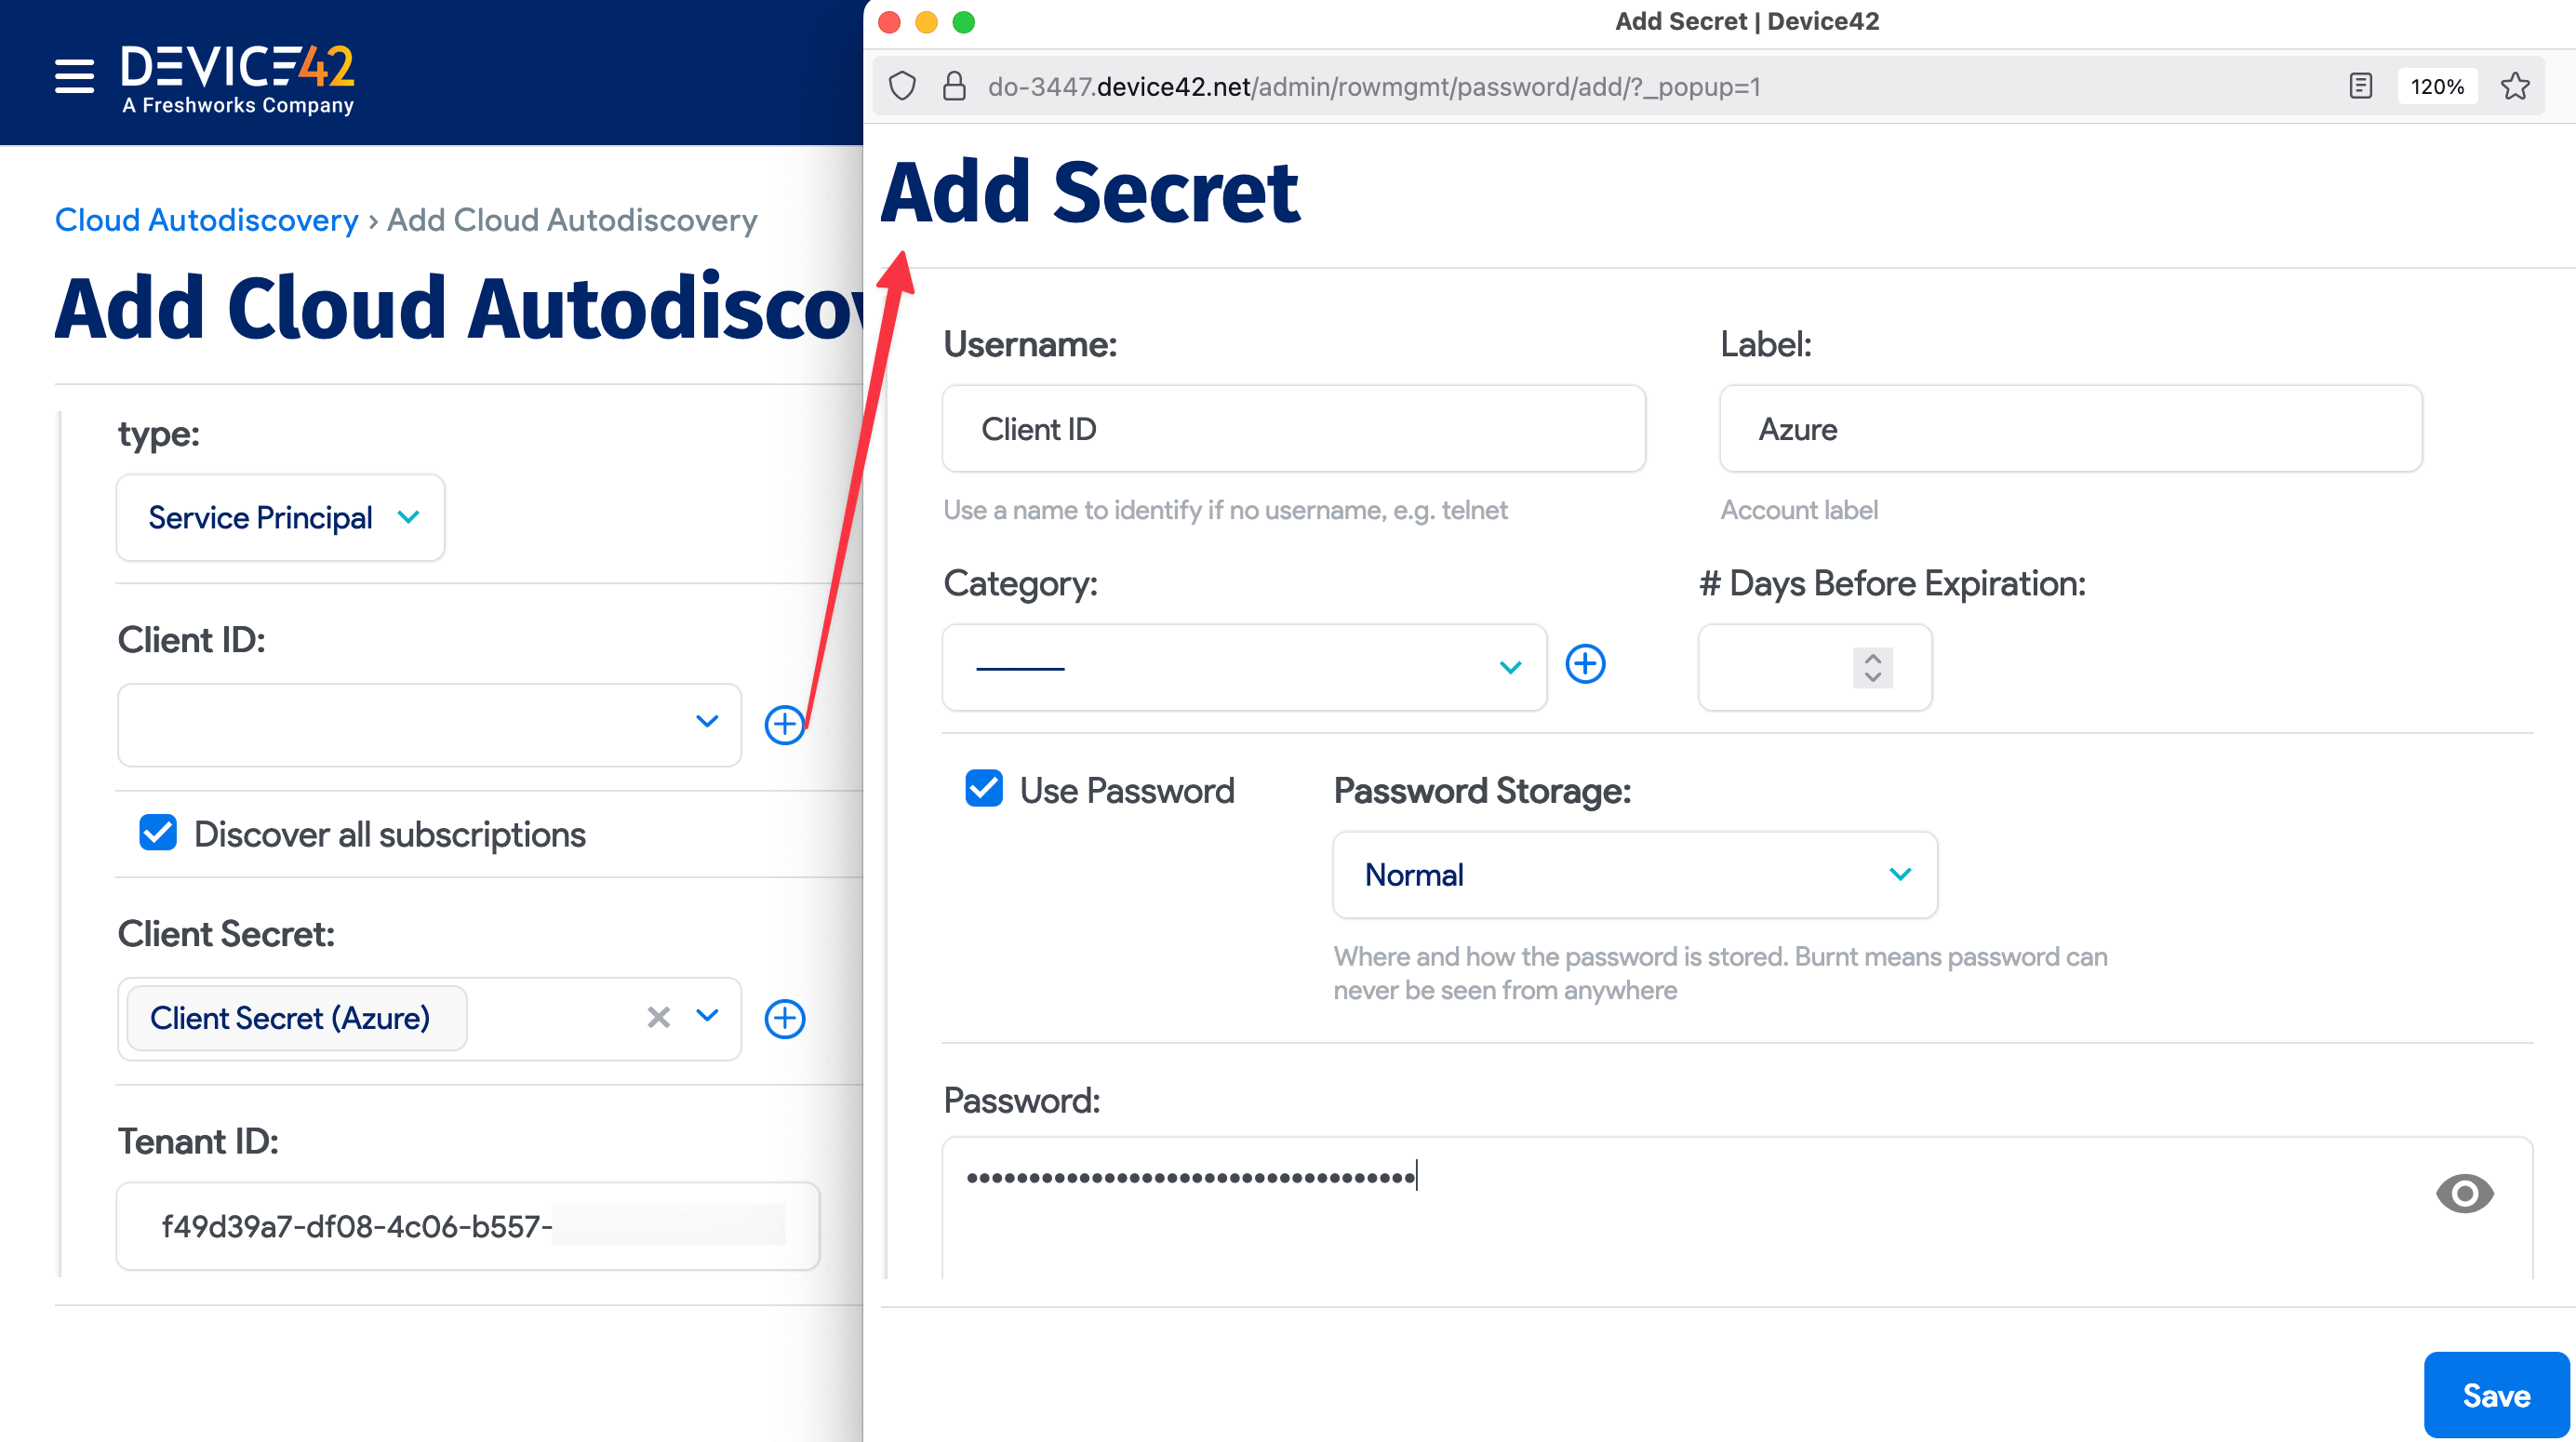
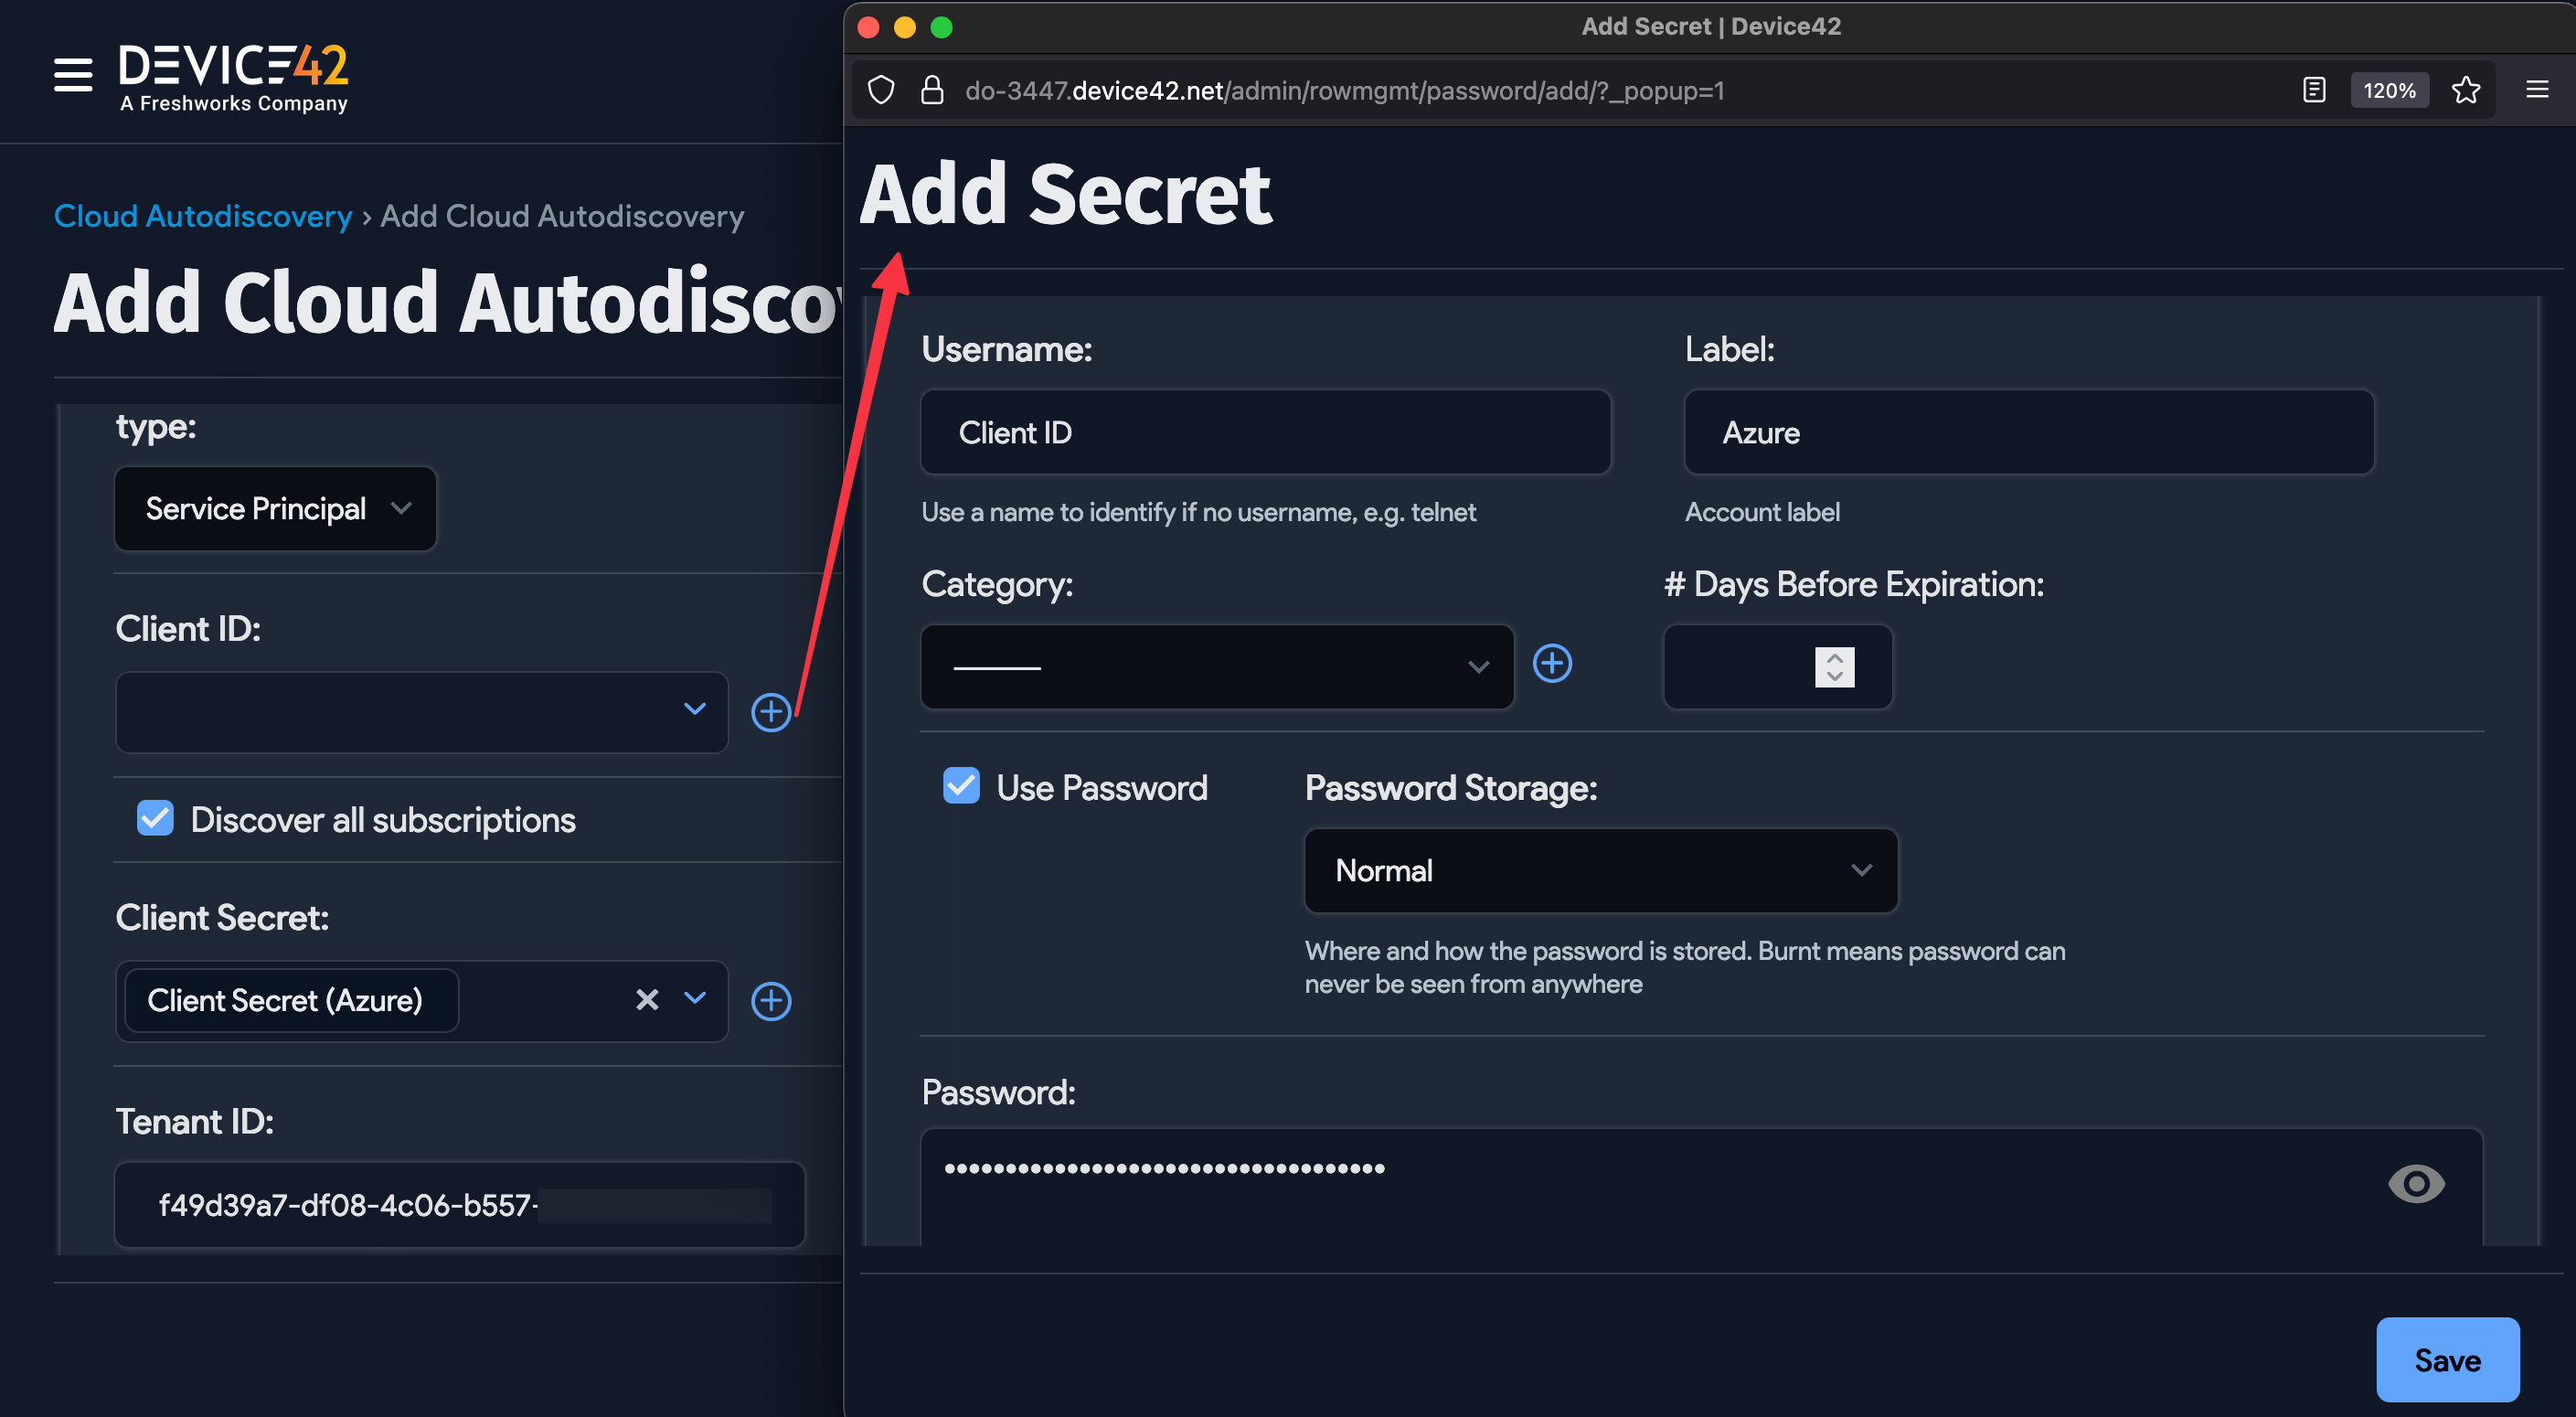
Log in to the Device42 main appliance web console and navigate to Discovery > Cloud > Add Cloud Autodiscovery. Give your cloud discovery job a name, select Microsoft Azure from the Cloud Type dropdown, choose an appropriate remote collector, and select Service Principal. The four Azure values you noted earlier are used to configure the discovery job.
- Click the magnifying glass icon for the Client ID value and choose Add Secret in the window that opens. The username field requires a value, so use it as a label (for example, "Azure Client ID"). Next, enter the Application (client) ID value for the Azure application in the Password field. Then, select Save.
- Repeat this process for the Subscription ID and Client Secret fields, where the Subscription ID and Client Secret ID values are entered in the respective password fields of their secret entries.
- The Directory (tenant) ID can be pasted directly into the Tenant ID field of the discovery job.
You can set the Service Level of the job to be applied to the discovered items. See the service level and object category options for details.
You can also configure the following additional discovery options:
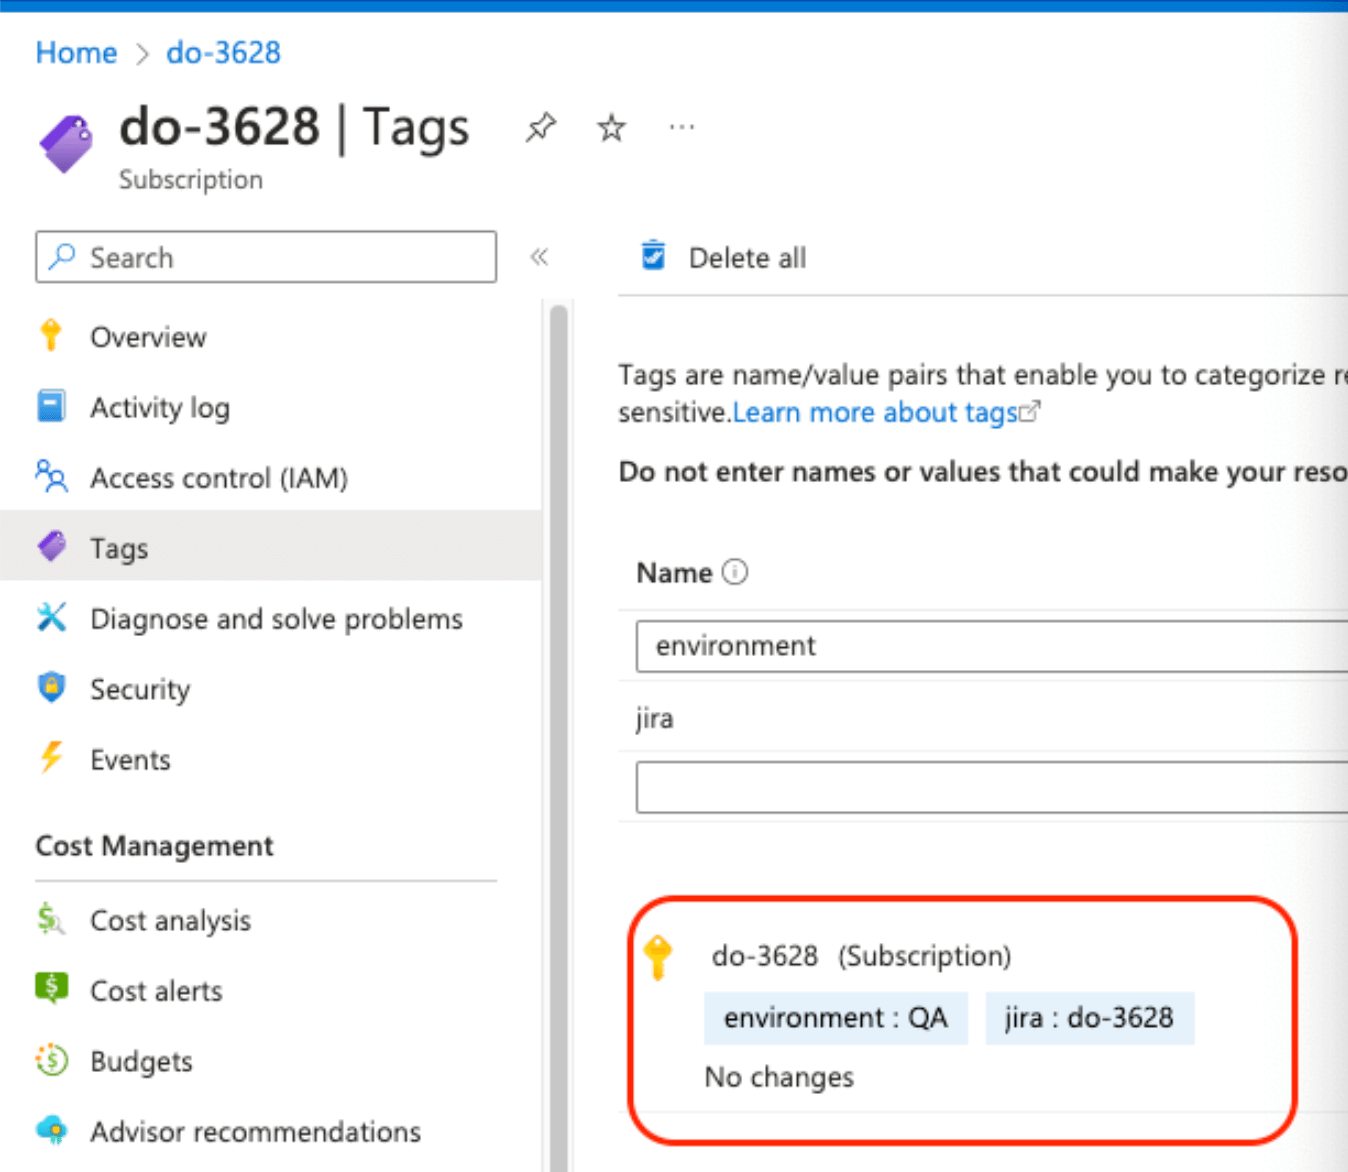
- You can add vendor metadata as tags or custom fields, edit device name format, and enable Kubernetes discovery to pull in AKS resources.
- Every Vendor is user-defined. Device42 does not ship with a list of vendors.
- If a VRF Group is selected, all discovered IPs will be placed in subnets in that VRF group. This is useful if you have duplicate IPs in your internal network.
- If you choose a Remote Collector to run a job, ensure the chosen remote collector can reach the target network.
- By default, Azure discovery is set to Discover all subscriptions for tenant-level discovery.
- When Discover all subscriptions is unchecked, you can manually discover a subscription using its Subscription ID.
- Select the Device Name Format for discovered cloud instances.


- Select Kubernetes Discovery to discover Kubernetes clusters hosted on your cloud platform. Choose an Action for Kubernetes Resources not found.
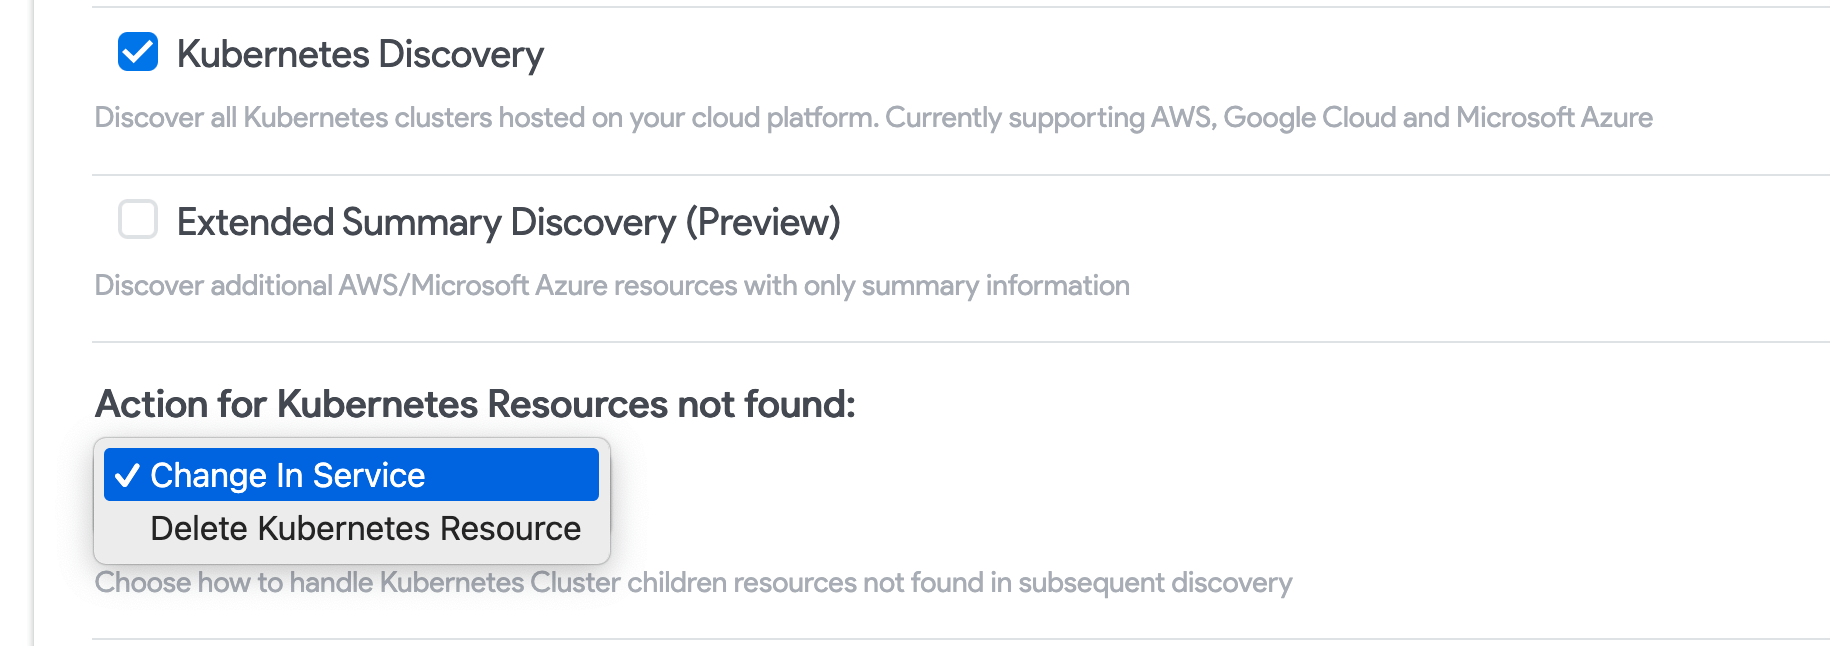
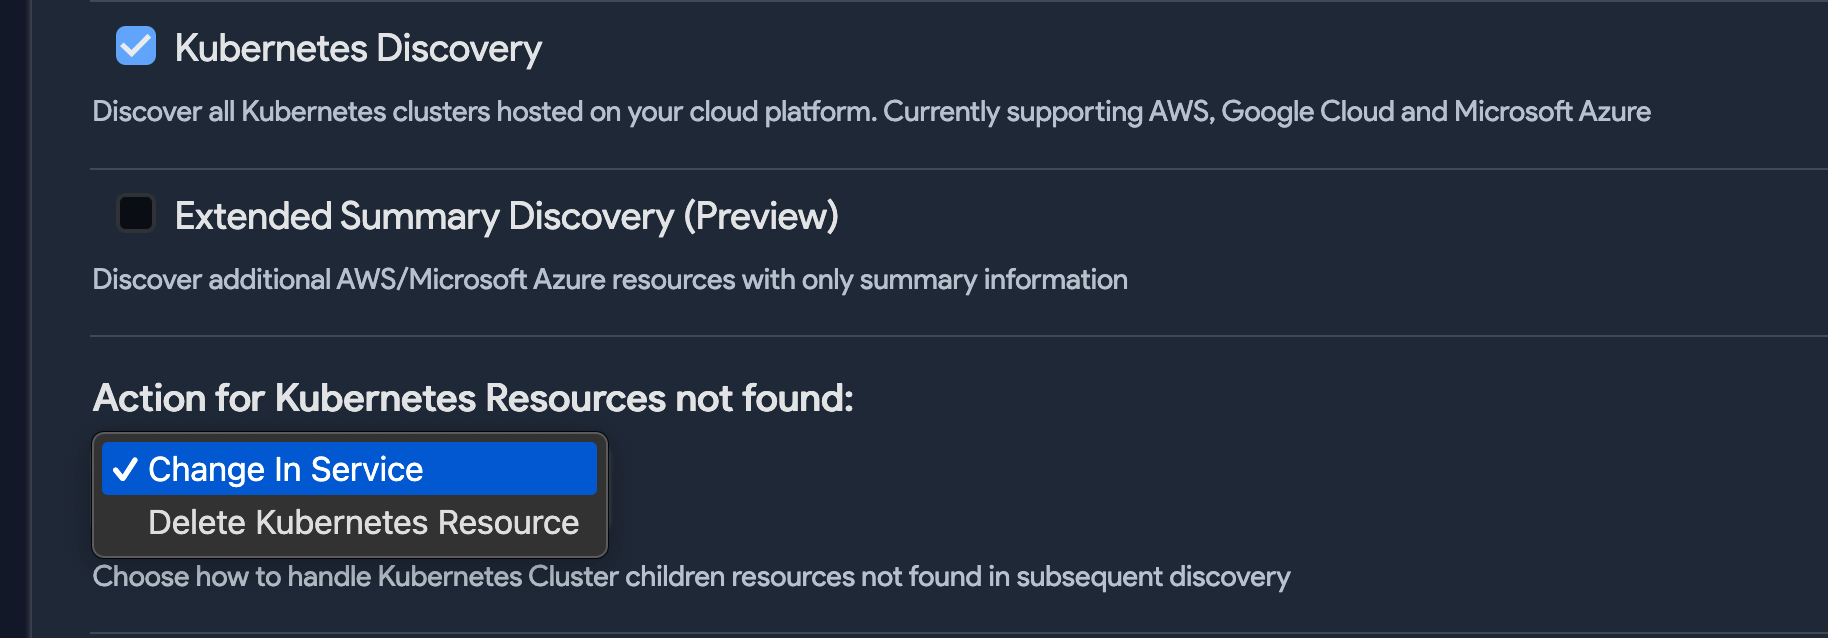
- Check Extended Summary Discovery (Preview) to discover all resources within your Azure environments. Summary discovery will bring in all resources, with abbreviated detail.
- Check Add tags as custom fields to add discovered tags to Device42 custom fields.
- Check Strip domain name to have Device42 strip the discovered domain suffix (everything after the first period) from the device instance name.
- Choose a category for discovered devices (note that categories are user-defined).
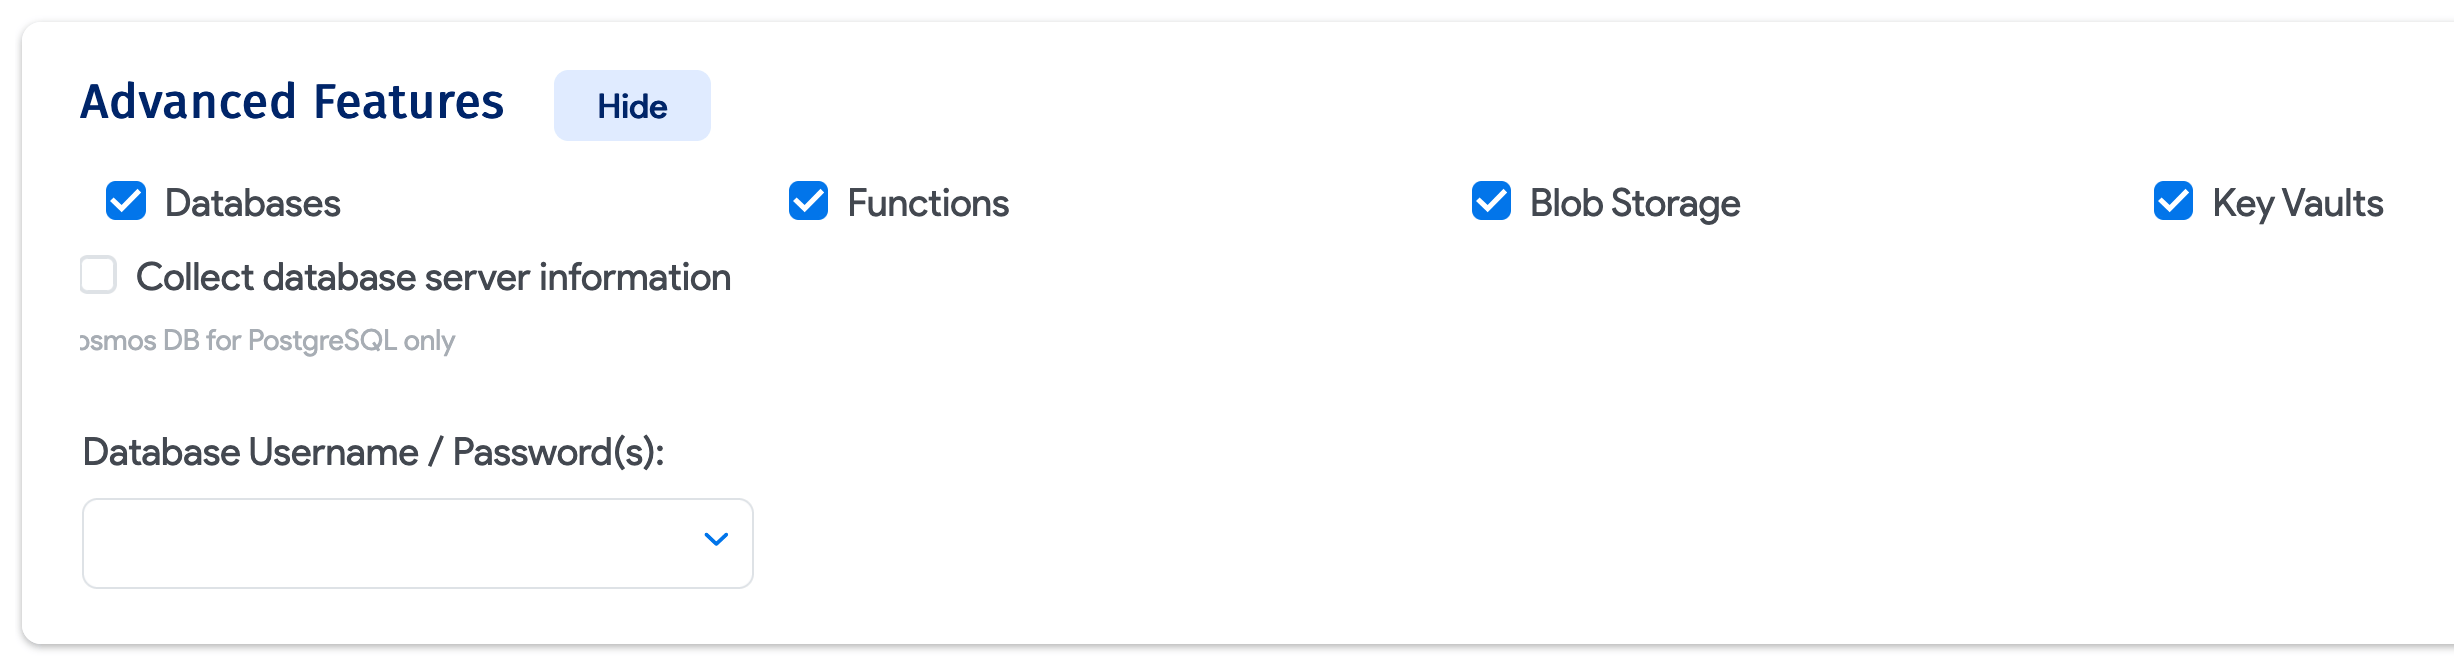
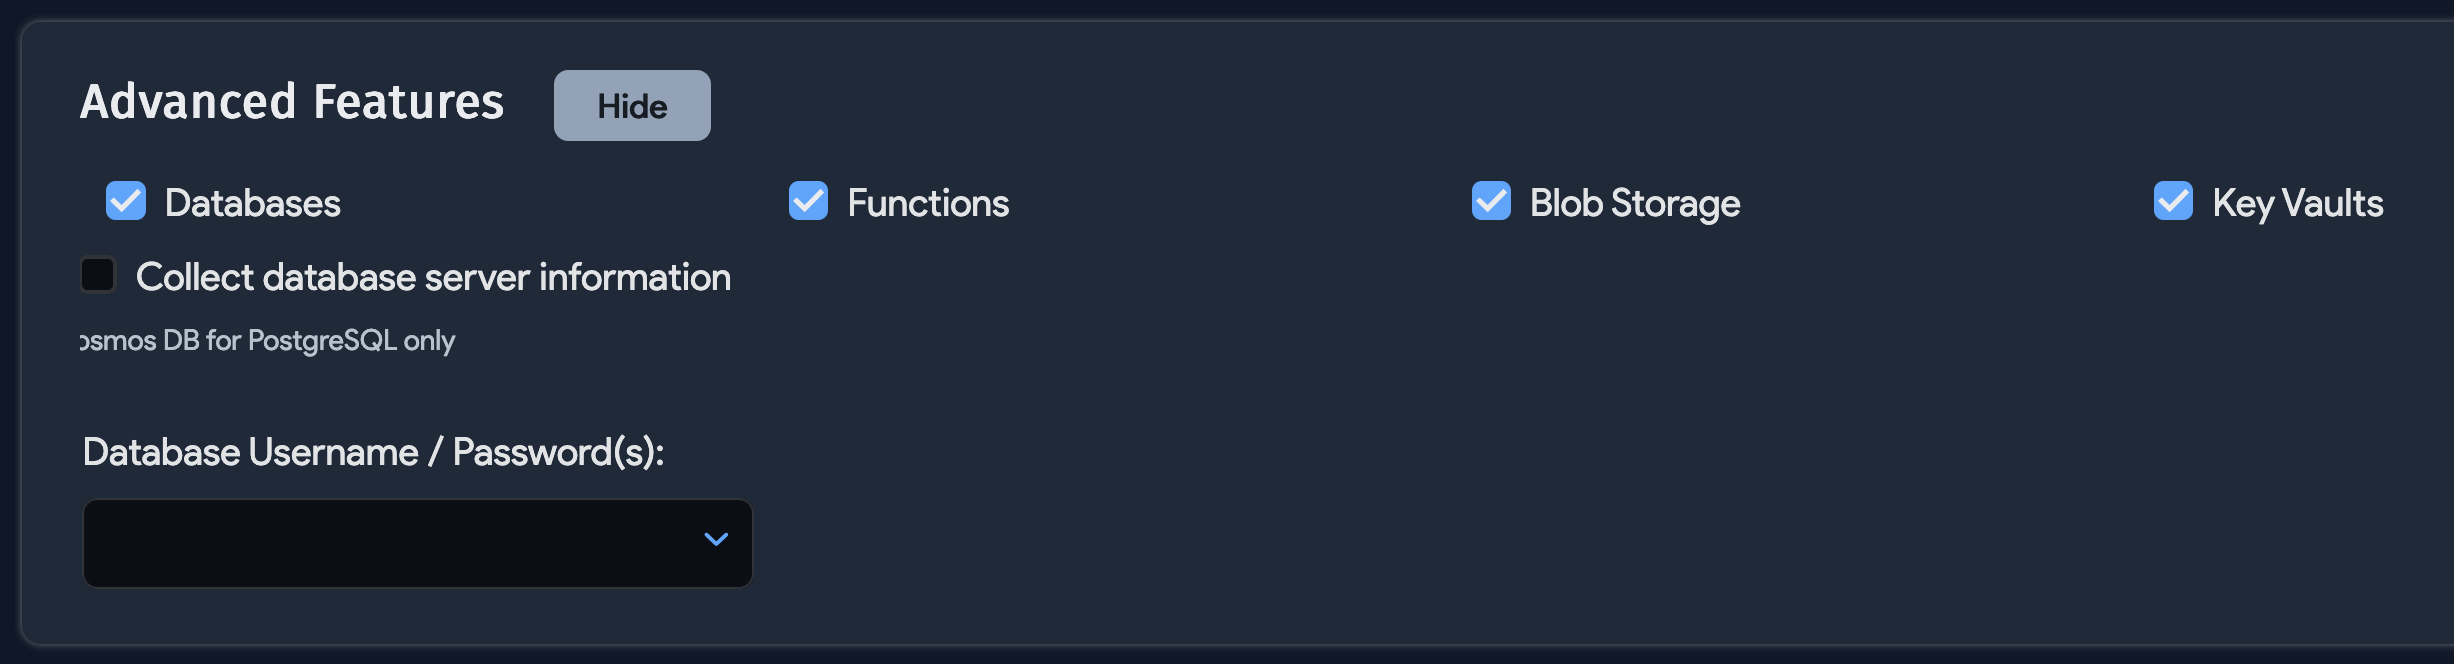
The Advanced Features section enables the discovery of database and function resources.
Next, click Save. Click Run Now to run the job immediately, or set it to run on a regular schedule.
Azure Discovery Items
The following Azure resources are discoverable. Instances of Azure Database for PostgreSQL flexible servers are also supported.
Detailed Discovery Items
| Service or Object Name | Where in Device42 | Accessed API | Sample Information Generated | Permission(s) Required |
|---|---|---|---|---|
| SQL Server | Resources > All Resources | management.azure.com | Name, virtual subtype, tags | Microsoft.Sql/servers/read, Microsoft.Sql/servers/databases/read |
| Managed SQL Server | Resources > All Resources | management.azure.com | Name, virtual subtype, tags, tables | Microsoft.Sql/managedInstances/read, Microsoft.Sql/managedInstances/databases/read |
| Azure DB for MySQL | Resources > All Resources | management.azure.com | Name, virtual subtype, tags, tables | Microsoft.DBforMySQL/flexibleservers/read, Microsoft.DBforMySQL/flexibleservers/databases/read |
| Azure DB for Postgres | Resources > All Resources | management.azure.com | Name, virtual subtype, tags, tables | Microsoft.DBforPostgreSQL/servers/read, Microsoft.DBforPostgreSQL/servers/databases/read |
| Azure DB for MariaDB | Resources > All Resources | management.azure.com | Name, virtual subtype, tags, tables | Microsoft.DBforMariaDB/servers/read, Microsoft.DBforMariaDB/servers/databases/read |
| Cosmos DB | Resources > All Resources | management.azure.com | Name, virtual subtype, tags, tables | Microsoft.DocumentDB/databaseAccounts/read, Microsoft.DocumentDB/databaseAccounts/sqlDatabases/read, Microsoft.DocumentDB/databaseAccounts/cassandrakeyspaces/read, Microsoft.DocumentDB/databaseAccounts/gremlinDatabases/read, Microsoft.DocumentDB/databaseAccounts/mongodbDatabases/read, Microsoft.DocumentDB/databaseAccounts/tables/read, Microsoft.DBforPostgreSQL/serverGroupsv2/*, Microsoft.DocumentDB/databaseAccounts/privateEndpointConnections/read, Microsoft.Network/privateEndpoints/read, Microsoft.OperationalInsights/workspaces/read (Log Analytics Reader on workspace level) |
| SQL VM | Resources > All Resources | management.azure.com | Name, virtual subtype, tags, tables | Microsoft.SqlVirtualMachine/sqlVirtualMachines/read |
| Functions | Resources > All Resources | management.azure.com | Resource group name, runtime, trigger, function type | Microsoft.Web/sites/read, Microsoft.Web/sites/functions/read |
| Kubernetes (AKS) | Devices > Unknown | management.azure.com | Containers, nodes, clusters | Microsoft.ContainerService/managedClusters/read, Microsoft.ContainerService/managedClusters/accessProfiles/listCredential/action |
| Load Balancers | Devices > All Devices | management.azure.com | Name, tags, IP | Microsoft.Network/loadBalancers/read, Microsoft.Network/publicIPAddresses/read |
| Networks (as VRF Groups) | Network > VRF Groups | management.azure.com | Name | Microsoft.Network/virtualNetworks/read |
| Subnets | Network > All Subnets | management.azure.com | Network, mask, name | Microsoft.Network/virtualNetworks/read |
| VMs | Devices > All Devices | management.core.windows.net | Name, OS version, RAM size, CPU, IP, MAC | Microsoft.Compute/virtualMachines/read, Microsoft.Network/networkInterfaces/read, Microsoft.Network/publicIPAddresses/read |
| Blob Storage | Resources > All Resources | management.azure.com | Capacity, available capacity | Microsoft.Storage/storageAccounts/read, Microsoft.Storage/storageAccounts/blobServices/containers/read, Microsoft.Storage/storageAccounts/privateEndpointConnections/read, Microsoft.Network/privateEndpoints/read |
| Workspaces | Resources > All Resources | management.azure.com | Microsoft.OperationalInsights/workspaces/read | |
| Recovery Services Vault | Resources > All Resources | management.azure.com | Name, subtype, tags | Microsoft.RecoveryServices/vaults/read |
| Extended Summary Discovery | Resources > All Cloud Resources | management.azure.com | Microsoft.Resources/subscriptions/resourceGroups/read | |
| Extended Summary Discovery Supplementary Permissions | Resources > All Cloud Resources | management.azure.com | microsoft.aad/domainservices/read, microsoft.alertsmanagement/smartdetectoralertrules/read, microsoft.compute/disks/read, microsoft.compute/sshpublickeys/read, microsoft.compute/virtualmachines/extensions/read, microsoft.compute/virtualmachinescalesets/read, microsoft.containerservice/managedclusters/read, microsoft.dbforpostgresql/flexibleservers/read, microsoft.documentdb/databaseaccounts/read, microsoft.insights/actiongroups/read, microsoft.insights/components/read, microsoft.insights/datacollectionrules/read, microsoft.managedidentity/userassignedidentities/read, microsoft.migrate/migrateprojects/read, microsoft.network/applicationgateways/read, microsoft.network/connections/read, microsoft.network/dnsresolvers/read, microsoft.network/loadbalancers/read, microsoft.network/localnetworkgateways/read, microsoft.network/networkinterfaces/read, microsoft.network/networksecuritygroups/read, microsoft.network/networkwatchers/read, microsoft.network/networkwatchers/flowlogs/read, microsoft.network/privatednszones/read, microsoft.network/privatednszones/virtualnetworklinks/read, microsoft.network/privateendpoints/read, microsoft.network/publicipaddresses/read, microsoft.network/routetables/read, microsoft.network/virtualnetworkgateways/read, microsoft.network/virtualnetworks/read, microsoft.operationalinsights/querypacks/read, microsoft.operationalinsights/workspaces/read, microsoft.operationsmanagement/solutions/read, microsoft.recoveryservices/vaults/read, microsoft.servicebus/namespaces/read, microsoft.storage/storageaccounts/read, microsoft.web/serverfarms/read, microsoft.web/sites/read, Microsoft.Resources/subscriptions/resourceGroups/read/read |
*Specific calls are available on request.
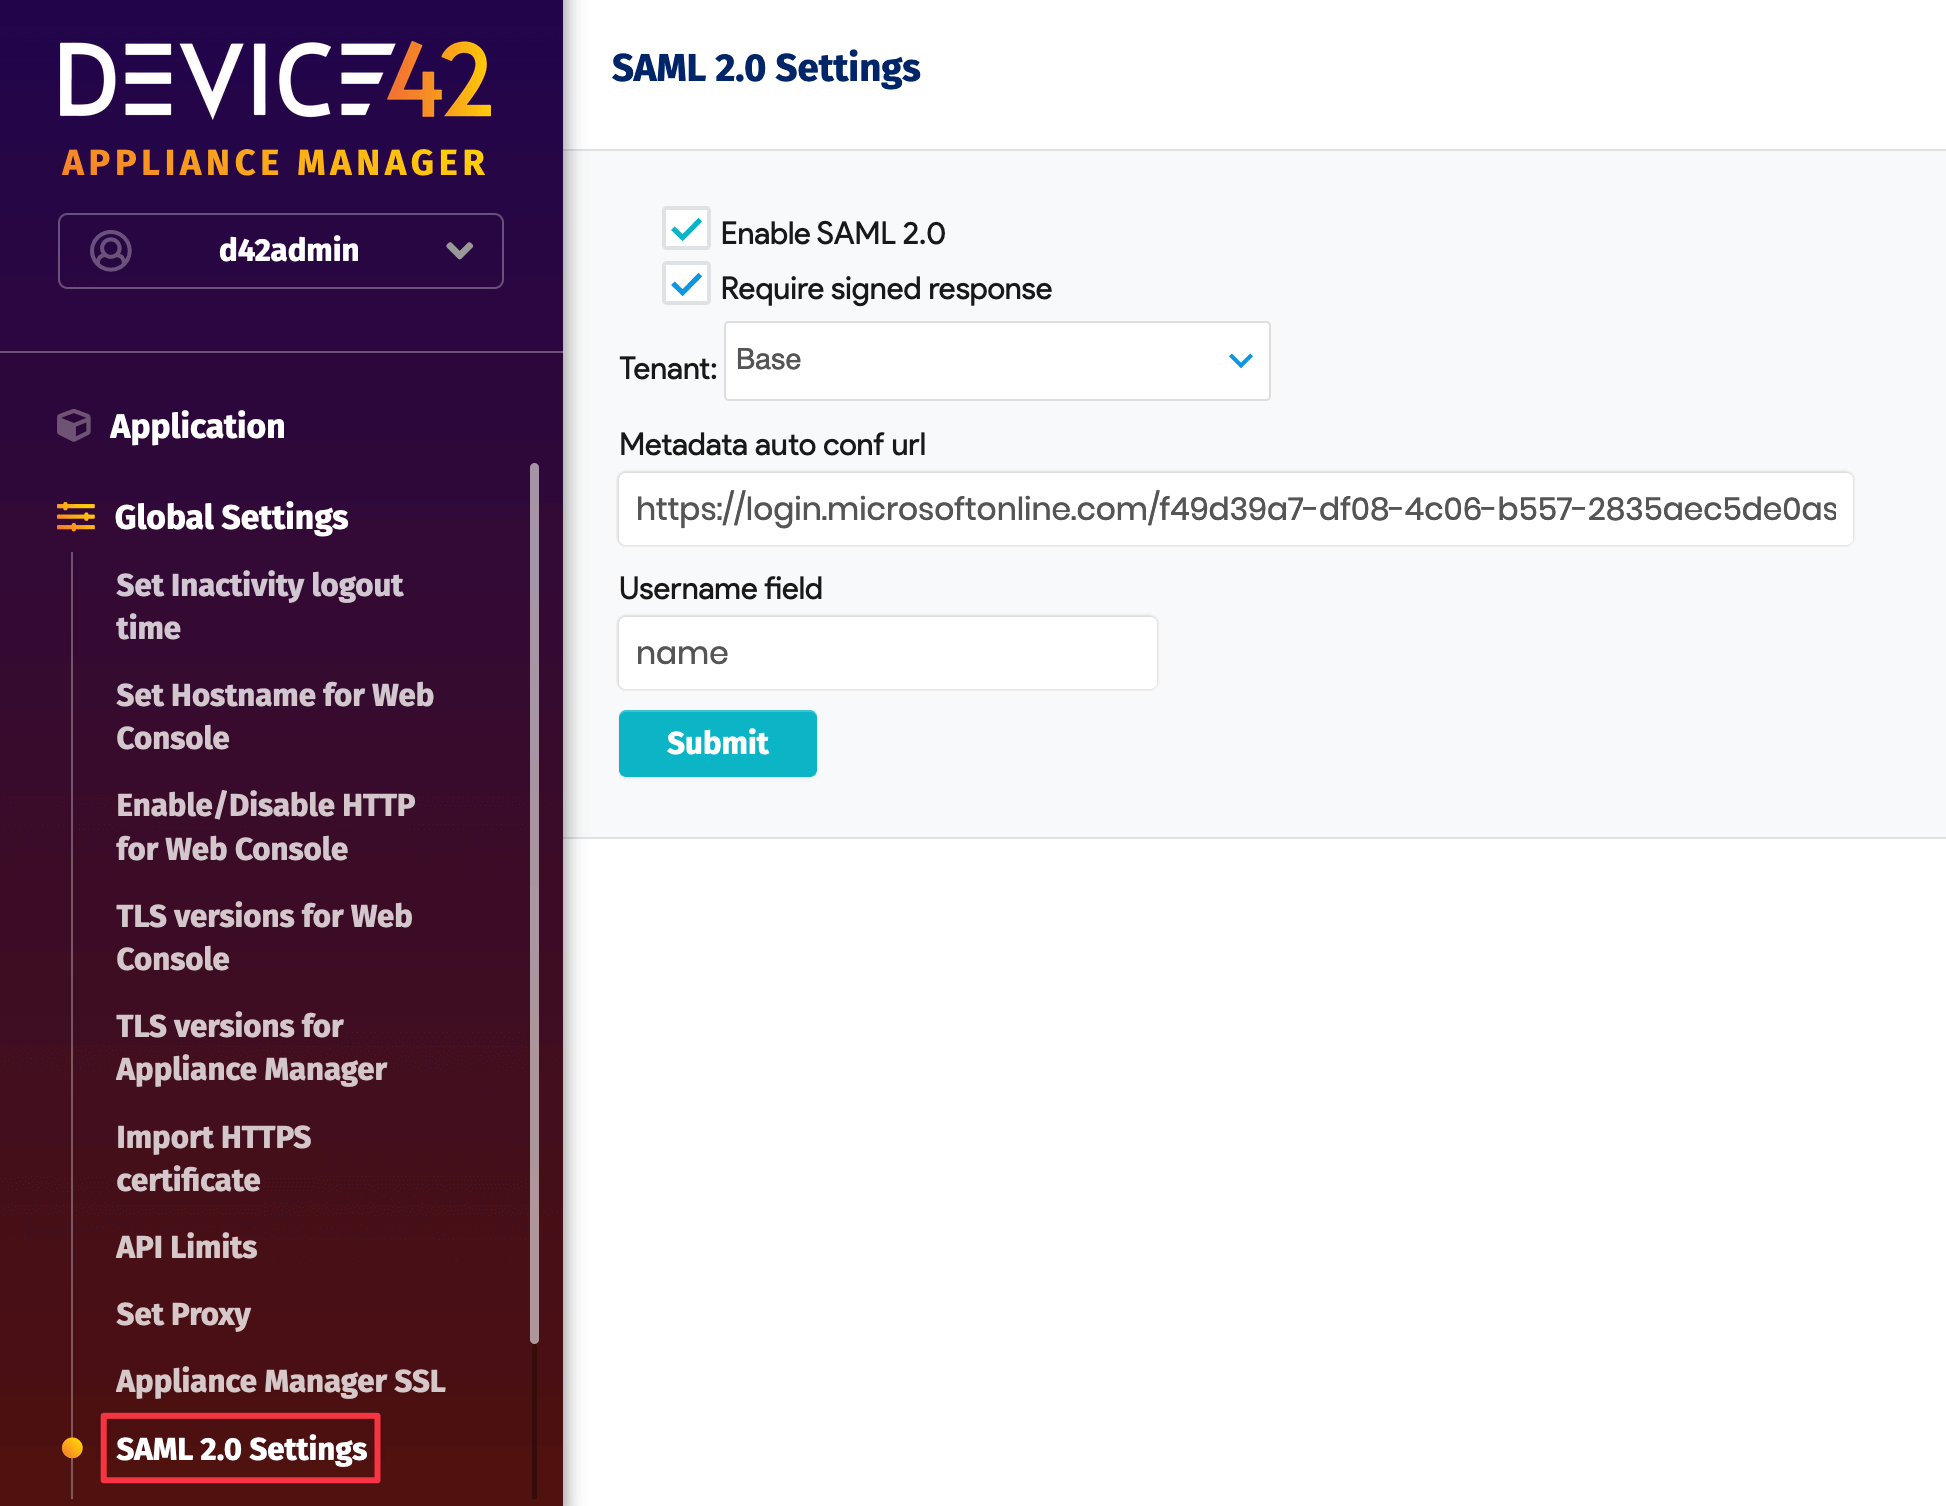
Use SAML
When confirming SAML for Azure, change the Signing Option to Sign SAML response. This change could take a few minutes to apply.
In the Device42 Appliance Manager, go to Global Settings > SAML 2.0 Settings and check that the Username field has a value of "name":
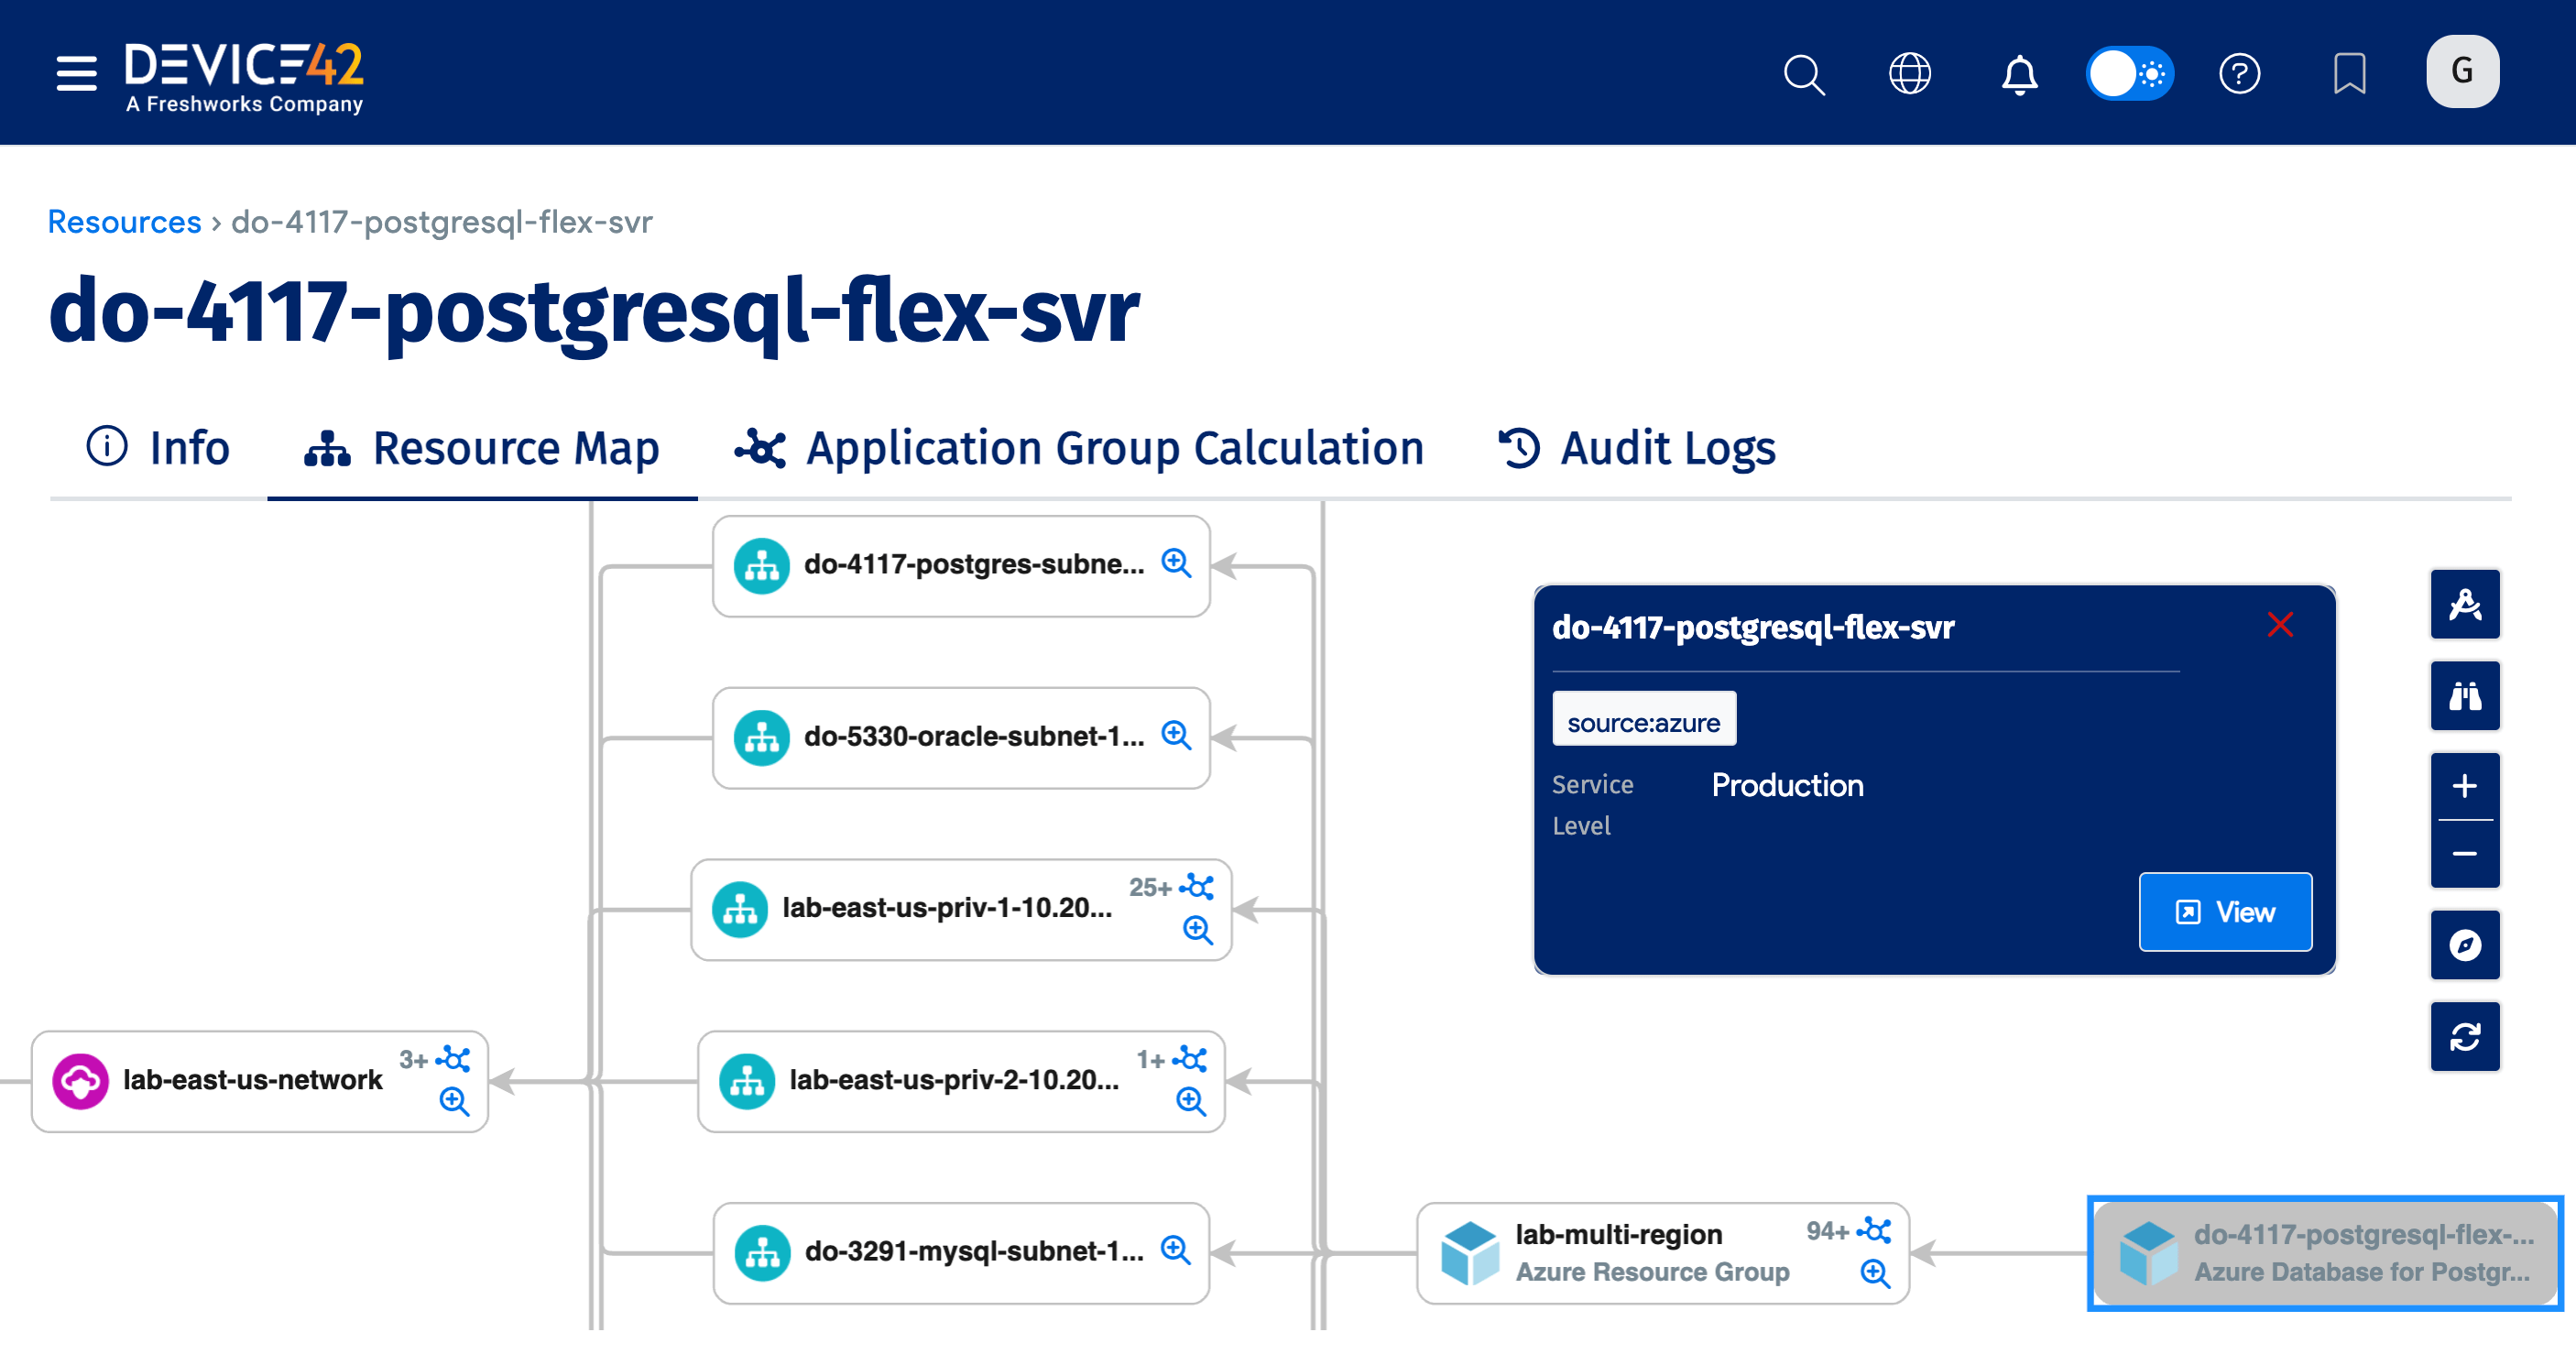
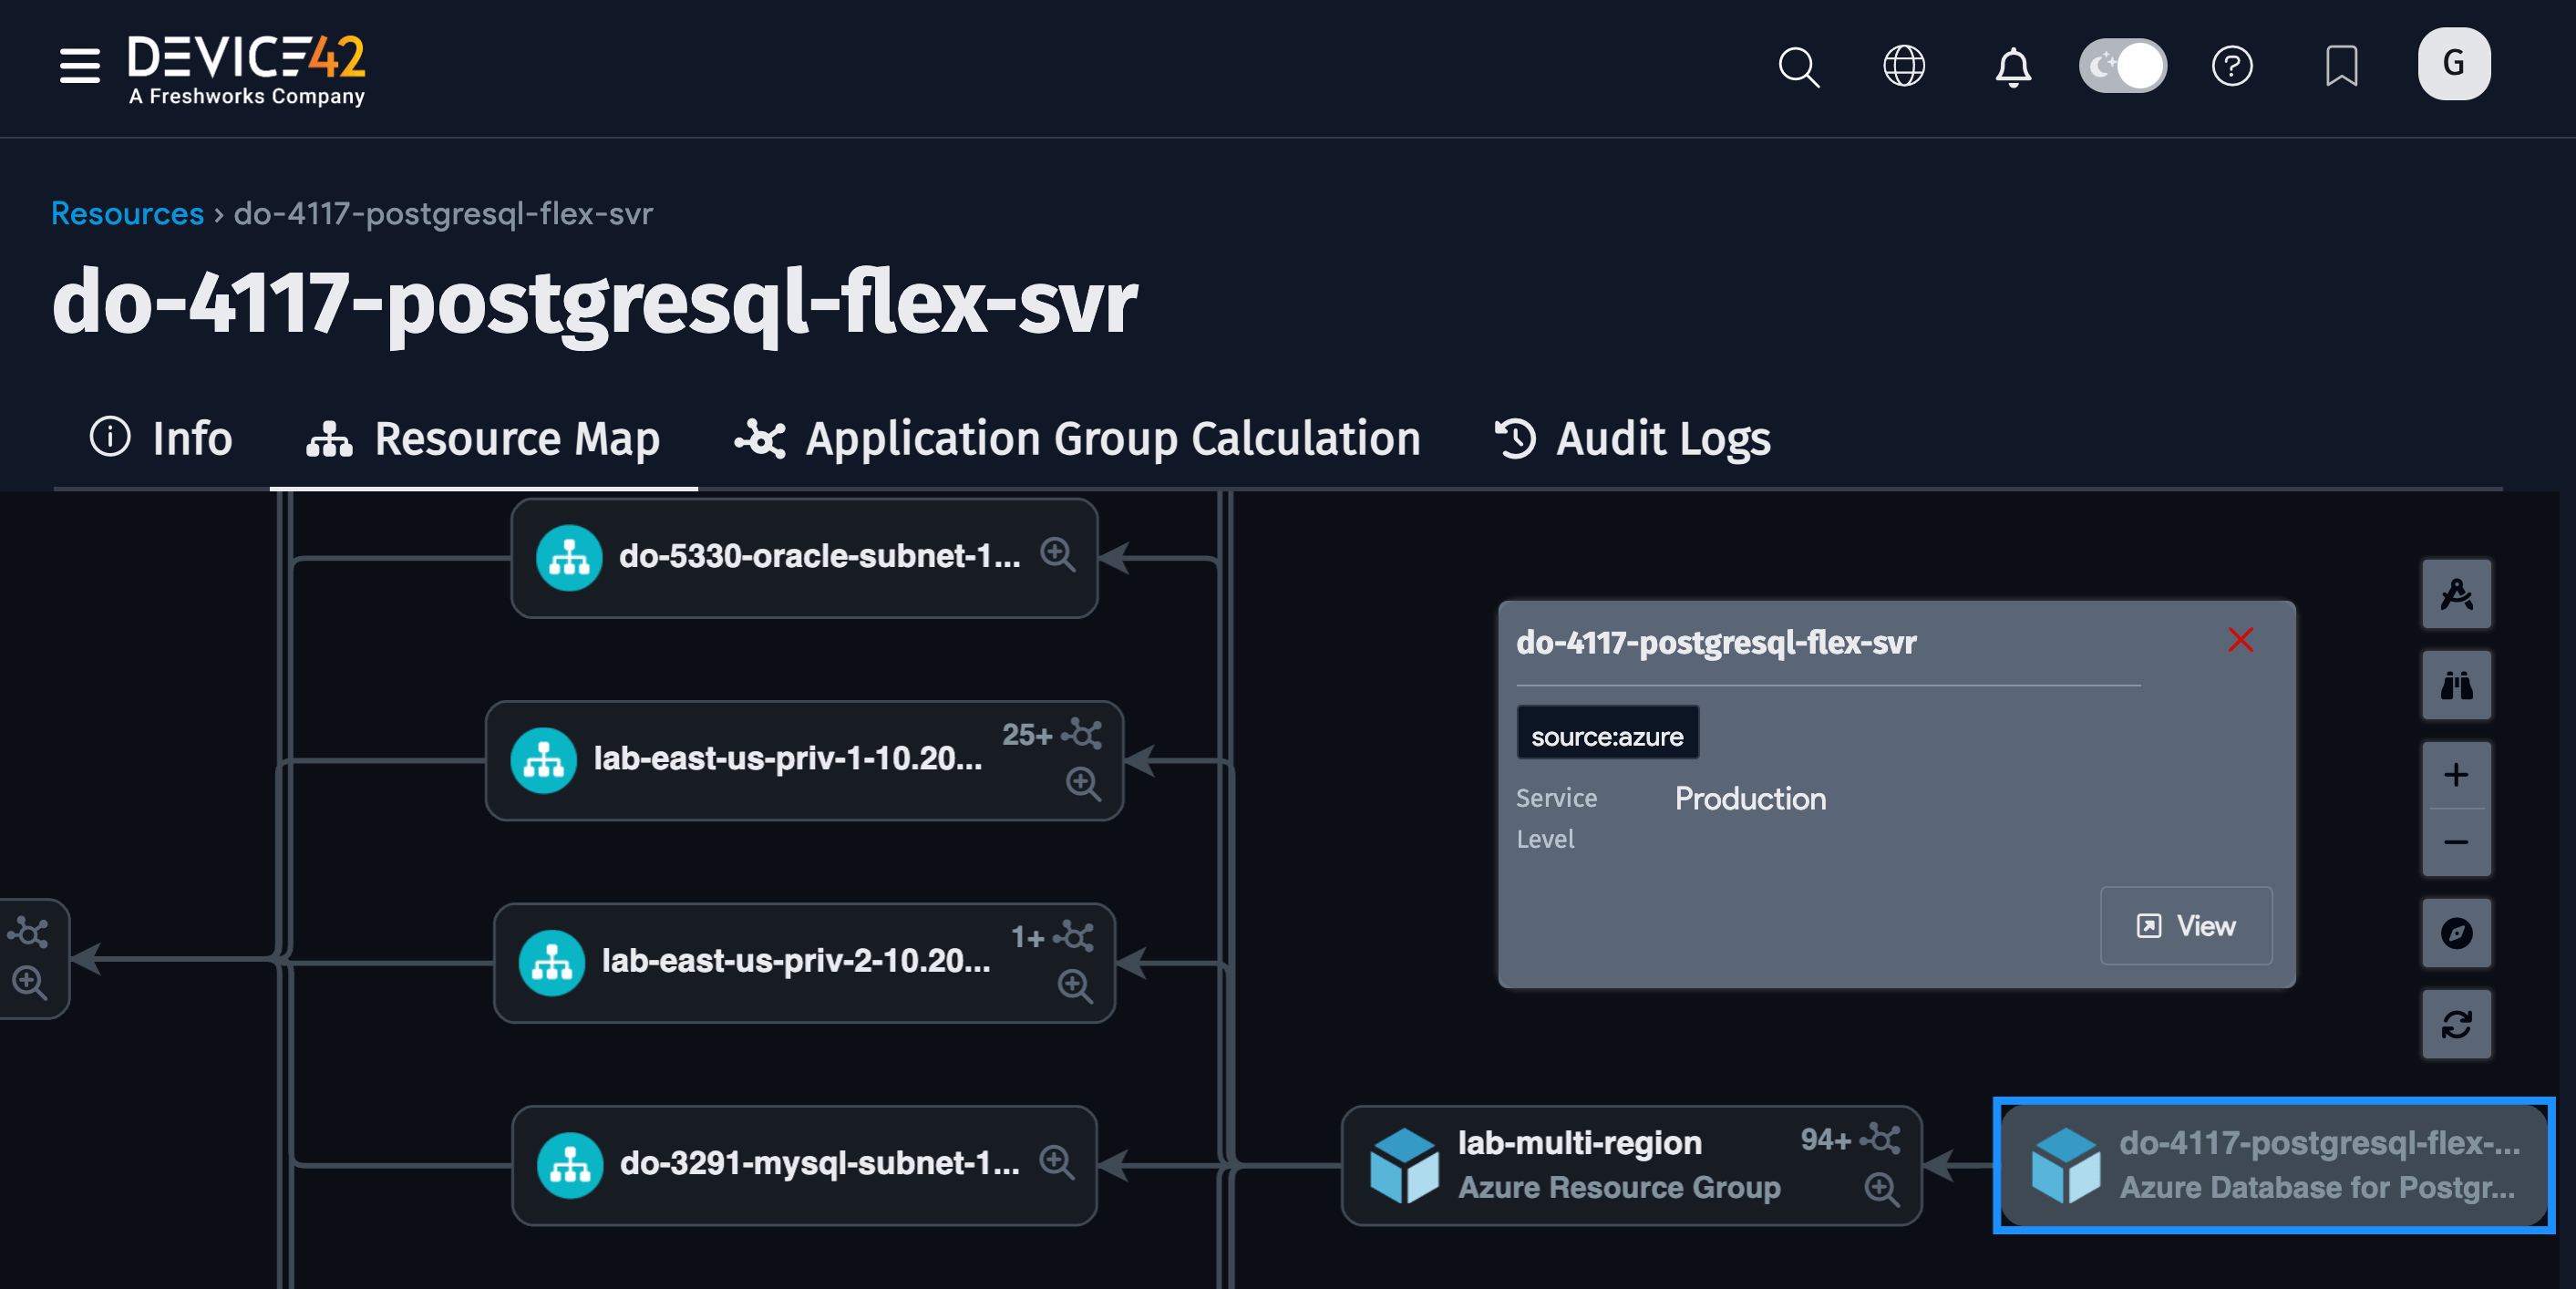
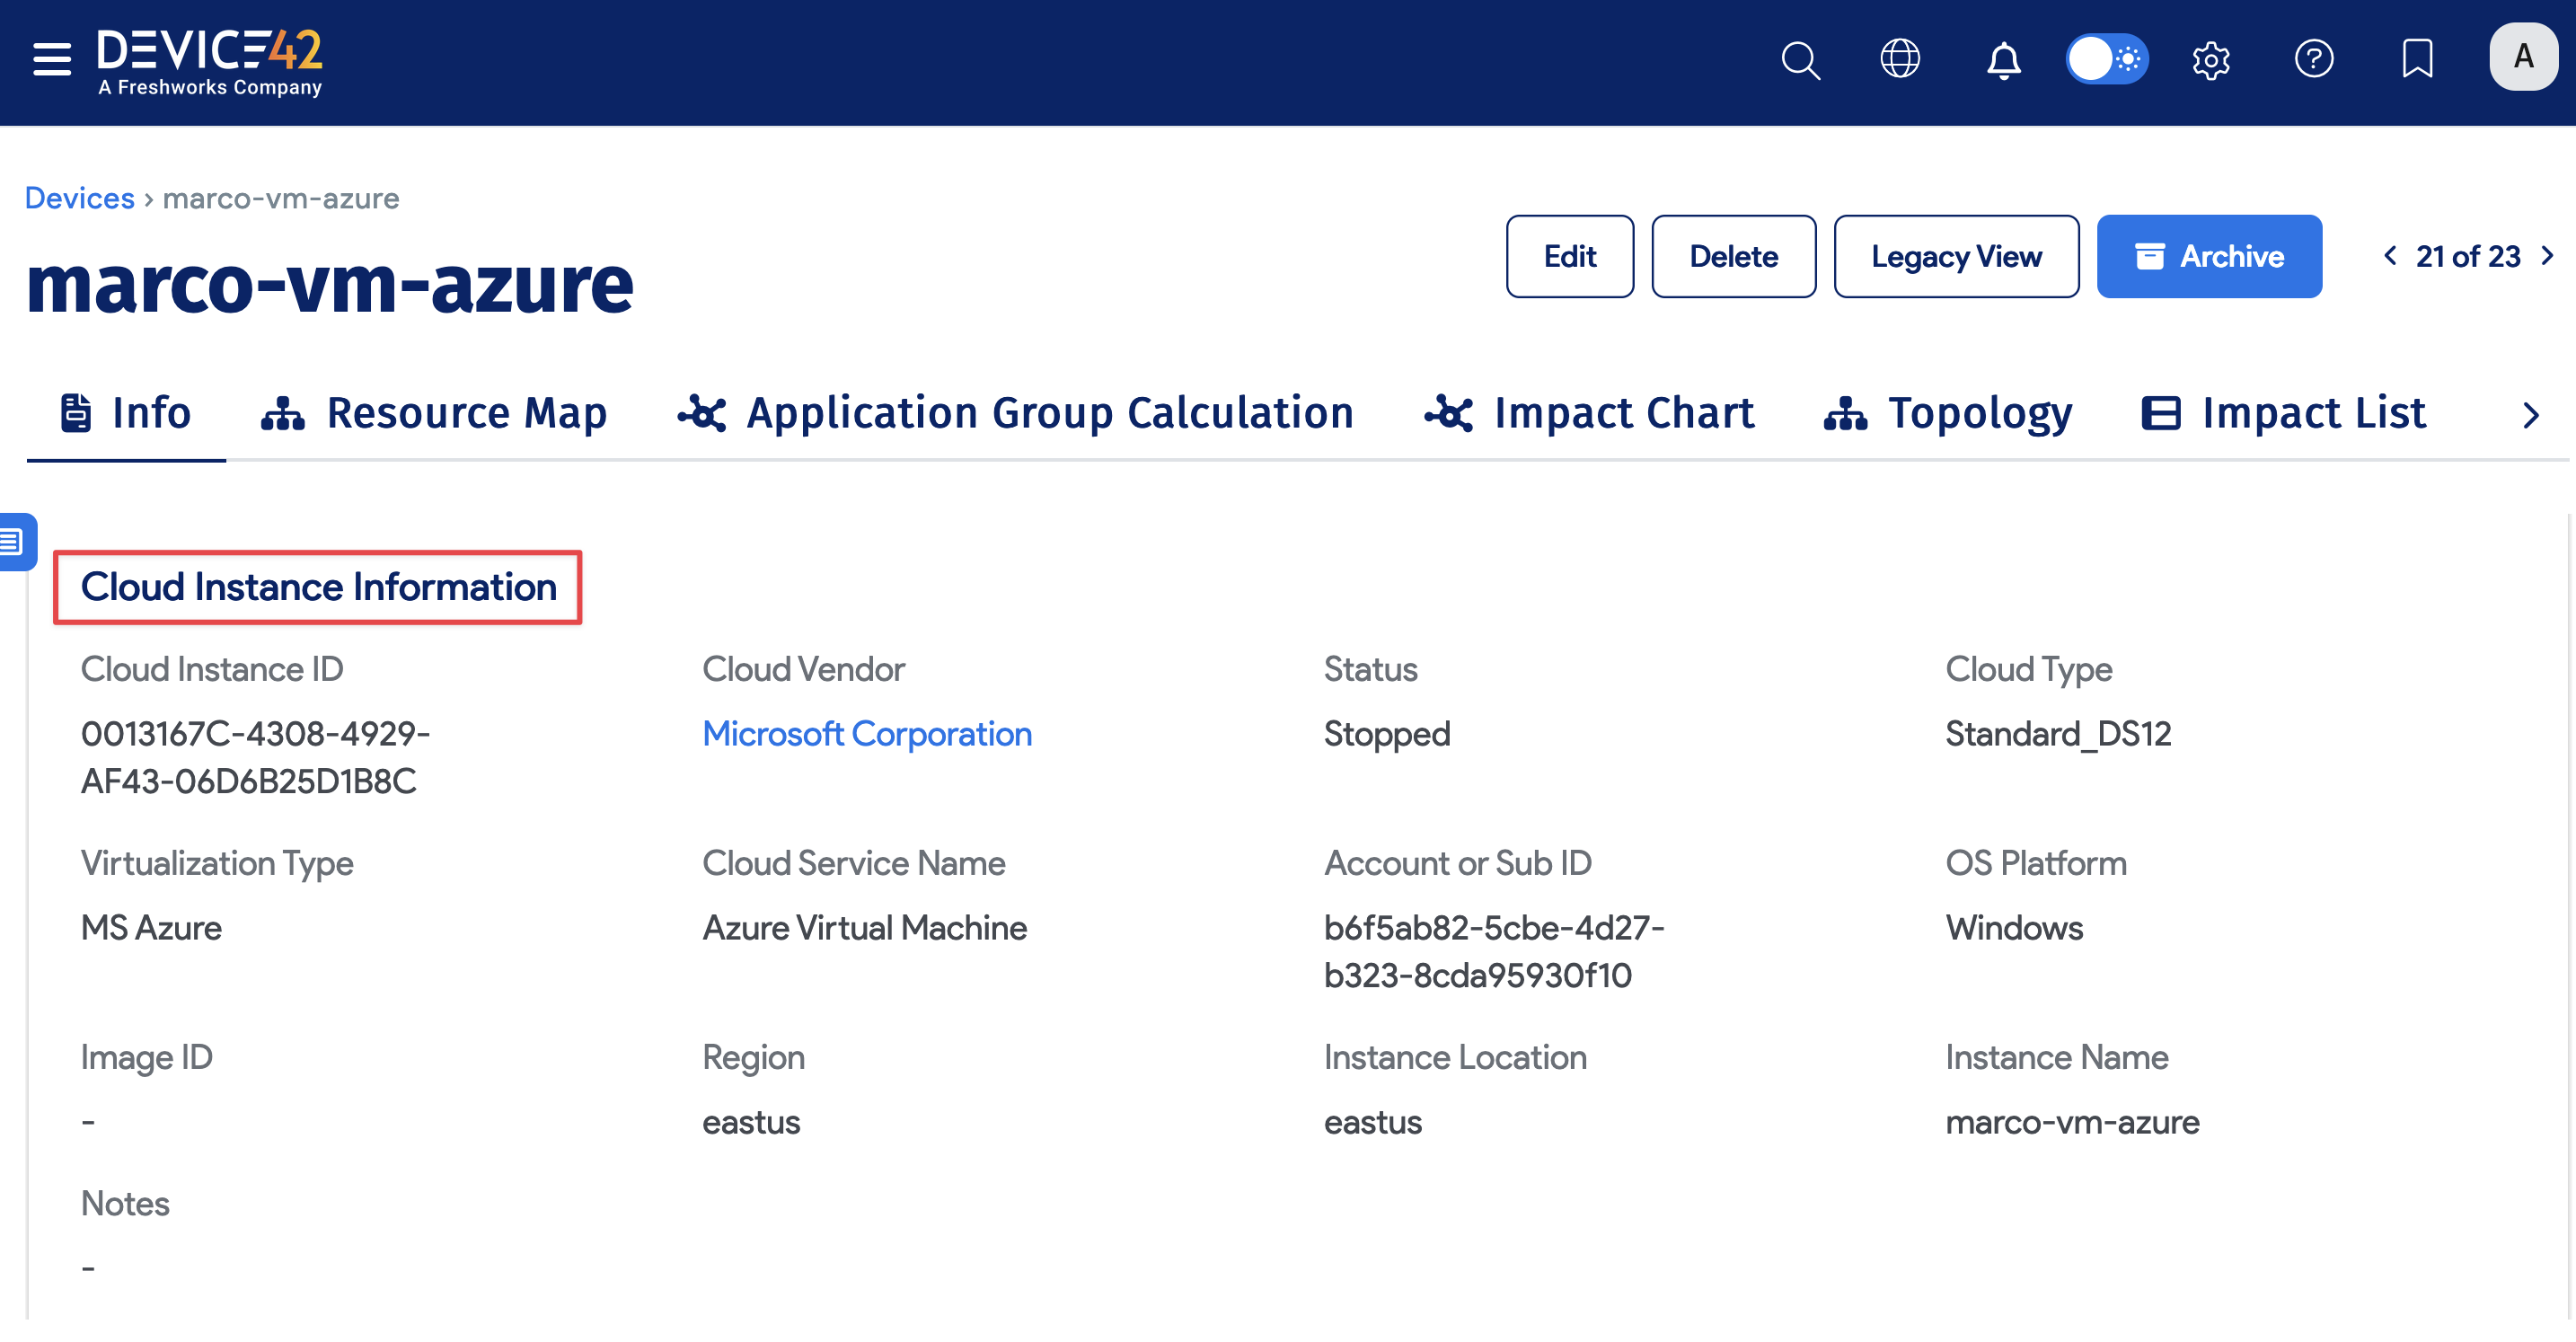
Virtual Device with Azure Discovery
To locate virtual devices, navigate to Resources > All Devices and use the Type dropdown to filter the list by virtual. You can view Cloud Instance Information on the virtual device details view.

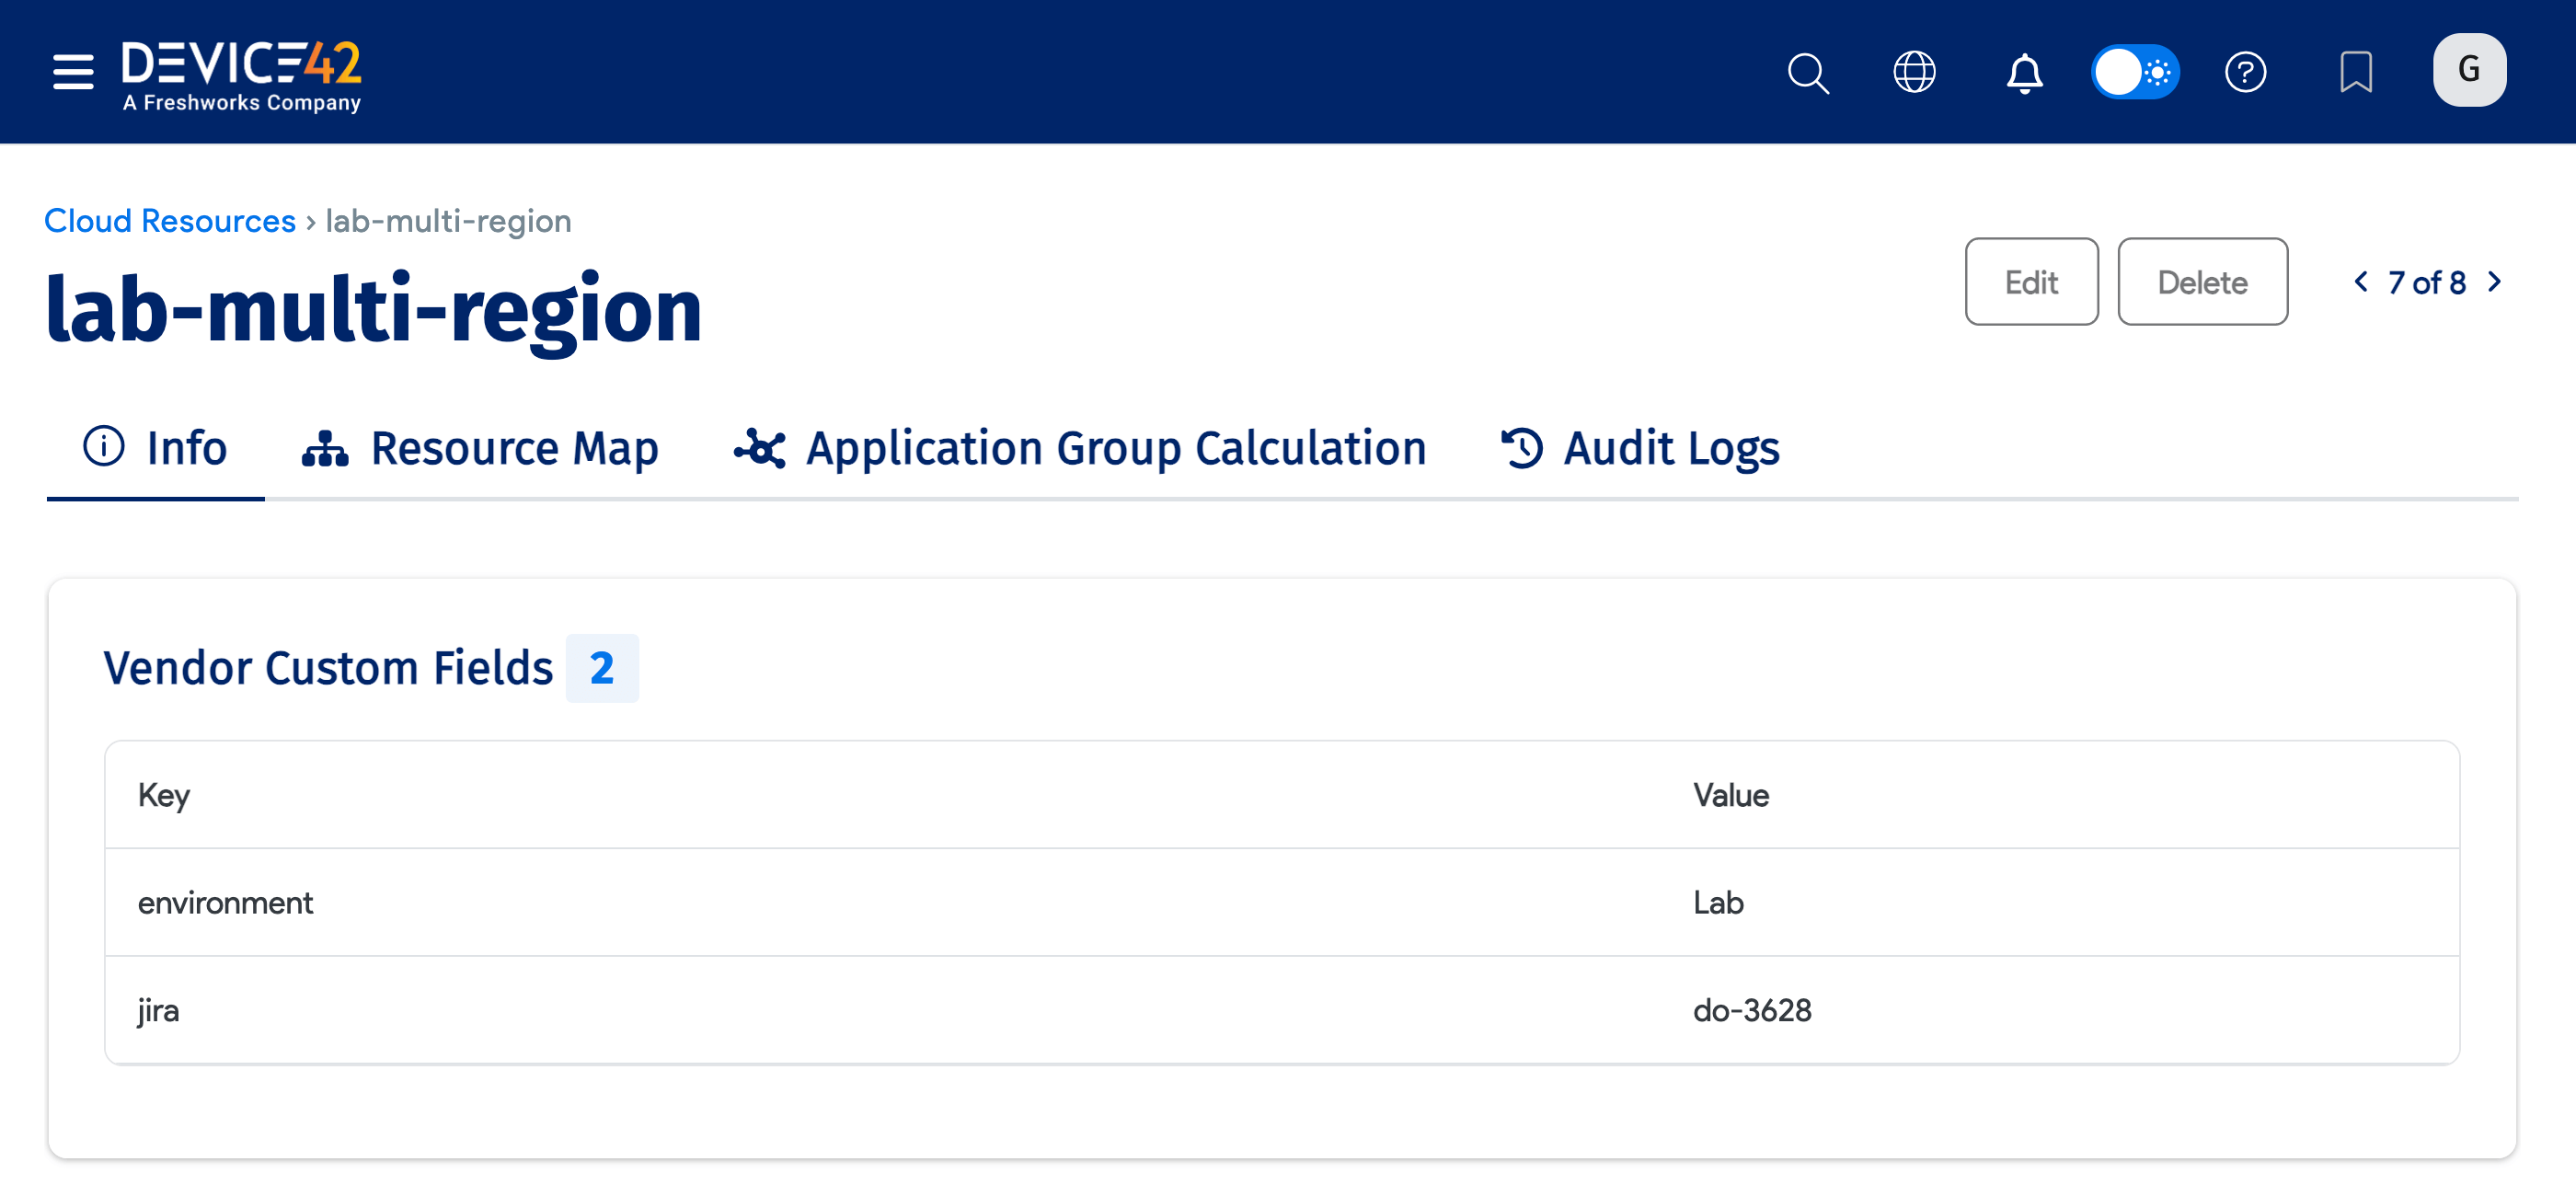
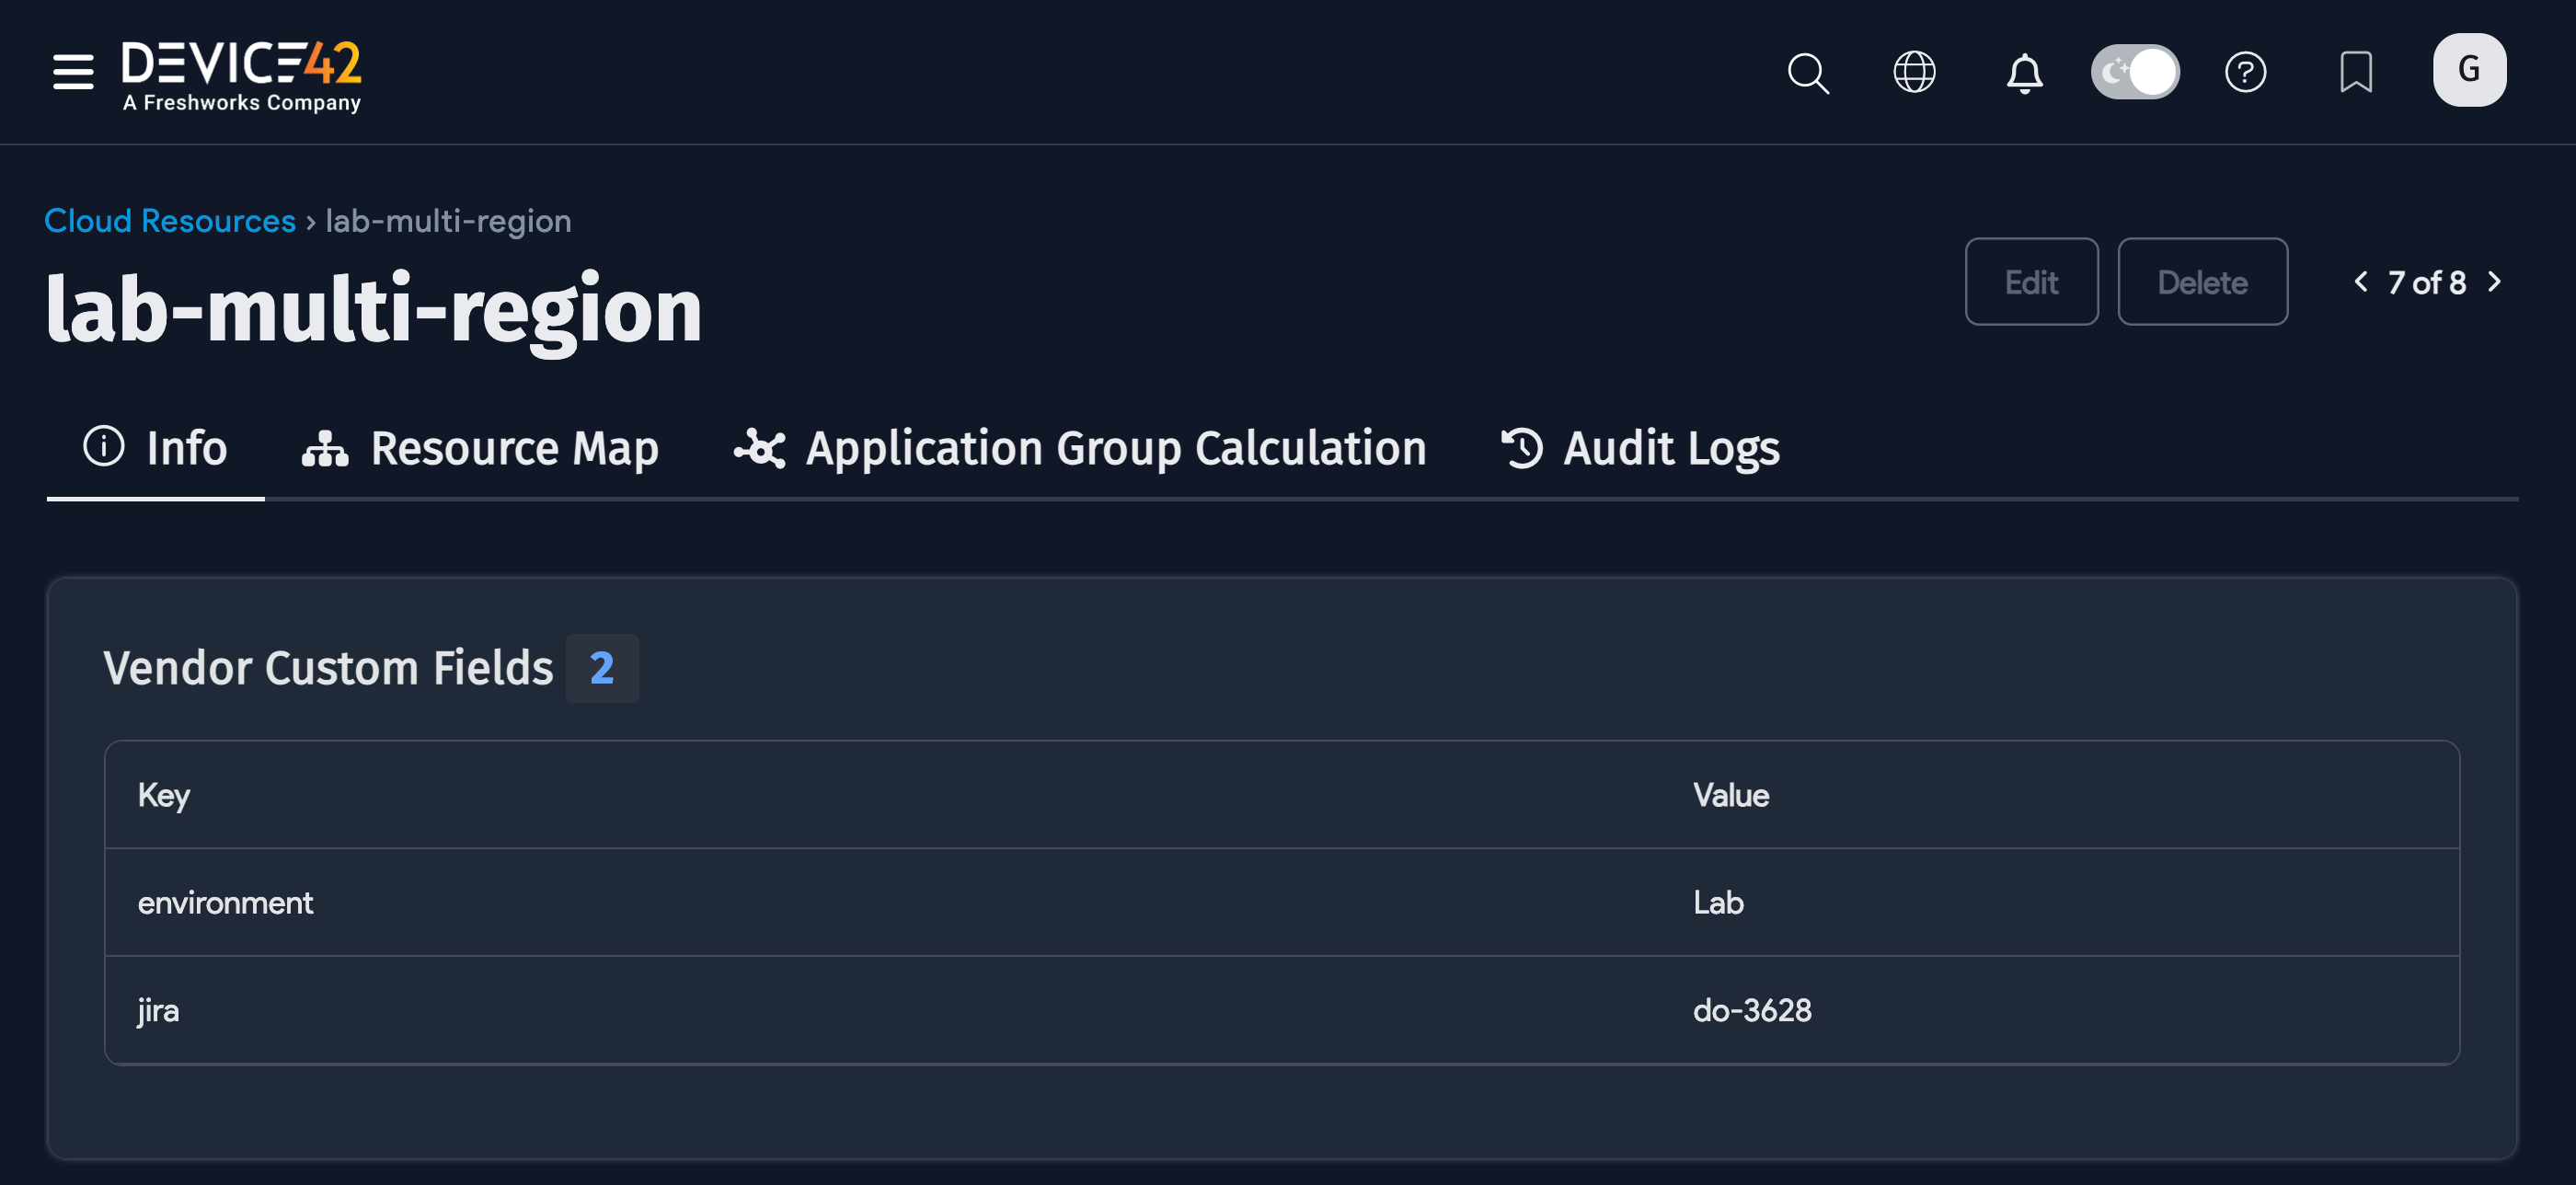
Azure Cloud Account Tags
Select your Azure cloud account from the list page under Infrastructure > Cloud Infrastructure > Cloud Accounts.
If available, the discovered account-level tags will be listed under the Vendor Custom Fields section.