Agent-Based Offline Discovery
This page is for Device42 administrators who need to discover devices in completely network-isolated environments. Use offline agent-based discovery when target devices cannot communicate with the Device42 appliance at all. For environments where devices can reach Device42 but security rules limit traffic, use standard agent-based discovery. instead.
Agentless discovery in Device42 works great for most custom use cases. There are some edge cases where discovery is desired but the network doesn't allow communication back to the main Device42 appliance. Sometimes remote collectors can't be deployed because the target network segments are segregated or remote, while other times, policy doesn't allow it.
To use discovery in those scenarios, use the Device42 Offline Data Processing Tool to process the offline discovery files generated by the Device42 Offline Discovery Agent.
Supported Platforms
The Device42 Offline Discovery Agent is available for the following platforms:
| Windows x32/x64 | Mac | OpenBSD x32/x64 |
|---|---|---|
| Linux x32/x64 | Solaris Sparc x64 | FreeBSD x32/x64 |
How Offline Discovery Works
This is a high-level outline of the offline discovery process:
- The Windows or Linux discovery agent is run in
-offlinemode and creates a log file of the discovered data. - One or more sets of log files created are uploaded to a machine that can run the offline processing utility.
- The offline processing utility ingests the log files, processes them, and uploads the discovery data to your Device42 Main Appliance.
Download the Offline Discovery Agent
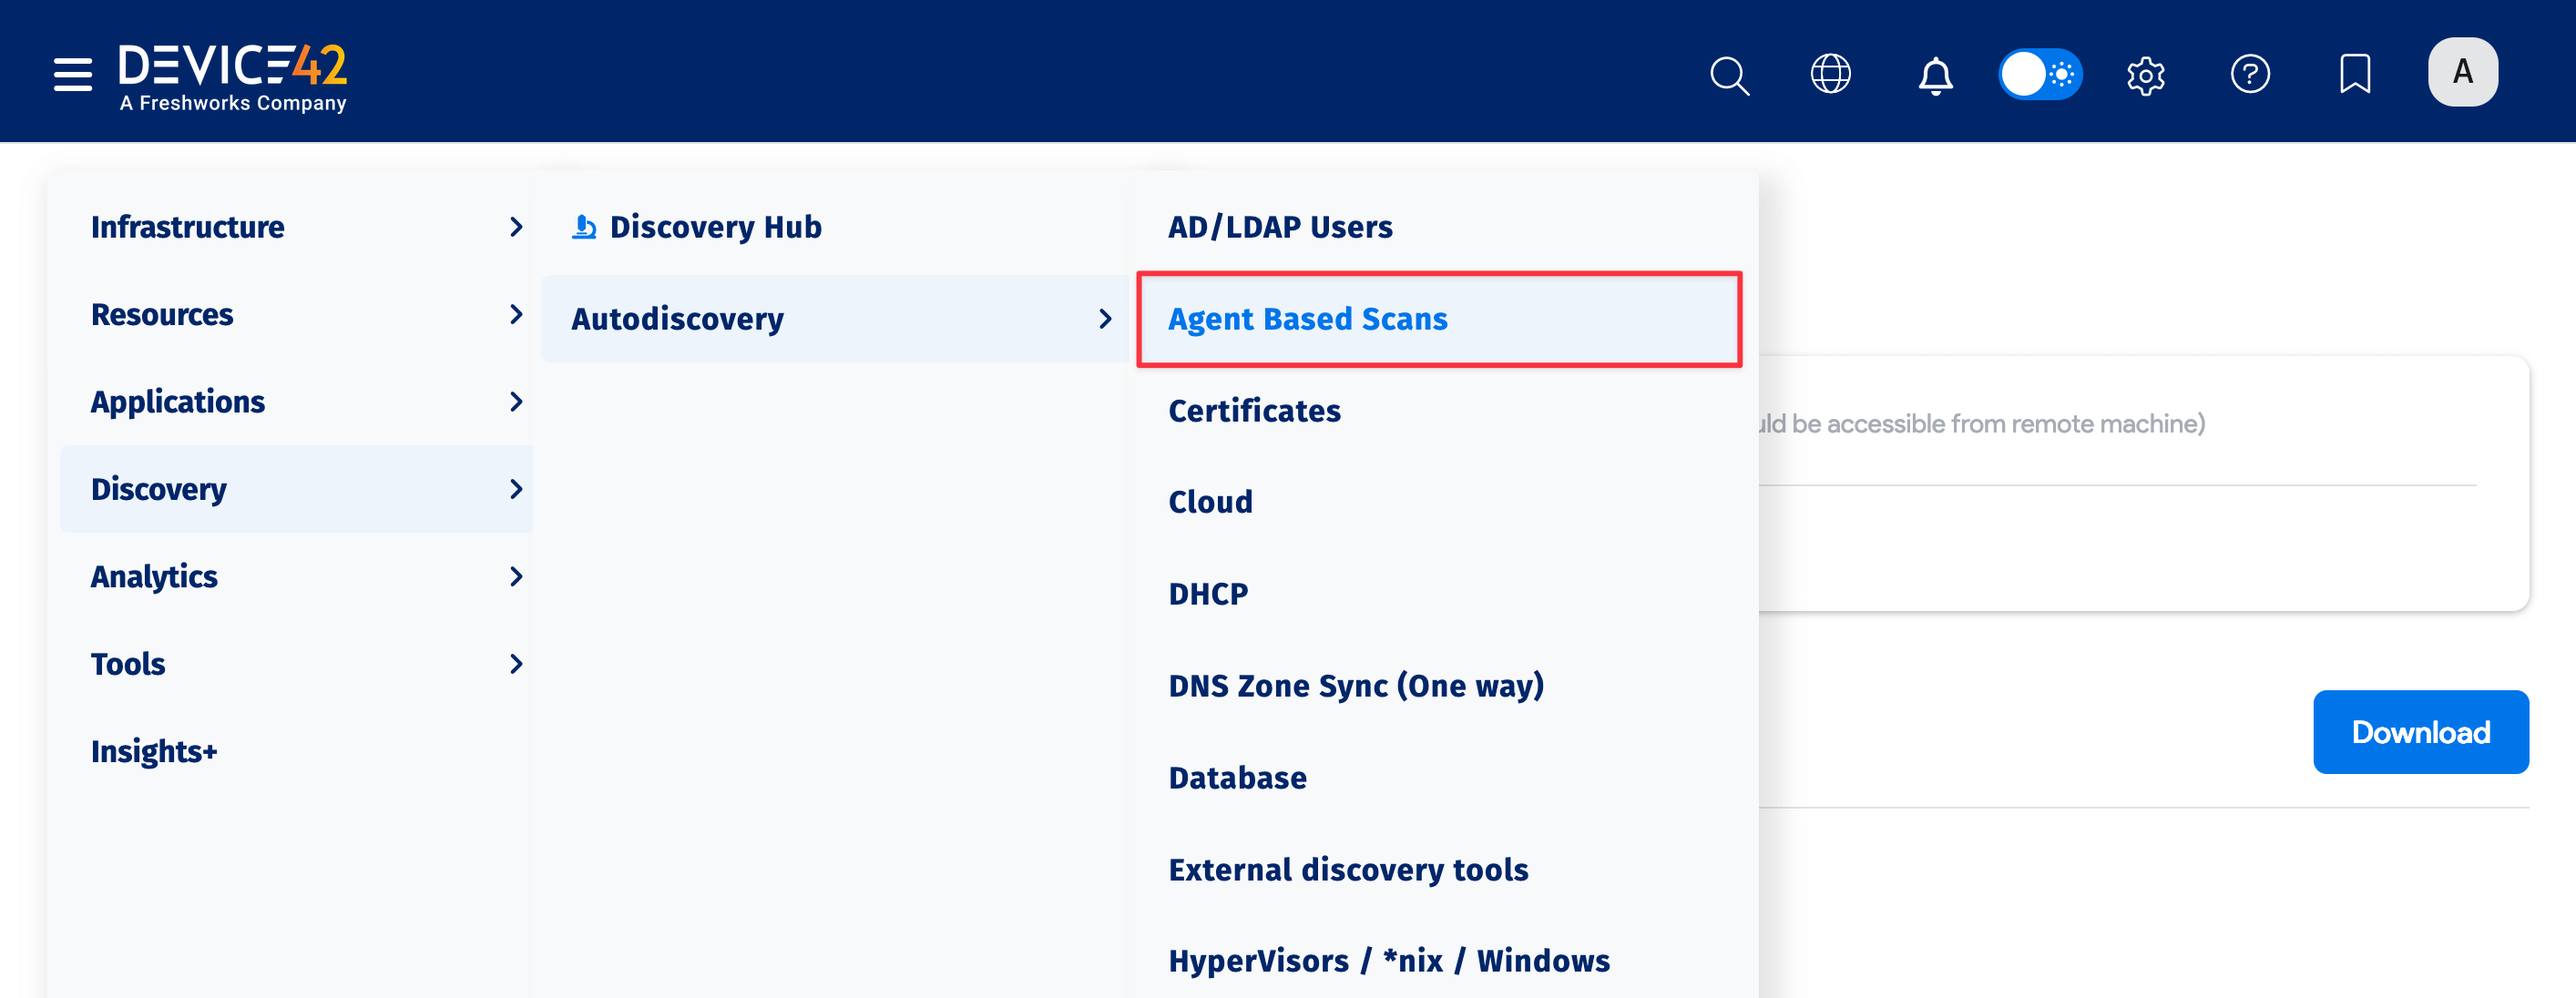
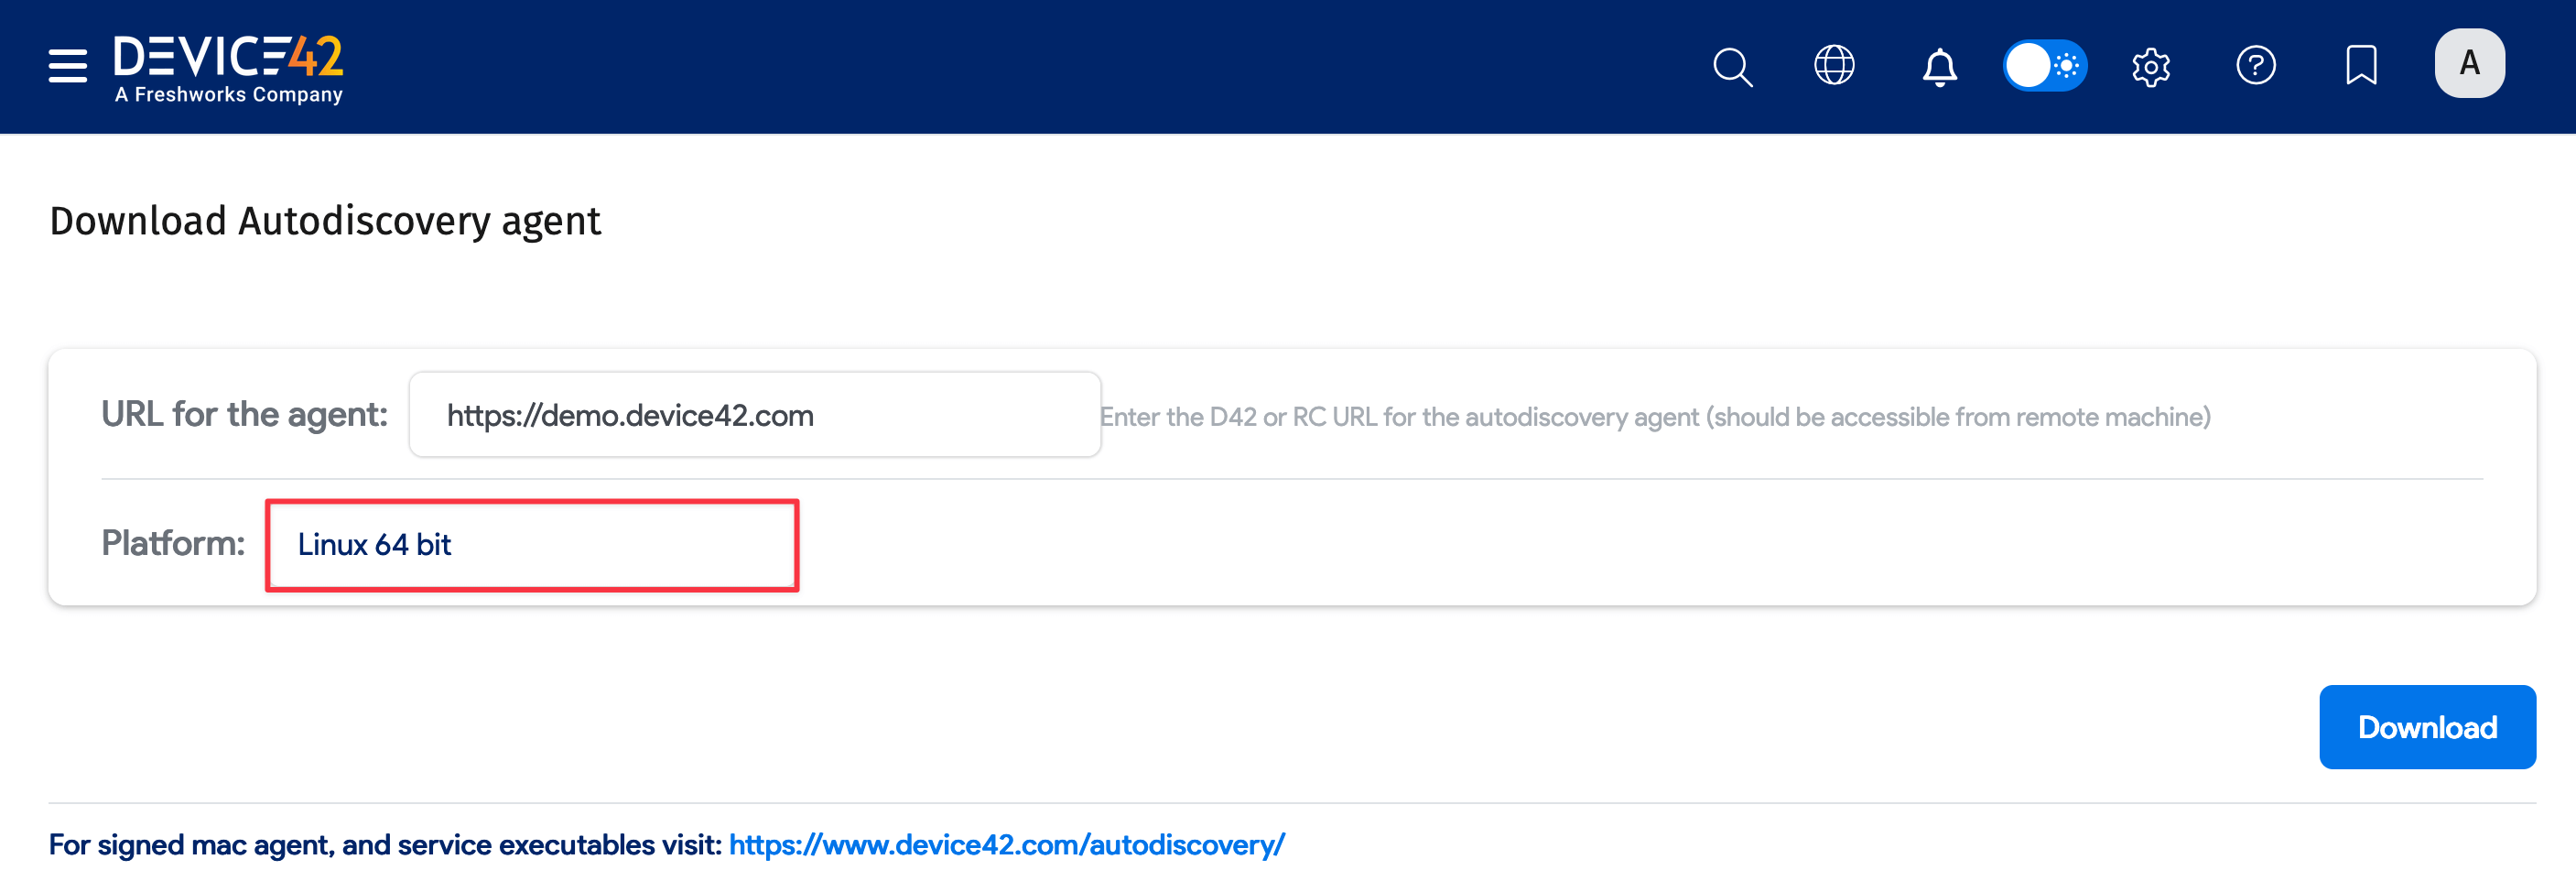
The discovery agent is built-in to your Device42 instance, and can be downloaded for any of the platforms listed above by going to the main menu, Discovery > Agent Based Scans.
-
Enter the URL for the agent, select the Platform, and Download the agent.

-
Copy the downloaded file to the target server. On Windows, you can drag and drop, FTP, or even use a USB stick. If you're using Linux, one method is to use SFTP and run the command:
put d42_linuxagent_x64For example:

-
On Windows, you can skip this step. On Linux, change file permissions to make the file executable using the command:
chmod +x d42_agentnameFor example:

-
Execute the agent and create a variable to name your log files dynamically:
$ ./agentname -offline -sudo-password ‘password’ > $VAR1.log
Now proceed to configure variables for your output log file names.
Create Naming Variables for Agent Logs
It’s important to have a unique file name as you might want to run the discovery multiple times before processing the data, possibly also from multiple computers.
Variables are used to define the file name. We use the computer name and the date-time stamp to generate the unique file names for the discovered data.
Windows example:
Click to expand the code block
C:\>set var=%computername%-%date%-%time::=%
C:\>set var=%var:.=%
C:\>set var=%var:/=-%
C:\>set var=%var: =%
C:\>echo %var%.log
ASUS-GL553V-Thu03-14-2019-16265819.log
C:\>d42_winagent_x64.exe -offline > %var%.log
Linux example:
Click to expand the code block
$ VAR1=`hostname`-`date +%Y%m%d-%k%M%S`
$
$ echo $VAR1
> CentOS7-20190306-133710.log
$ ./linuxagent.sh -offline > $VAR1.log
Sudo Permissions for Linux
On Linux, the agent file requires Sudo permissions to collect data. There are two ways to grant these permissions:
- Set up the account executing the agent with the
NOPASSWD:option in the Sudoers file. - Or pass the Sudo password to the agent as a parameter on execution.
- Tell the agent to save the data locally and not post the data to the Device42 appliance:
-offline - Pass the Sudo password directly to the agent. This is not required if you configured with
NOPASSWD:in the Sudoers file.-sudo-password string - Name the output file. We recommend a unique name log based on the hostname and timestamp for each scanned device. The file could be a local file or on a writeable network share for easier collection. See the section Create Naming Variables for Agent Logs above for details.
> filename.log
- Tell the agent to save the data locally and not post the data to the Device42 appliance:
Download the Offline Discovery Data Processing Tool and Upload Utility
This tool is required to complete the agent-based discovery process.
Download the tool from the Device42 Miscellaneous Tools download page.
When the Device42 Offline Discovery Agent runs, it outputs log files of discovery information. The Data Processing utility is required to get your agent-based offline discovery data into Device42 by uploading the discovery log files to your Device42 Main Appliance.
The utility supports batch upload of multiple log files per run, is a Windows-based application, and is compatible with Device42 15.14.04 and above.
Process Offline Discovery Data
Once you have these files, you can either manually transfer the files to the machine that has the offline processor installed, or write the files to a share that's accessible from the offline processing tool.
Collect the Offline Discovery Output for Upload
The agent will create two output files. Your output file is named based on the variable you selected. The log files need to be collected on a central machine for processing. Files can be collected off each server using server management tools or the agent can be configured to write directly to a shared drive.
If you follow the instructions above, the files will be named HOSTNAME-DATE-TIME.log and agent_local.log.
You only need the specific log file for the host that you created. You don't need to collect the agent_local.log files, as it's for diagnostics only.
Process Using the Agent Log Upload Utility
Set up and run the Device42 Agent Log Upload Utility tool as follows:
- Unzip the compressed archive that contains the utility.
- Browse to the unzipped folder and edit the
appsettings.jsonfile. Update these fields according to your instance:- BaseURL: Change
d42_urlto your instance address or IP address. - InputDir: Change
C:/d42_loaderto the location of your collected scan logs. Note: Use the/character, not\in the path. - Username: Change to your instance username.
- Secret: Change to your instance password.
- BaseURL: Change
- Make sure all the files to be processed are in the input folder as specified in the configuration file in the previous step.
- Run
d42_loader_winx64.exeto begin processing the input files. Once successfully processed, it will move each file to the output directory.
You should now see your data in Device42.