Discover
In the Discover phase you will configure, execute, and schedule jobs that discover your IT landscape and collect and store the associated data. These discovery jobs systematically scan and inventory your IT infrastructure, using Device42's automatic discovery capabilities to populate the database. This includes everything from network devices to software, applications, and storage.
This is the second phase (Discover) in the Device42 implementation process. See How is Device42 Implemented? for an overview of all four phases.
This phase is broken down into four tasks:
- Task 1: Prepare for Discovery Jobs
- Task 2: Create and Run Discovery Jobs
- Task 3: Verify Discovery Jobs
- Task 4: Schedule Discovery Jobs
Note that the Verify and Schedule tasks can be performed immediately following Task 2 (Create and Run Discovery Jobs for each discovery job) instead of validating and scheduling after running all the discovery jobs.
Discovery Job Best Practices
Below are lists of basic discovery job best practices. While many discovery job best practices are listed, discovery is the foundation of Device42, and it is therefore important that you understand and implement these best practices. We recommend you refer back to this list often.
Discovery Job Best Practices: Discovery Job Planning
-
Limit your discovery focus: There are a variety of discovery jobs and it is tempting to immediately run as many as possible. Focus on the jobs that will deliver the maximum value to your organization; these typically include jobs like SNMP, Virtualization, Windows, Linux and Unix, Cloud, Storage, and Certificate. You can run additional discovery jobs once the core jobs have been created and scheduled.
-
Organize your discovery jobs: There are different discovery job types (for example SNMP, Hypervisor, Windows, Linux, Cloud, Storage, and so on) and each of these will likely have multiple jobs based on location, Data Center, Region, and so on, or due to the large number of items to be discovered. Consider how you want to organize each discovery job type. For example, you may conclude it is best to have a separate Windows discovery job for each location or Data Center. Take into account the recommended maximum number of devices a Remote Collector supports when organizing your jobs.
-
Adopt a standard discovery job naming convention: Name each discovery job so they are easily understandable, are consistent, and can be sorted in a way that will be useful.
Discovery Job Best Practices: Discovery Job Configuration
-
Do not set up an autodiscovery scan using critical production account credentials; create a separate, dedicated account used only for discovery. Account lock-out could result in an otherwise avoidable outage depending on your permissions and configured password policies. You as a customer are responsible for any such behavior.
-
Always leverage a Remote Collector when performing discovery jobs. Note this is required when scanning networks larger than
/24, using Nmap and leveraging any of our modular offerings such as: Application Dependency Mapping (ADM), Resource Utilization (RU), Storage Discovery, and Power and Environmental Monitoring. -
For each discovery job, be as specific as possible in terms of defining your discovery targets (for example, your devices), excluding any targets that should not be discovered. Doing so will reduce the number of discovery failures.
-
Do not exceed the largest recommended network range of
/16, which includes 65,534 IP addresses. Adding more than the recommended range may either yield inconsistent discovery results or lengthen the time required for the discovery job to complete. -
Break down larger subnets into smaller subnets, and leverage additional RCs to optimize discovery performance for larger environments.
Discovery Job Best Practices: Discovery Job Scheduling
-
Schedule your discovery jobs. Discovery jobs that are created, run once, and never scheduled to run again result in stale information and an inaccurate inventory.
-
Confirm job health before scheduling. Make sure your discovery jobs return the expected data before you schedule them to run.
-
Schedule discovery jobs to run with the level of frequency required to keep your data current. Different jobs will require different frequencies based on their rate of data change.
-
Confirm that scheduled discovery jobs are complete before they are scheduled to run next. For example, a discovery job scheduled to run every four hours completes in less than four hours.
-
Avoid running jobs during high network traffic hours; this can reduce impact to network performance.
-
When running multiple jobs during a day, schedule them to run evenly throughout the day. If you cannot run jobs during primary business or production hours, spread them across non-peak, non-business hours as evenly as possible.
-
Regularly view the Scheduled Job Distribution Status report to ensure your jobs are not overloaded (Insights+ > System Administration > Scheduled Job Distribution Status).
Task 1: Prepare for Discovery Jobs
1.1 Collect and Store Discovery Credentials
Credentials (Secrets) are frequently required when performing agentless Discovery; you specify them when creating discovery jobs. It is important to store the correct credentials in Device42 so you can reference them for jobs that require them.
Incorrect credentials is a common reason why discovery jobs do not successfully complete. Make sure you have the correct credentials and that you enter them correctly.
Here are some examples of credentials required for common discovery jobs:
- SNMP Discovery: Requires SNMP Community String (SNMP GET read account)
- Linux Discovery: Requires SSH Login
- Windows Discovery: Requires Windows Services Account (WMI access to devices)
Secrets are centrally stored in Resources > Secrets > All Secrets; note they are only visible to the user who created them but can be shared.
1.2 Create Subnets
Adding subnets helps you define the network scope as you discover your network(s) and also reduces the number of undefined 0.0.0.0 network types.
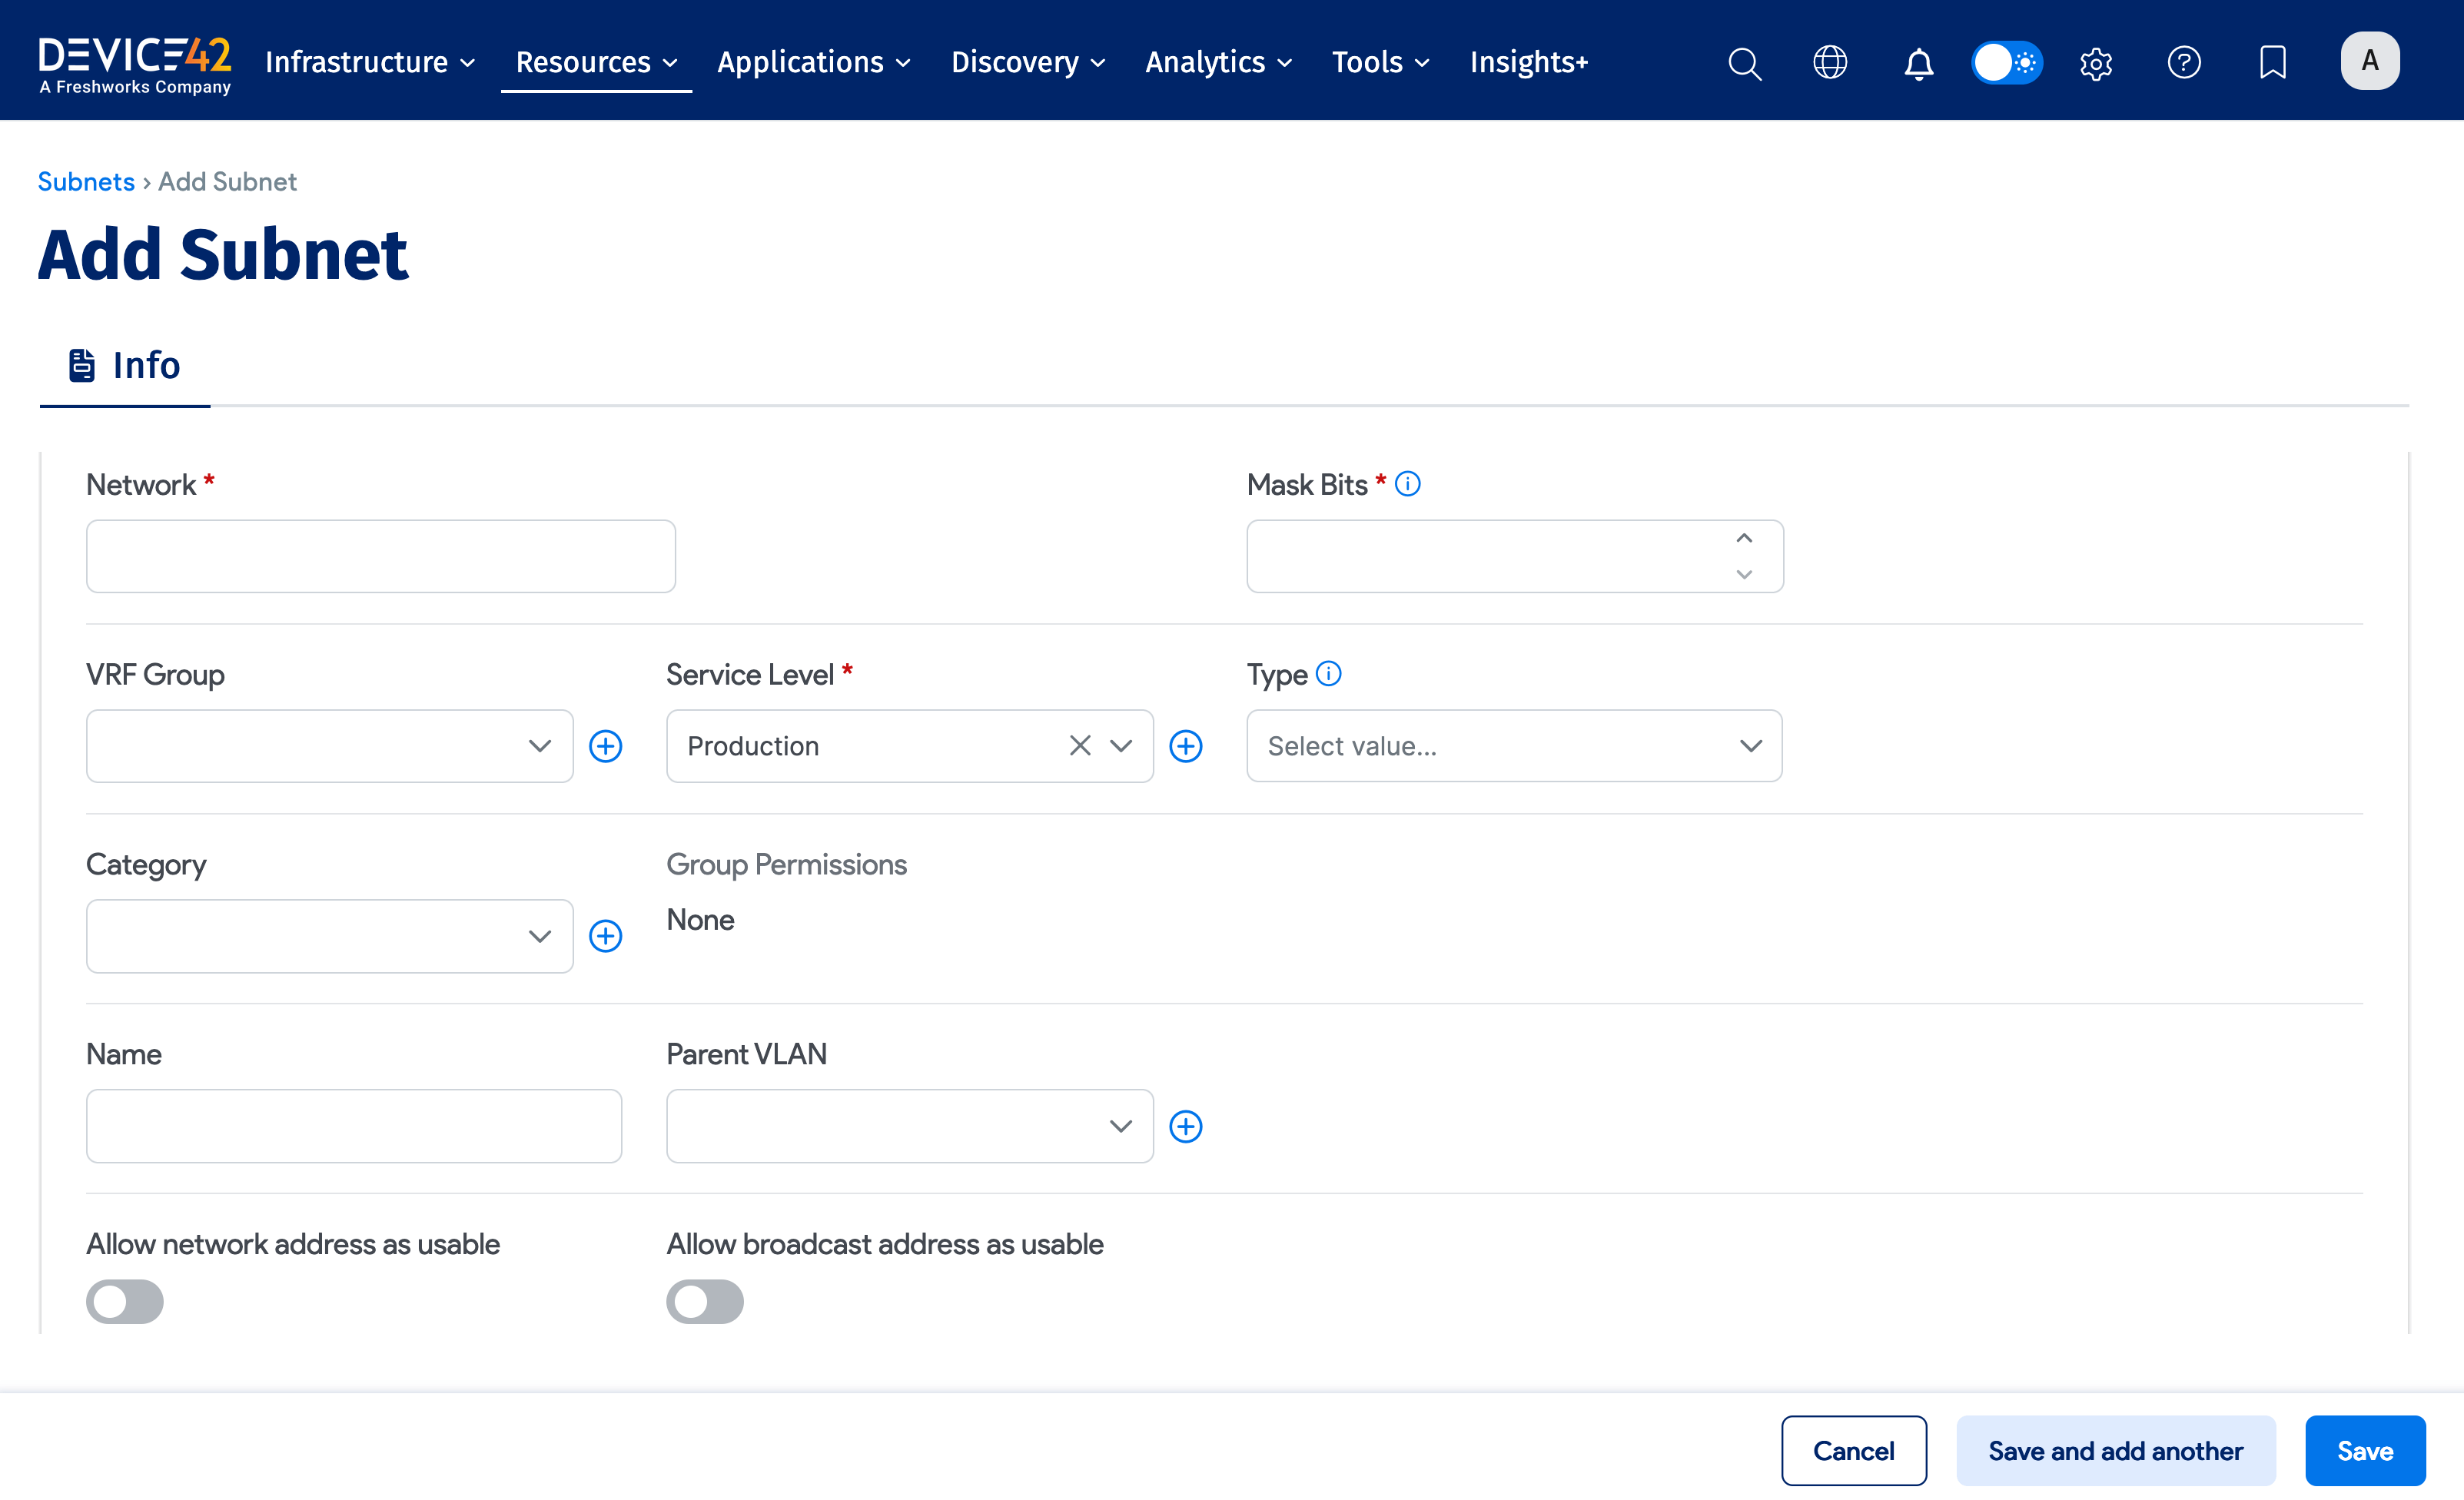
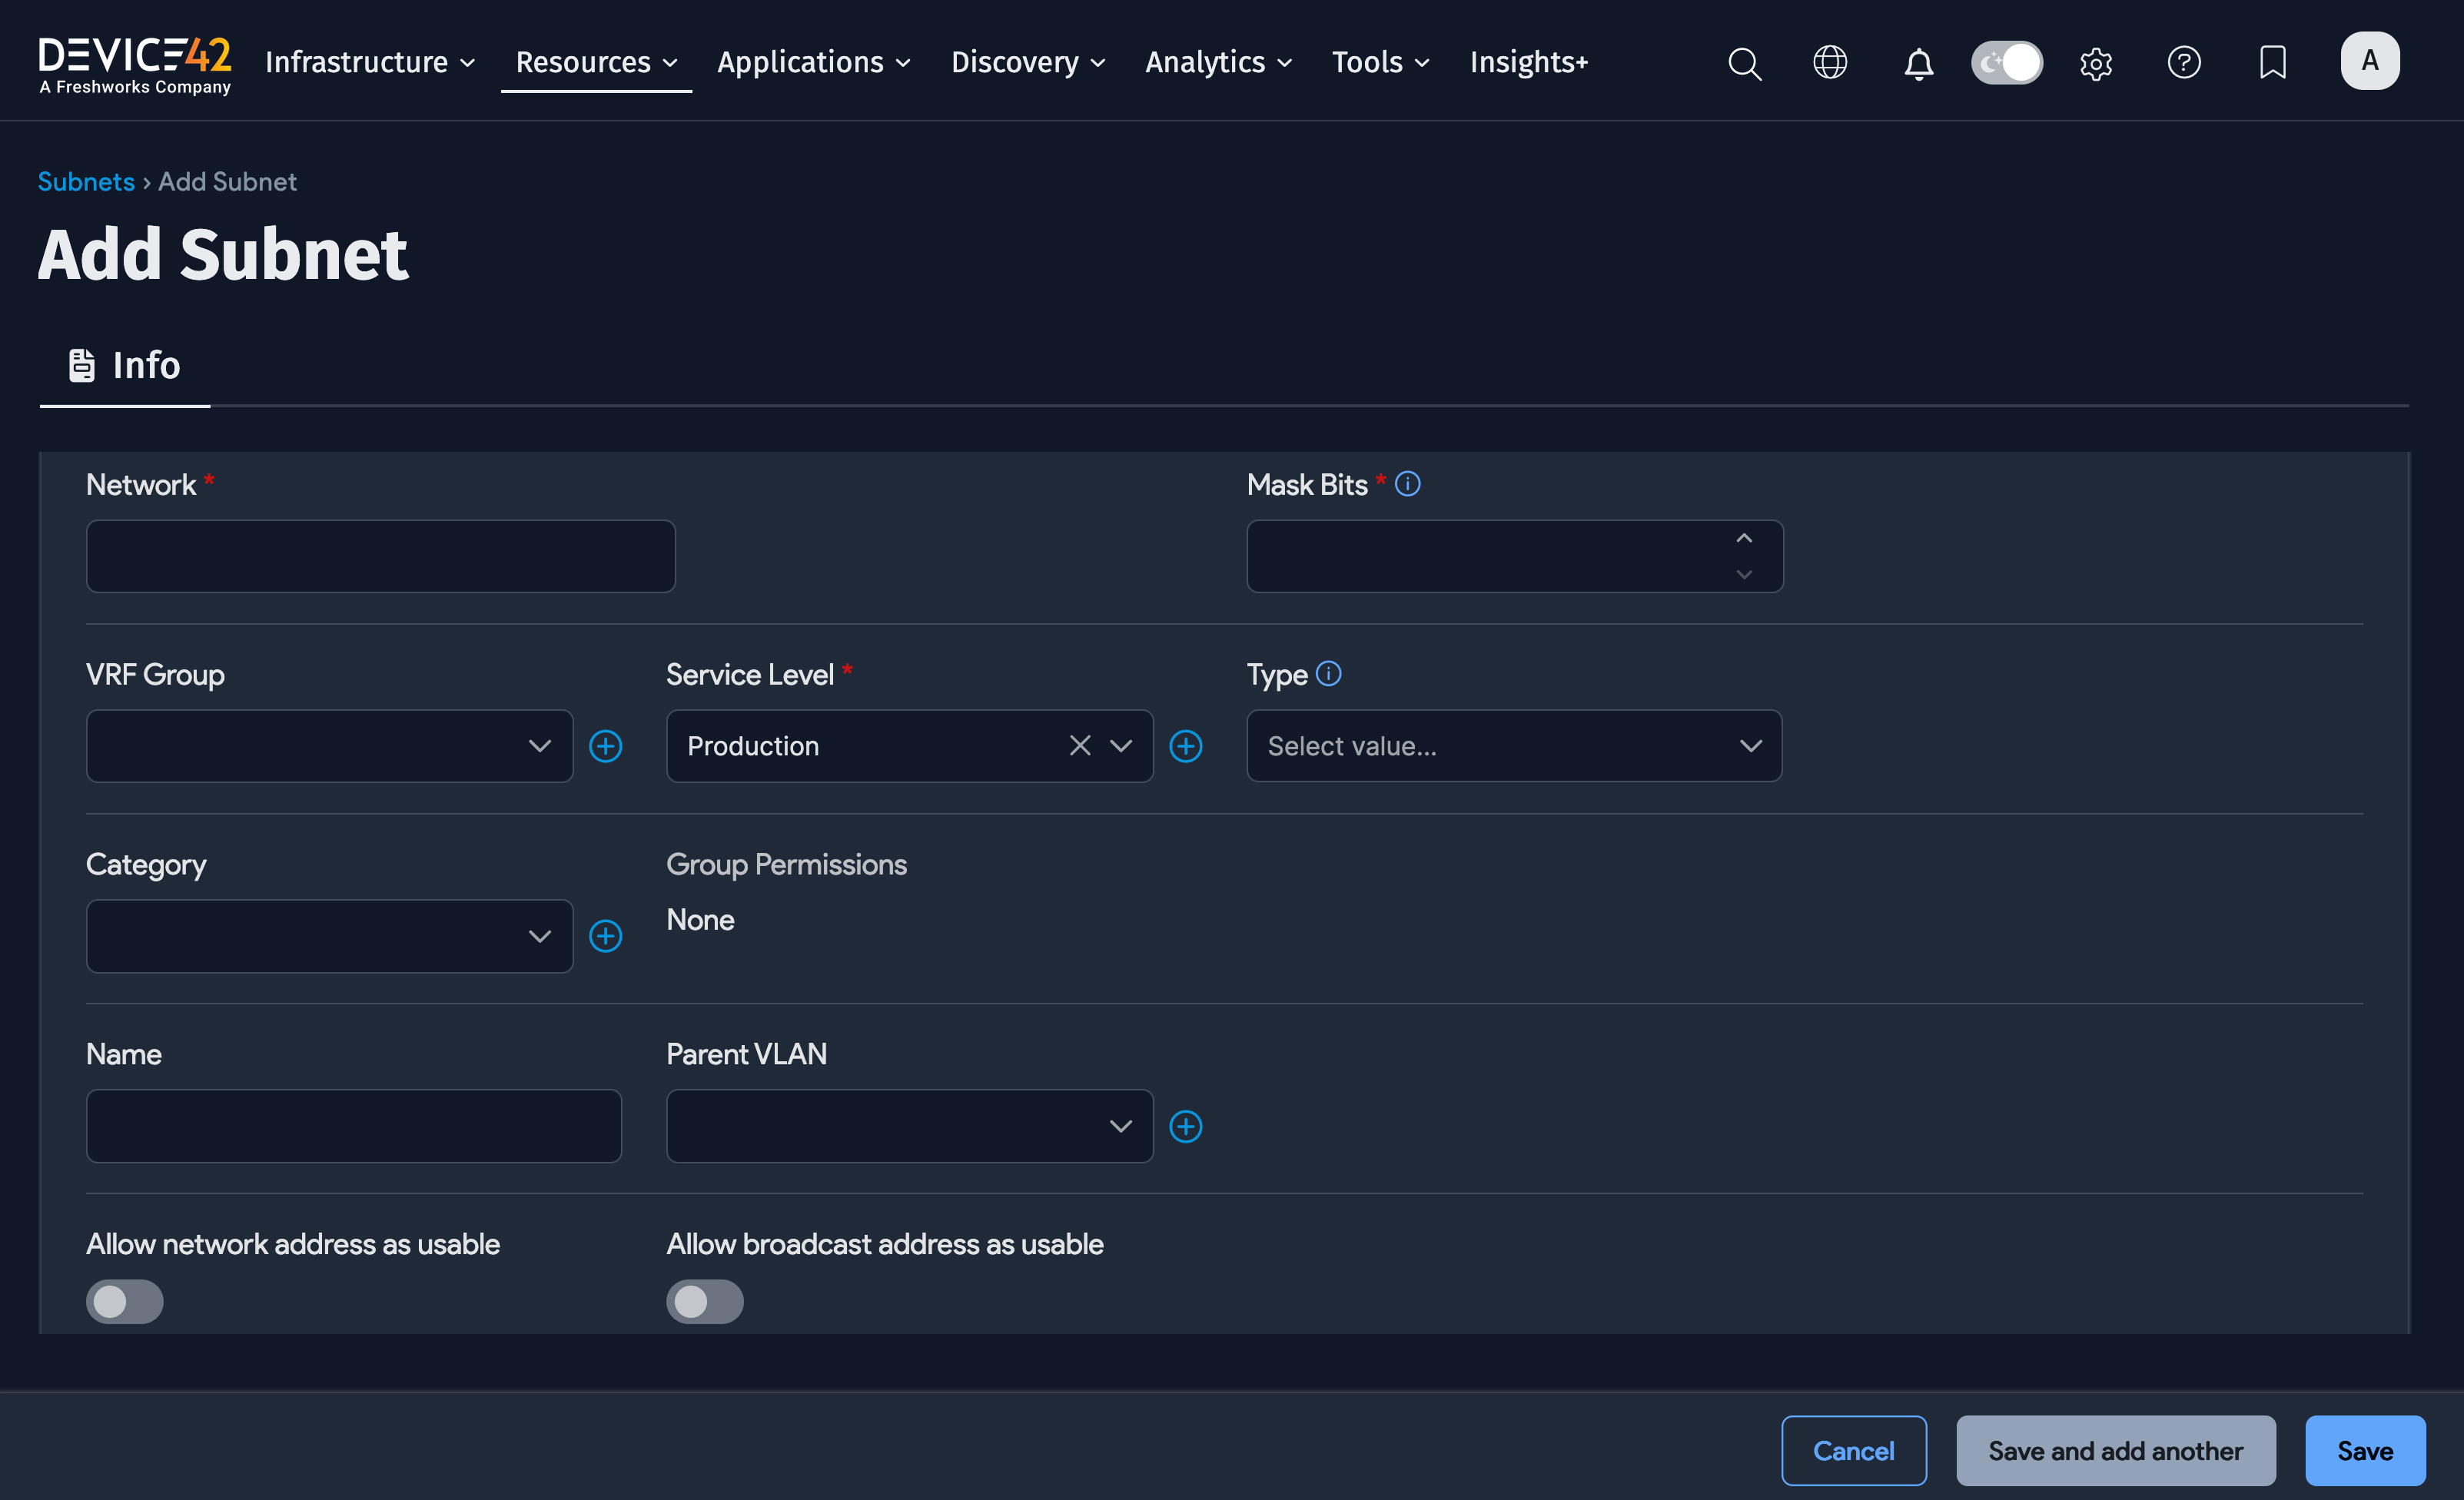
To add your Subnets, perform the following steps:
- Go to Resources > Networks > All Subnets and click Create in the top-right corner.
- Enter an IPv4 or IPv6 address into the Network field.
- Enter the Mask Bits (omit the
/). - Enter the Service Level.
- Review the remaining options and choose the items that best fit your needs.
- Click the Save button.
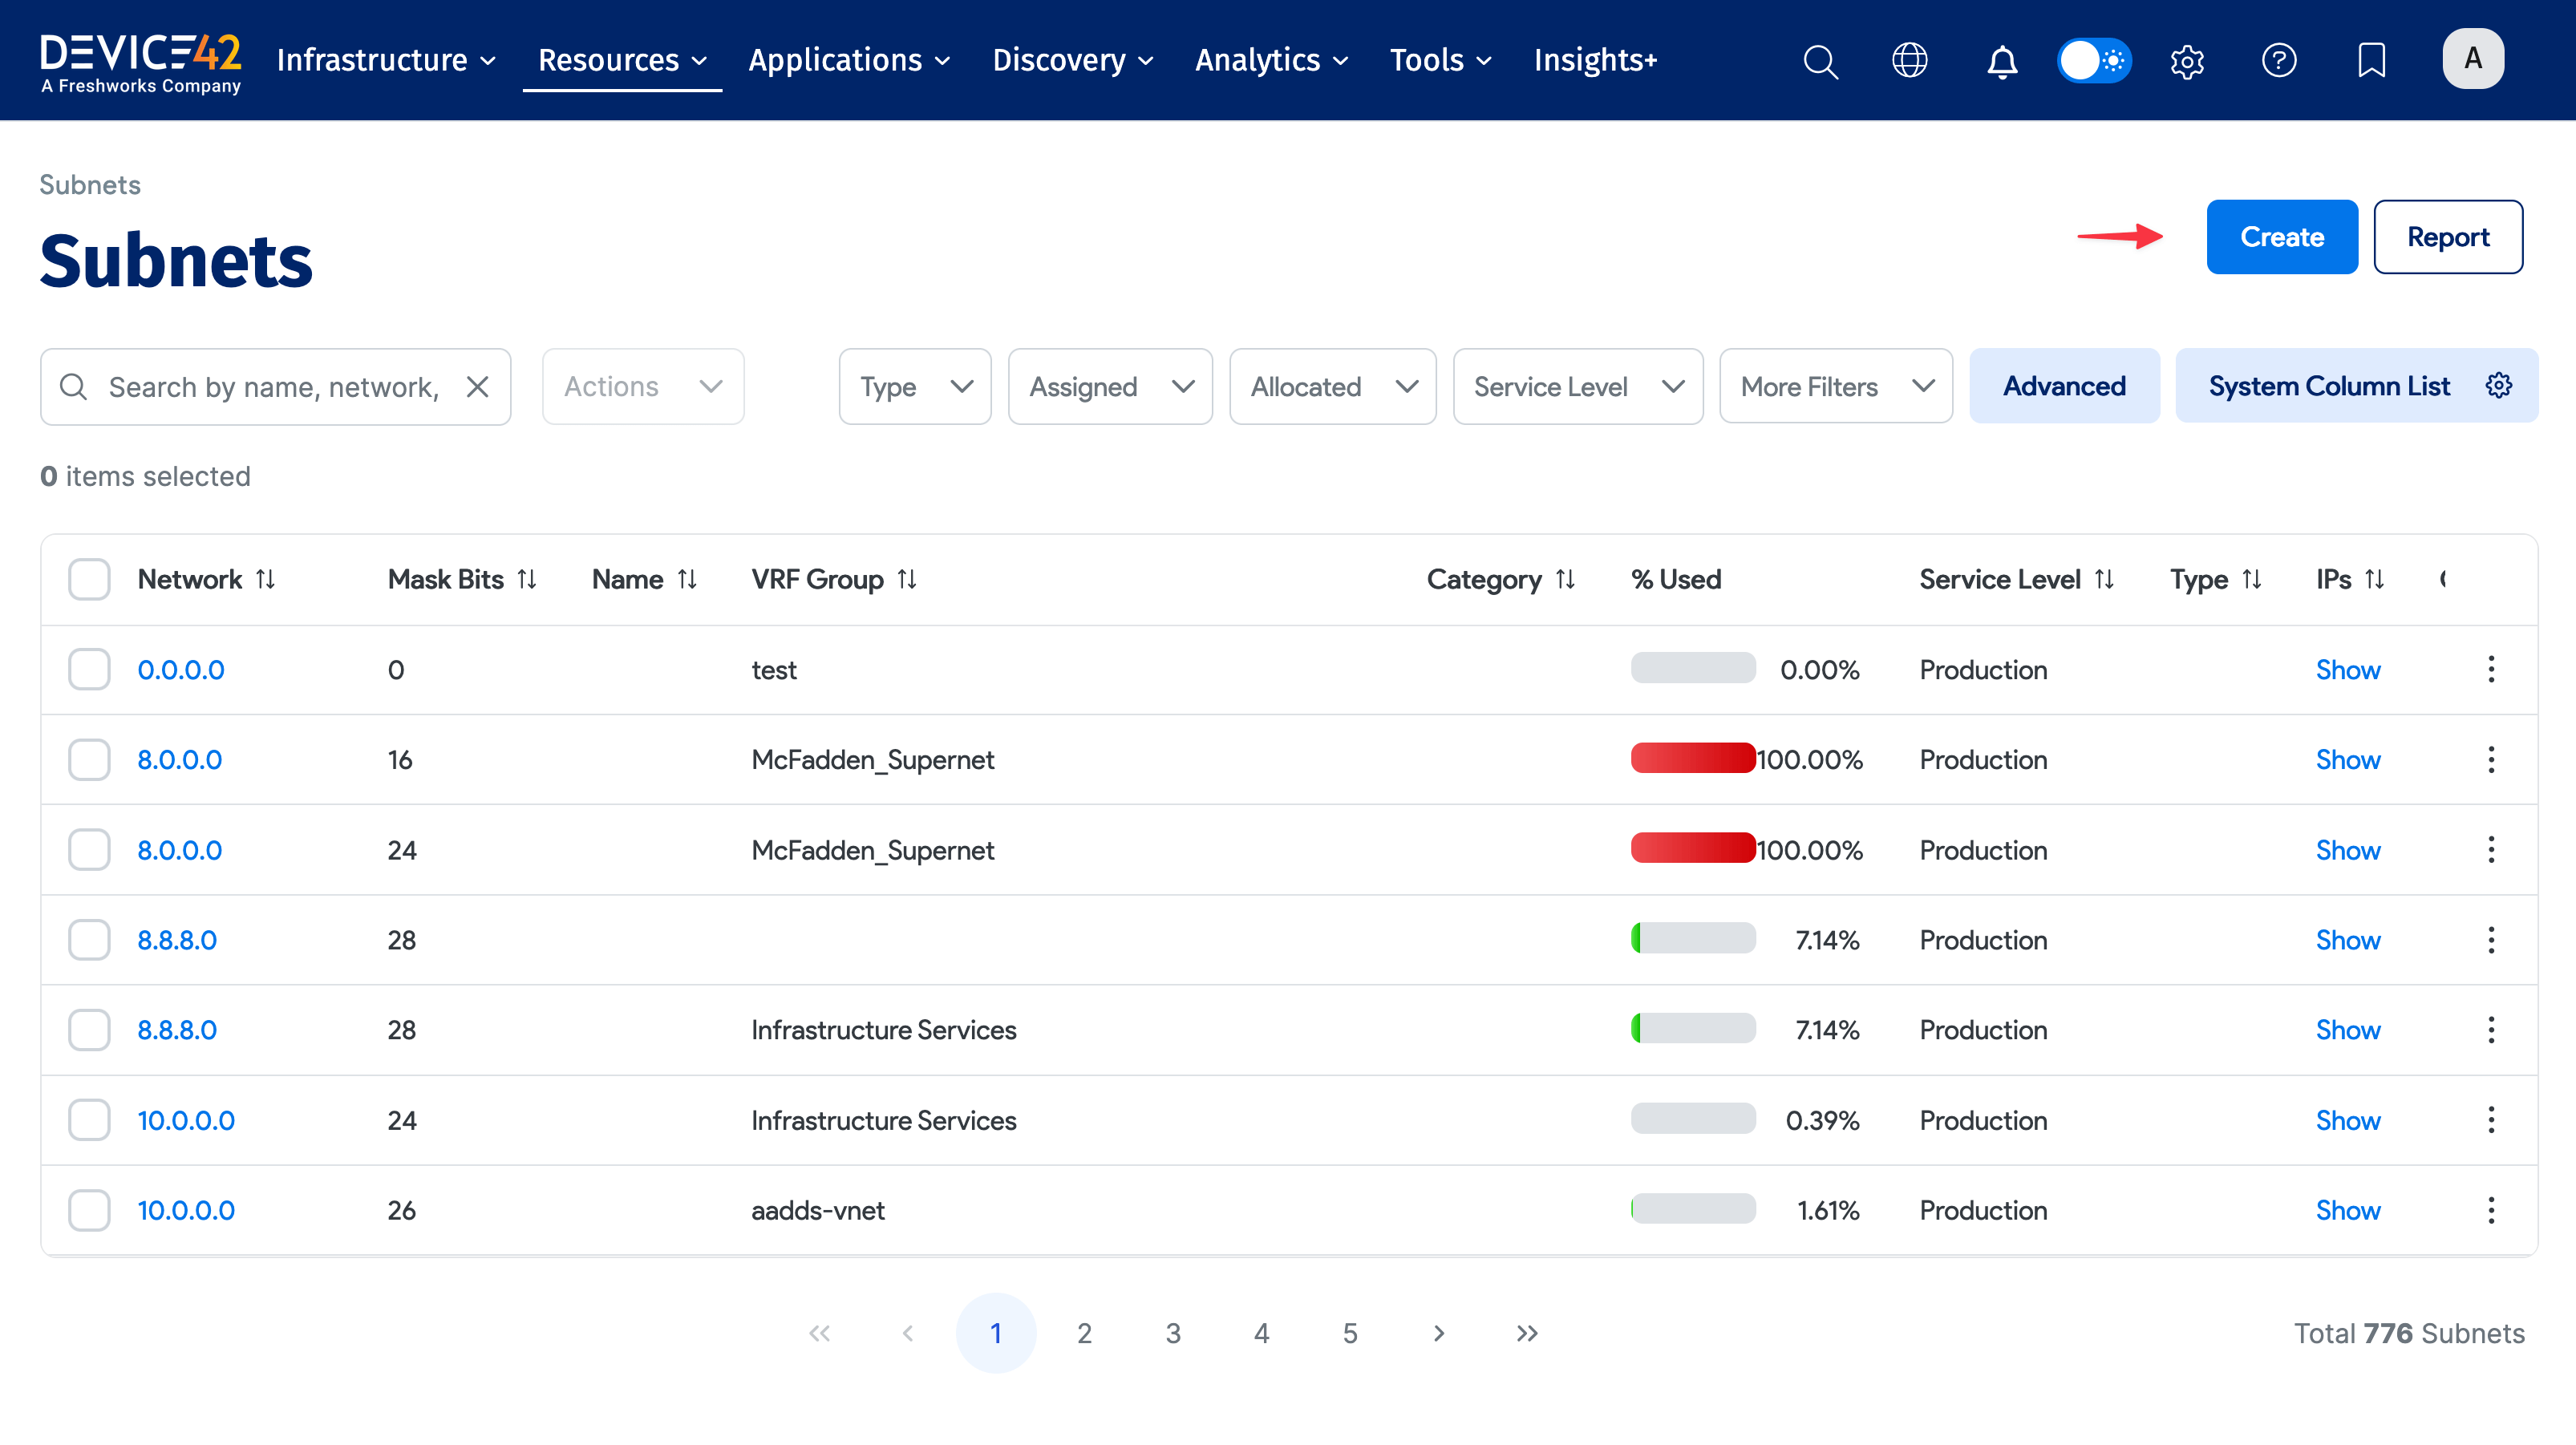

The required fields are Network, Mask Bits, and Service Level. The other fields are optional. If left empty, Range Begin and Range End are automatically calculated based on the Network and Mask Bits.
If subnets have been predefined, all discovered IP addresses will be placed in their respective subnets. Otherwise, the IPs will end up in an undefined subnet.
Click here for more information about subnets, including detailed instructions for adding or editing a subnet.
1.3 Configure Ports to Discovery Targets
It is critical that the ports used to access the targets are open in advance of running discovery jobs. Click here for a list of all ports that may be used to access targets for discovery, along with their directionality.
Task 2: Create and Run Discovery Jobs
Discovery Job Order
Device42 strongly recommends you run your first discovery jobs in the order listed below; you will achieve the best results and it will minimize future reconciliation work. You can skip any jobs that are not applicable to your organization.
| Order | Discovery | Description |
|---|---|---|
| 1 | Network (SNMP) | Uses Simple Network Management Protocol (SNMP) to build your L2 Network landscape by discovering and gathering information from network devices such as switches, routers, and printers, collecting hardware and connectivity details. Use this document to help get you started. |
| 2 | Virtual Machine | V-Server autodiscovery collects data from hypervisors such as VMware, Citrix Xen, libvirt, and oVirt. Use this document to help get you started. |
| 3 | Windows/Hyper-V | Brings in Windows and Hyper-V machines, performing deep discovery on Hypervisors, and Windows OS using WMI and WinRM protocols. It collects comprehensive hardware and software details and discovers virtualization platforms such as VMware, Hyper-V, and others. It gathers information about virtual machines, hosts, and their configurations. Use this document to help get you started. |
| 4 | Linux | Brings in host information, parts, OS, Service processes, and installed software and applications and configuration files for Linux and Unix machines. Use this document to help get you started. |
| 5 | Cloud | Brings in virtual machines and storage in Amazon Web Services, Microsoft Azure, Cloudstack, Openstack, and numerous other platforms. Discovers infrastructure and resources in various cloud environments such as AWS, Azure, Google Cloud, and Alibaba Cloud. It collects detailed information about the cloud assets and their configurations. Use this document to help get you started. |
| 6 | Storage | Discovers Storage Arrays for on premise storage solutions, using the appropriate API for the vendors required. Detailed information of Controllers, LUNs, Storage Pools and Disks in use. Connected to the appropriate hypervisors and file servers with a breakdown of usage. Use this document to help get you started. |
| 7 | Certificate | Scans and discovers SSL certificates across your network. It gathers information about the certificates and alerts you before they expire. Use this document to help get you started. |
| 8 | Warranty Sync | Syncs with vendors like Dell, IBM, Lenovo, and Meraki to pull in warranty information for discovered devices using their service tags and serial numbers. This helps in tracking device warranties and managing end-of-life replacements. Use this document to help get you started. |
| 9 | UCS/Load Balancer | Discovers Cisco Unified Computing System (UCS) and Application Centric Infrastructure (ACI) environments, as well as load balancers like F5. It collects detailed configuration and performance data. Use this document to help get you started. |
2.1 Create SNMP Discovery Jobs
SNMP discovery jobs capture network equipment data per unique IP Address, CIDR block, or IP Range responding to SNMP get requests on Port 161.
SNMP discovery will discover network switches, storage switches, basic SAN details, management interfaces (iLO, iDRAC, and so on) and load balancer details. The Main Appliance will then federate newly discovered devices and details with other configuration items in Device42 allowing you to map connectivity across the network. The SAN discovery will also allow you to see which SANs are attached to a fiber switch when their WWNs are discovered. Discovery of various management interfaces will bring in BMC details and associate them with their affiliated hypervisor/bare-metal servers in Device42.
Device42 supports SNMP v1, v2c and v3.
Port and Credential Requirements
Ports: UDP Port 161 should be accessible on any of the SNMP targets from the Device42 Remote Collectors.
Credentials: Read-only credentials are required for SNMP discovery jobs.
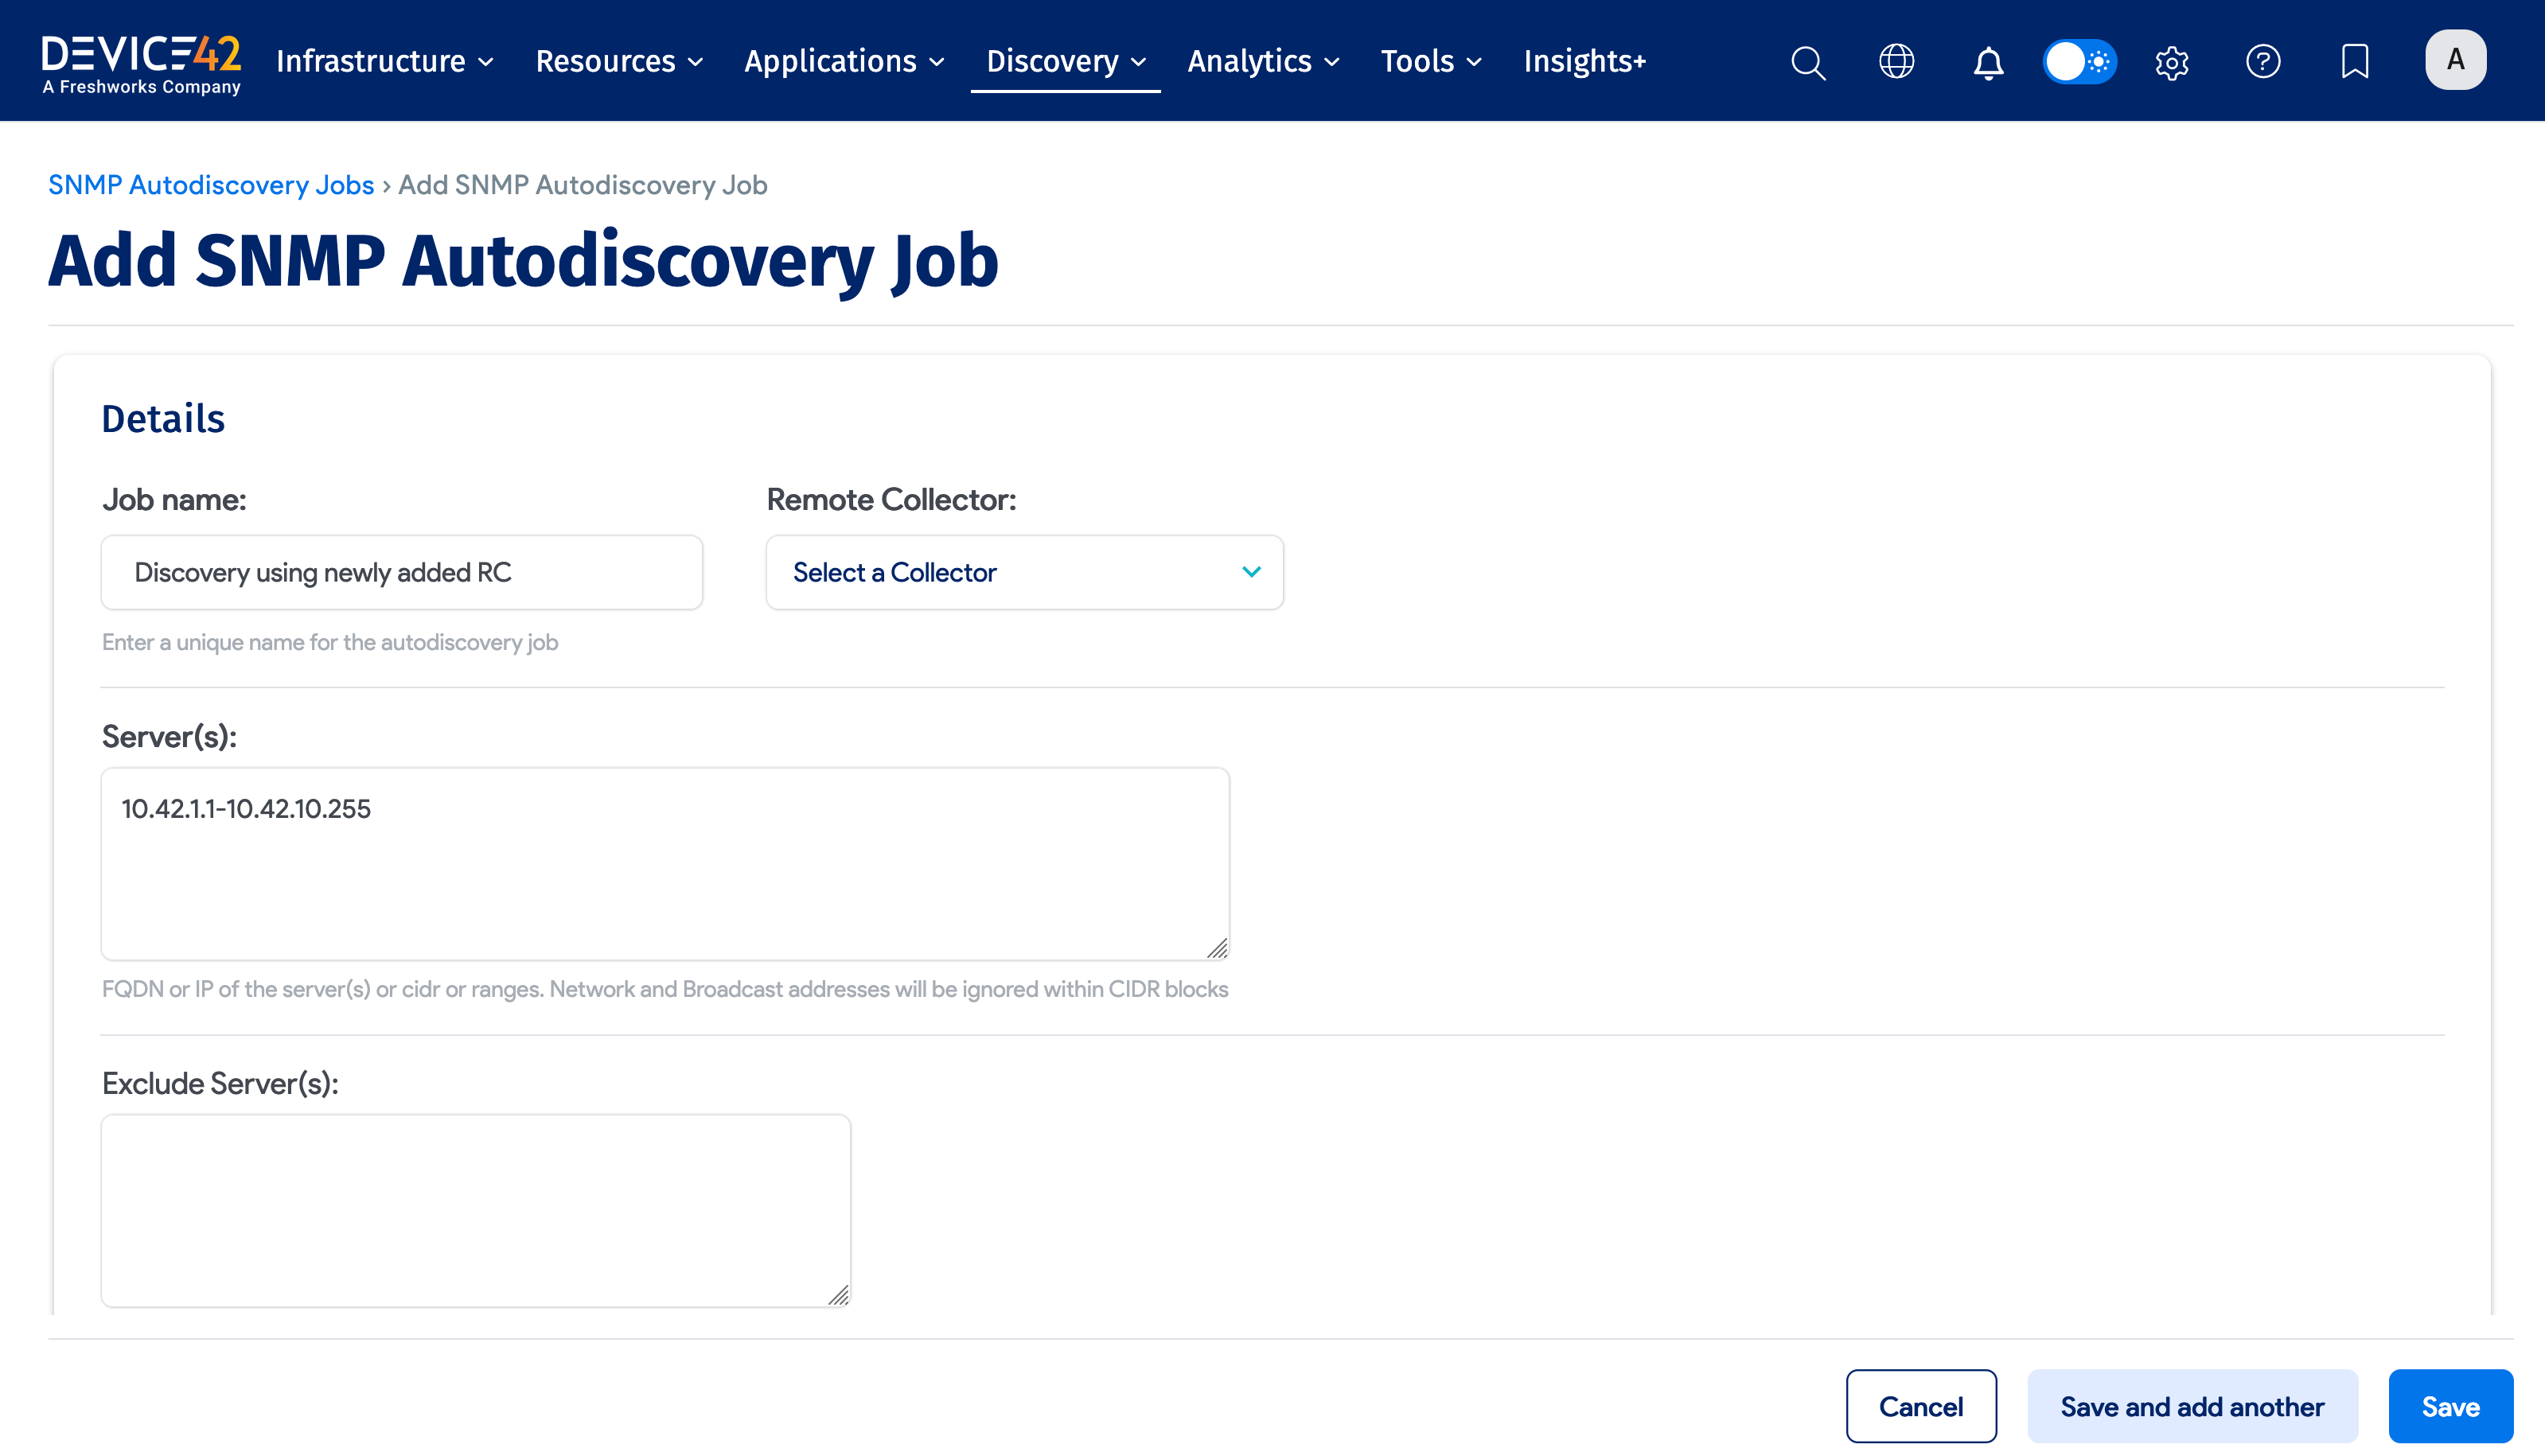
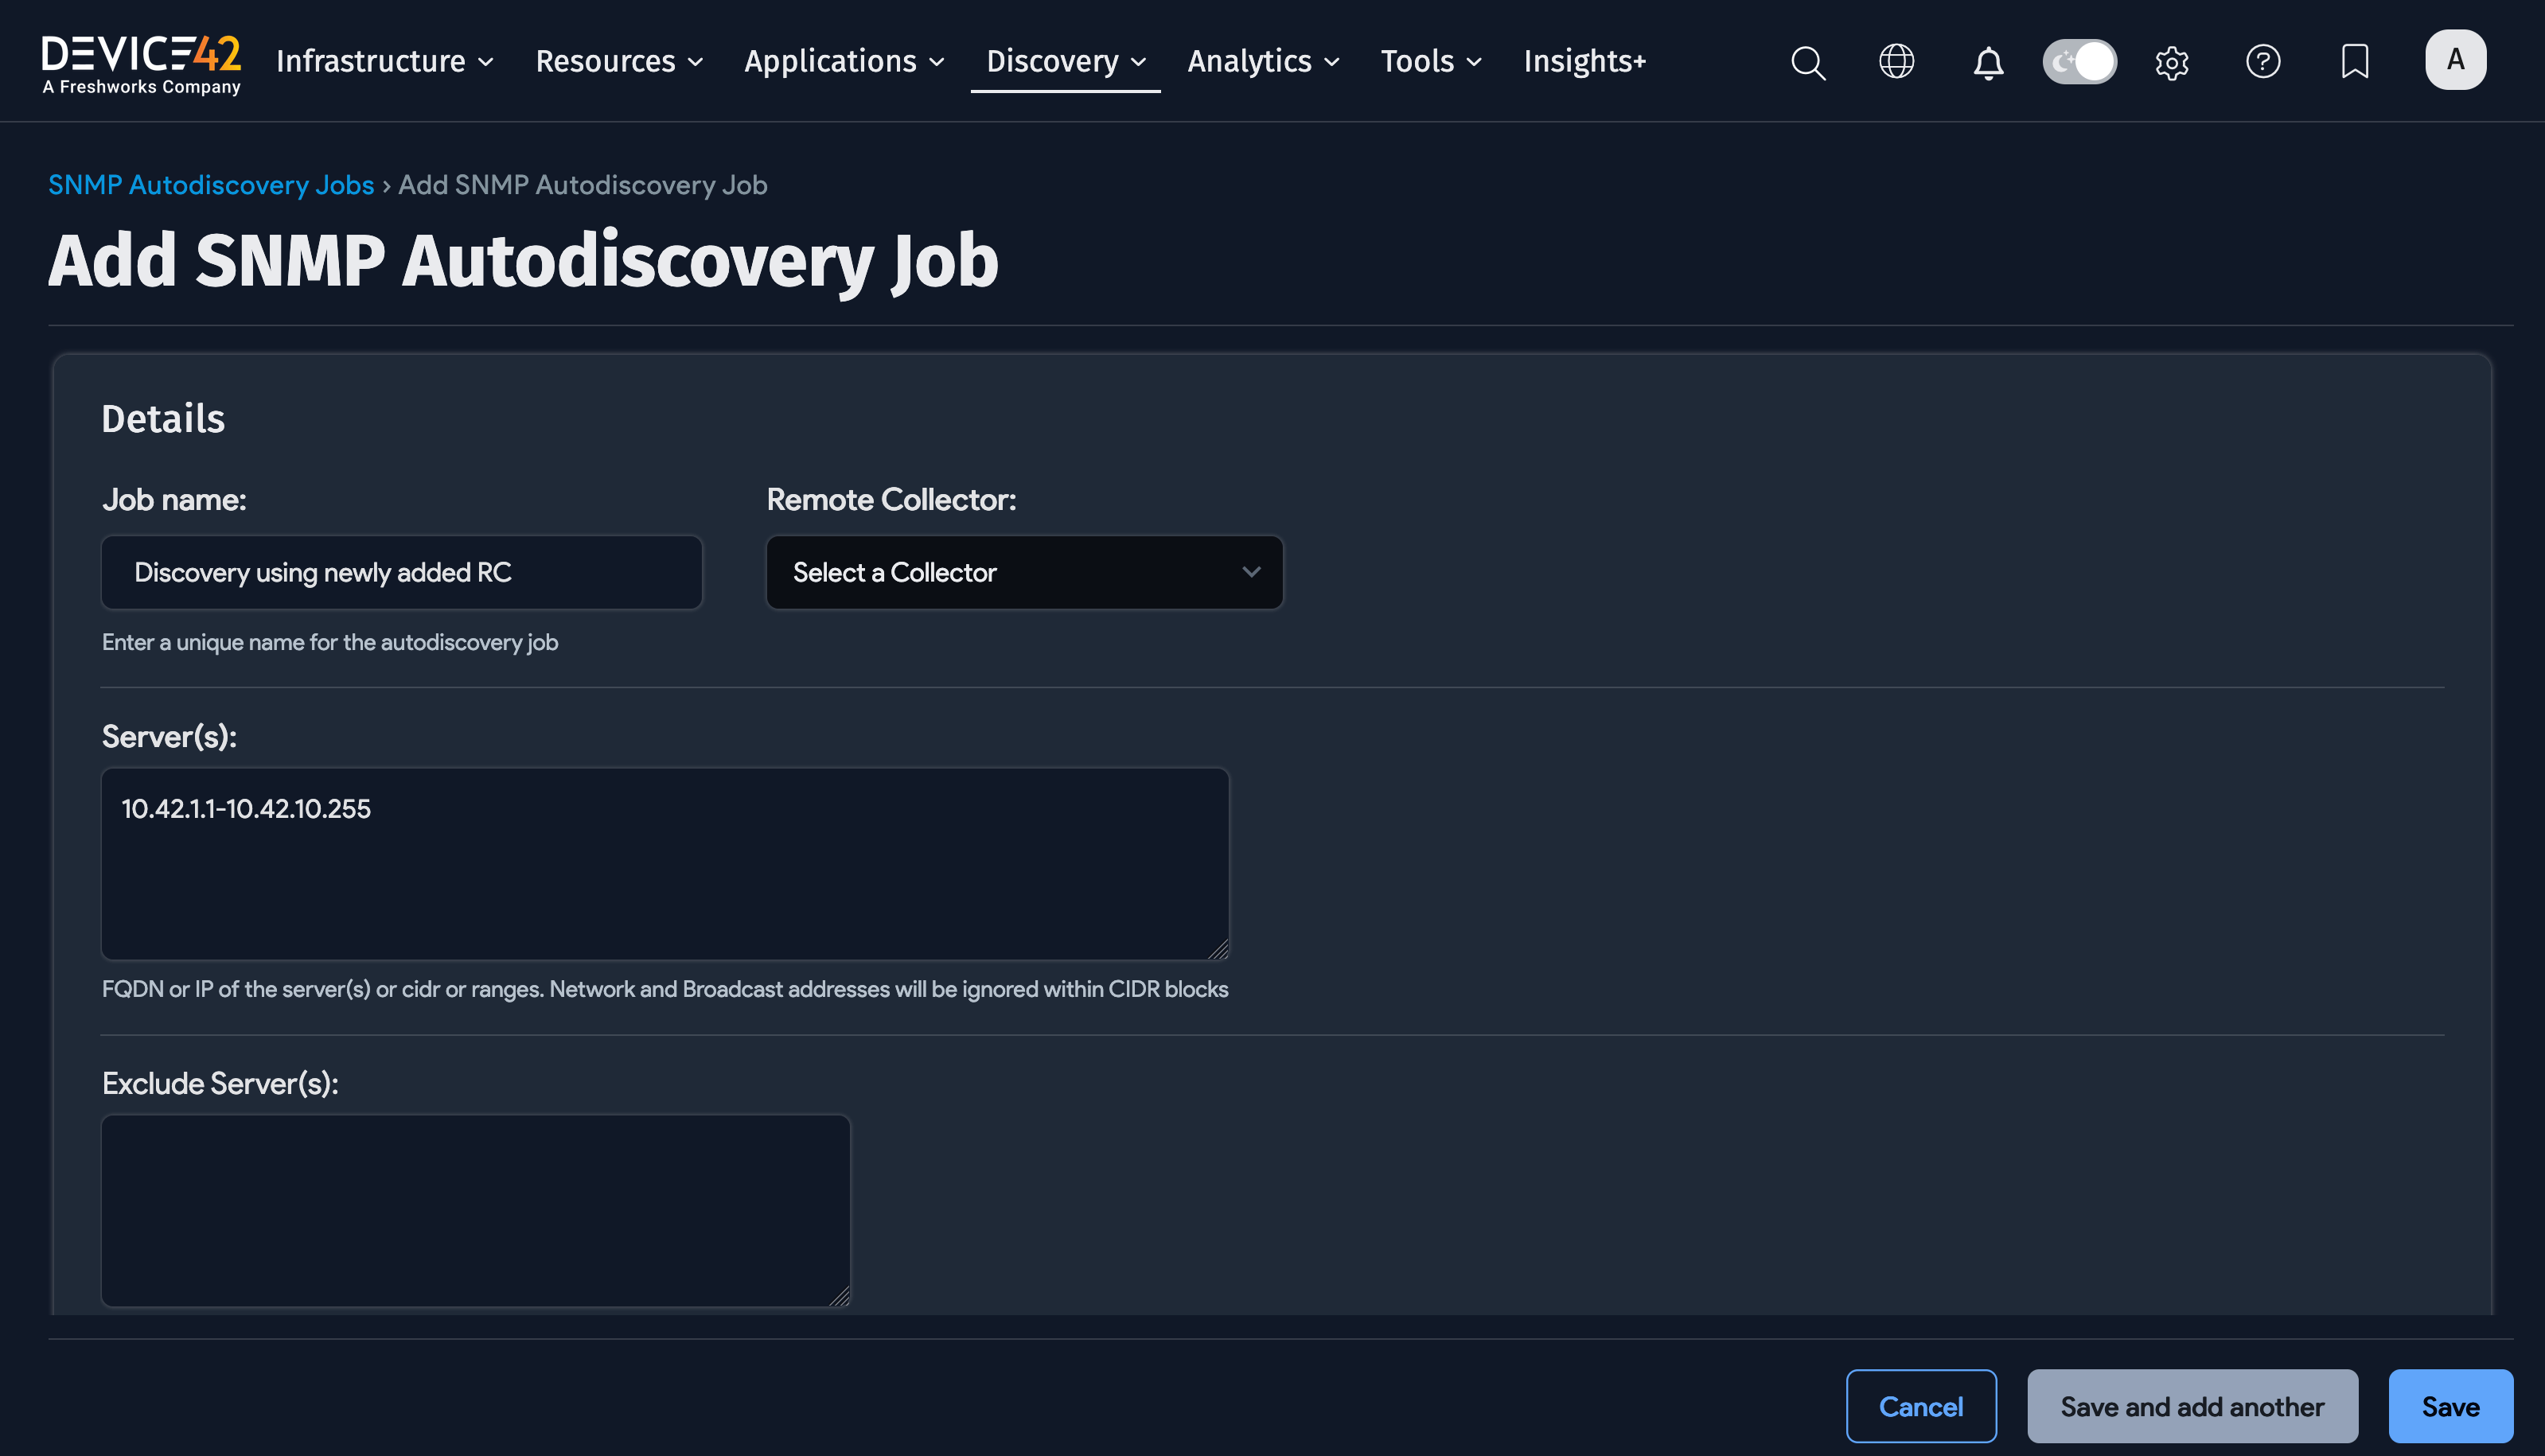
Steps to Create and Run an SNMP Discovery Job
To create and run an SNMP Discovery Job, perform the following steps:
- Navigate to Discovery > SNMP.
- Click the Create button.
- Enter the Job name.
- Select the Remote Collector.
- Enter the Server or Servers, CIDR Block, or IP Range.
- Review the remaining options and choose the items that best fit your needs.
- Add the credentials.
- Click the Save button.
- Click the checkbox next to the discovery job(s) and choose Actions > Run Selected Jobs.
Click here for more detail regarding SNMP Network Autodiscovery. This should be your first place to look when troubleshooting SNMP discovery job issues.
To view a video on creating an SNMP discovery job, click here.
2.2 Create Hypervisor Discovery Jobs
Hypervisor discovery jobs discover the Virtual Systems on the Hypervisor Platform, including ESX and ESXi, Citrix XenServer, HyperV, oVirt, Redhat, KVM/libvirt, OpenVZ, AIX HMC, Nutanix Prism, Nutanix Prism Central, Docker, and LXC.
Click here for a full list of supported Platforms.
Port and Credential Requirements
Ports: For VMWare, TCP port 443 should be accessible from the Remote Collectors to the Hypervisors. Other Hypervisors leverage APIs over HTTPS, or SSH over a user-definable port for discovery.
Credentials: For VMWare, Read-only API account with access to vCenter or the target infrastructure is sufficient.
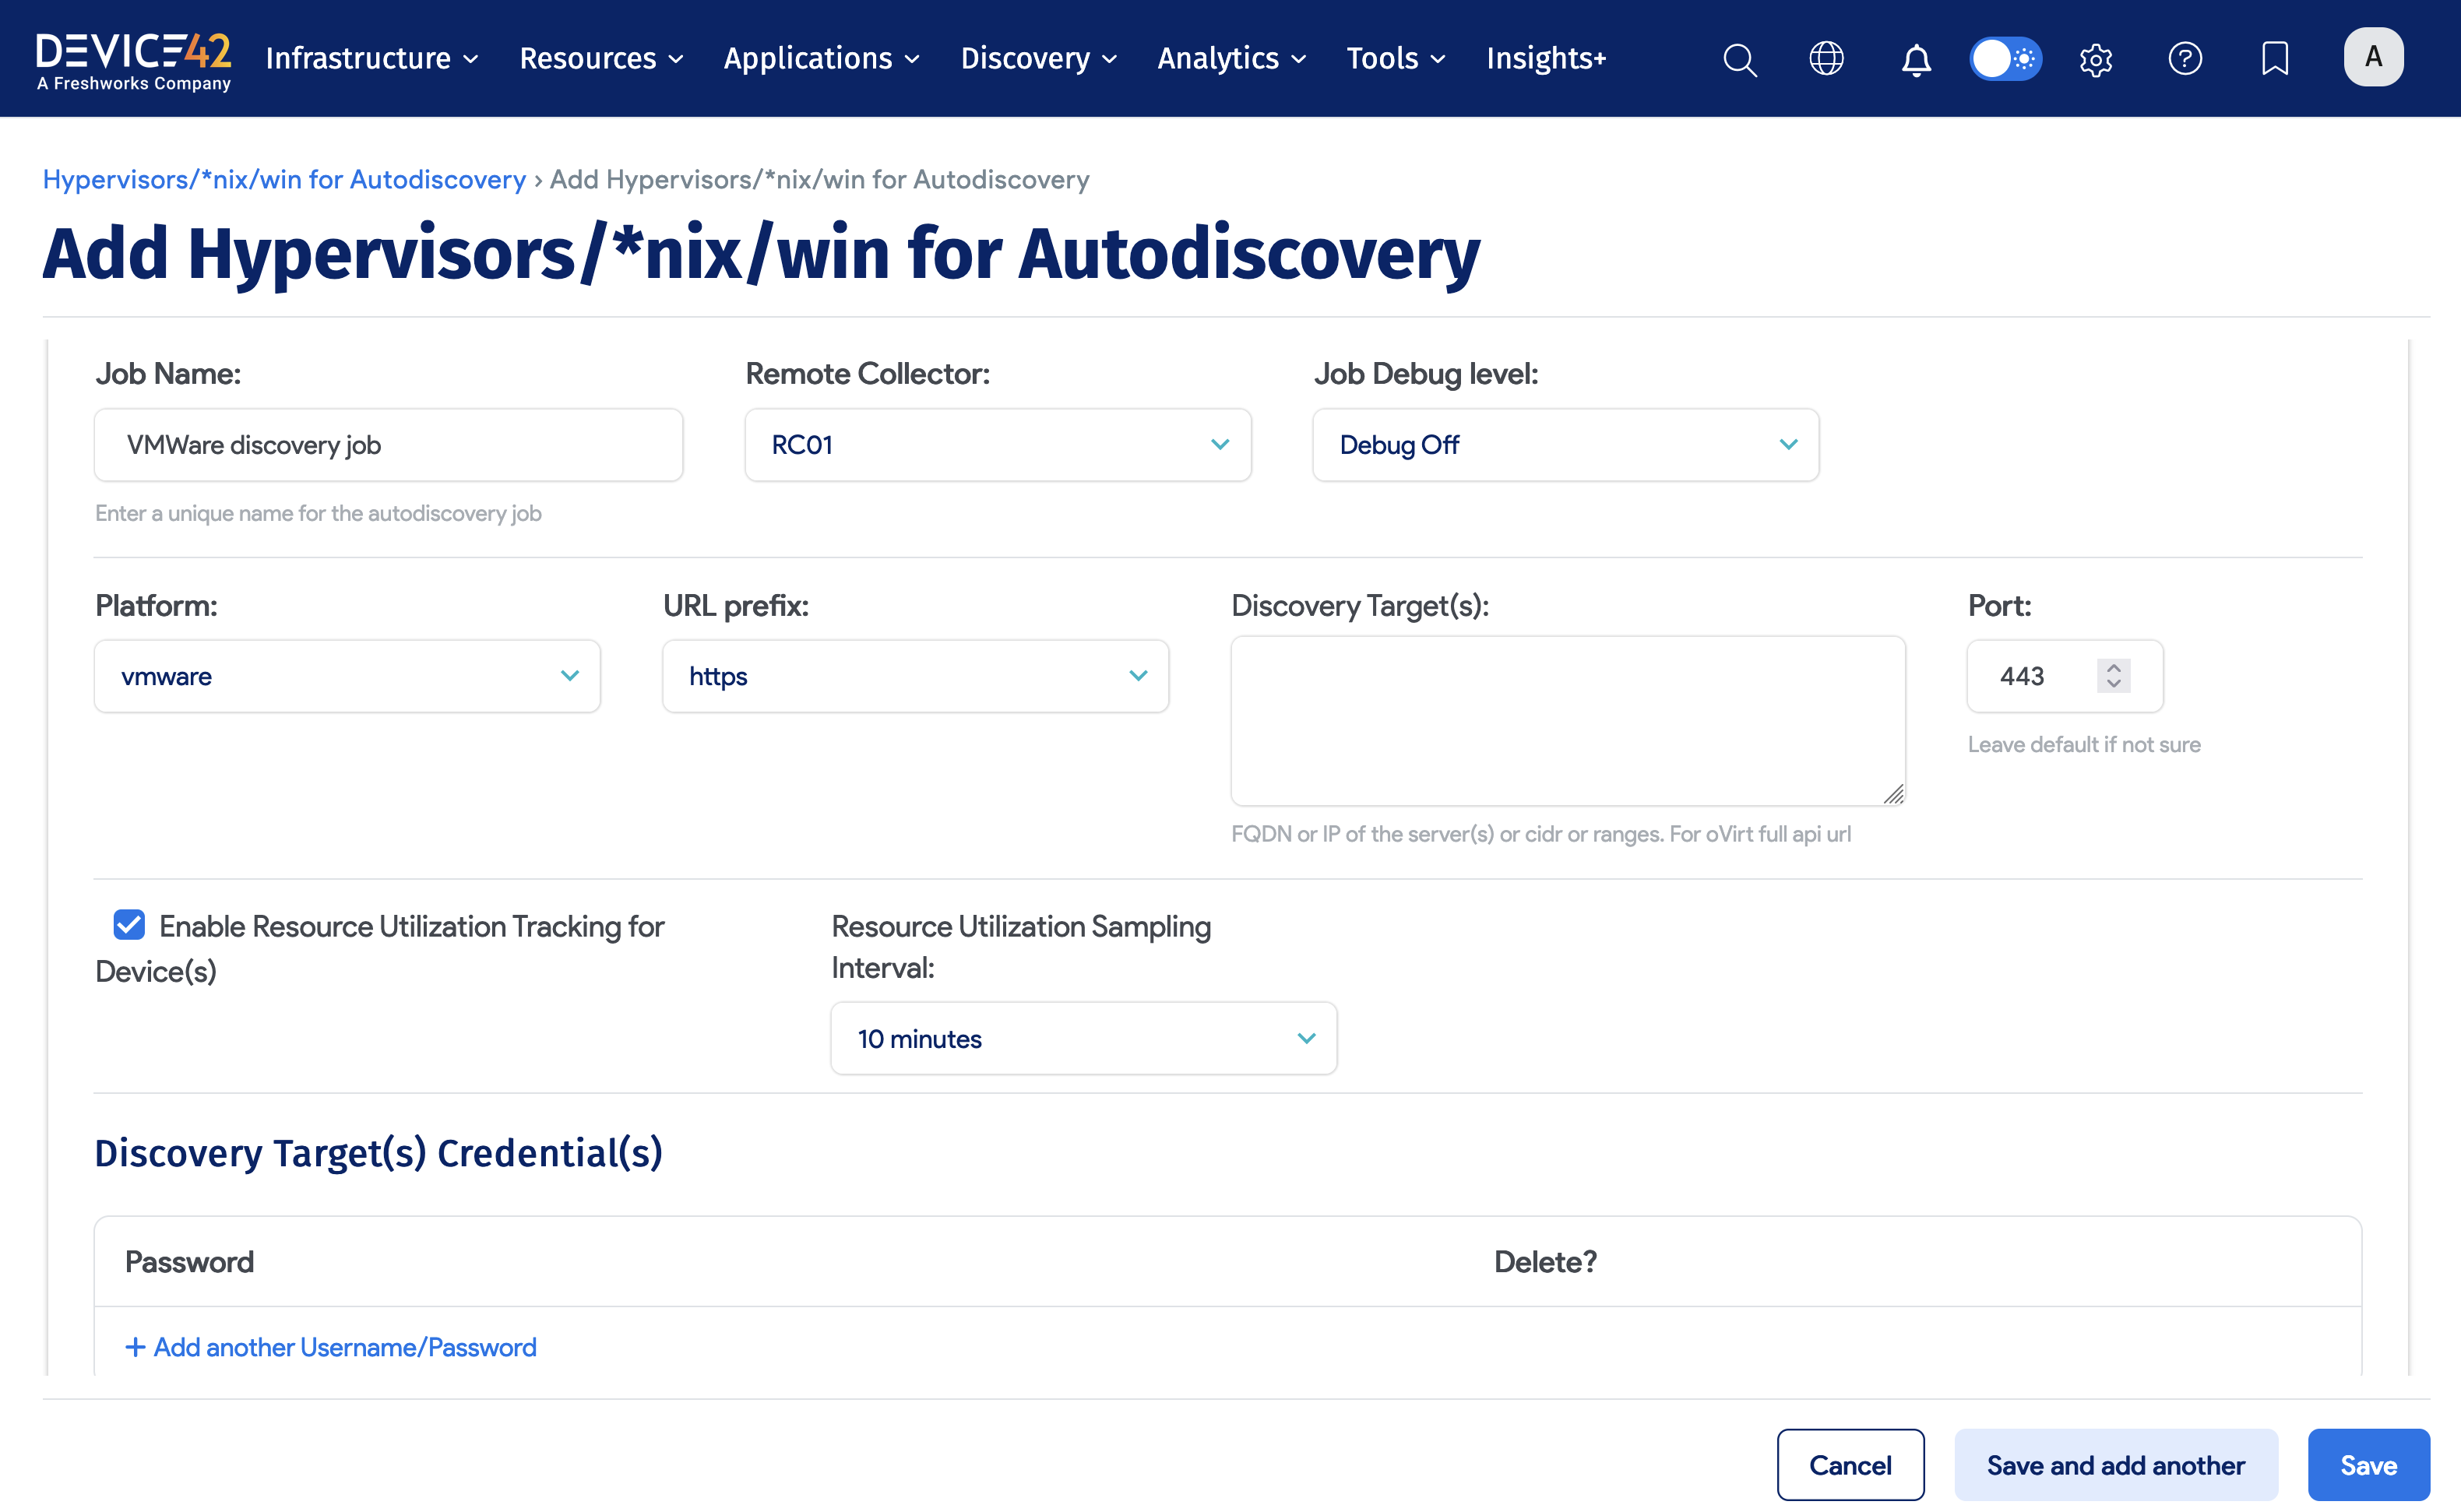
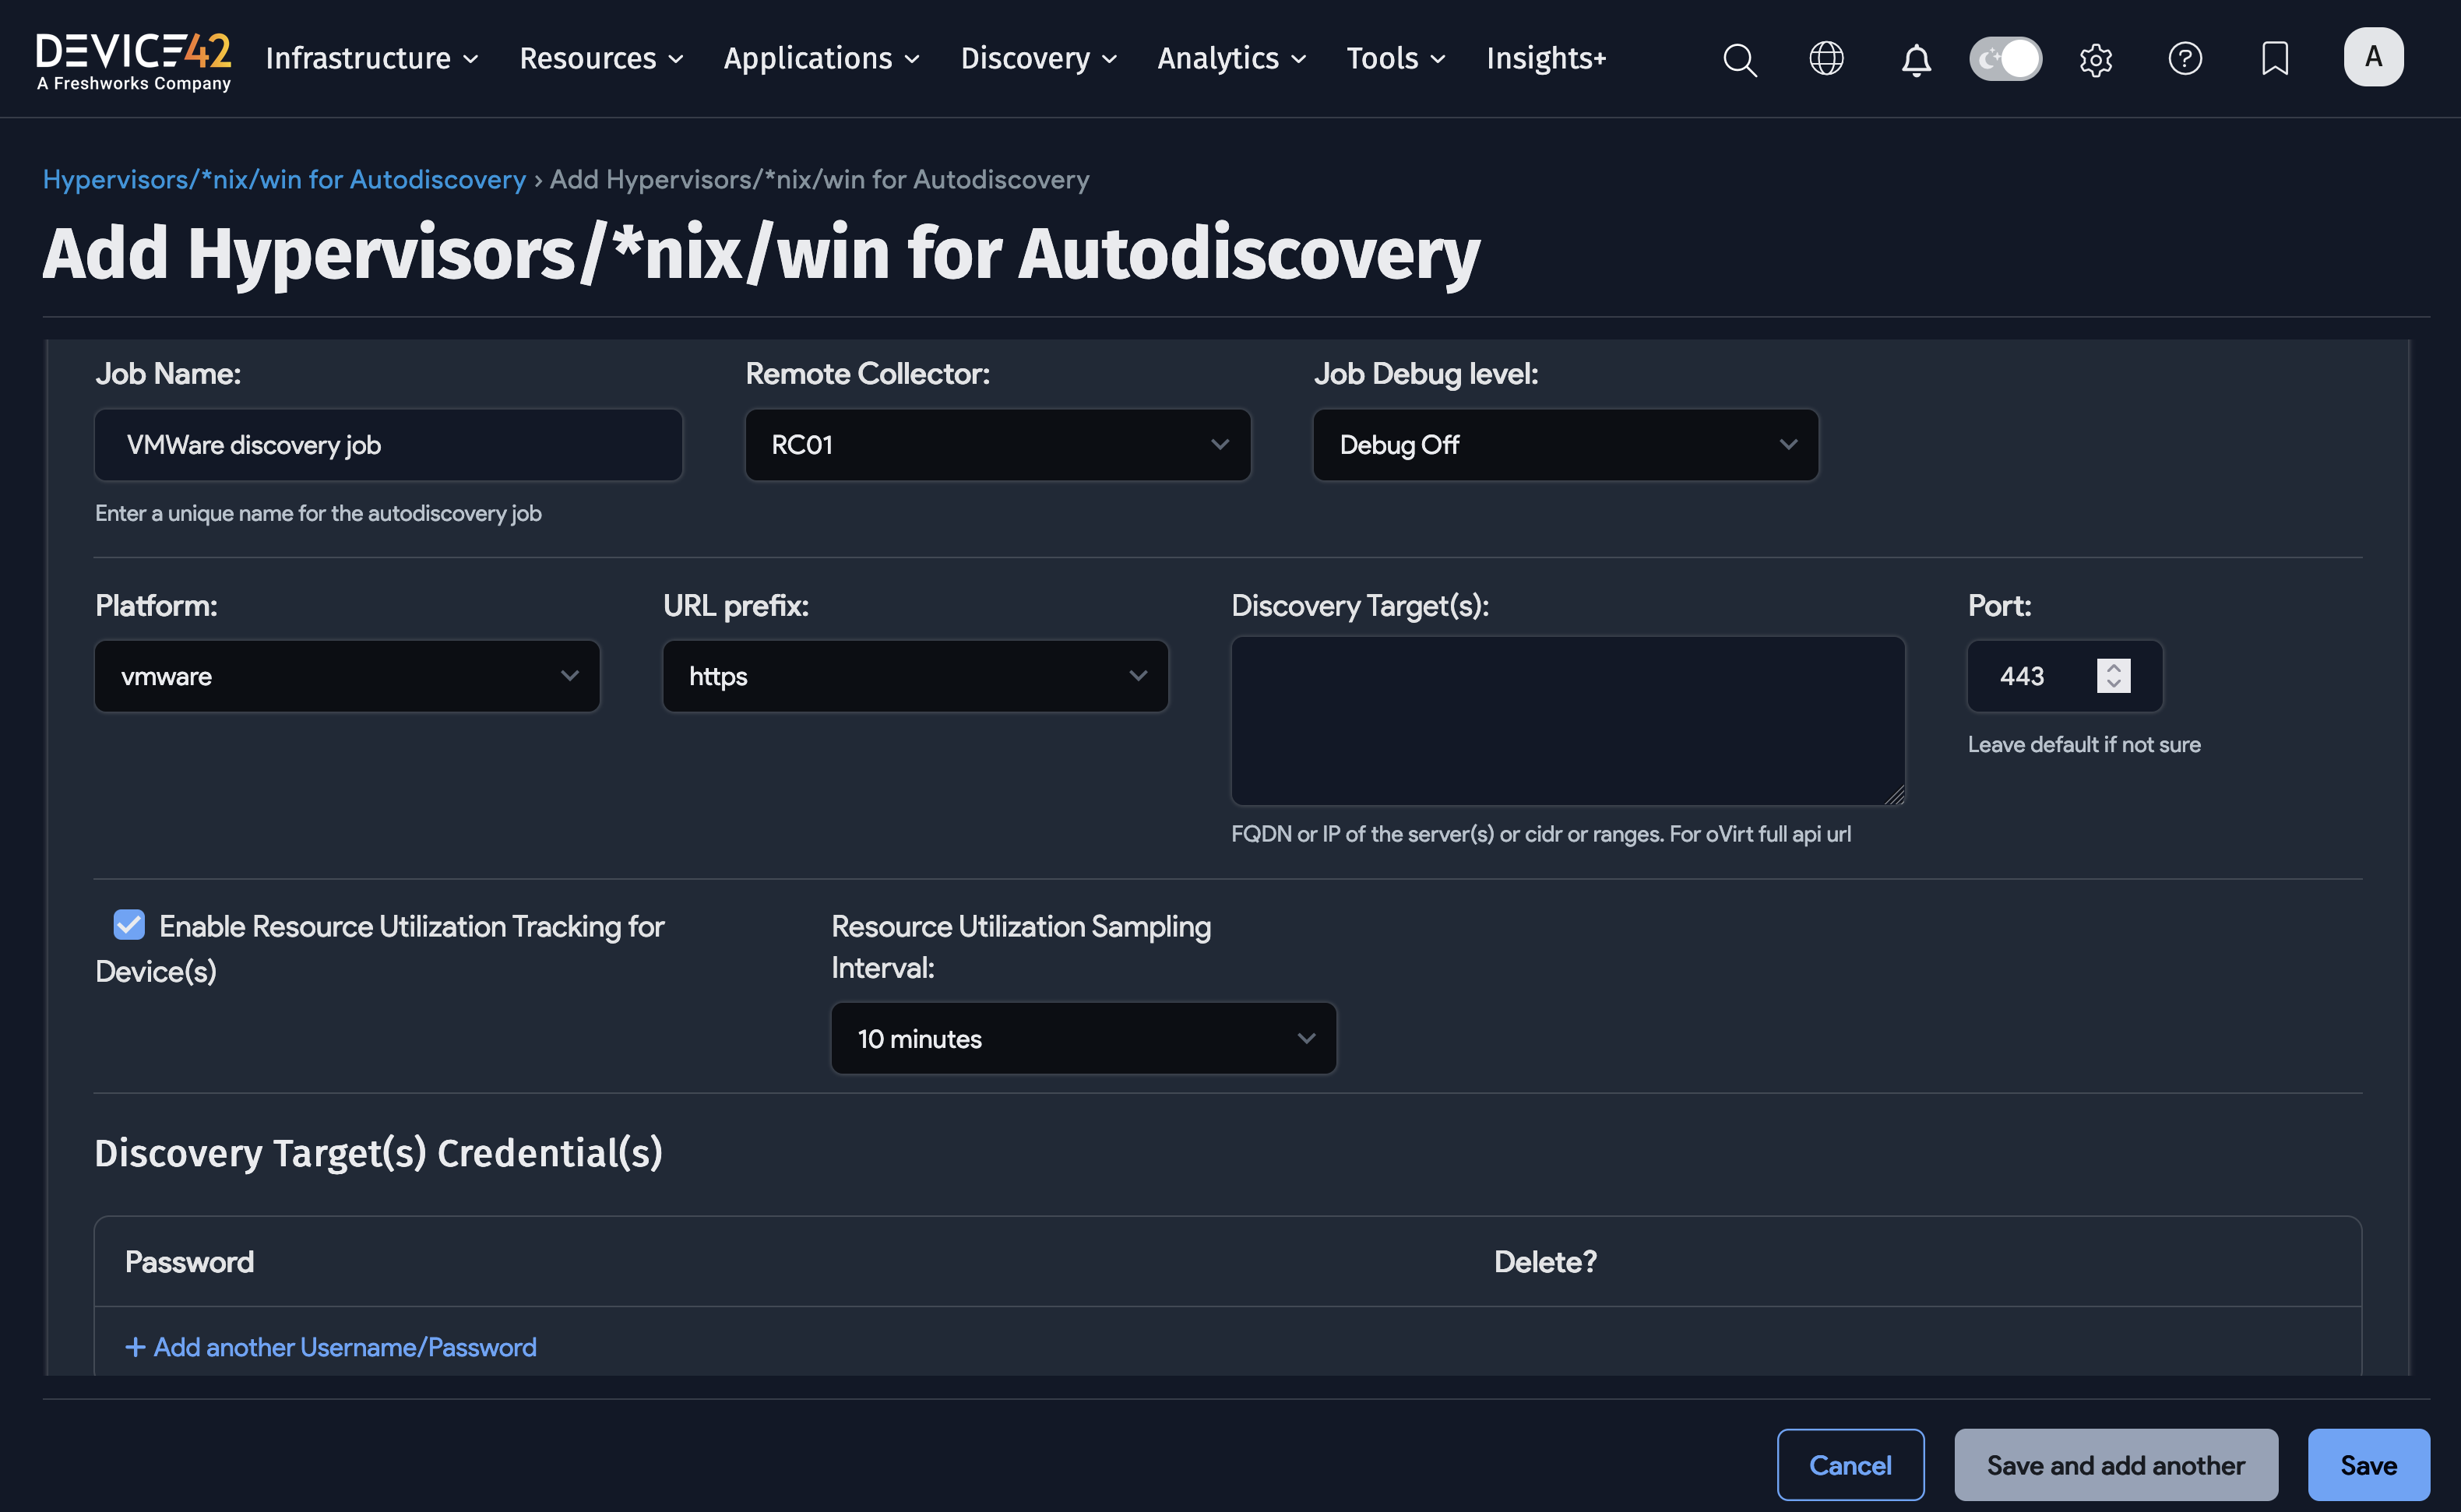
Steps to Create and Run a Hypervisor Discovery Job
To create and run a Hypervisor discovery job, perform the following steps:
- Choose Discovery > HyperVisors / *nix / Windows.
- Click the Create button.
- Enter the Job name.
- Select the Remote Collector.
- Select the Hypervisor Platform (for example, VMWare).
- Select the URL prefix (for example, HTTP or HTTPS).
- Enter the Server or Servers, CIDR Block, or IP Range.
- Add the Discovery Target(s) Credential(s) (that is, Username and Password).
- Review the remaining options and choose the items that best fit your needs.
- Click the Save button.
- Click the checkbox next to the discovery job(s) and choose Actions > Run Selected Jobs.
Click here for more detail regarding Hypervisor Autodiscovery. This should be your first place to look when troubleshooting Hypervisor discovery job issues.
To view a video that discusses Best Practices for Hypervisor discovery jobs, click here.
2.3 Create Windows Discovery Jobs
Windows discovery jobs provide an accurate inventory of the Windows devices on your target network.
While your virtual infrastructure can be discovered via VMWare, Hypervisor, etc. discovery jobs, Windows discovery jobs perform an OS-level discovery of your Windows devices, including your virtual Windows servers. Windows Discovery of physical infrastructure can be done either via Windows Management Instrumentation (WMI), an older and less secure discovery method, or Windows Remote Management (WinRM), which is newer and more secure.
Port and Credential Requirements
There are a number of prerequisites and requirements for Windows discovery jobs to run properly, including WinRM Network Requirements, WMI Network Requirements, WMI and Windows Permissions, and Port Requirements. It is imperative that the prerequisites and the requirements are met prior to running Windows discovery jobs.
Click here for these requirements and prerequisites, and also for more detailed instructions on creating and running Windows discovery jobs. This should be your first place to look when troubleshooting Windows discovery job issues.
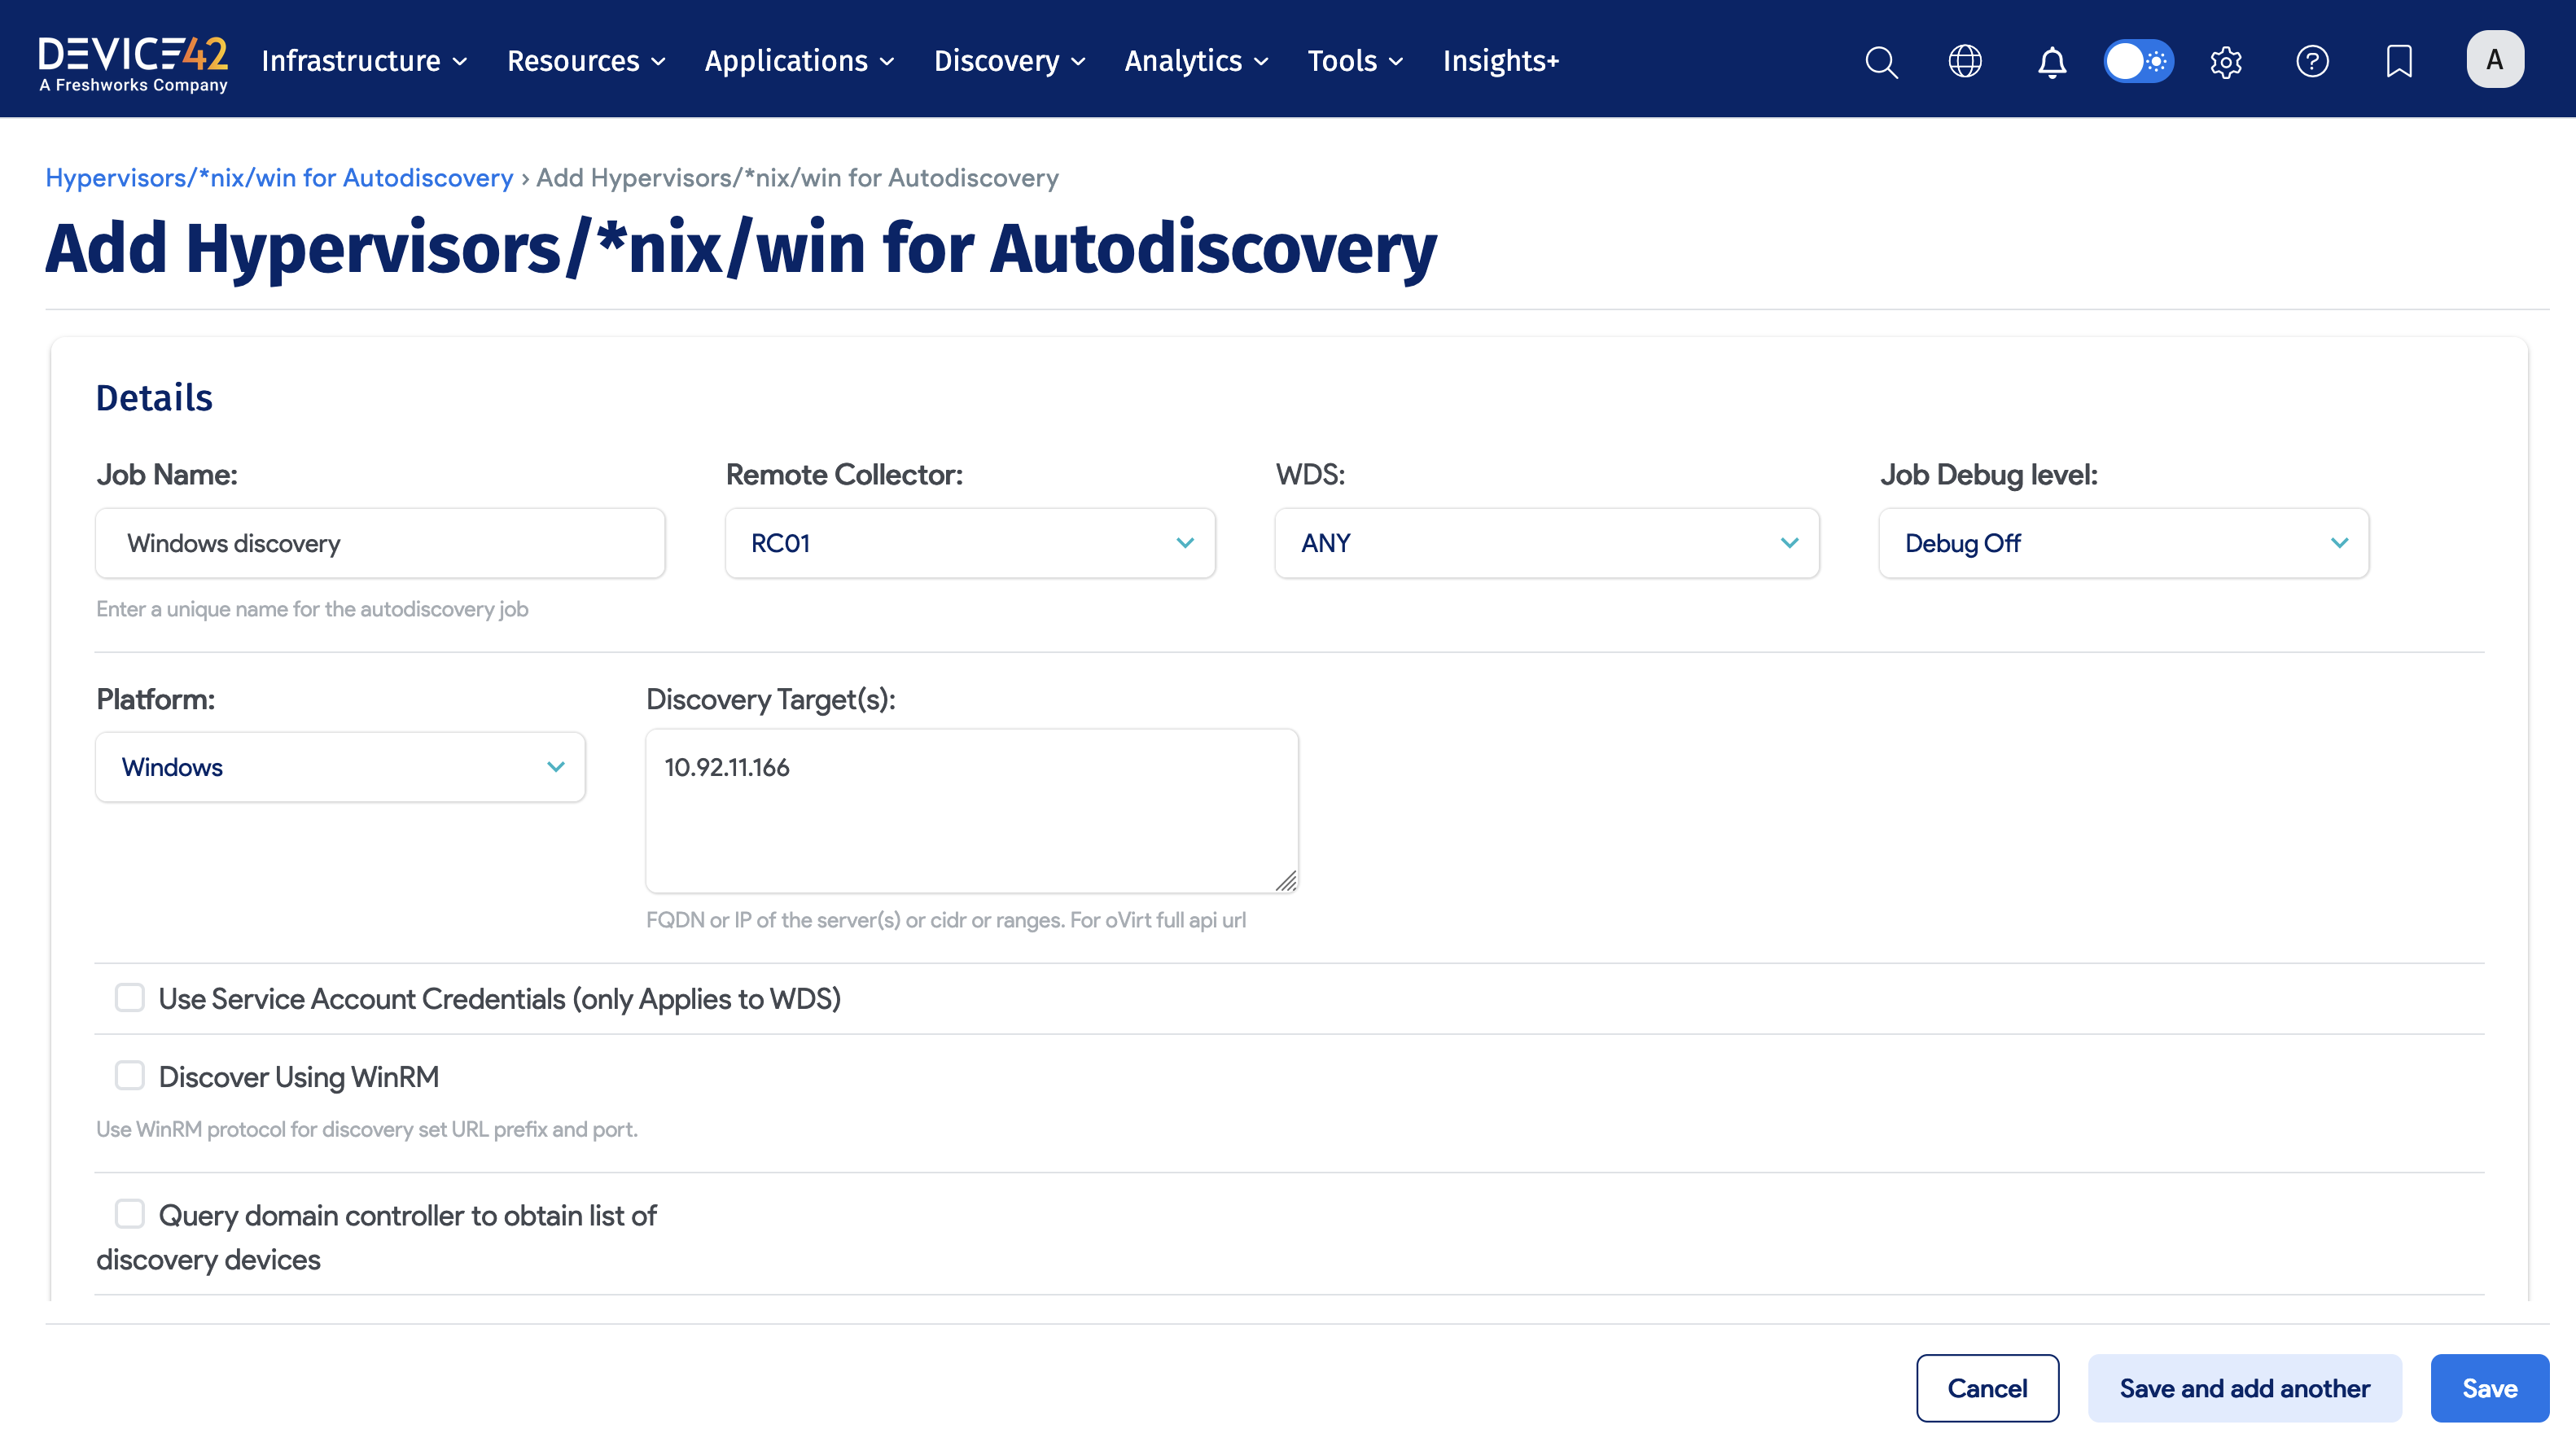
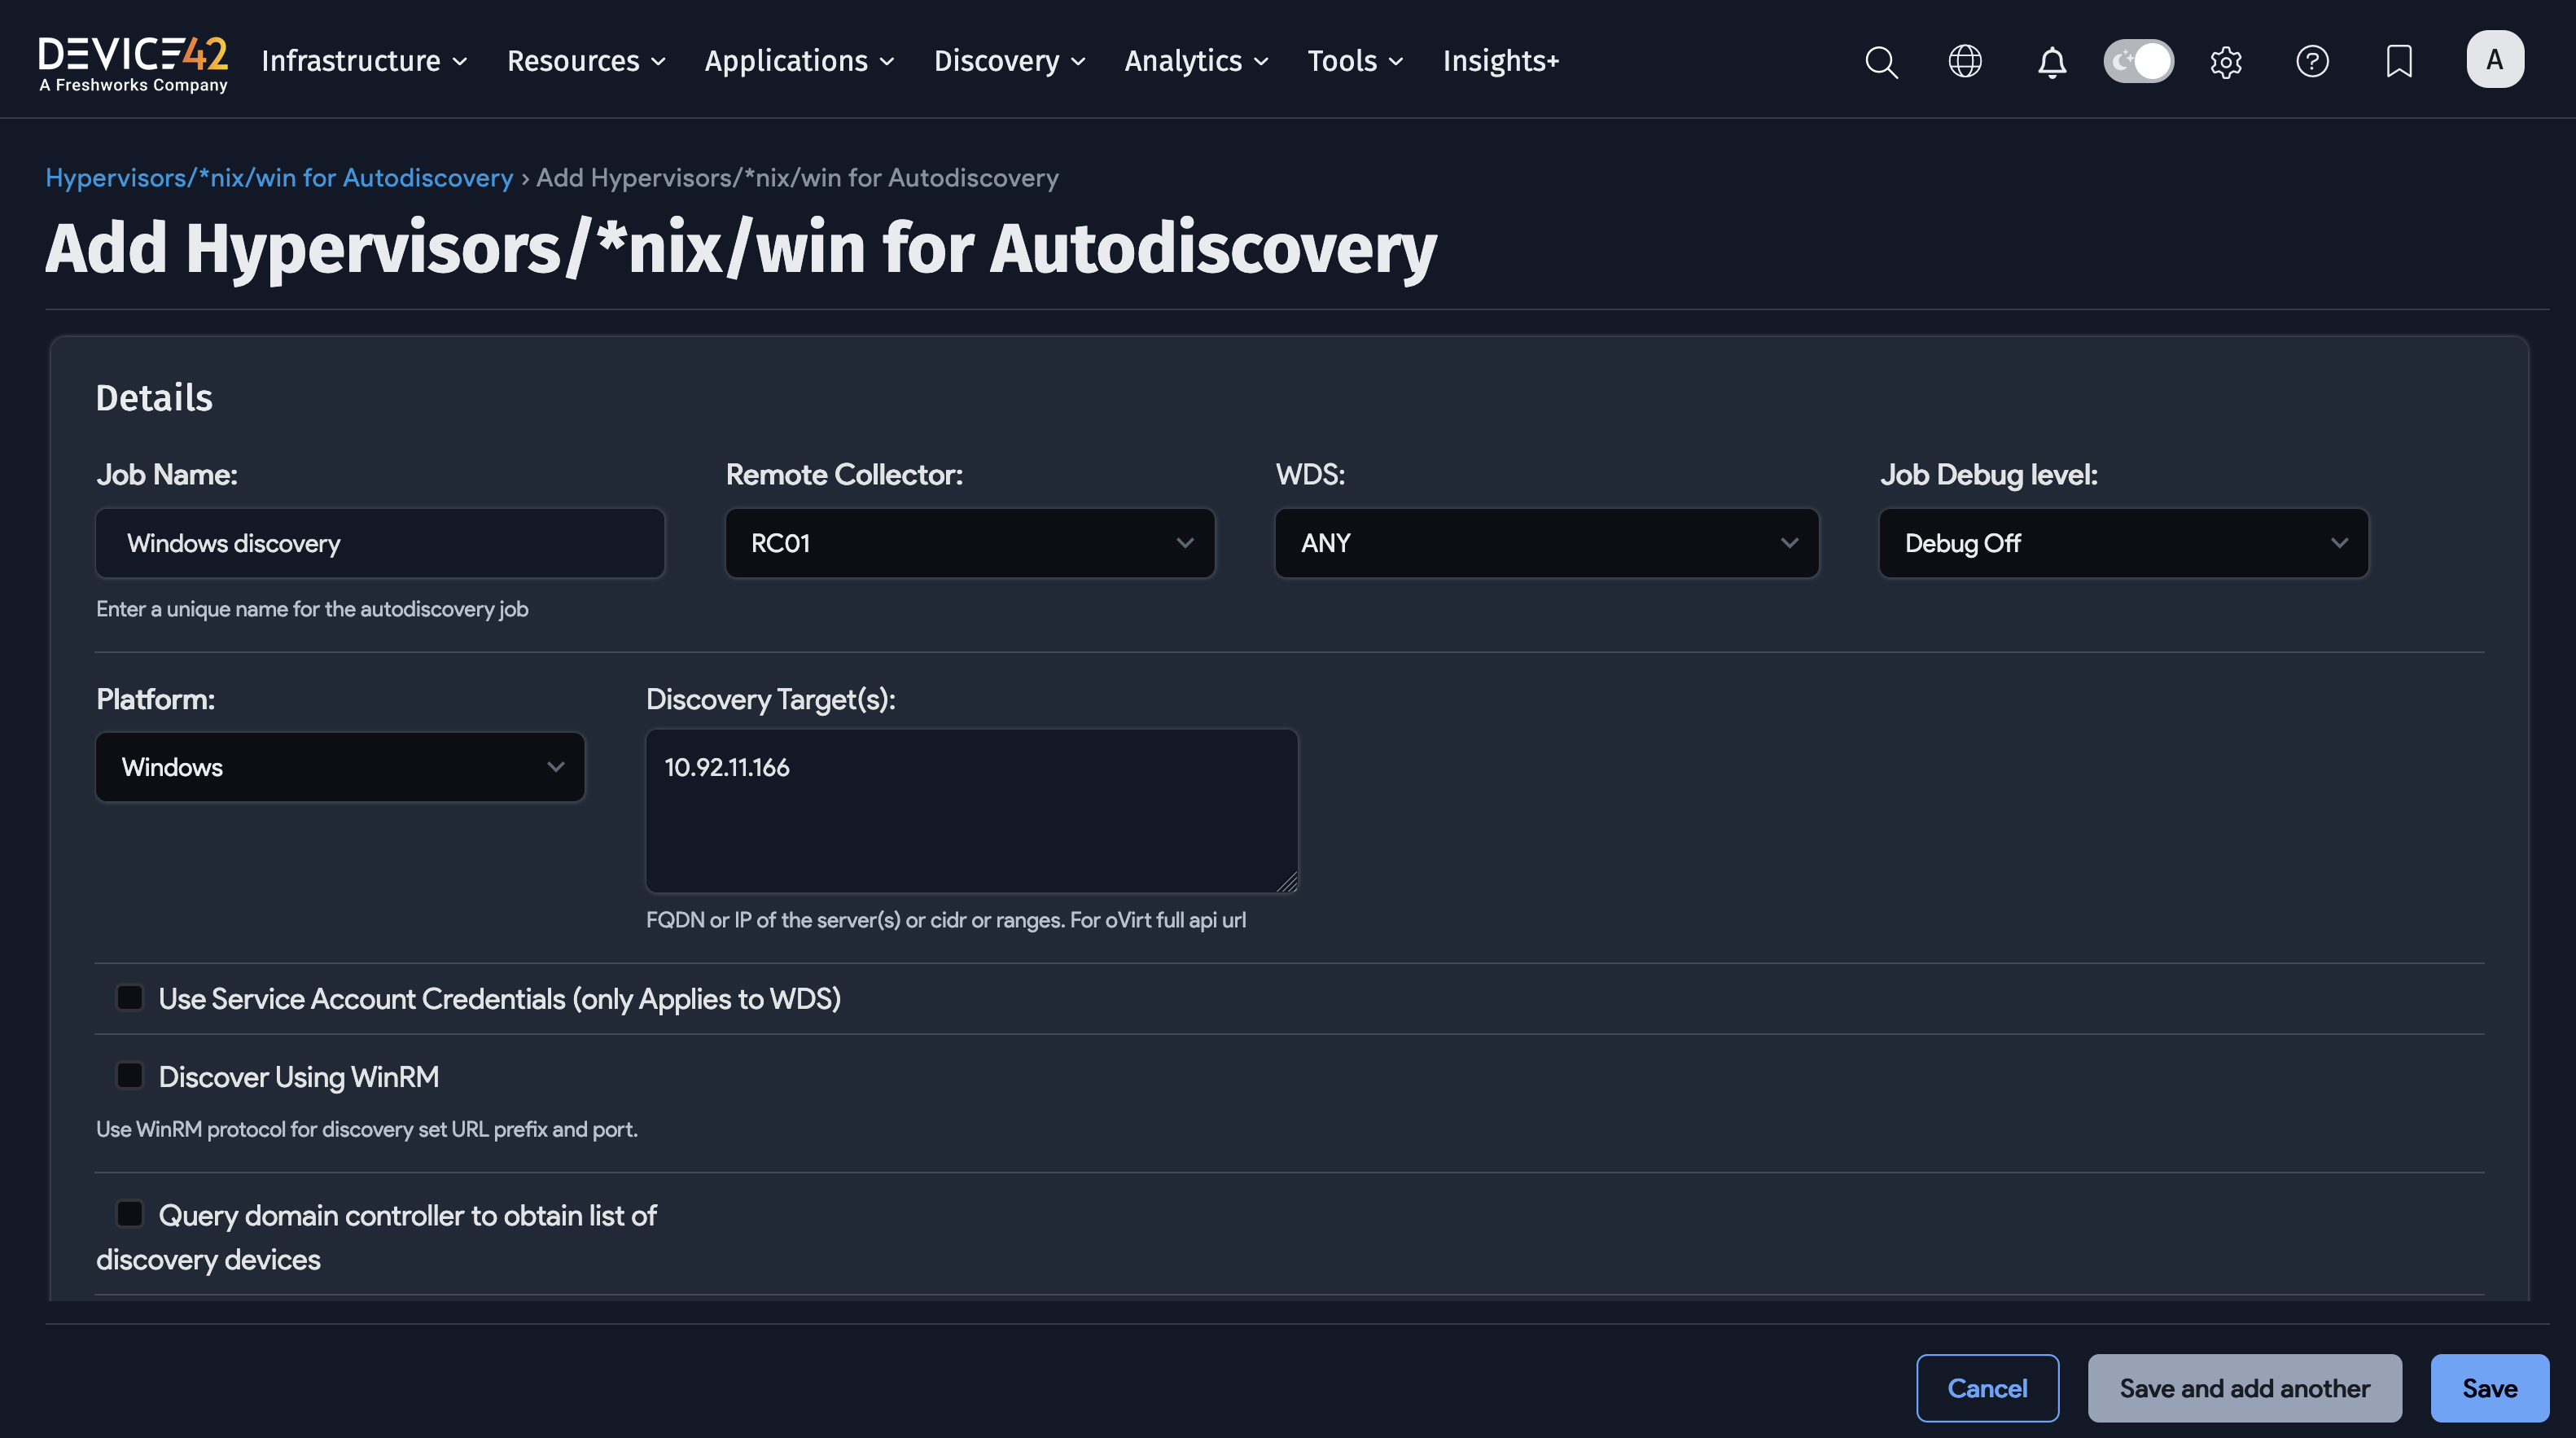
Steps to Create and Run a Windows Discovery Job
To create and run a Windows discovery job, perform the following steps:
- Choose Discovery > HyperVisors / *nix / Windows.
- Click the Create button.
- Enter the Job name.
- Select the Remote Collector.
- Select the Windows Platform.
- Enter the Server or Servers, CIDR Block, or IP Range.
- Add the Discovery Target(s) Credential(s) (that is, Username and Password).
- Review the remaining options and choose the items that best fit your needs.
- Click the Save button.
- Click the checkbox next to the discovery job(s) and choose Actions > Run Selected Jobs.
Note:
-
There are sometimes failures when discovering Windows operating system-based devices. Use the Windows Discovery Troubleshooting guide to help you investigate and resolve these failures. If you are unable to resolve these failures, please contact Device42 Support for assistance.
-
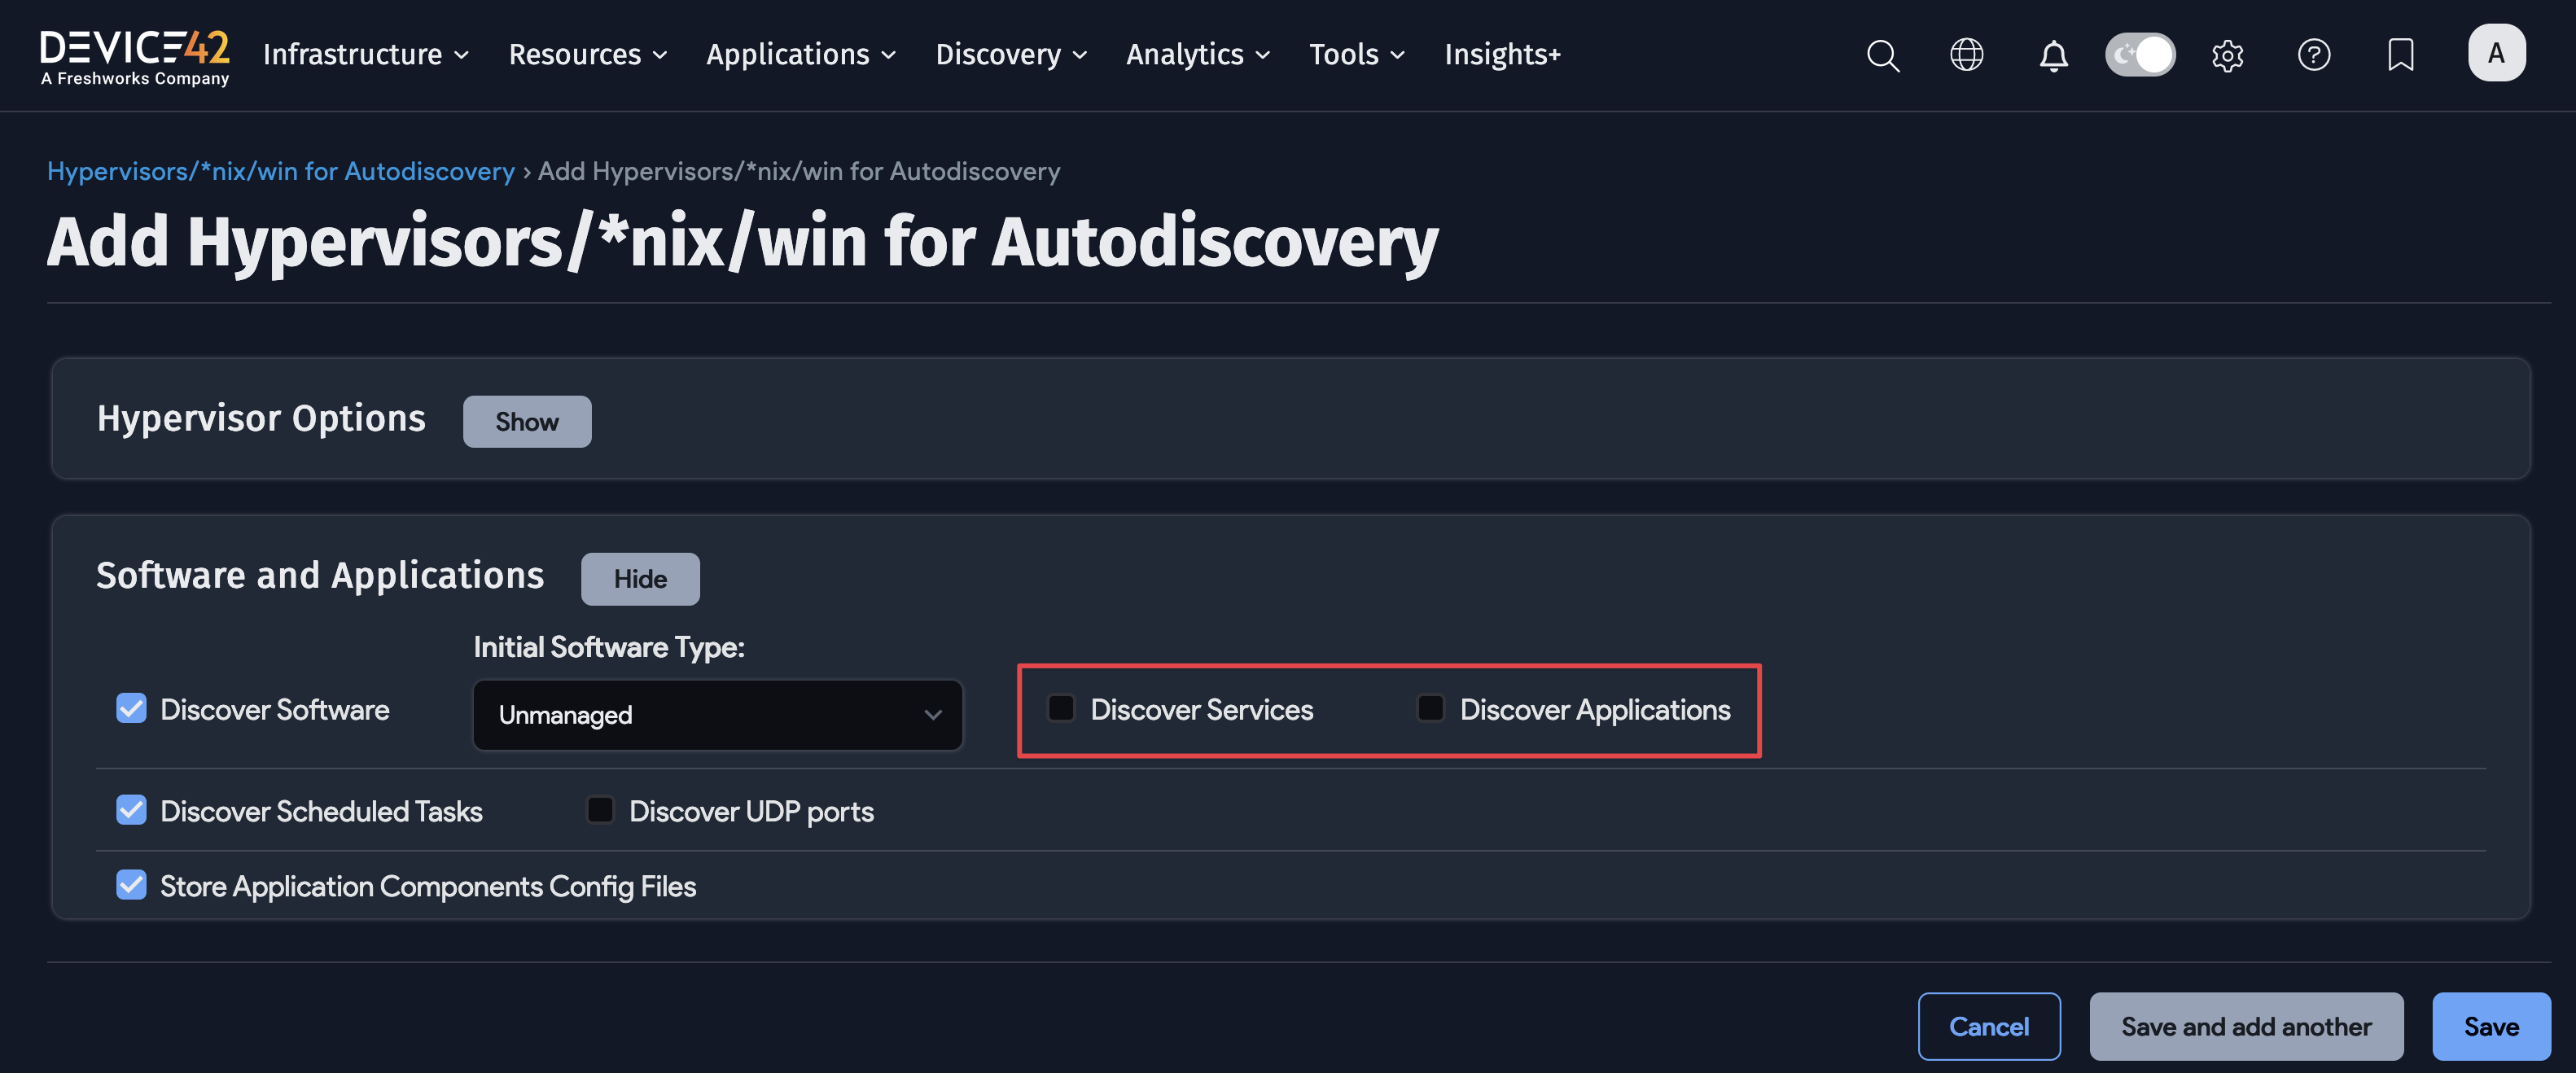
Organizations that have purchased the Software License Management module can include Software discovery when running Windows discovery jobs by clicking the Discover Software checkbox within the Software and Applications section of the job. For more information regarding Software License Management with Device42, see the Software License Management Discovery Jobs section later in this document.
-
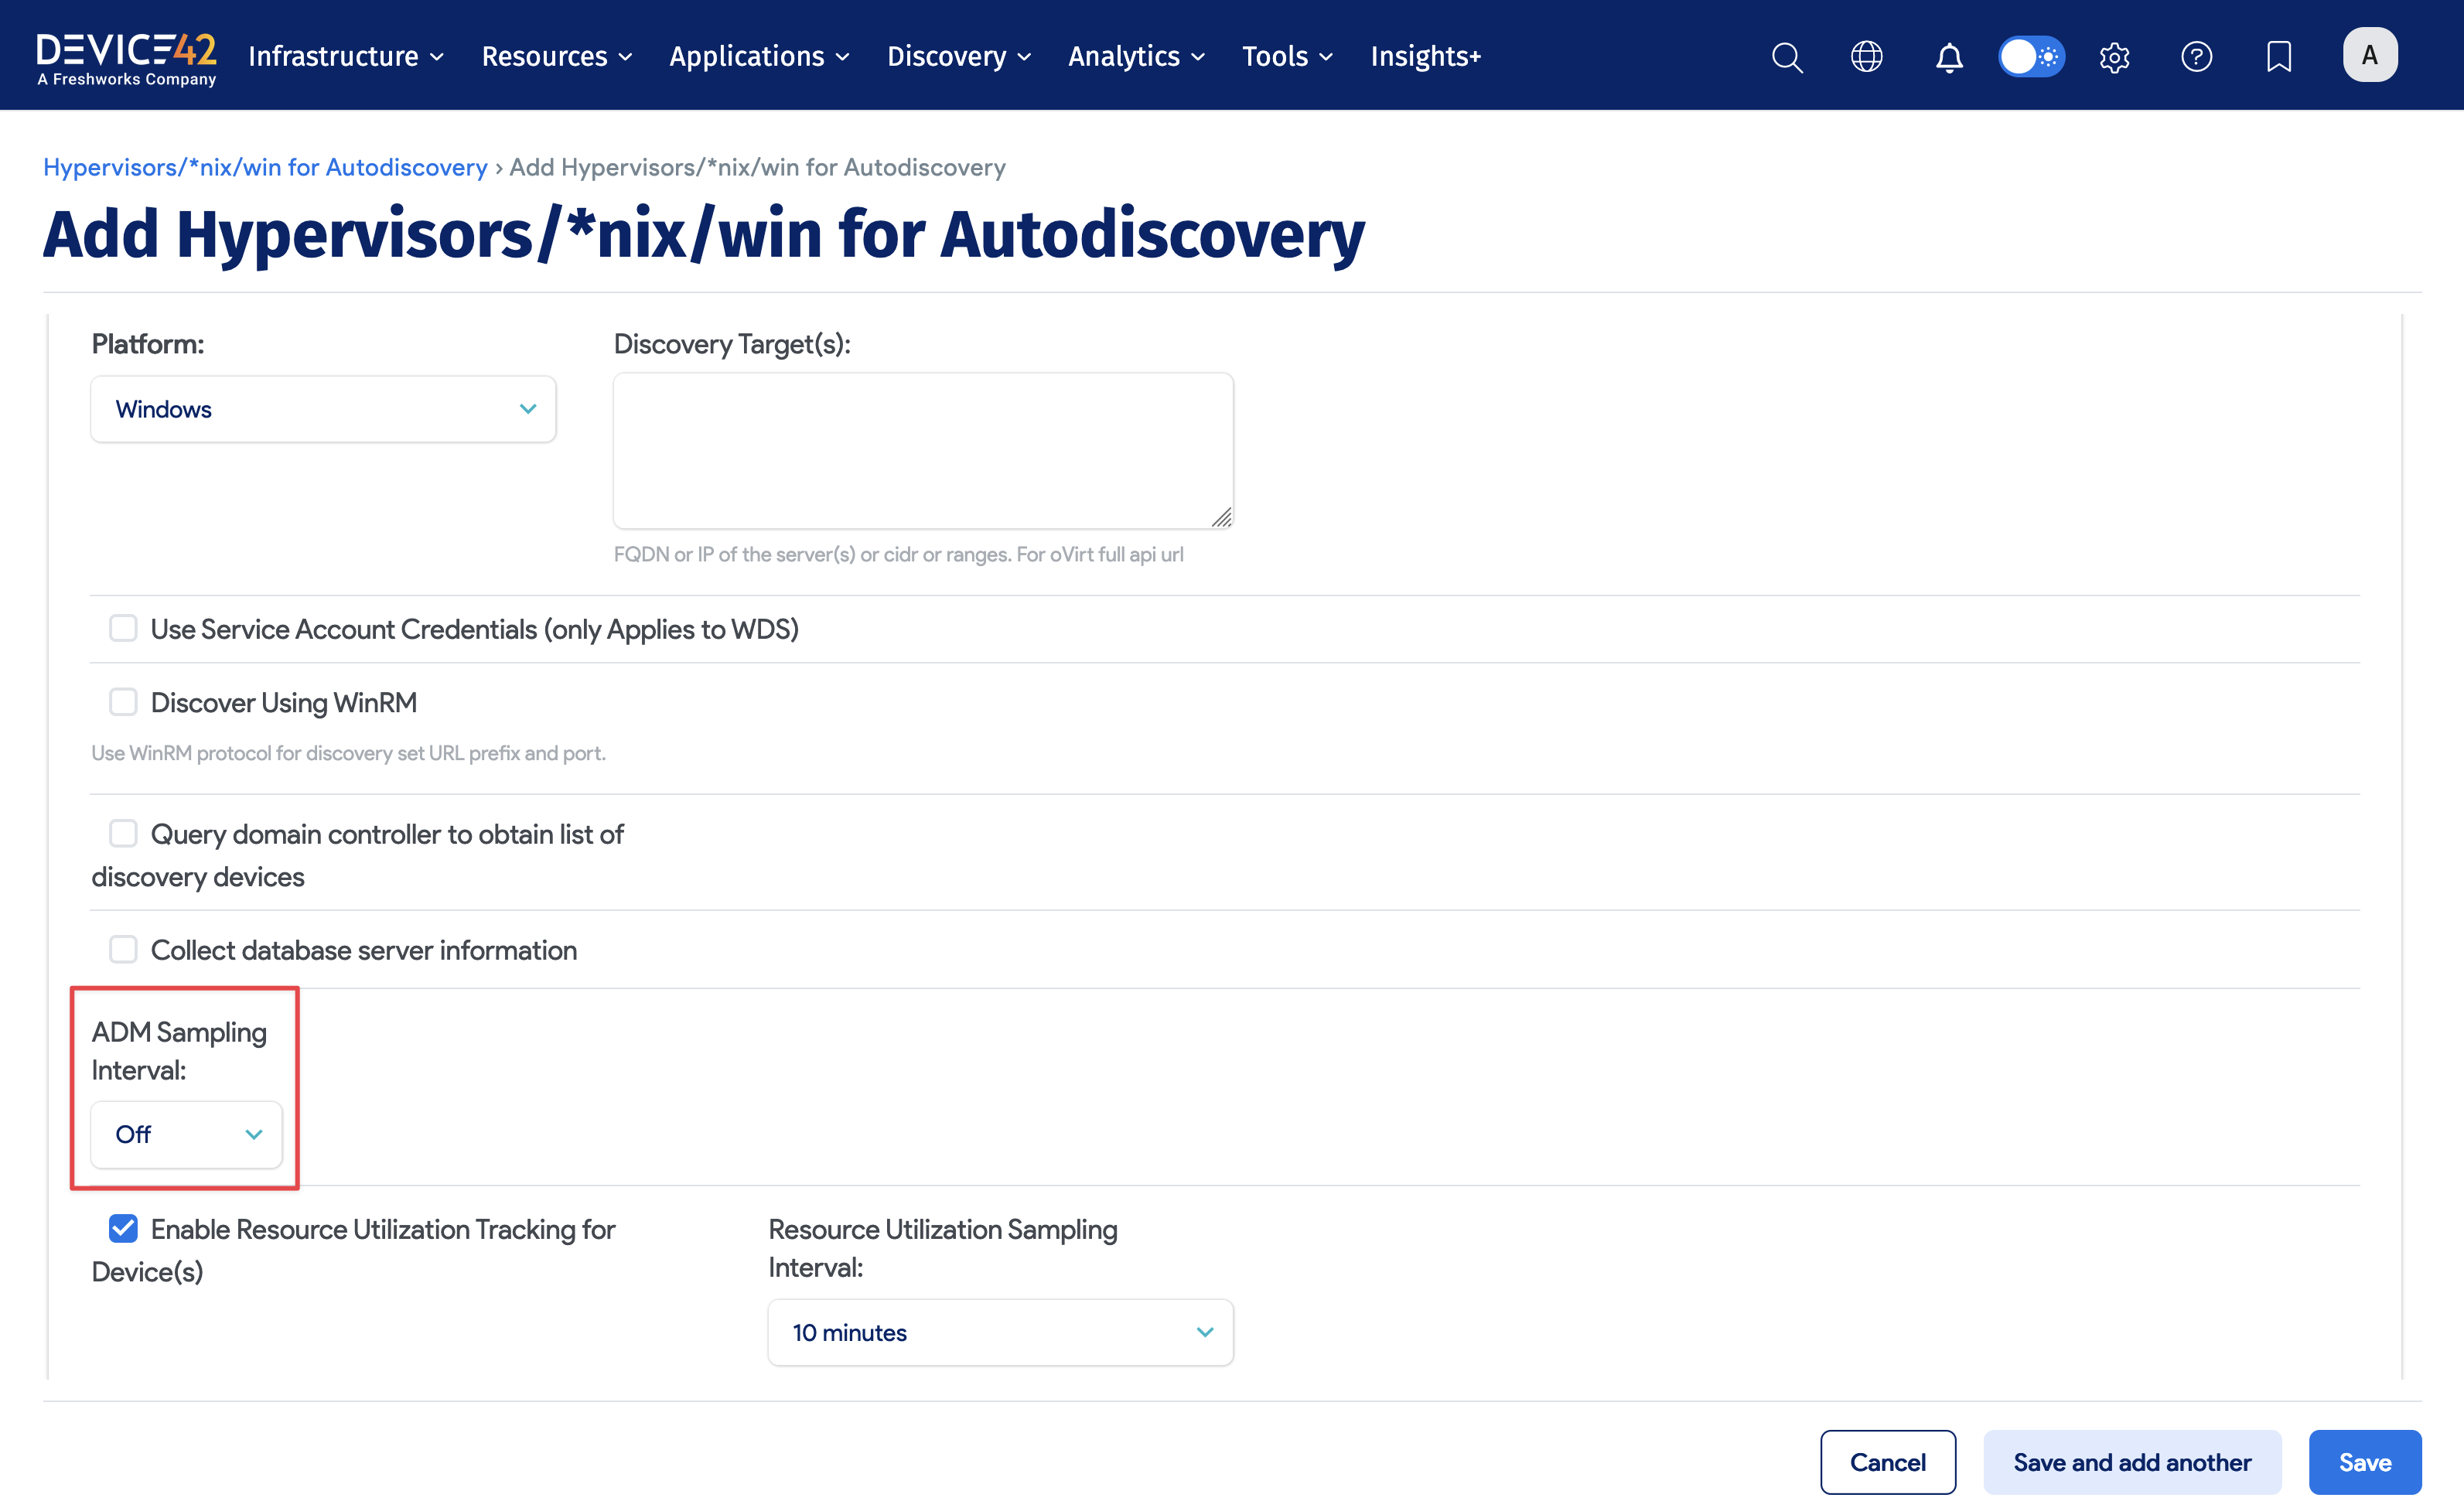
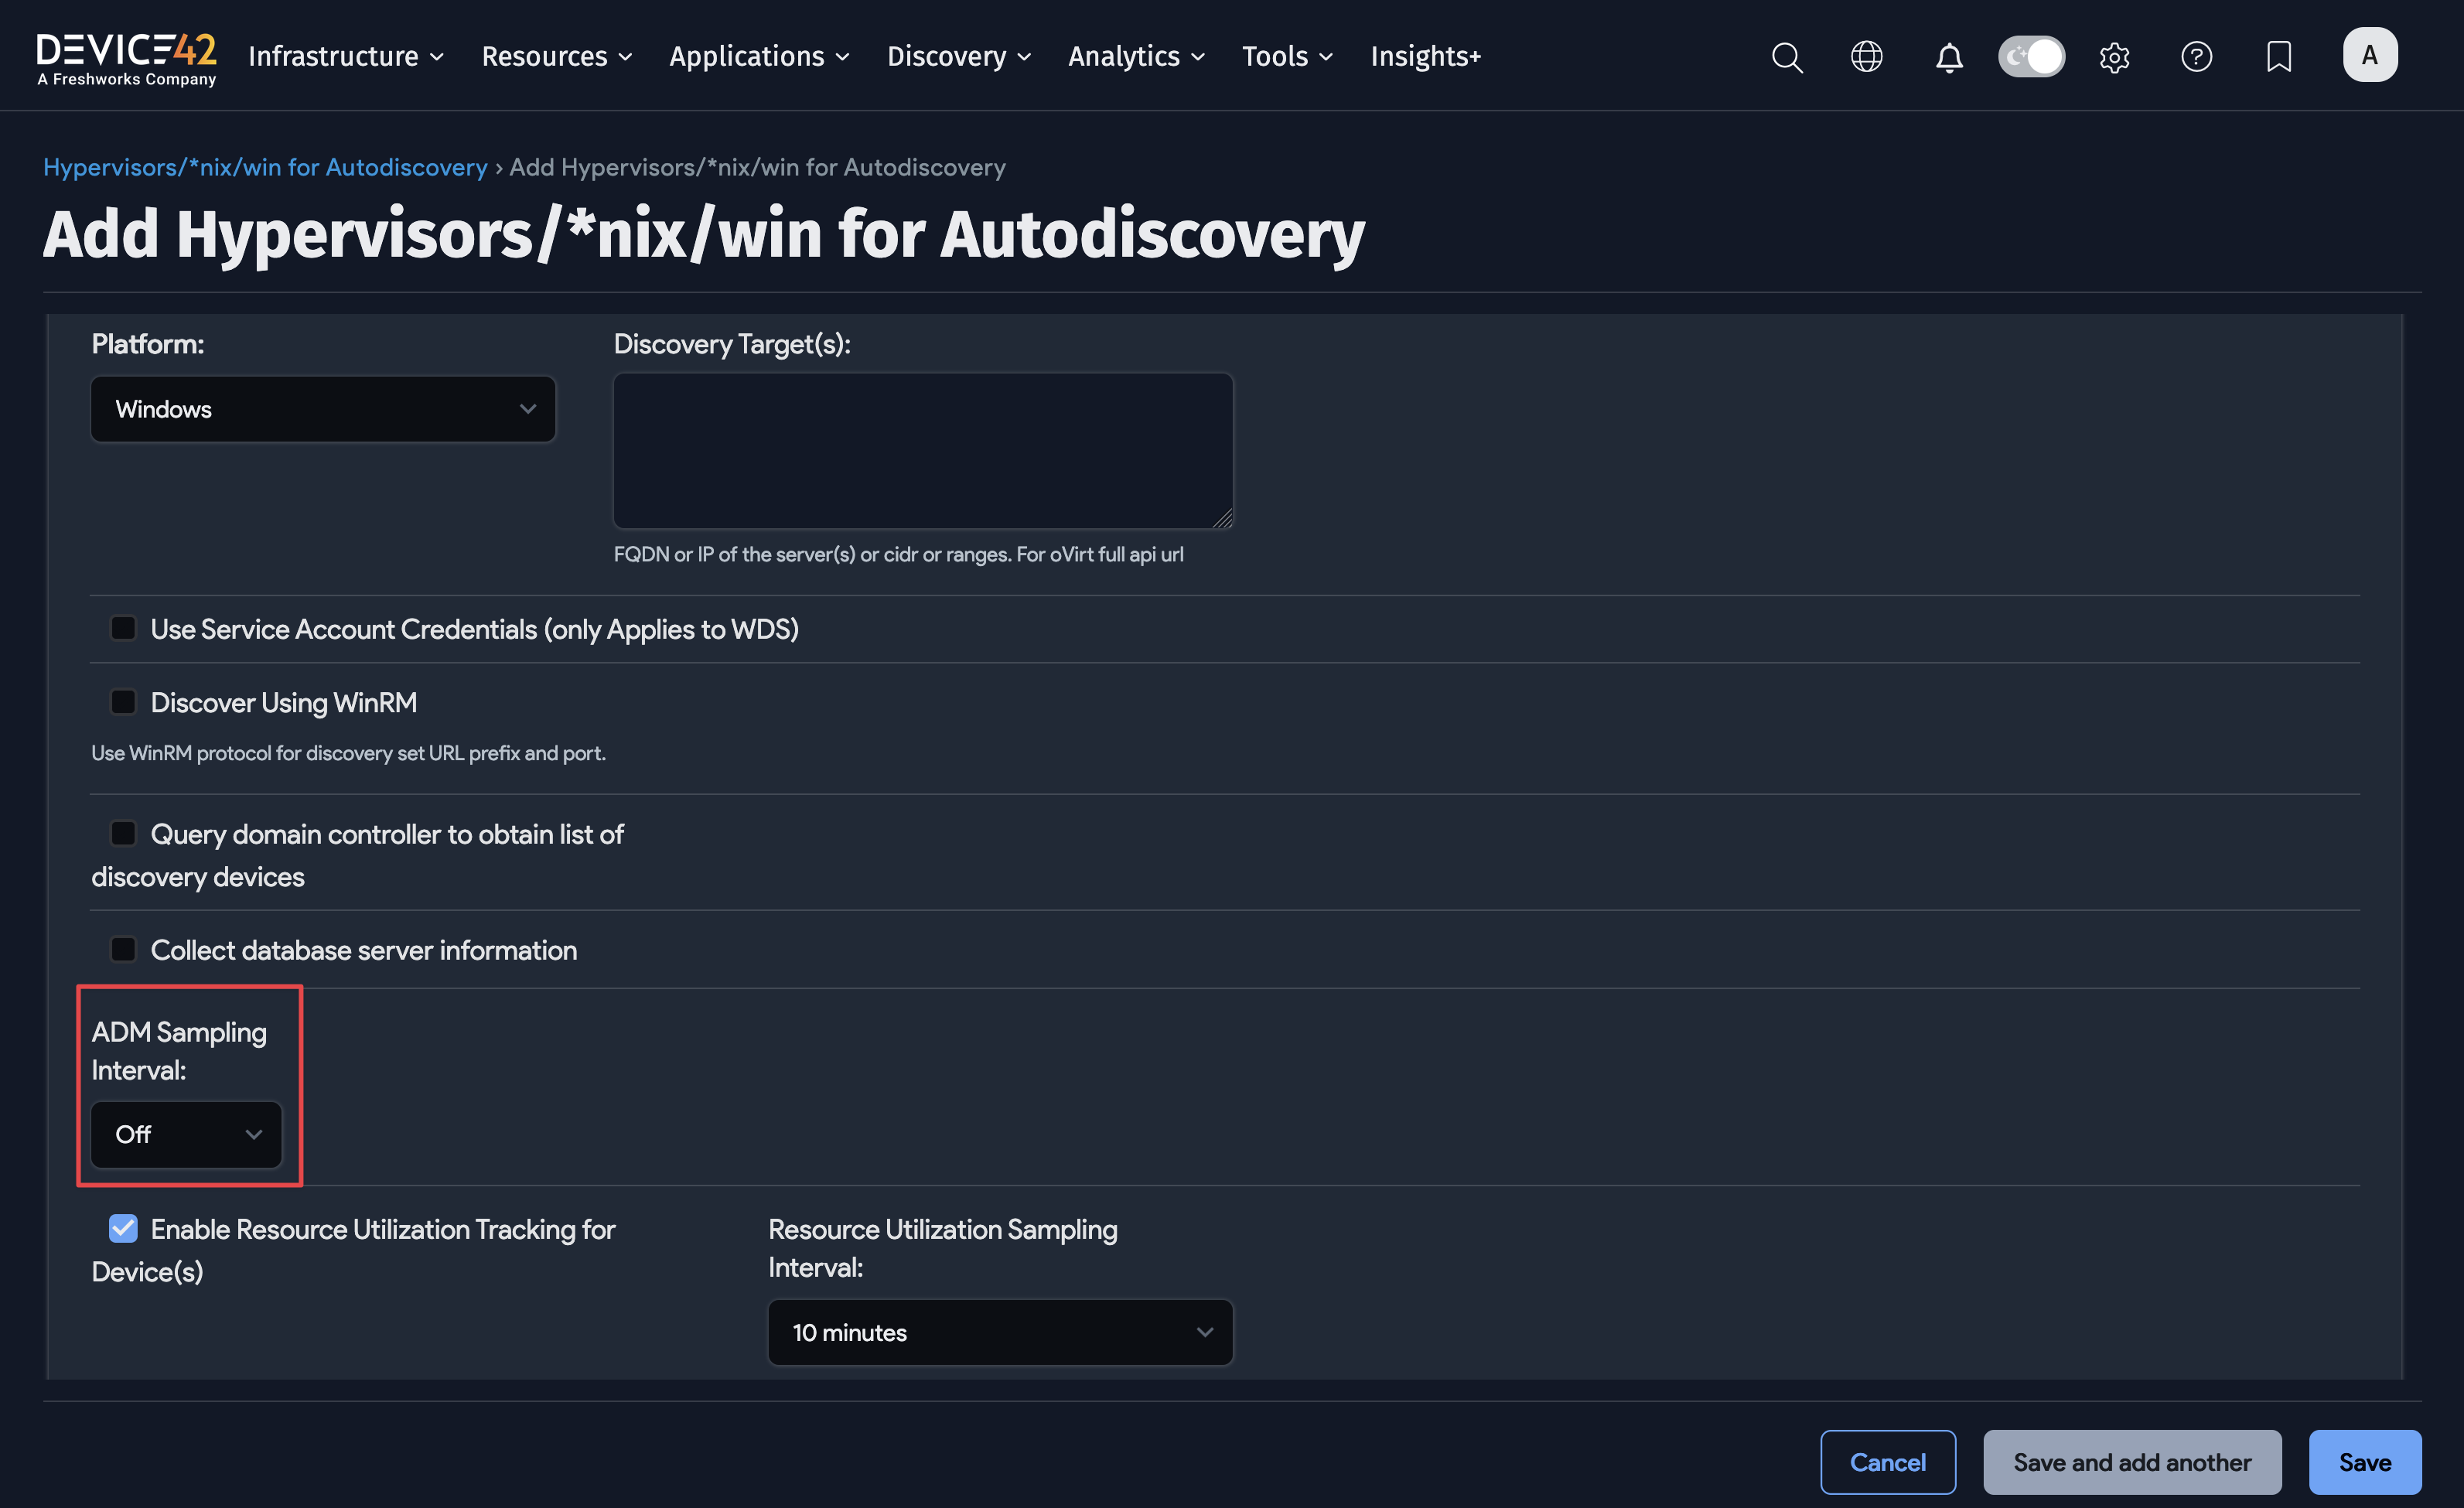
Do not initially configure Windows discovery jobs to collect ADM information. There are two reasons for this: 1) You may inadvertently consume your ADM licenses by discovering the wrong devices. 2) We recommend you wait ~30 days before enabling ADM.
- Set ADM Sampling to Off. Note: This is enabled by default when licensed for Enterprise Application Discovery and Services Discovery. If you do not set ADM Sampling to Off you will have to perform multiple 'cleanup' steps.
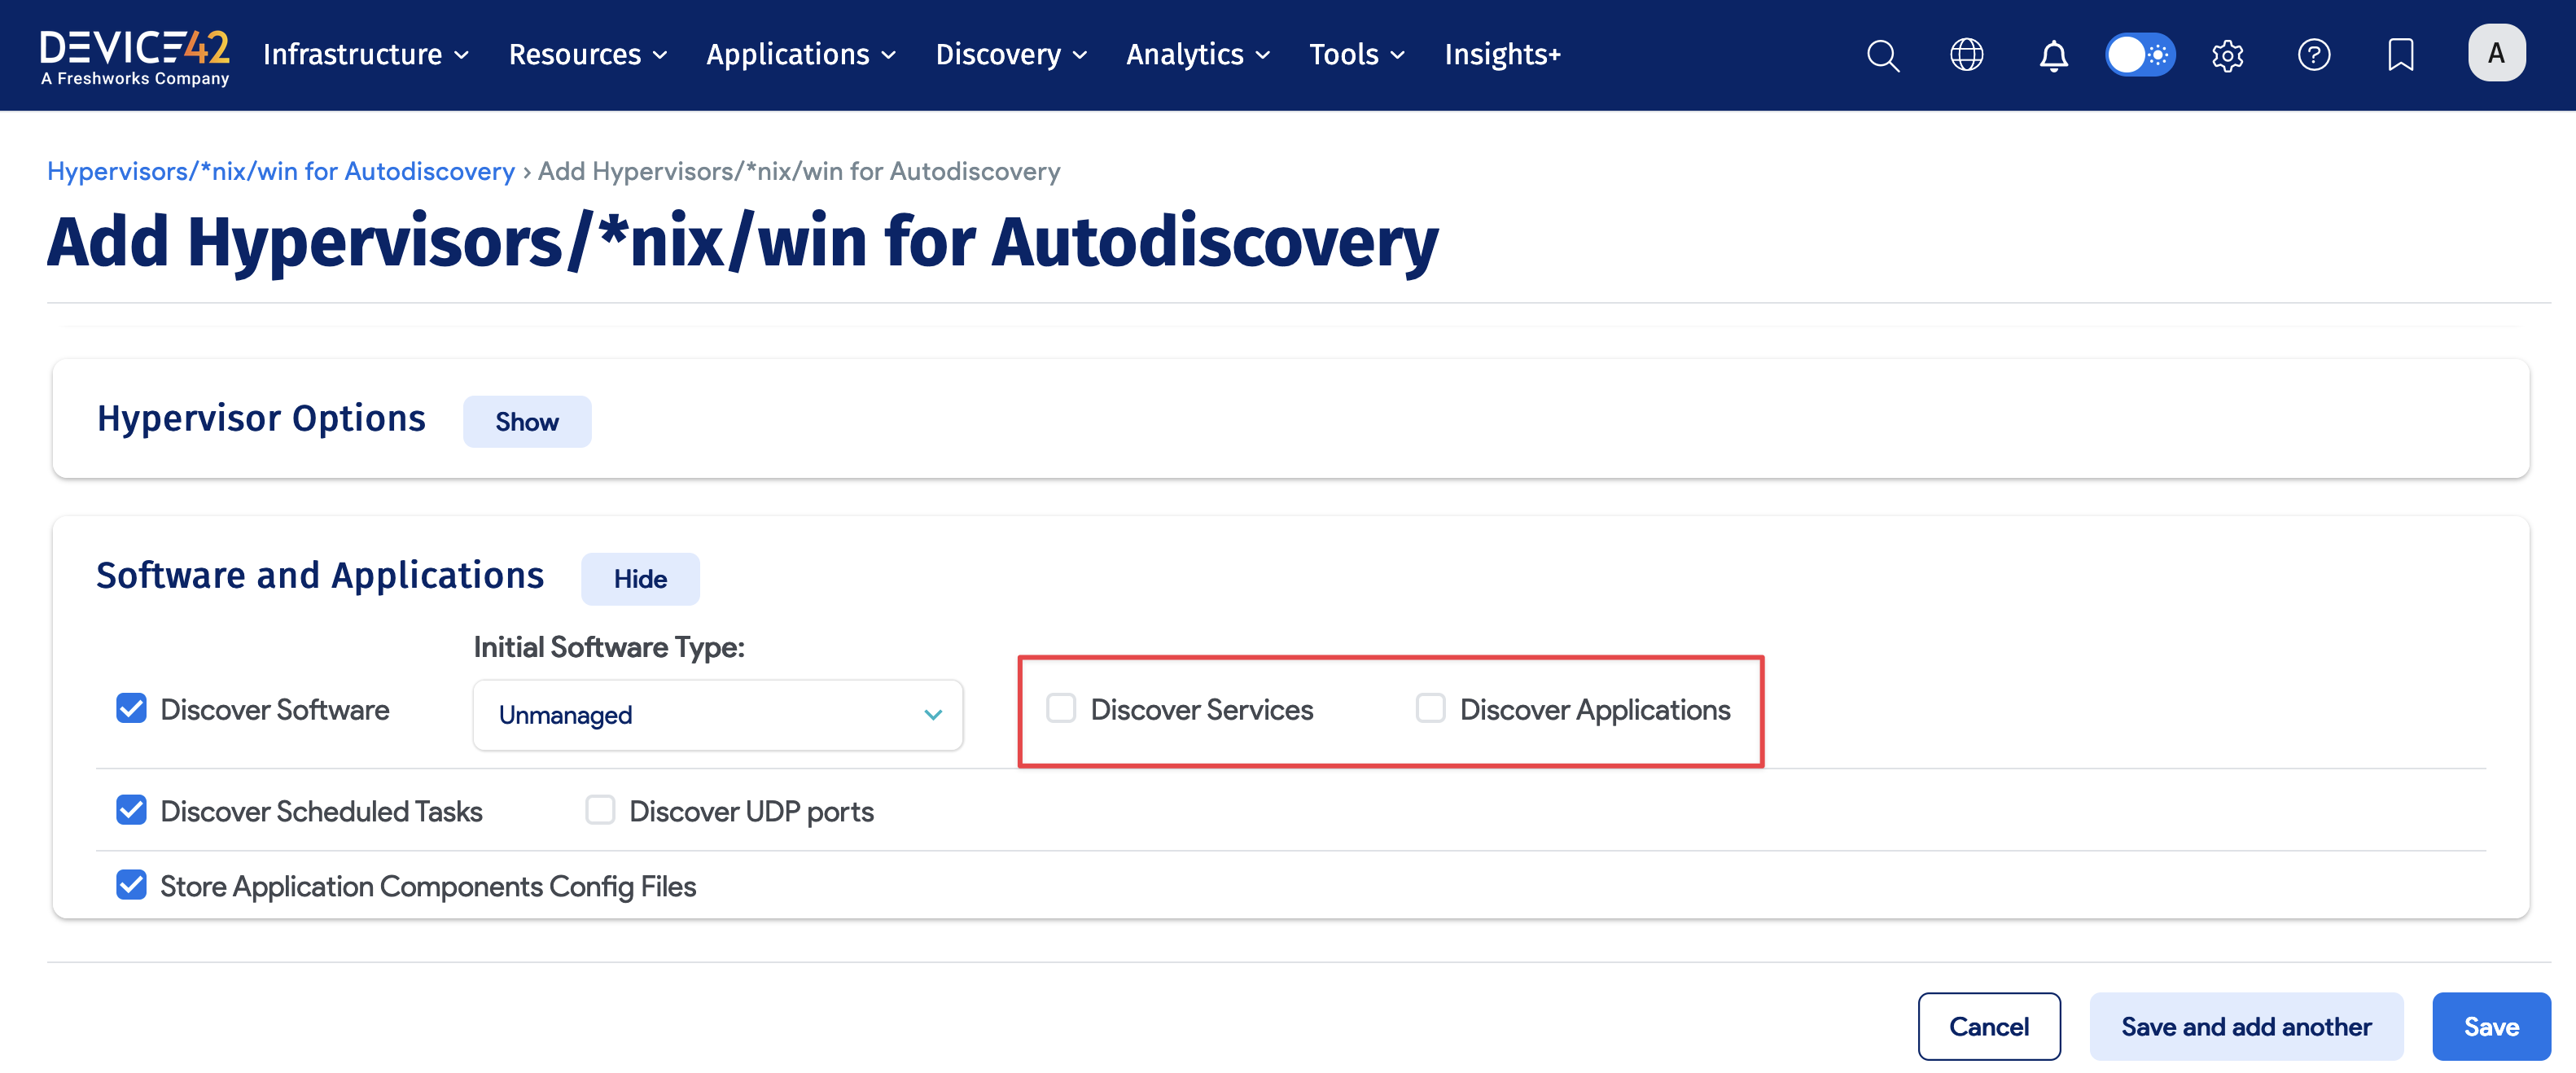
- In Software and Applications, click Show and make sure that Discover Services and Discover Applications checkboxes are unchecked.
2.4 Create Linux and Unix Discovery Jobs
Linux and Unix discovery jobs provide an accurate inventory of the Linux and Unix devices on your target network and discover your *nix physical and virtual infrastructure.
Port and Credential Requirements
Ports: Device42 will, by default, use the standard SSH port 22 to target your Linux and Unix infrastructure. If your organization uses a non-standard SSH port you can specify this port in the discovery job.
Credentials: Several of the commands that are run invoke sudo for escalated privileges. This is avoided when possible, but is sometimes necessary to determine certain information for a comprehensive discovery.
Click here for more detail regarding Linux and Unix Autodiscovery. This should be your first place to look when troubleshooting Linux and Unix discovery job issues.
Steps to Create and Run a Linux or *nix Discovery Job
To create and run a Linux or *nix discovery job, perform the following steps:
- Choose Discovery > HyperVisors / *nix / Windows.
- Click the Create button.
- Enter the Job name.
- Select the Remote Collector.
- Select the *nix Platform.
- Enter the Server or Servers, CIDR Block, or IP Range.
- Enter the Port (if default port 22 is not being used).
- Add the Discovery Target(s) Credential(s) (that is, Username and Password).
- Review the remaining options and choose the items that best fit your needs.
- Click the Save button.
- Click the checkbox next to the discovery job(s) and choose Actions > Run Selected Jobs.
Note: Organizations that have purchased the Software License Management module can include Software discovery when running *nix discovery jobs (as well as other platforms like Classic WinRM, IBM i/AS400, IBM z/OS, and SCCM) by clicking the Discover Software checkbox within the Software and Applications section of the job. For more information regarding Software License Management with Device42, see the Software License Management Discovery Jobs section later in this document.
To view a video on creating a Linux discovery job, click here.
2.5 Create Cloud Discovery Jobs
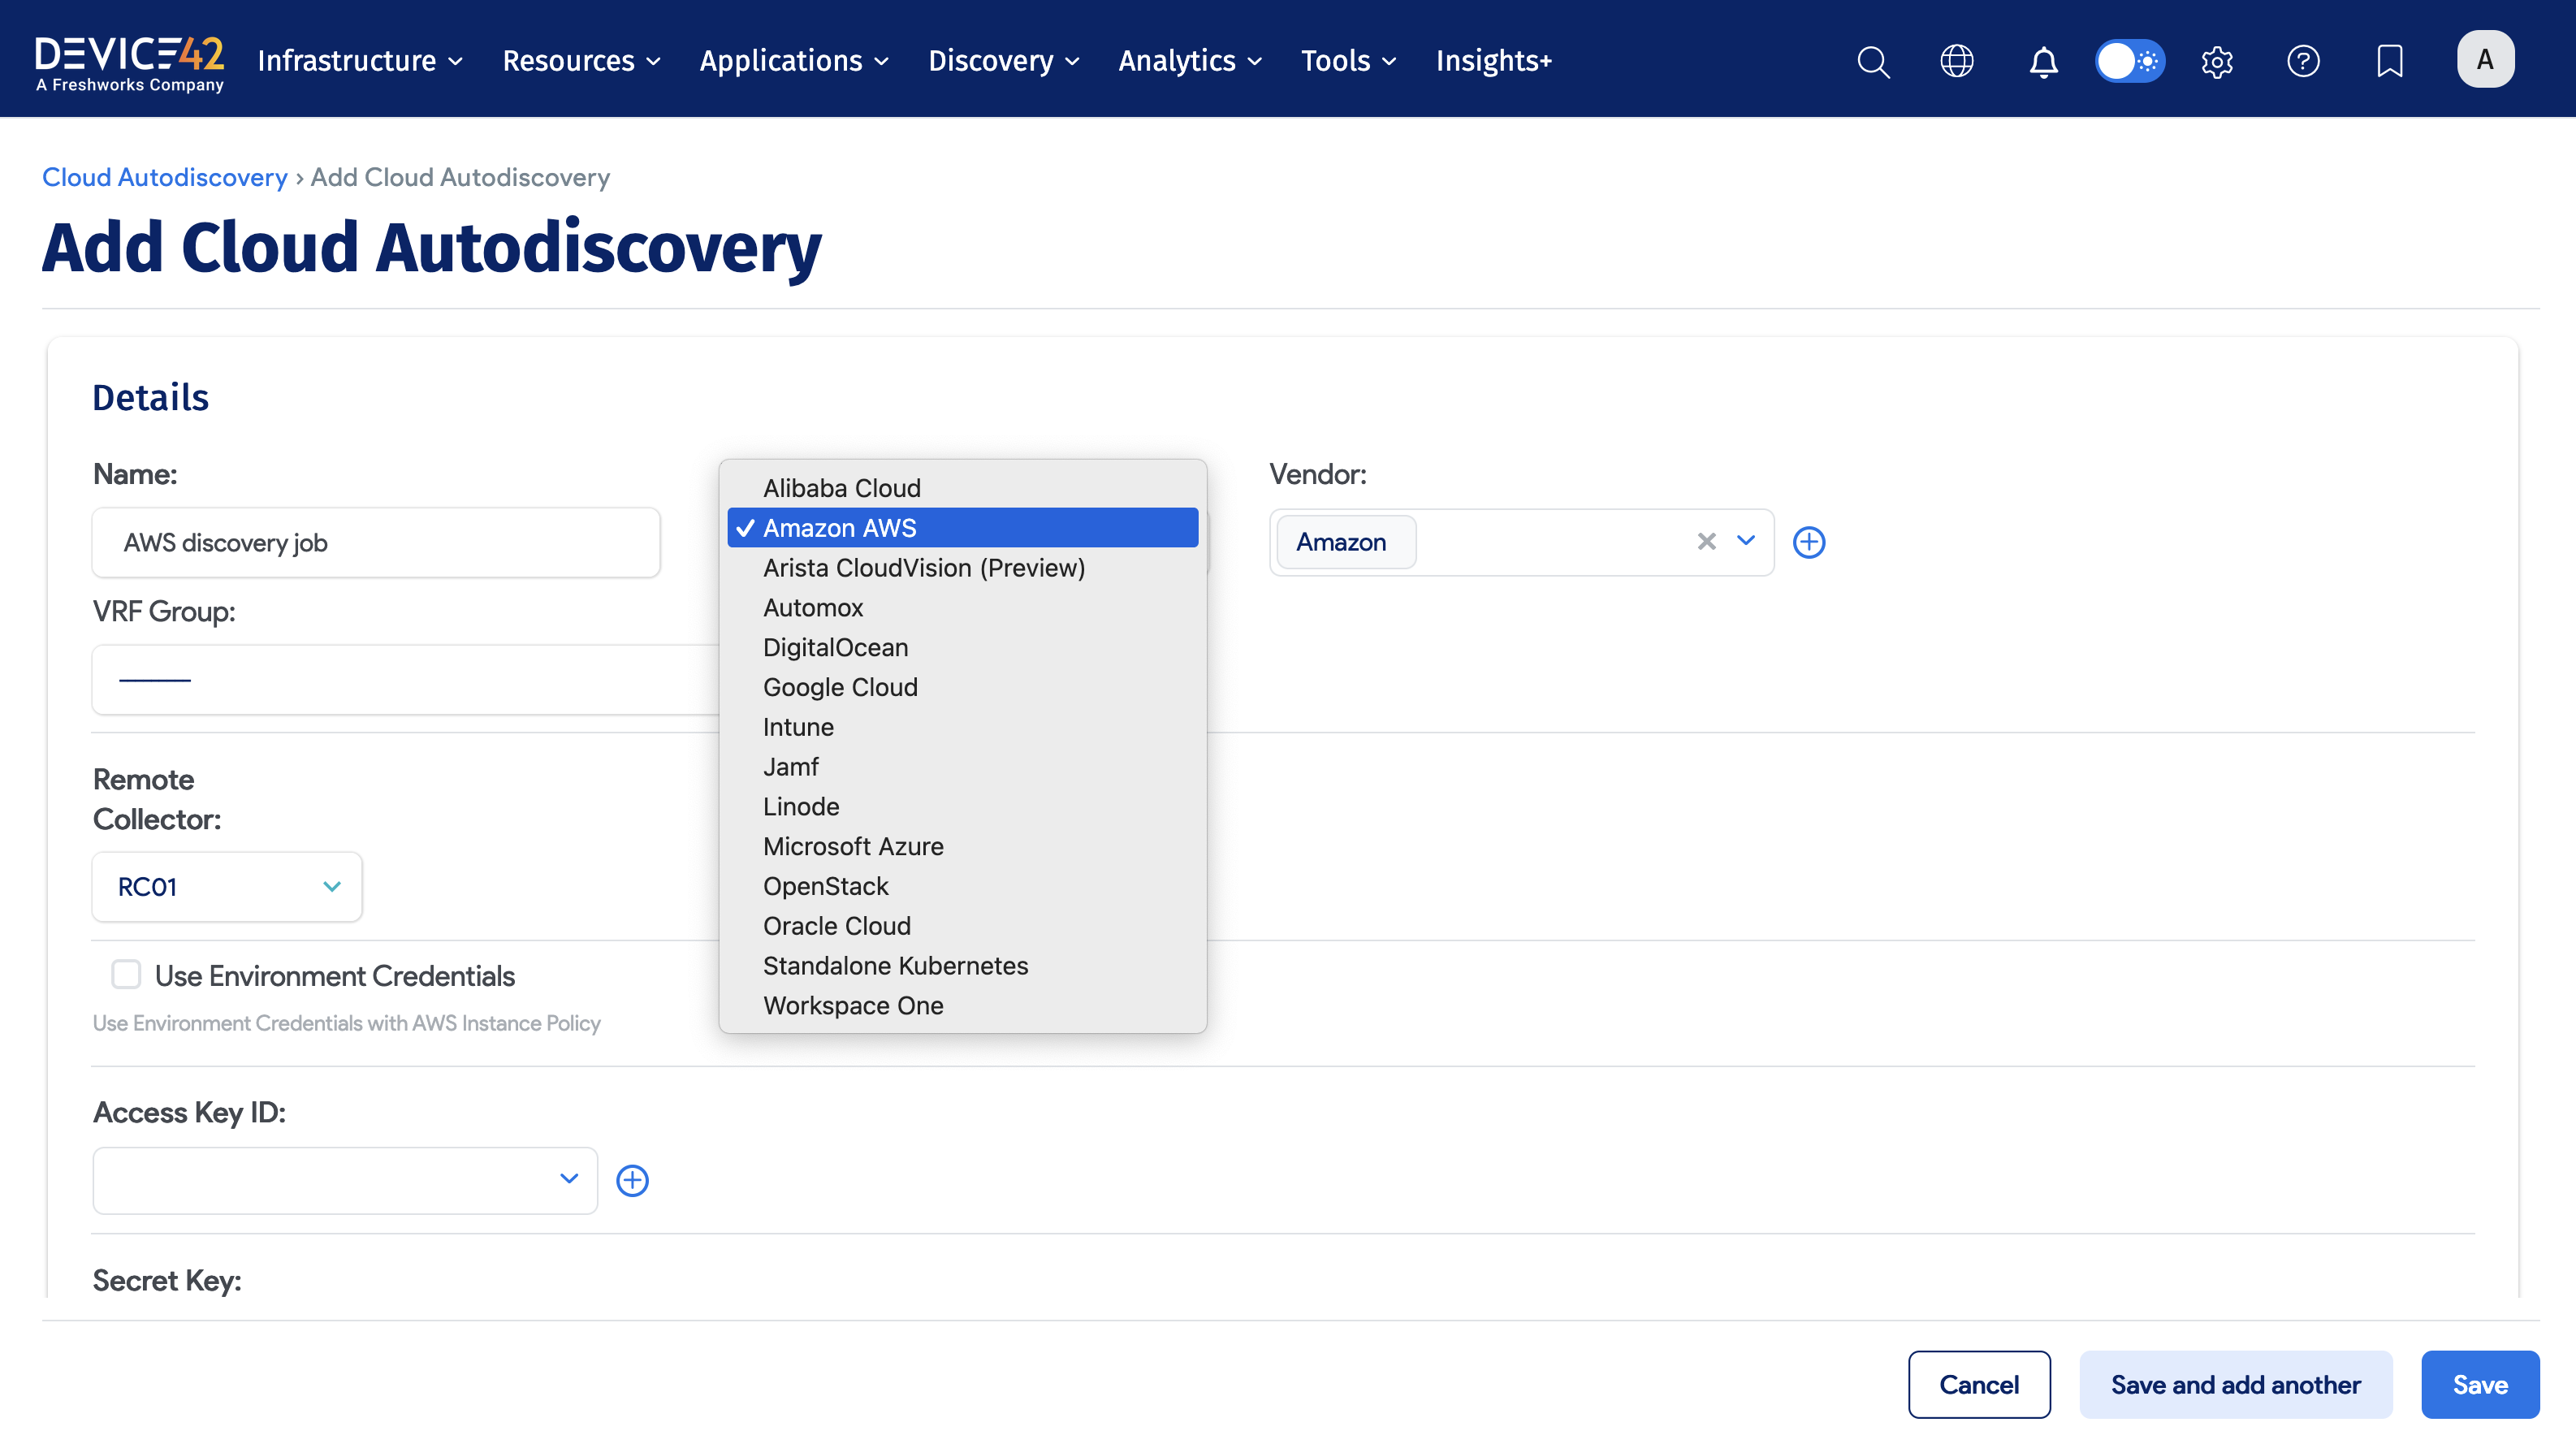
Cloud discovery jobs discover your infrastructure in AWS, Azure, Google Cloud, and other cloud providers and inventory your cloud infrastructure from available cloud solutions: AWS, Azure, GCP, Alibaba Cloud, Amazon API, Digital Ocean, Intune, Linode, Open stack, Oracle Cloud and Standalone Kubernetes.
Port and Credential Requirements
Ports: Cloud infrastructure discovery is performed using HTTPS over port 443.
Credentials: Required credentials vary by Cloud Provider.
- AWS
- Dynamic and Static Account Discovery are supported using both IAM users and EC2 instance Profiles
- Microsoft Azure
- Require Subscription ID (not required when performing Tenant wide discovery)
- Tenant ID Credentials (Username/Password or Service Principle ClientID/Client Secret Value)
- Google Cloud
- Project ID (leave blank if doing multi project discovery)
- Service Account with viewer role and a Service Account key (JSON key file)
- Kubernetes Cluster
- Basic Authentication (Username/Password) OR
- Bearer Token (Username and token string) OR
- The User or Service Account will need view permissions to any desired pods or applications or view cluster wide.
Click here for more detail regarding Cloud Autodiscovery. This should be your first place to look when troubleshooting Cloud discovery job issues.
Click the following links for discovery details for AWS, MS Azure, Google Cloud, and Kubernetes Cloud discovery jobs. Regarding Kubernetes, click here for information regarding provisioning a Service Account.
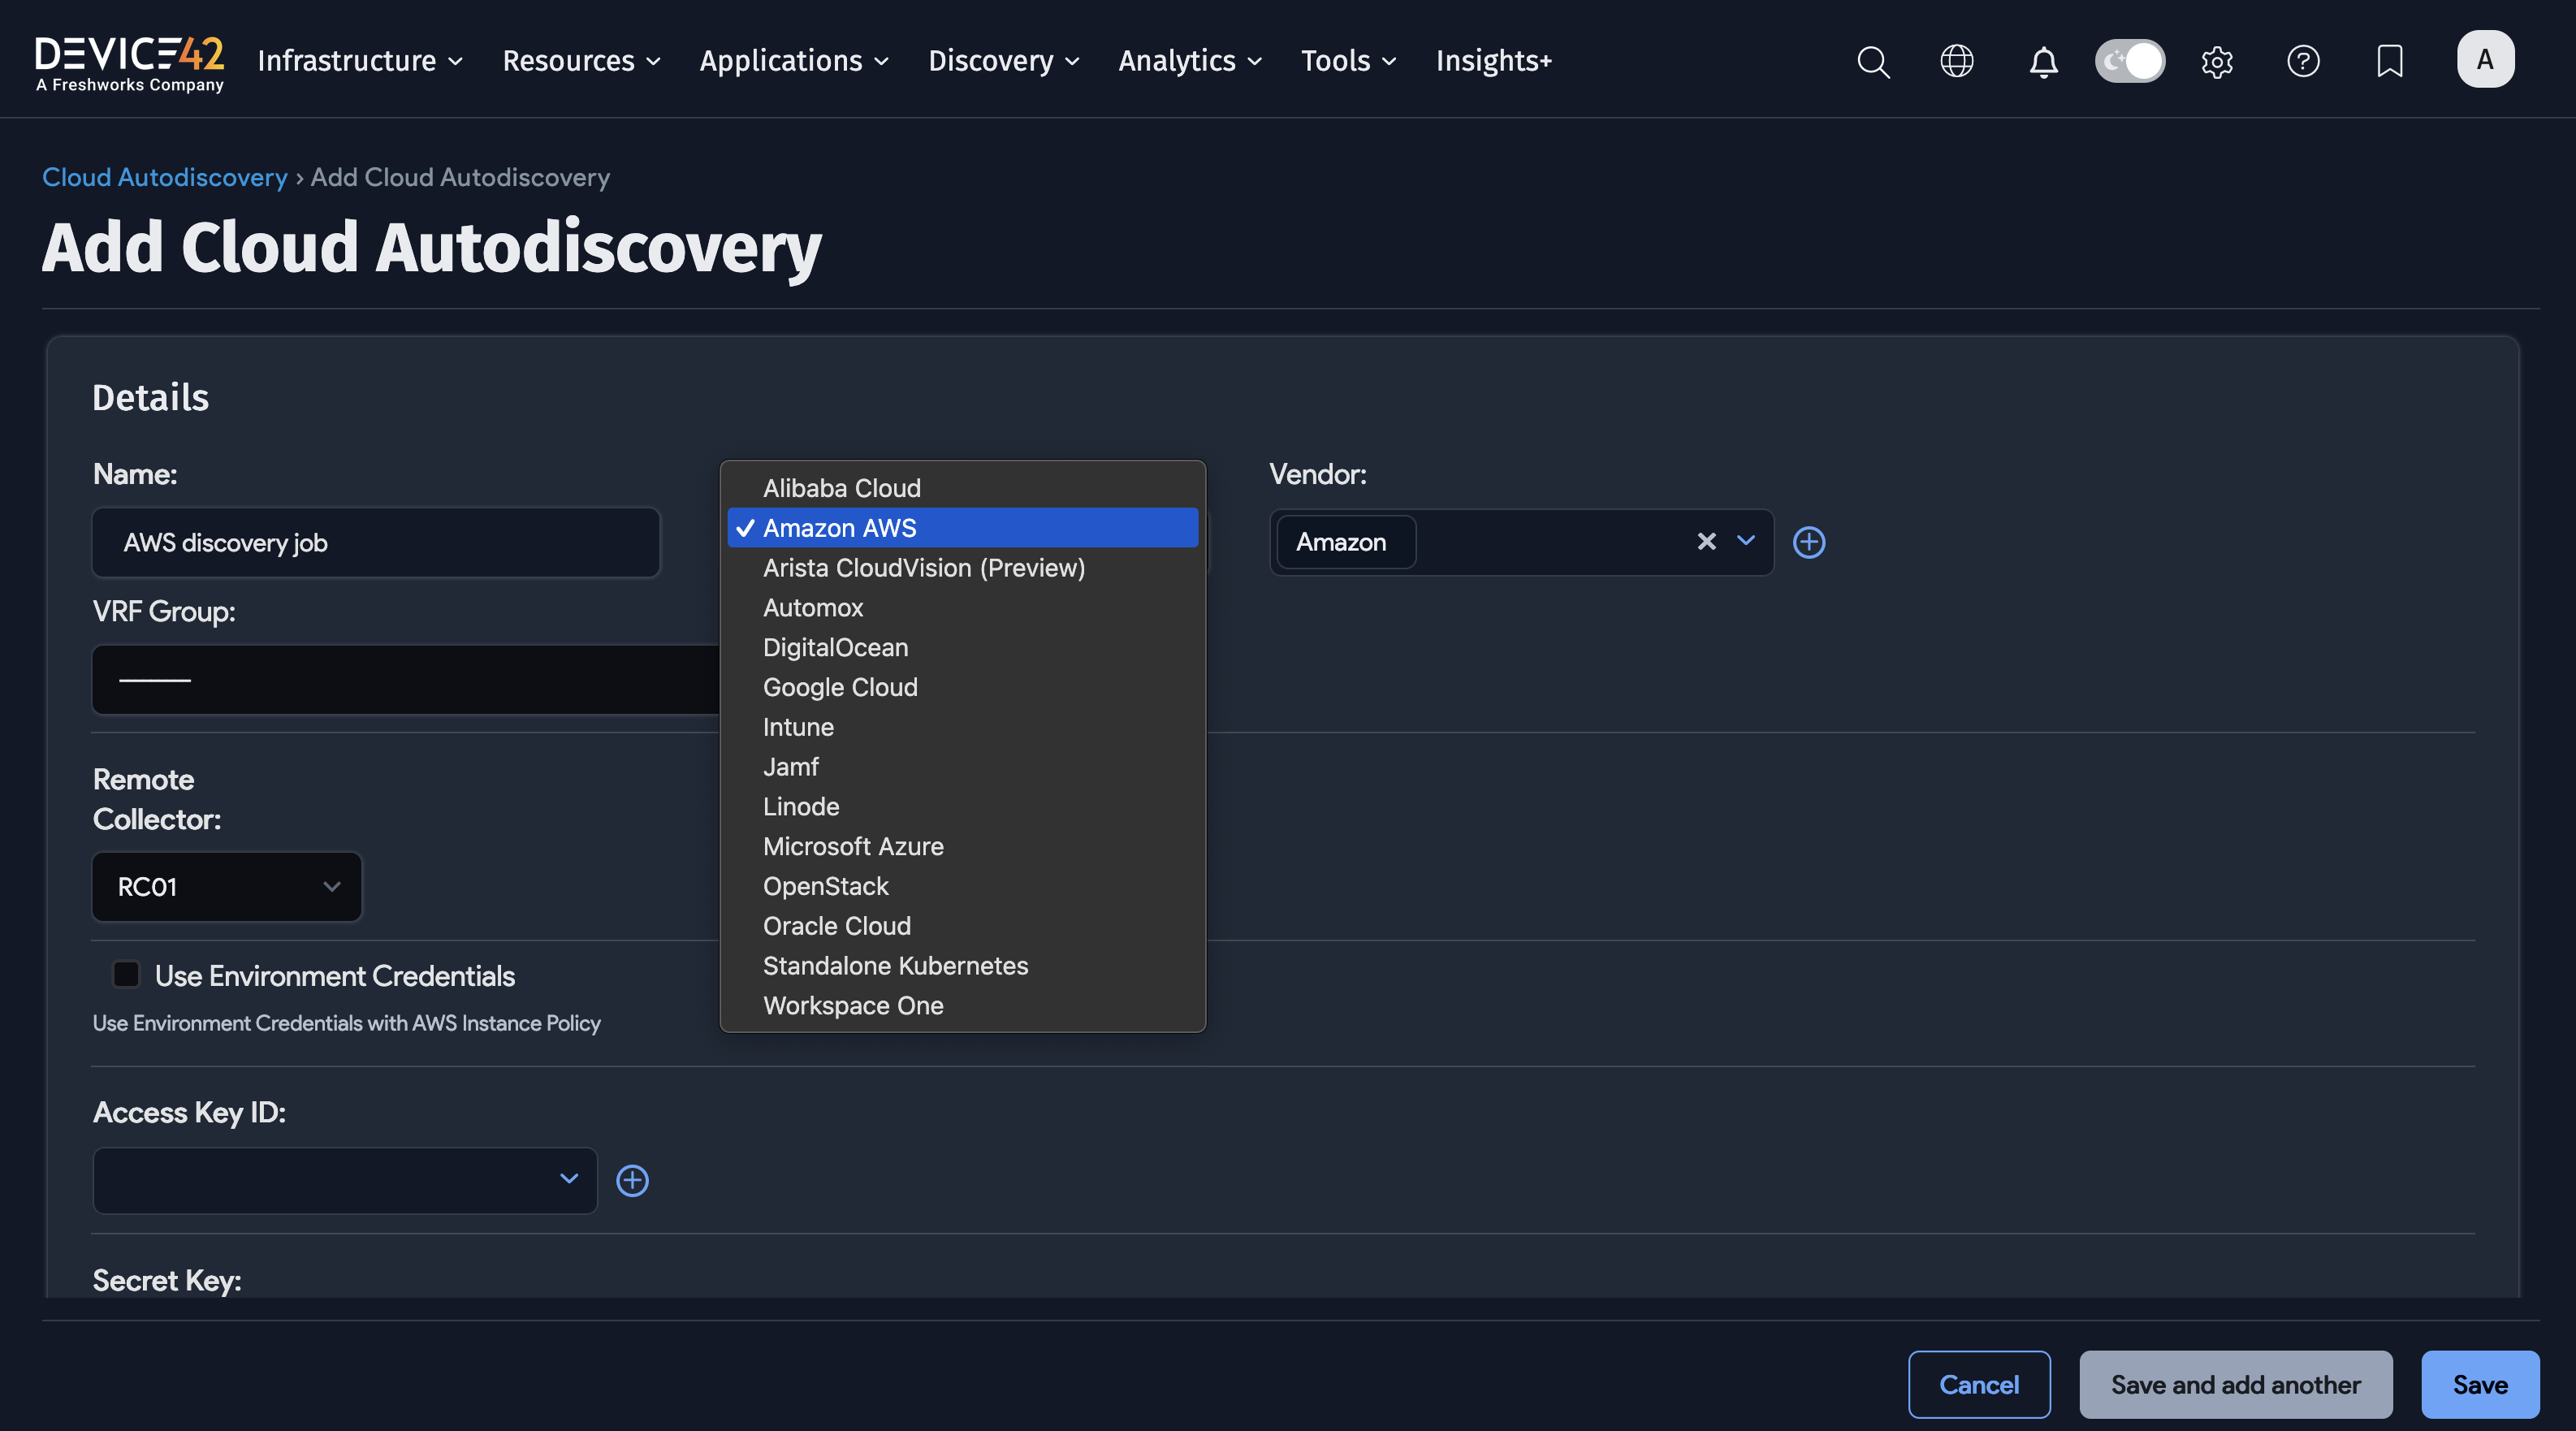
Steps to Create and Run a Cloud Discovery Job
To create and run a Cloud discovery job, perform the following steps:
- Choose Discovery > Cloud.
- Click the Create button.
- Enter the Job name.
- Select the Cloud Type and Vendor(s).
- Select the VRF Group.
- Select the Remote Collector.
- Enter the appropriate cloud credentials (varies depending on platform).
- Enter the Server or Servers, CIDR Block, or IP Range.
- Review the remaining options and choose the items that best fit your needs.
- Click the Save button.
- Click the checkbox next to the discovery job(s) and choose Actions > Run Selected Jobs.
2.6 Create Storage Array Discovery Jobs
Storage Array discovery jobs identify and return Storage Array resource details, related resources, and topology maps for a wide range of storage platforms.
Click here for more detail regarding Storage Arrays Autodiscovery, including the list of supported platforms. This page also contains links to additional information about access protocols and minimum permissions for Dell/EMC Arrays, HP Arrays, IBM Arrays, as well as All Other Storage Arrays. It also contains more detail on creating new Storage Array discovery jobs. This should be your first place to look when troubleshooting Storage Array discovery job issues.
Steps to Create and Run a Storage Arrays Discovery Job
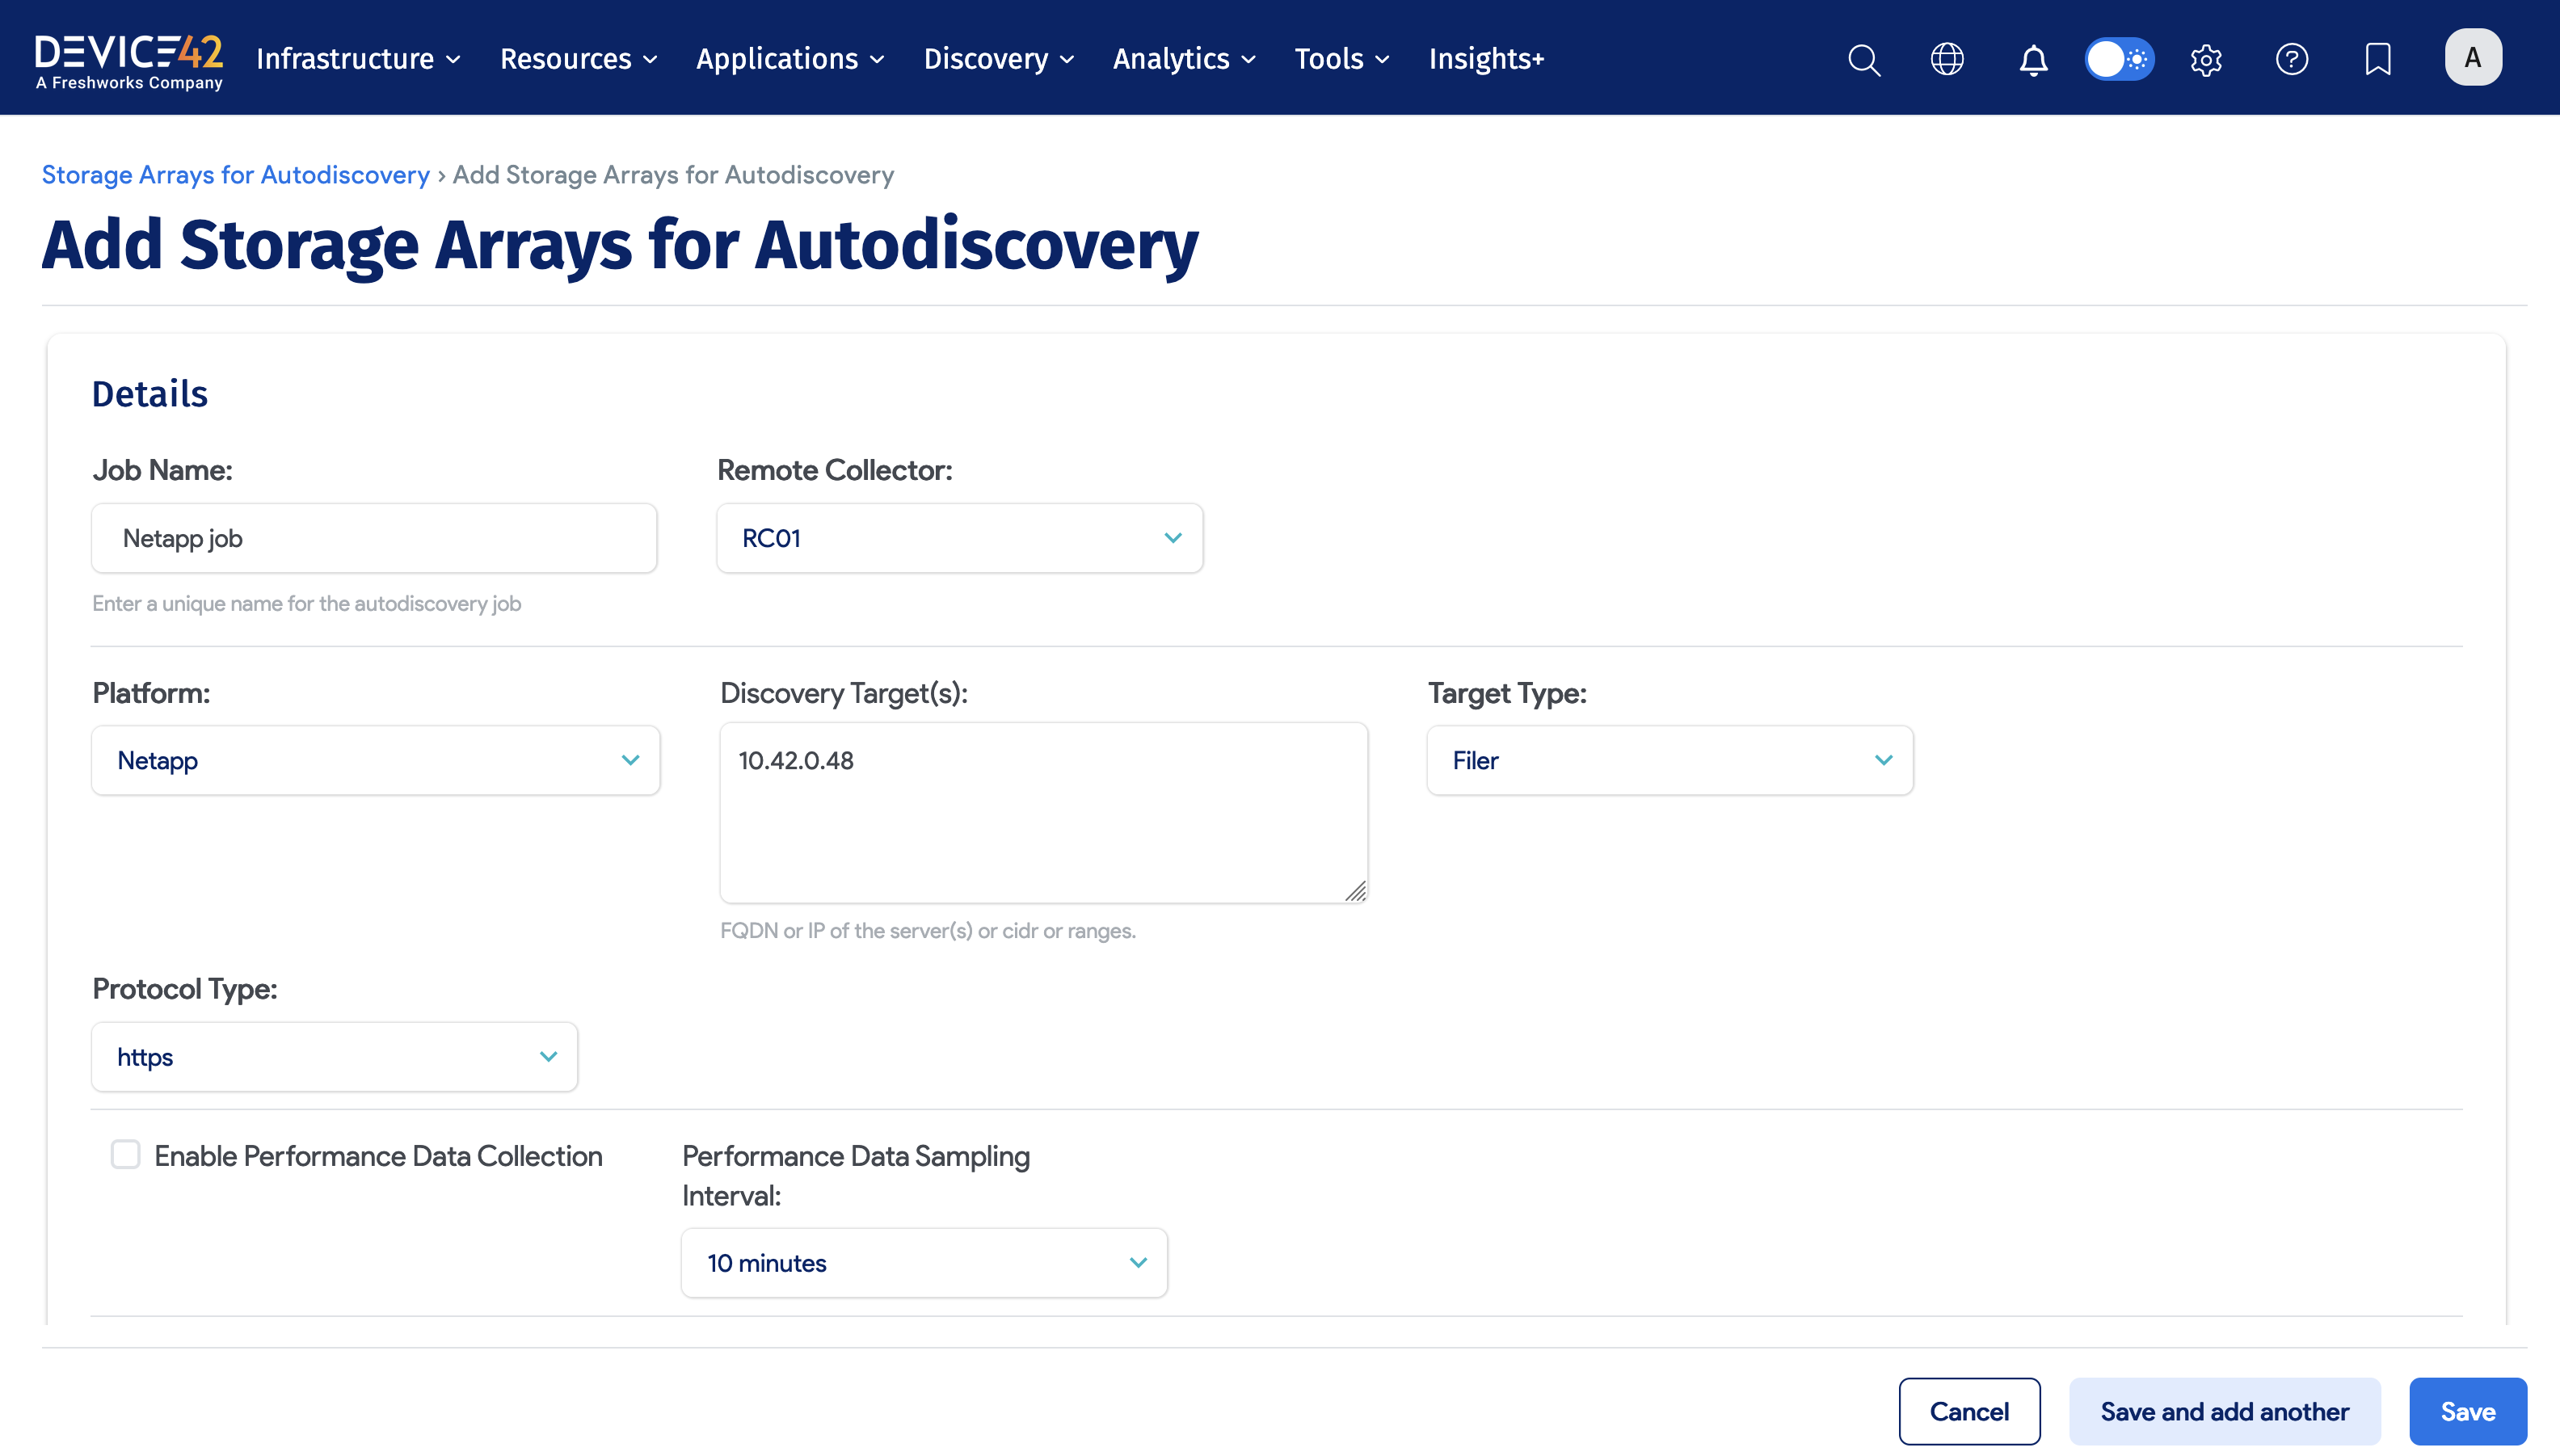
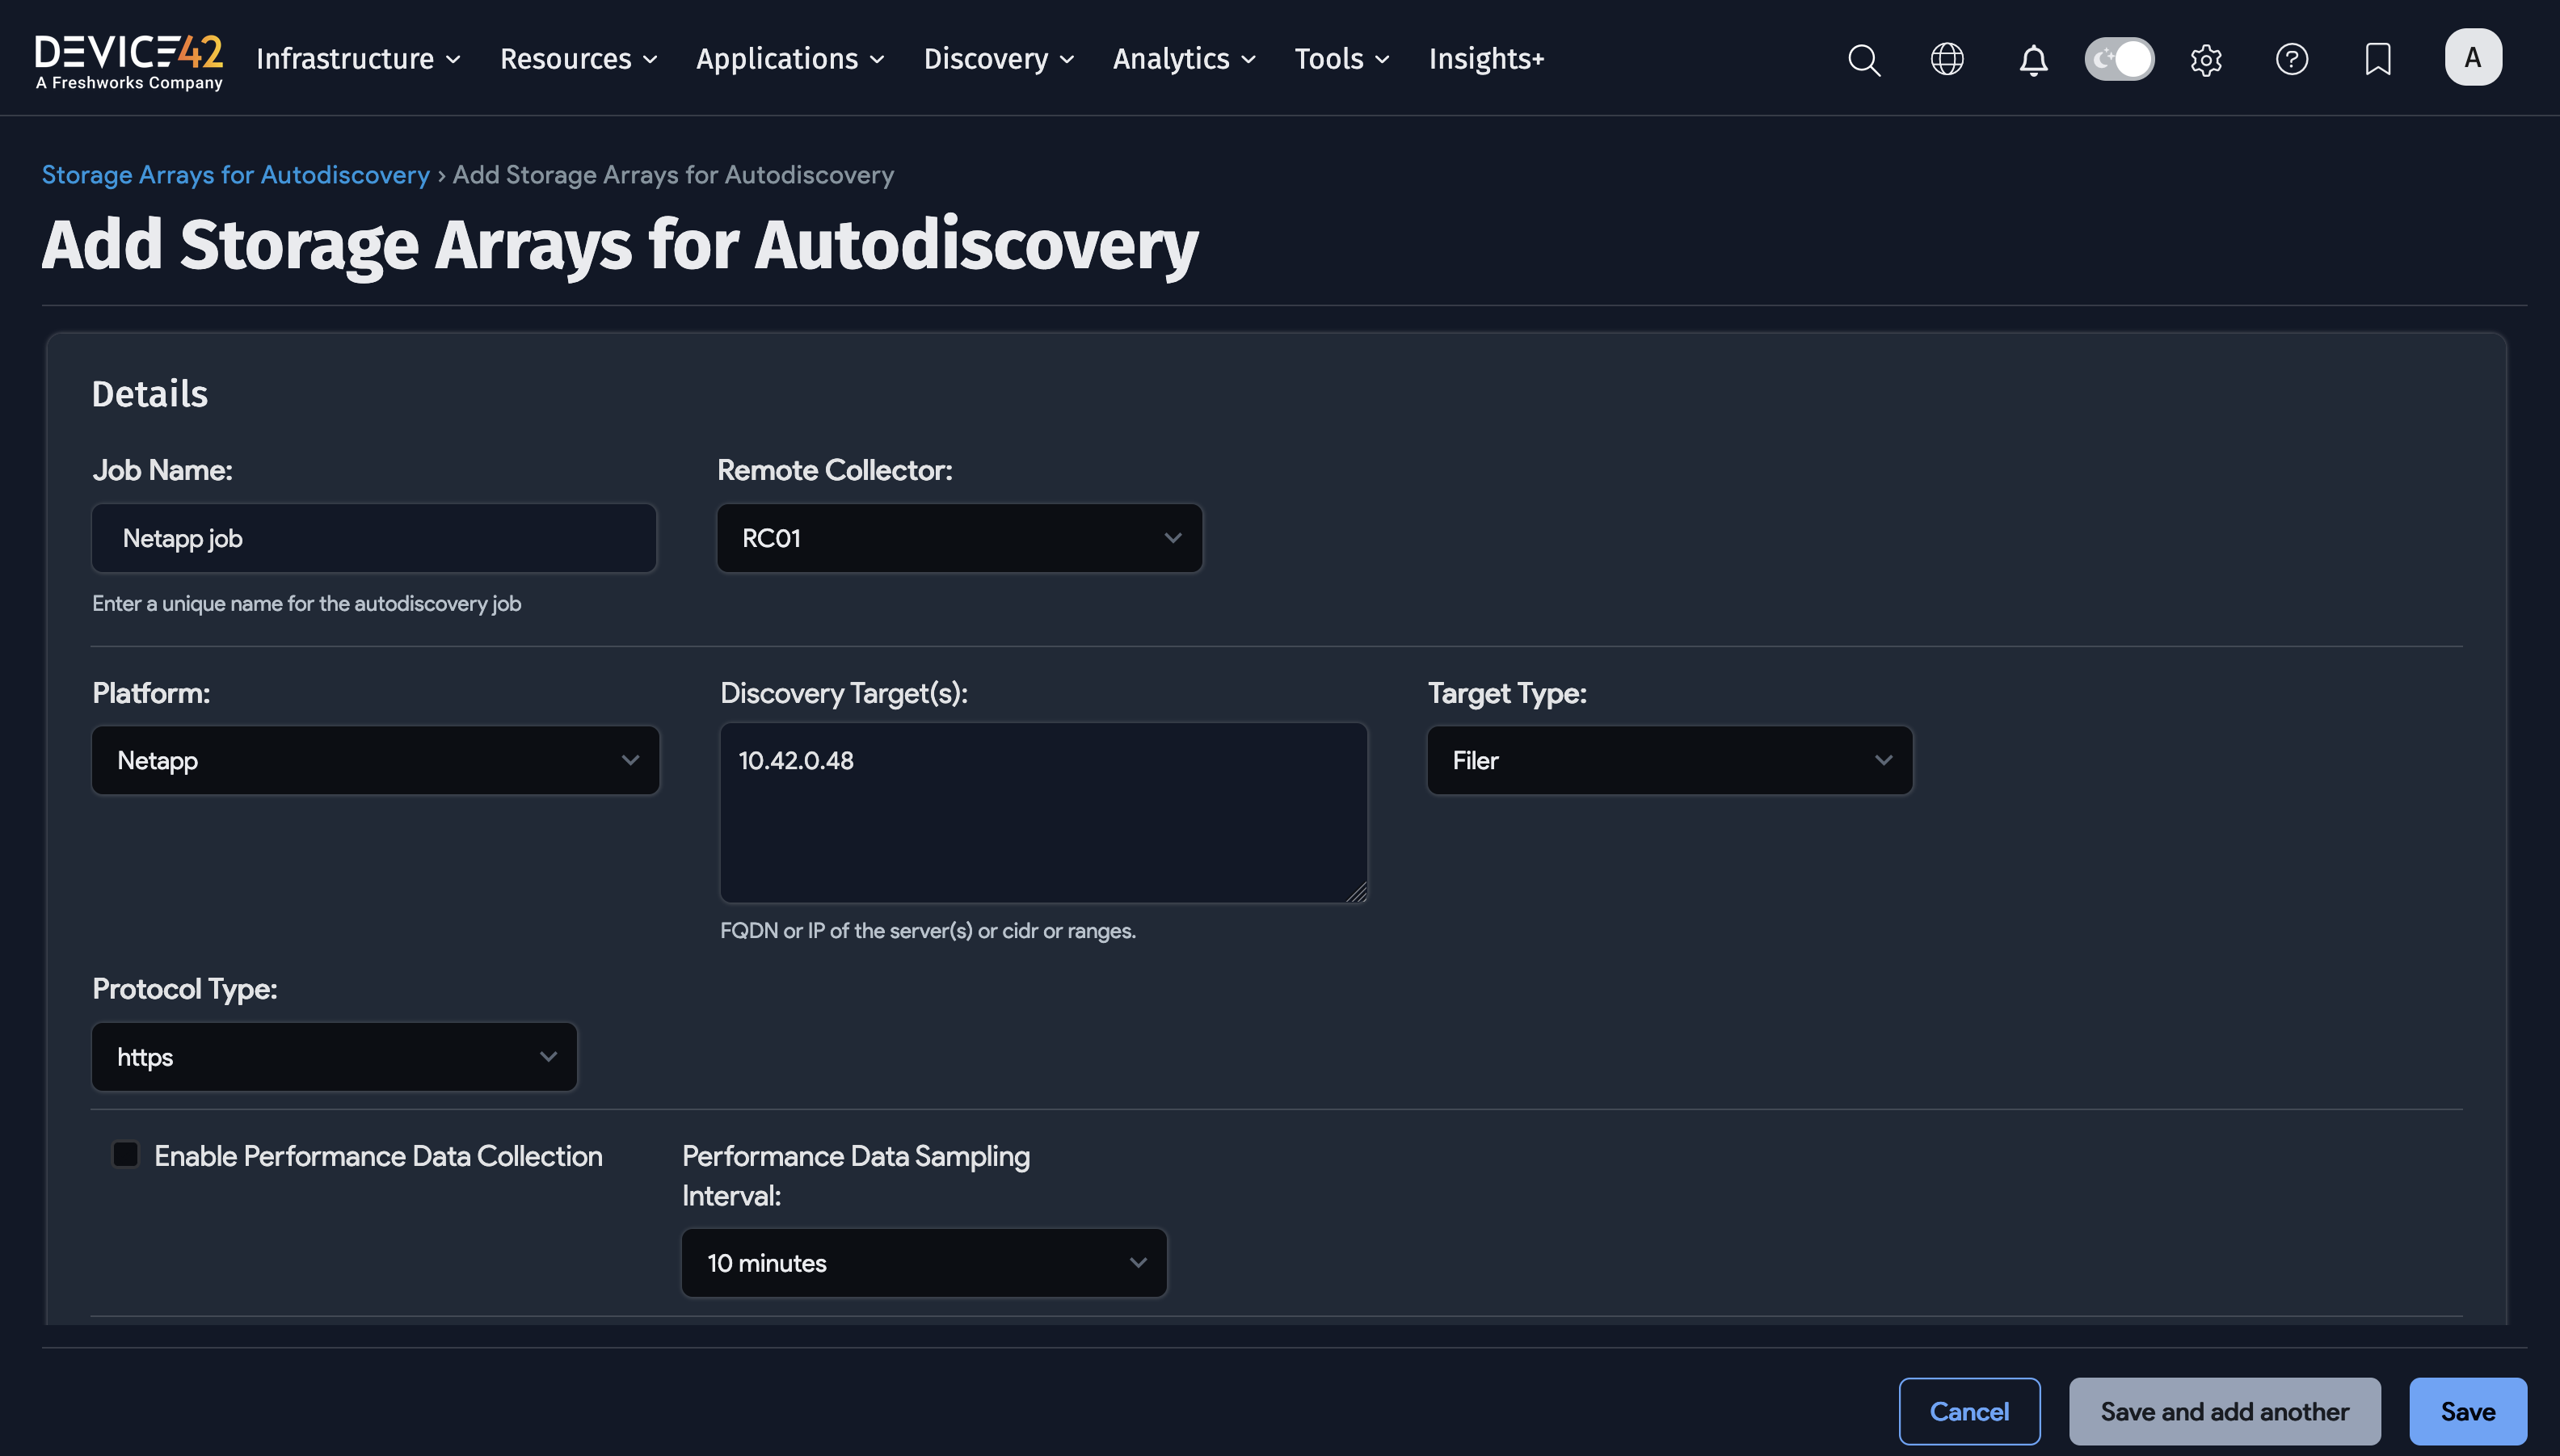
To create and run a Storage Arrays discovery job, perform the following steps:
- Choose Discovery > Storage Arrays.
- Click the Create button.
- Enter the Job name.
- Select the Remote Collector.
- Select the Platform (e.g. Netapp).
- Enter the Server or Servers, CIDR Block, or IP Range.
- Select the Target Type (values dependent on selected Platform).
- Select the Protocol Type (values dependent on selected Platform).
- Check or uncheck Enable Performance Data Collection.
- Select the Performance Data Sampling Interval.
- Select the Action for Storage Array not found (keep or delete Array Resource).
- Add the Discovery Target(s) Credential(s) (that is, Username and Password).
- Review the remaining options and choose the items that best fit your needs.
- Click the Save button.
- Click the checkbox next to the discovery job(s) and choose Actions > Run Selected Jobs.
Click here to view more information about Storage Arrays, including viewing and editing storage arrays, viewing arrays mapped to devices, viewing storage resource maps and trend graphs, and importing and exporting Storage Array discovery jobs.
2.7 Create Certificates Discovery Jobs
Certificates discovery jobs provide detailed information on https SSL certificates, including expiration dates, which is helpful for business continuity.
Click here for more detail regarding Certificates Autodiscovery, including creating a Certificates discovery job, SSL Certificate Cipher Suite Discovery, and discovery risks when multitenancy is enabled. This should be your first place to look when troubleshooting Certificates discovery job issues.
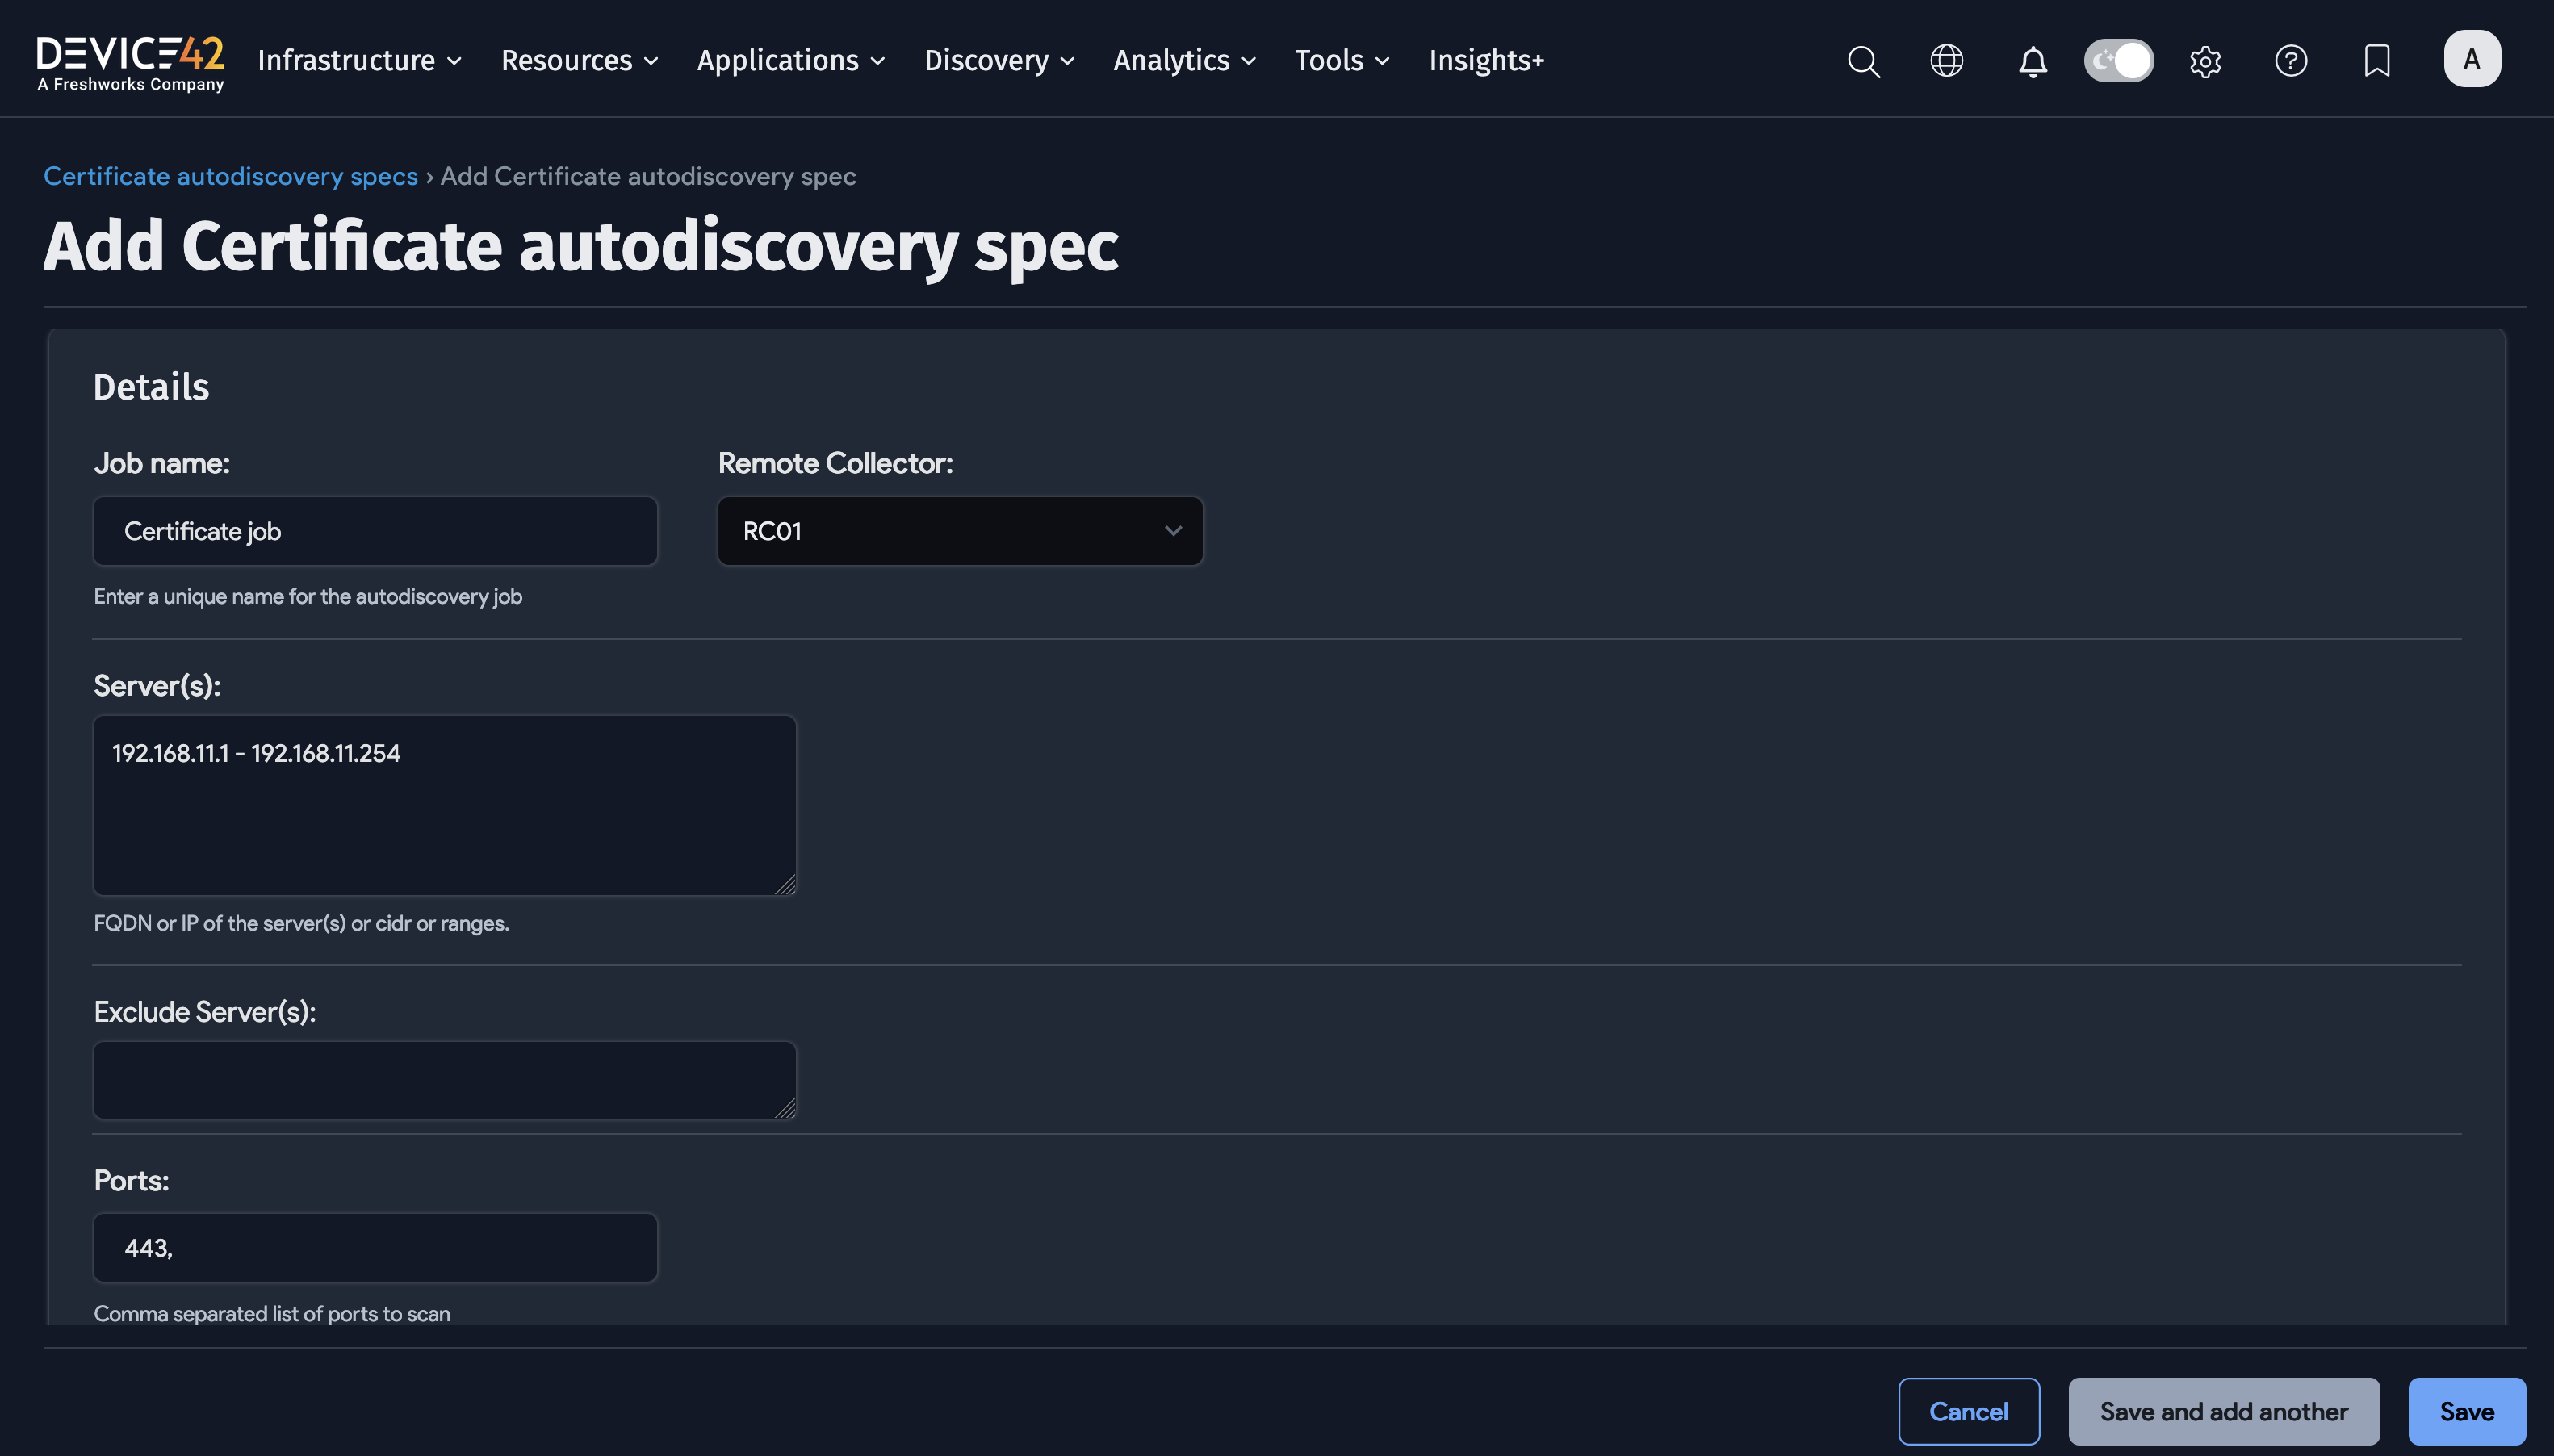
Steps to Create and Run a Certificates Discovery Job
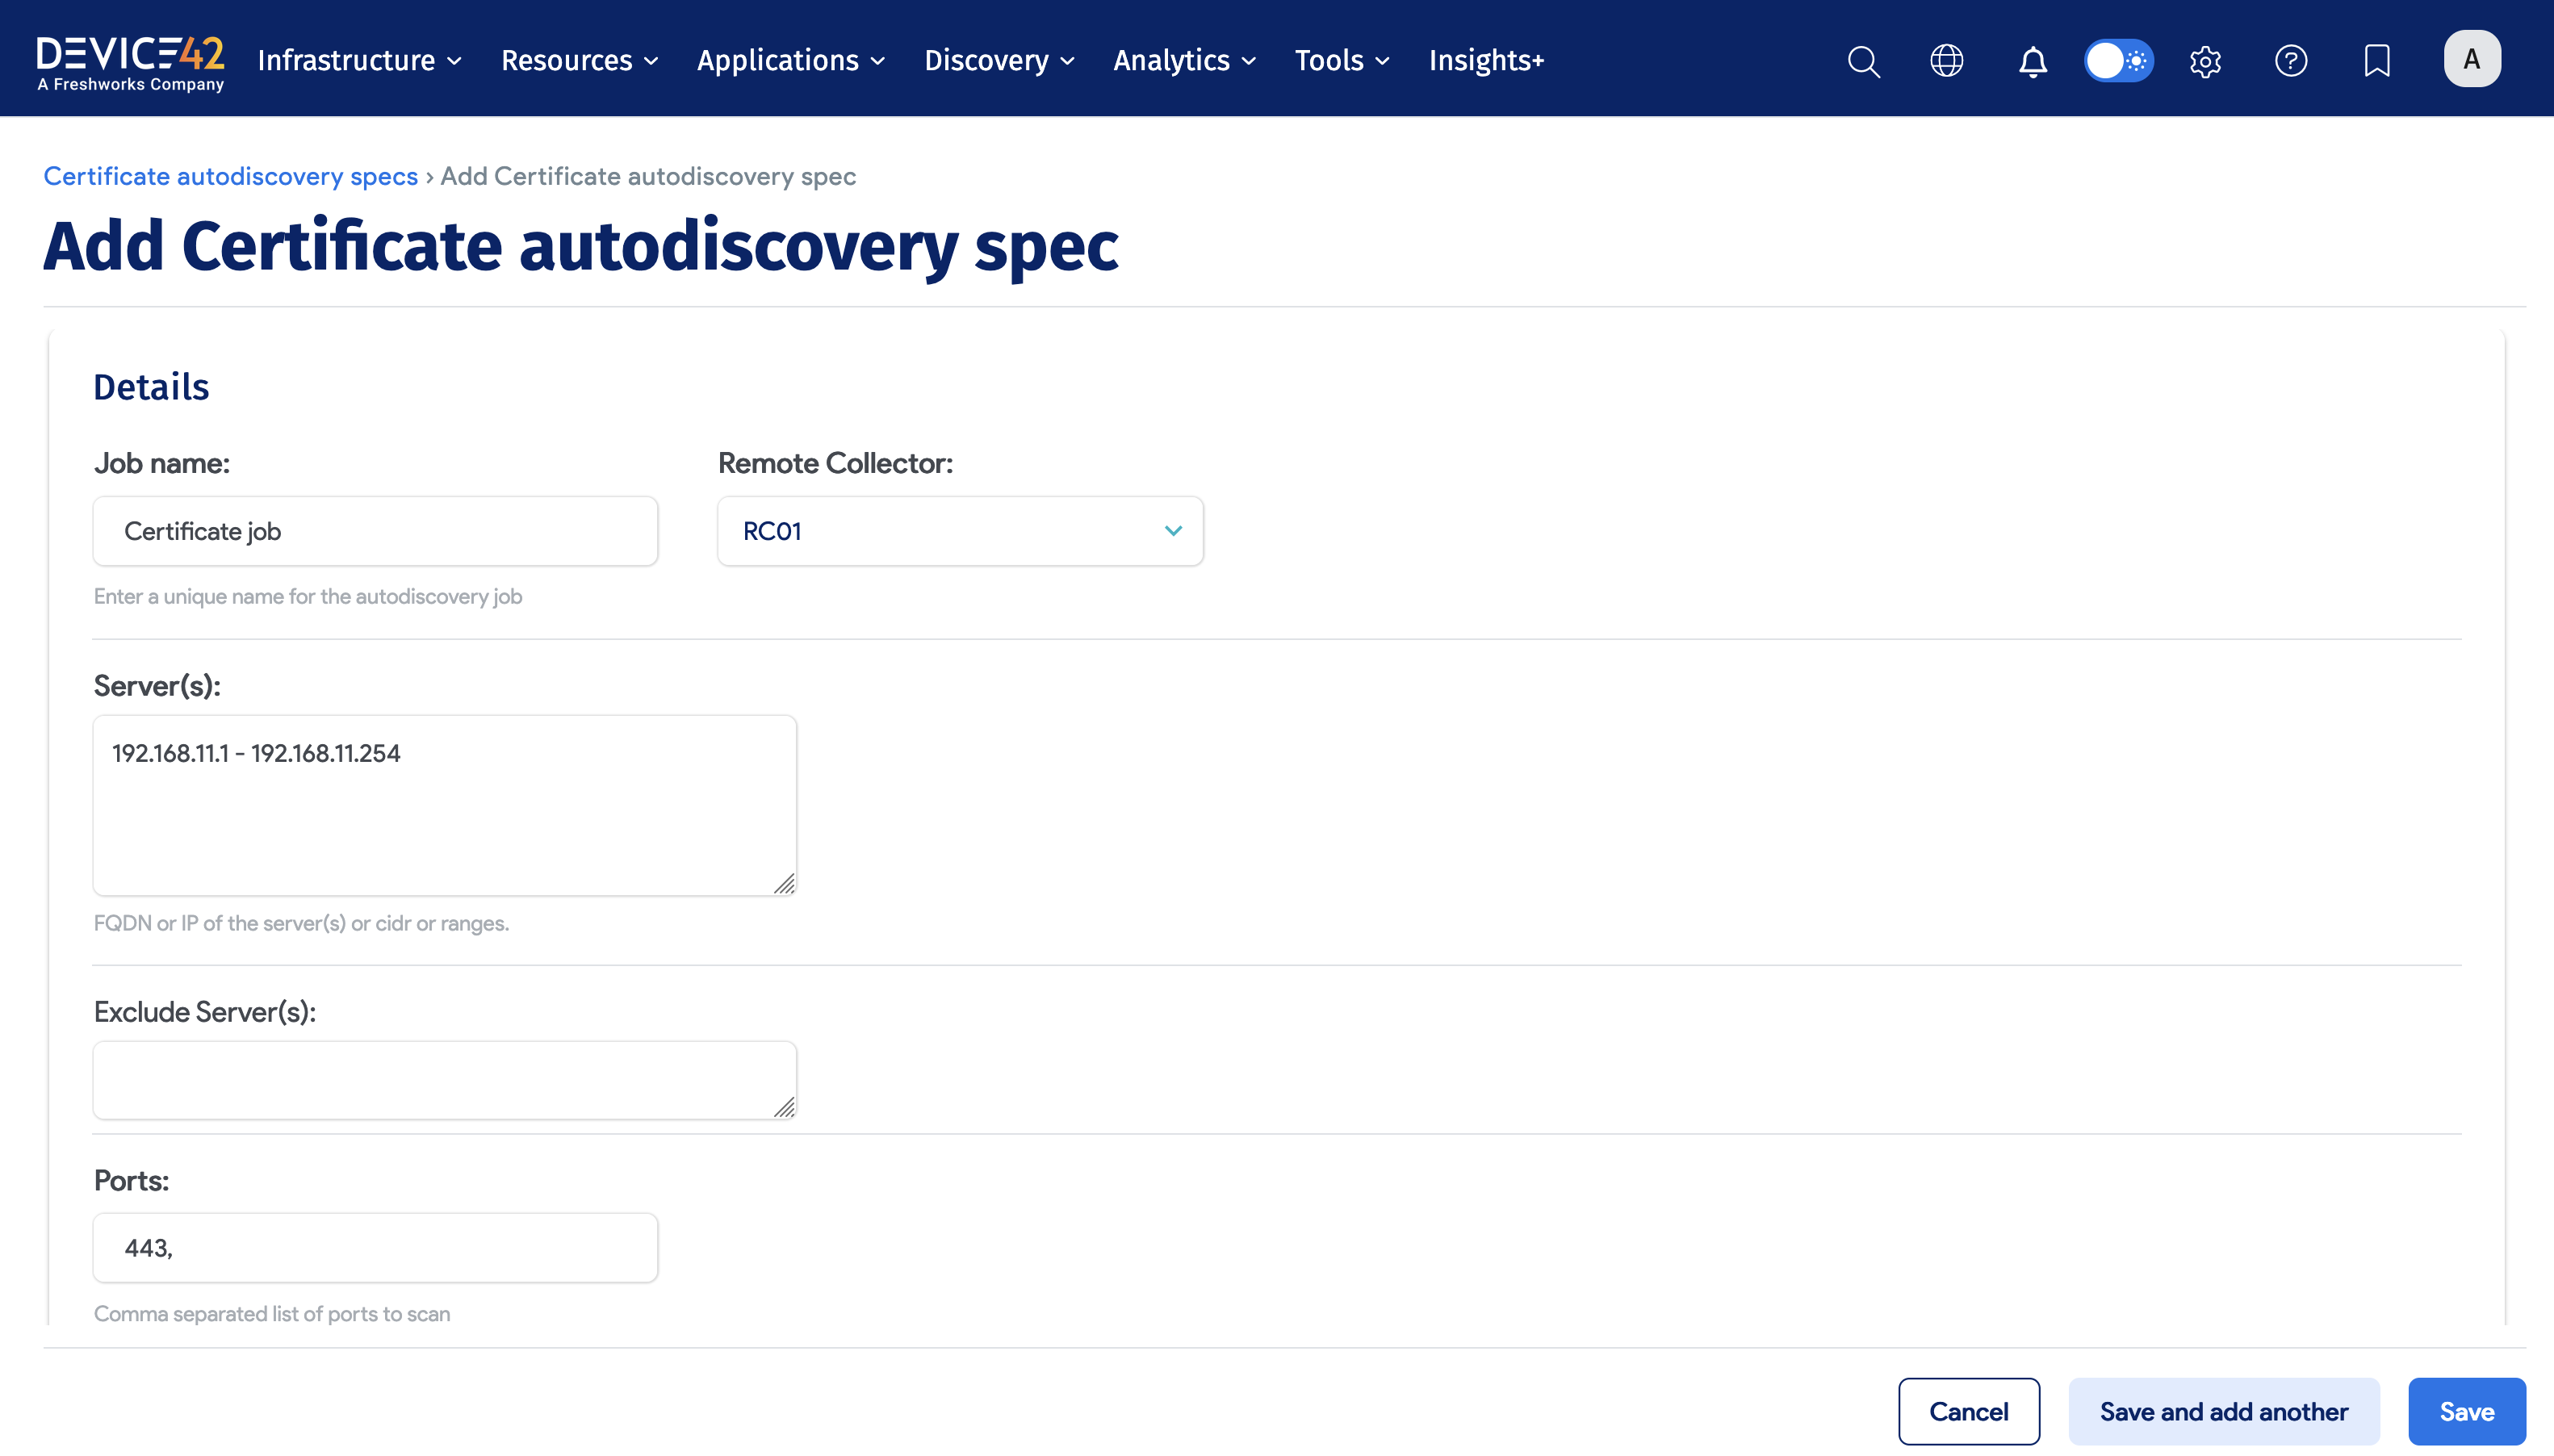
To create and run a Certificates discovery job, perform the following steps:
- Choose Discovery > Certificates.
- Click the Create button.
- Enter the Job name.
- Select the Remote Collector.
- Provide the Server or Servers, CIDR Block or IP Range.
- Review the remaining options and choose the items that best fit your needs.
- Click the Save button.
- Click the checkbox next to the discovery job(s) and choose Actions > Run Selected Jobs.
Click here for information on managing discovered certificates.
To view a video on viewing the results from Certificates discovery jobs, click here.
2.8 Create Warranty Discovery Jobs
Warranty discovery jobs enable you to discover and document your hardware warranties. Device42 currently supports warranty autodiscovery for the following vendors: Dell, IBM, Lenovo, Meraki, and Cisco (Preview).
Warranty Discovery Job Prerequisites
Device Field Prerequisites
The warranty discovery API requires both the device model and serial number fields be correctly entered, either manually or via discovery.
The Device42 Hardware field must include a vendor name that exactly equals a value of "Dell", "IBM", "Meraki", and "Lenovo". You can add vendor aliases if you choose. If you have multiple vendor entries for any of these vendors (e.g. "Dell", "Dell Inc.") we recommend merging these into a single vendor, using the above-mentioned vendor names (see the Merge Vendor Section of the Warranty Autodiscovery page for instructions to merge multiple vendors).
API Prerequisites
Warranty Discovery requires vendor API keys. See the information below on how to receive API keys from each vendor.
- Dell API key: Register or log in at Dell TechDirect portal and choose Services > APIs to request an API key; you will be provided with a Client ID and Client Secret for API access.
- Meraki API key: Click here for Meraki instructions to receive your API key.
- Lenovo API key: Large enterprise customers can request a warranty lookup API key from Lenovo Sales or Support Account Representatives.
- IBM API key: Click here to log in to your IBM account to access your warranty lookup information.
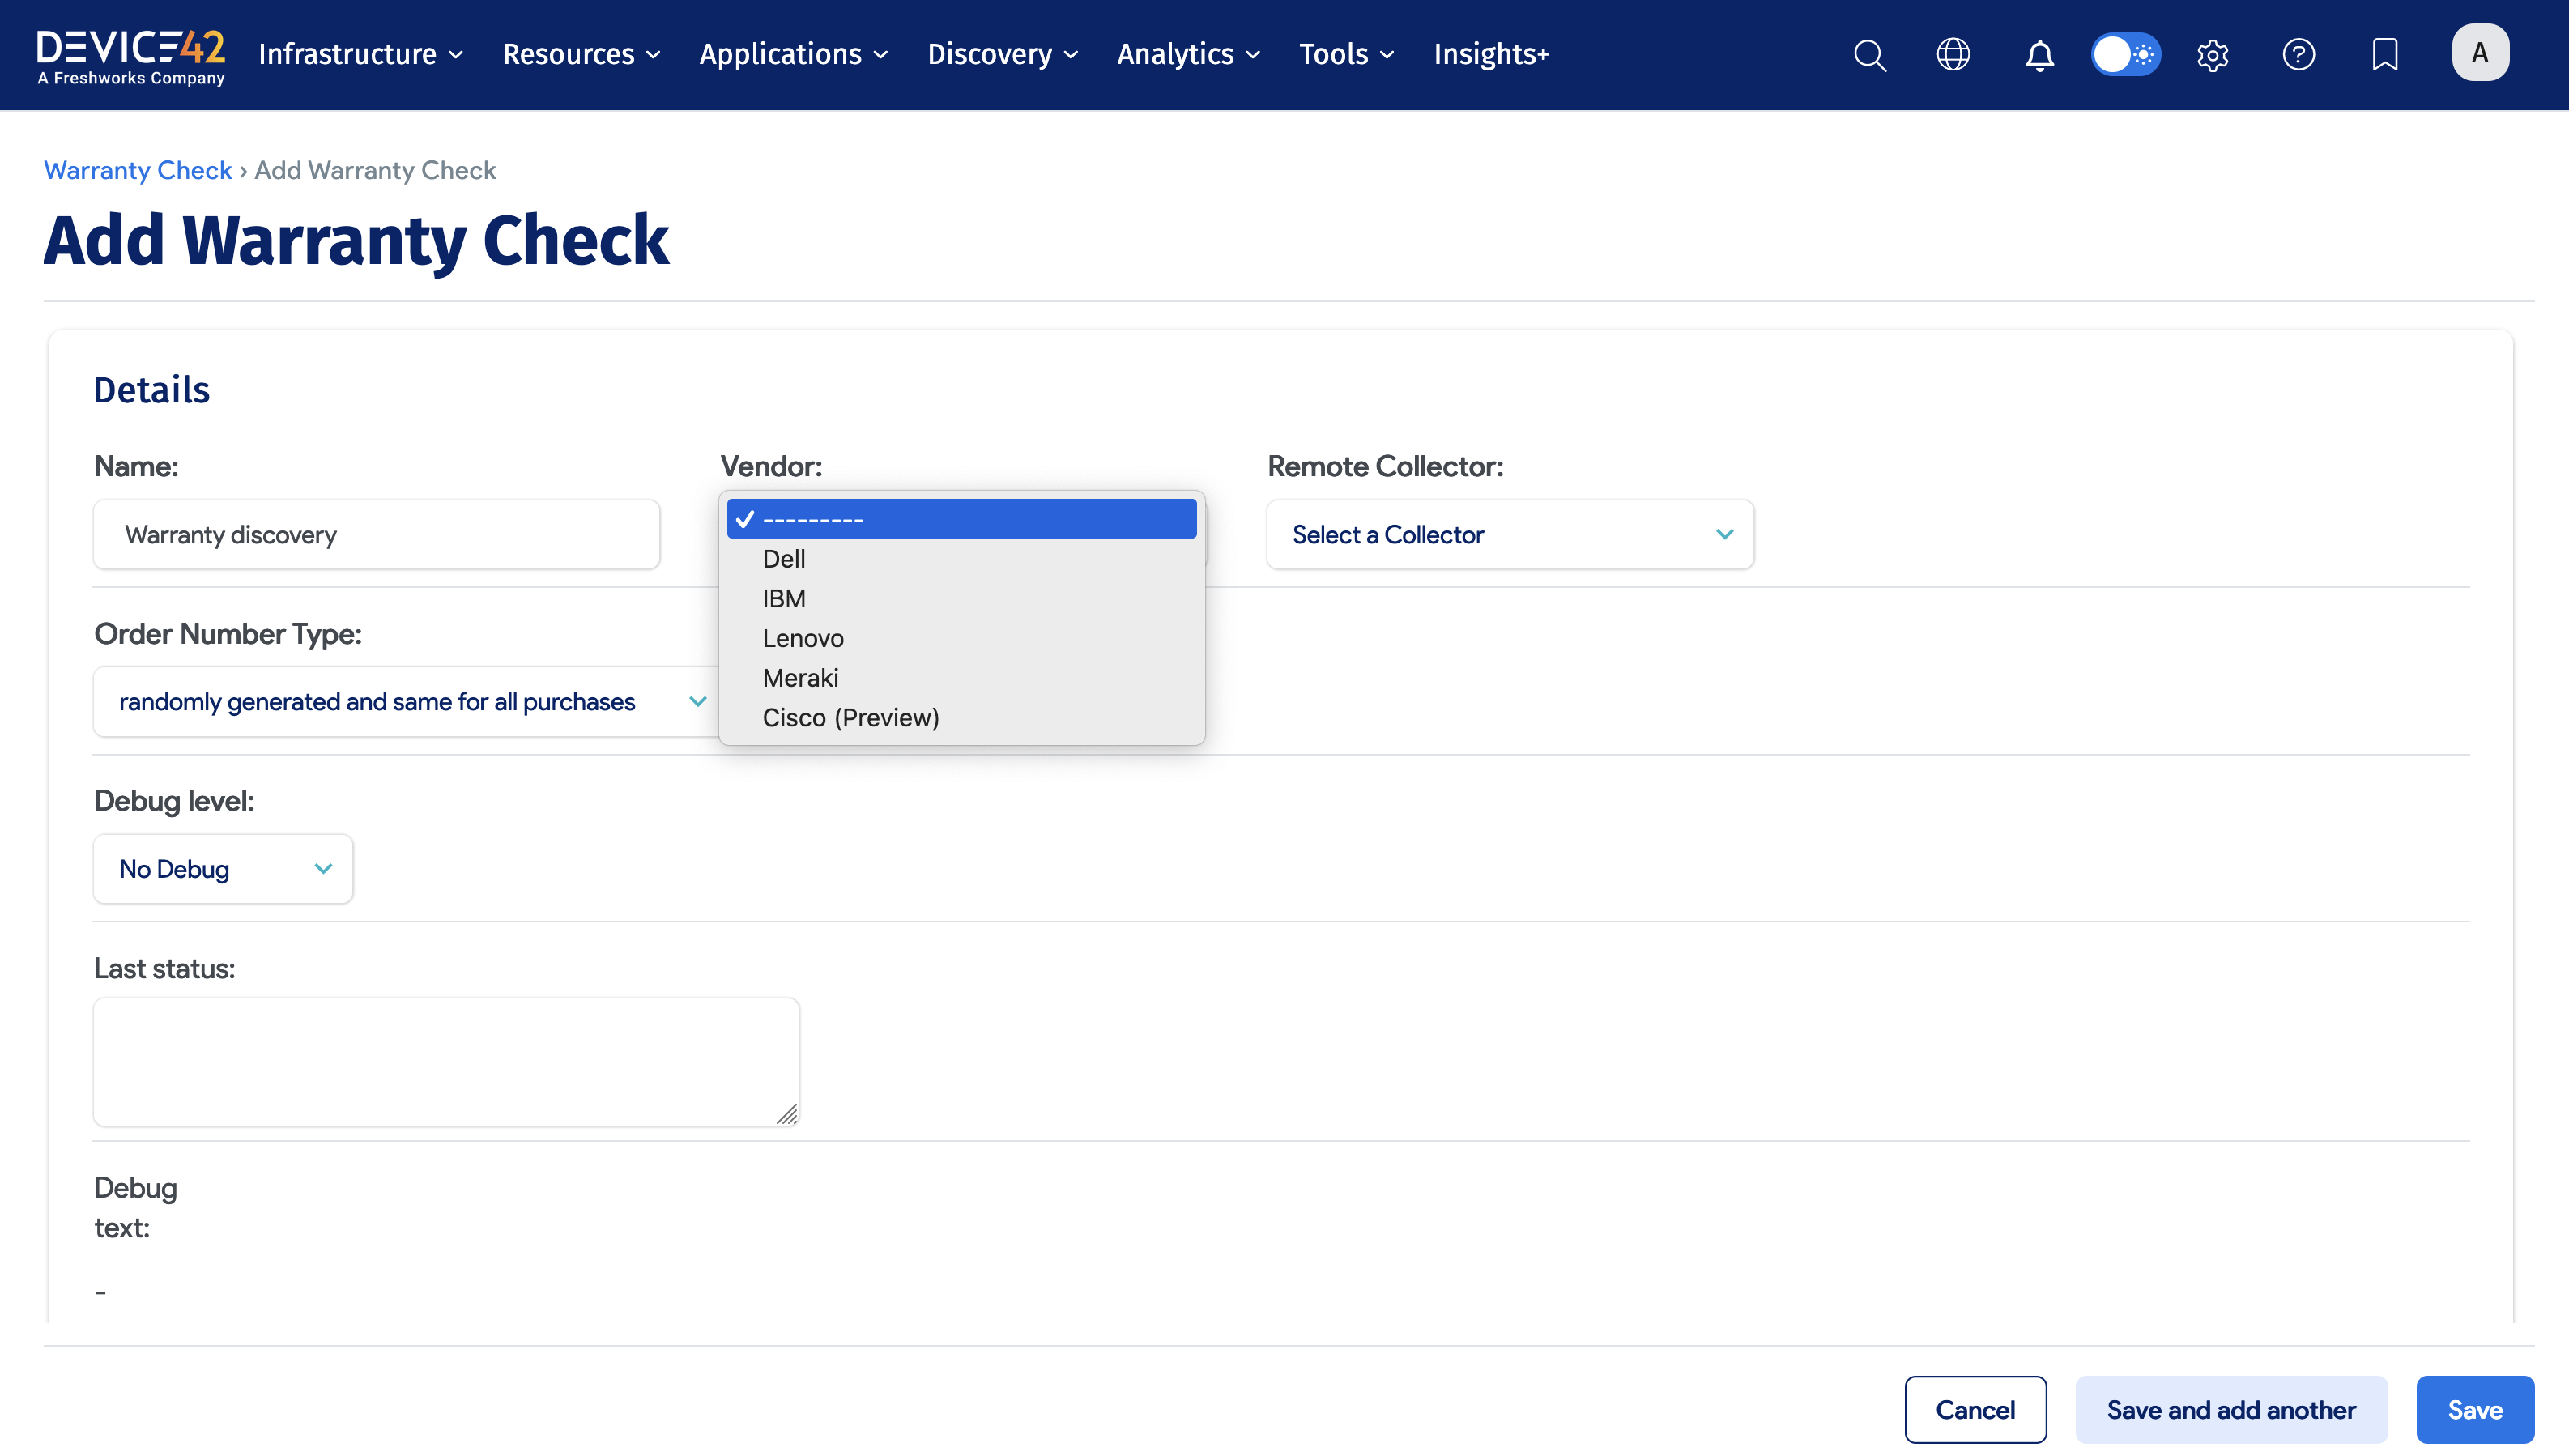
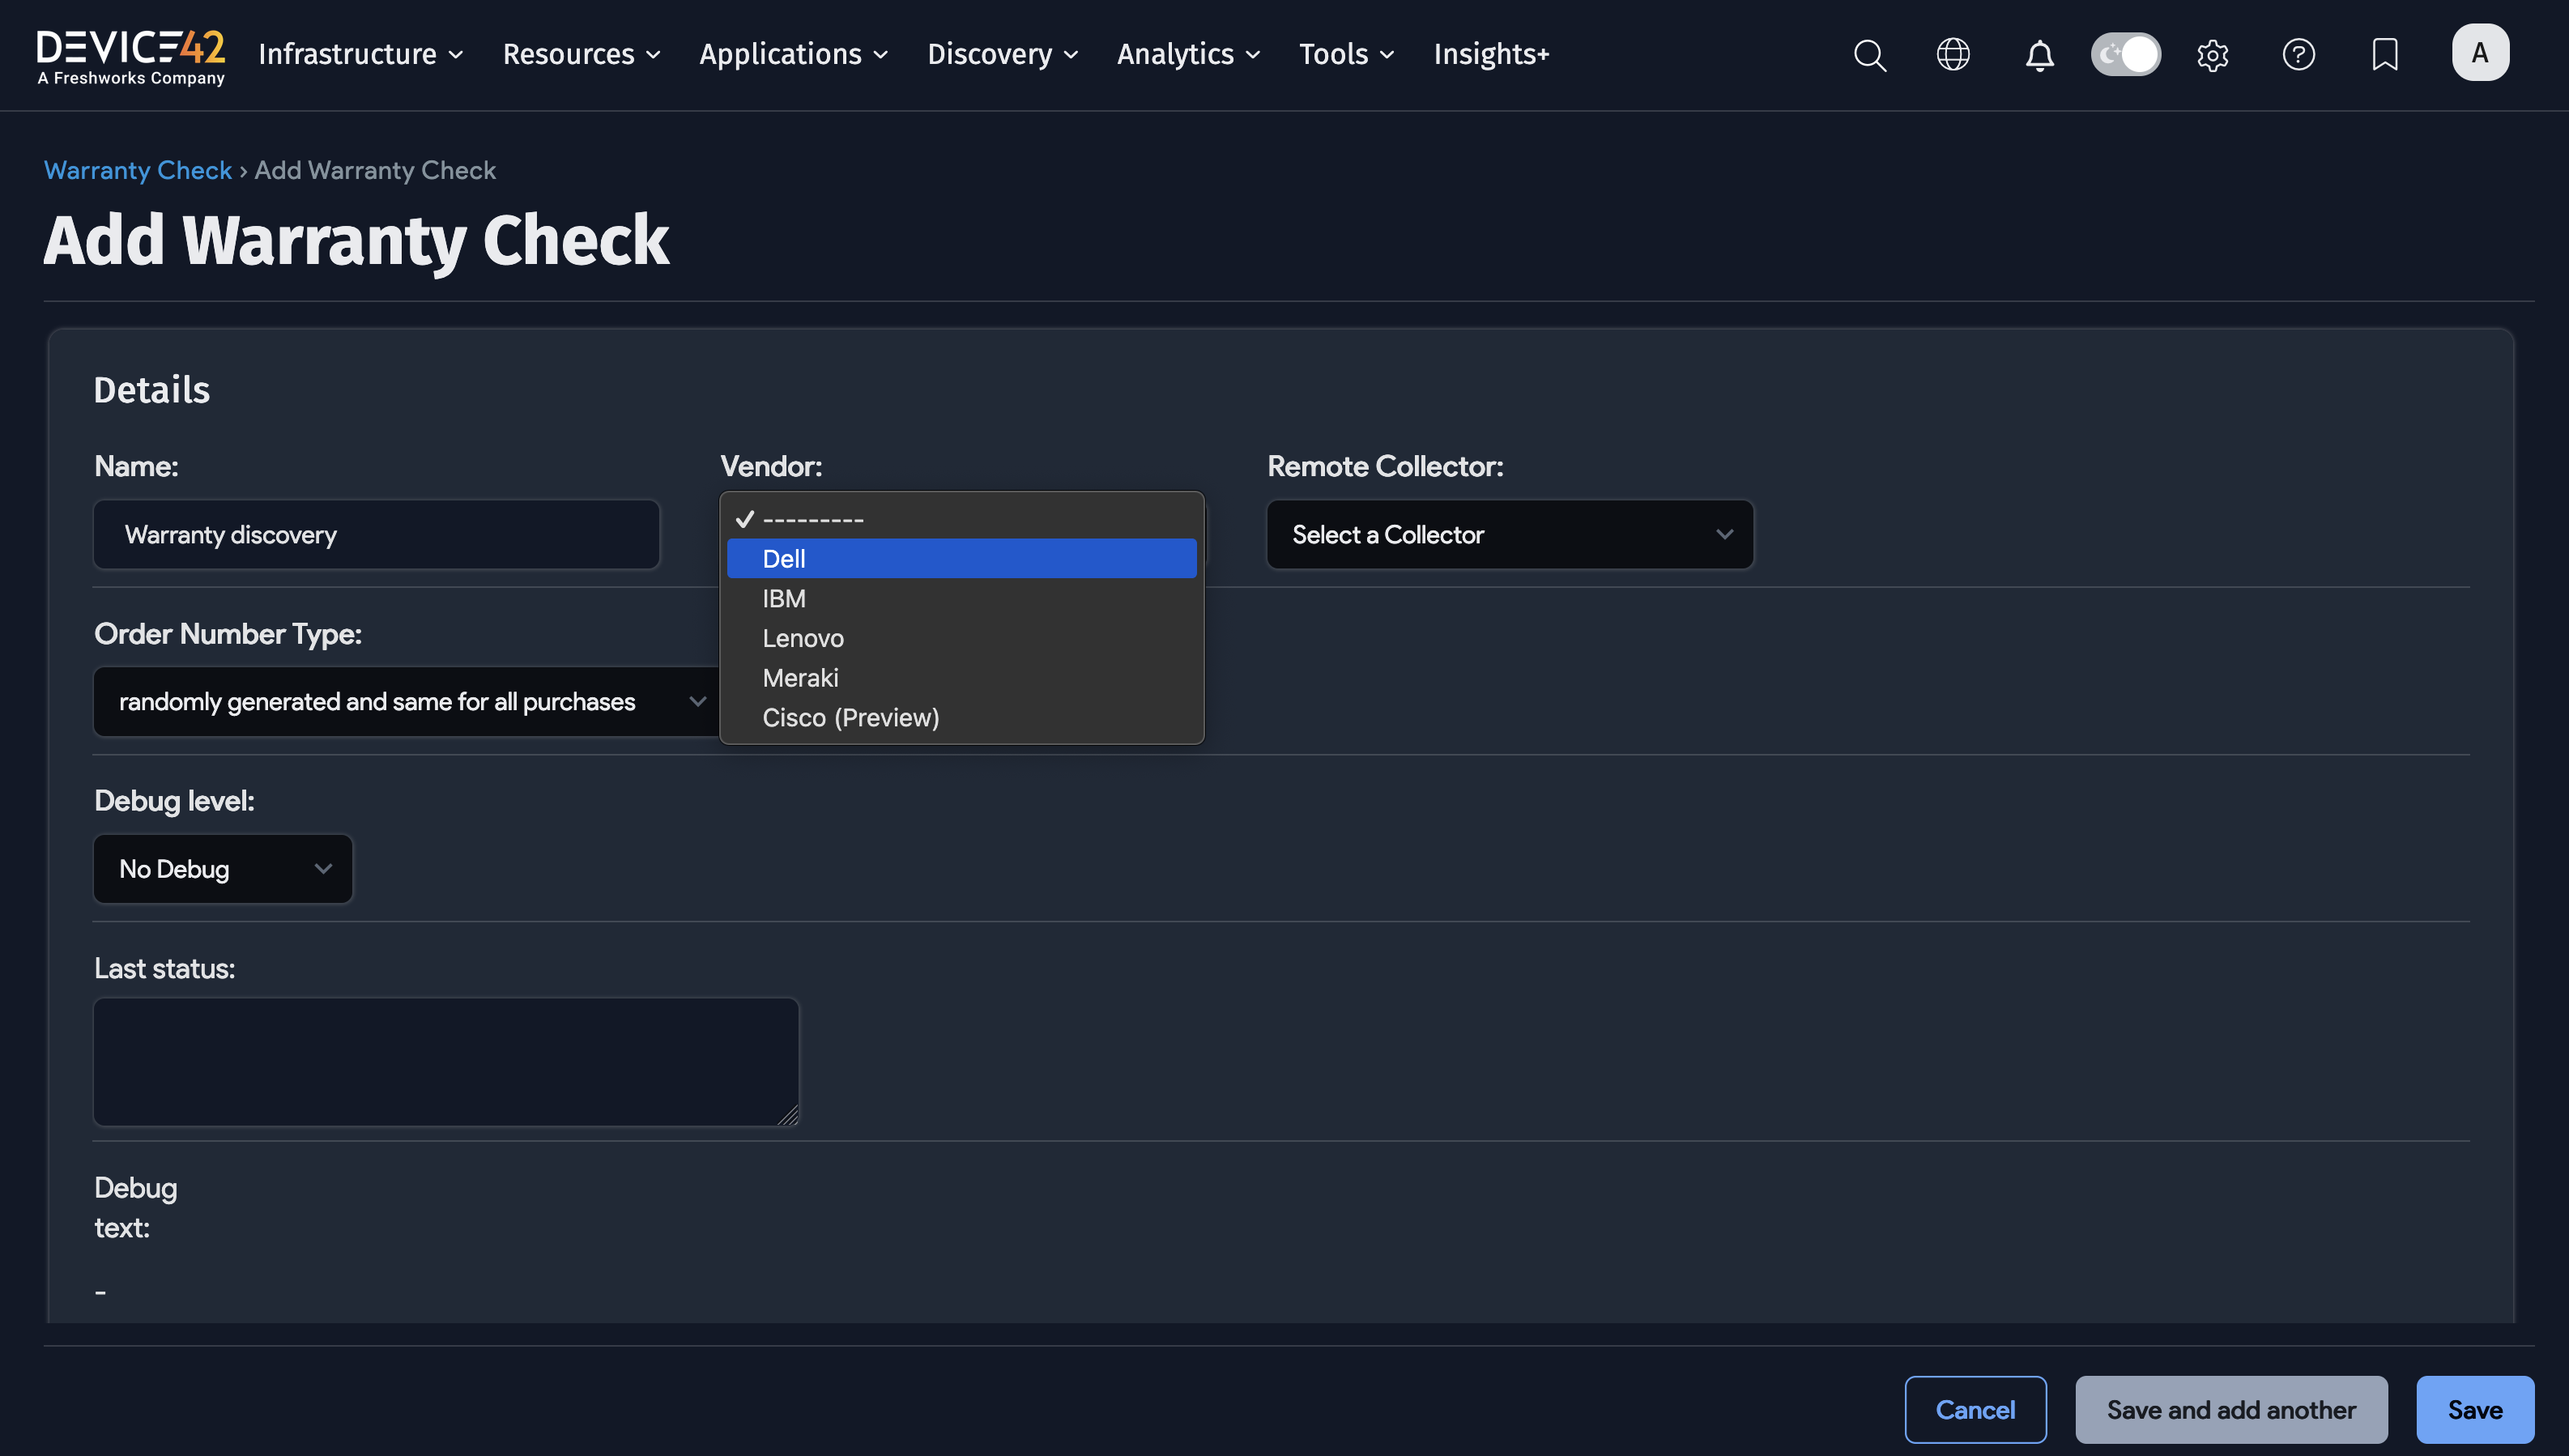
Steps to Create and Run a Warranty Discovery Job
To create and run a Warranty discovery Job, perform the following steps:
- Choose Discovery > Warranty Sync.
- Click the Create button.
- Enter the Job name.
- Select the Remote Collector.
- Select the Vendor:
- For Dell, then specify the API Version then specify the Access Key and Secret Key
- For Meraki, then specify the Access Key
- For IBM or Lenovo, then specify the Access Key
- Select the Order Number Type.
- Select the Debug level.
- Click the Save button.
- Click the checkbox next to the discovery job(s) and choose Actions > Run Selected Jobs.
Click here for more detail regarding Warranty Autodiscovery, including API Key details, configuration information, and prerequisites. It also includes information to configure the warranty script, as well as documenting the secure communication details between the Device42 UI and warranty script to the hardware vendor, and other information. This should be your first place to look when troubleshooting Warranty discovery job issues.
2.9 Create UCS/Load Balancer Discovery Jobs
UCS/Load Balancer discovery jobs map out virtual servers, pools, and their relationships to backend devices. Once you have run SNMP and Windows/*nix discovery jobs, you can create UCS/Load Balancer jobs to collect connectivity and dependency data.
Prerequisites
For F5 discovery, ensure you have the username for a local account with access to the F5 API. The API calls work with read-only access and do not require administrative privileges.
Note that F5 devices do not support username and password authentication for accounts that use external authentication providers, such as Active Directory, which uses token-based authentication.
Steps to Create and Run a Load Balancer and Cluster Device (UCS) Discovery Job
Given the variety of Discovery platforms, we recommend you click here to follow the steps to create these jobs. This page also includes prerequisites and discovery options. To run the created job, click the checkbox next to the discovery job(s) and choose Actions > Run Selected Jobs.
Task 3: Verify Discovery Jobs
There are a variety of ways for you to evaluate the success of a discovery job. These include:
- Discovery Job Results Status: Provides a status of the overall job, displaying successes, failures, warnings, and other results.
- Discovery Scores: Provides a score for one or all discovery jobs.
- Discovery Target Details: Provides discovery results and scores for individual targets (e.g. server).
3.1 Discovery Job Results
After running a discovery job you will be presented with the Job Status.
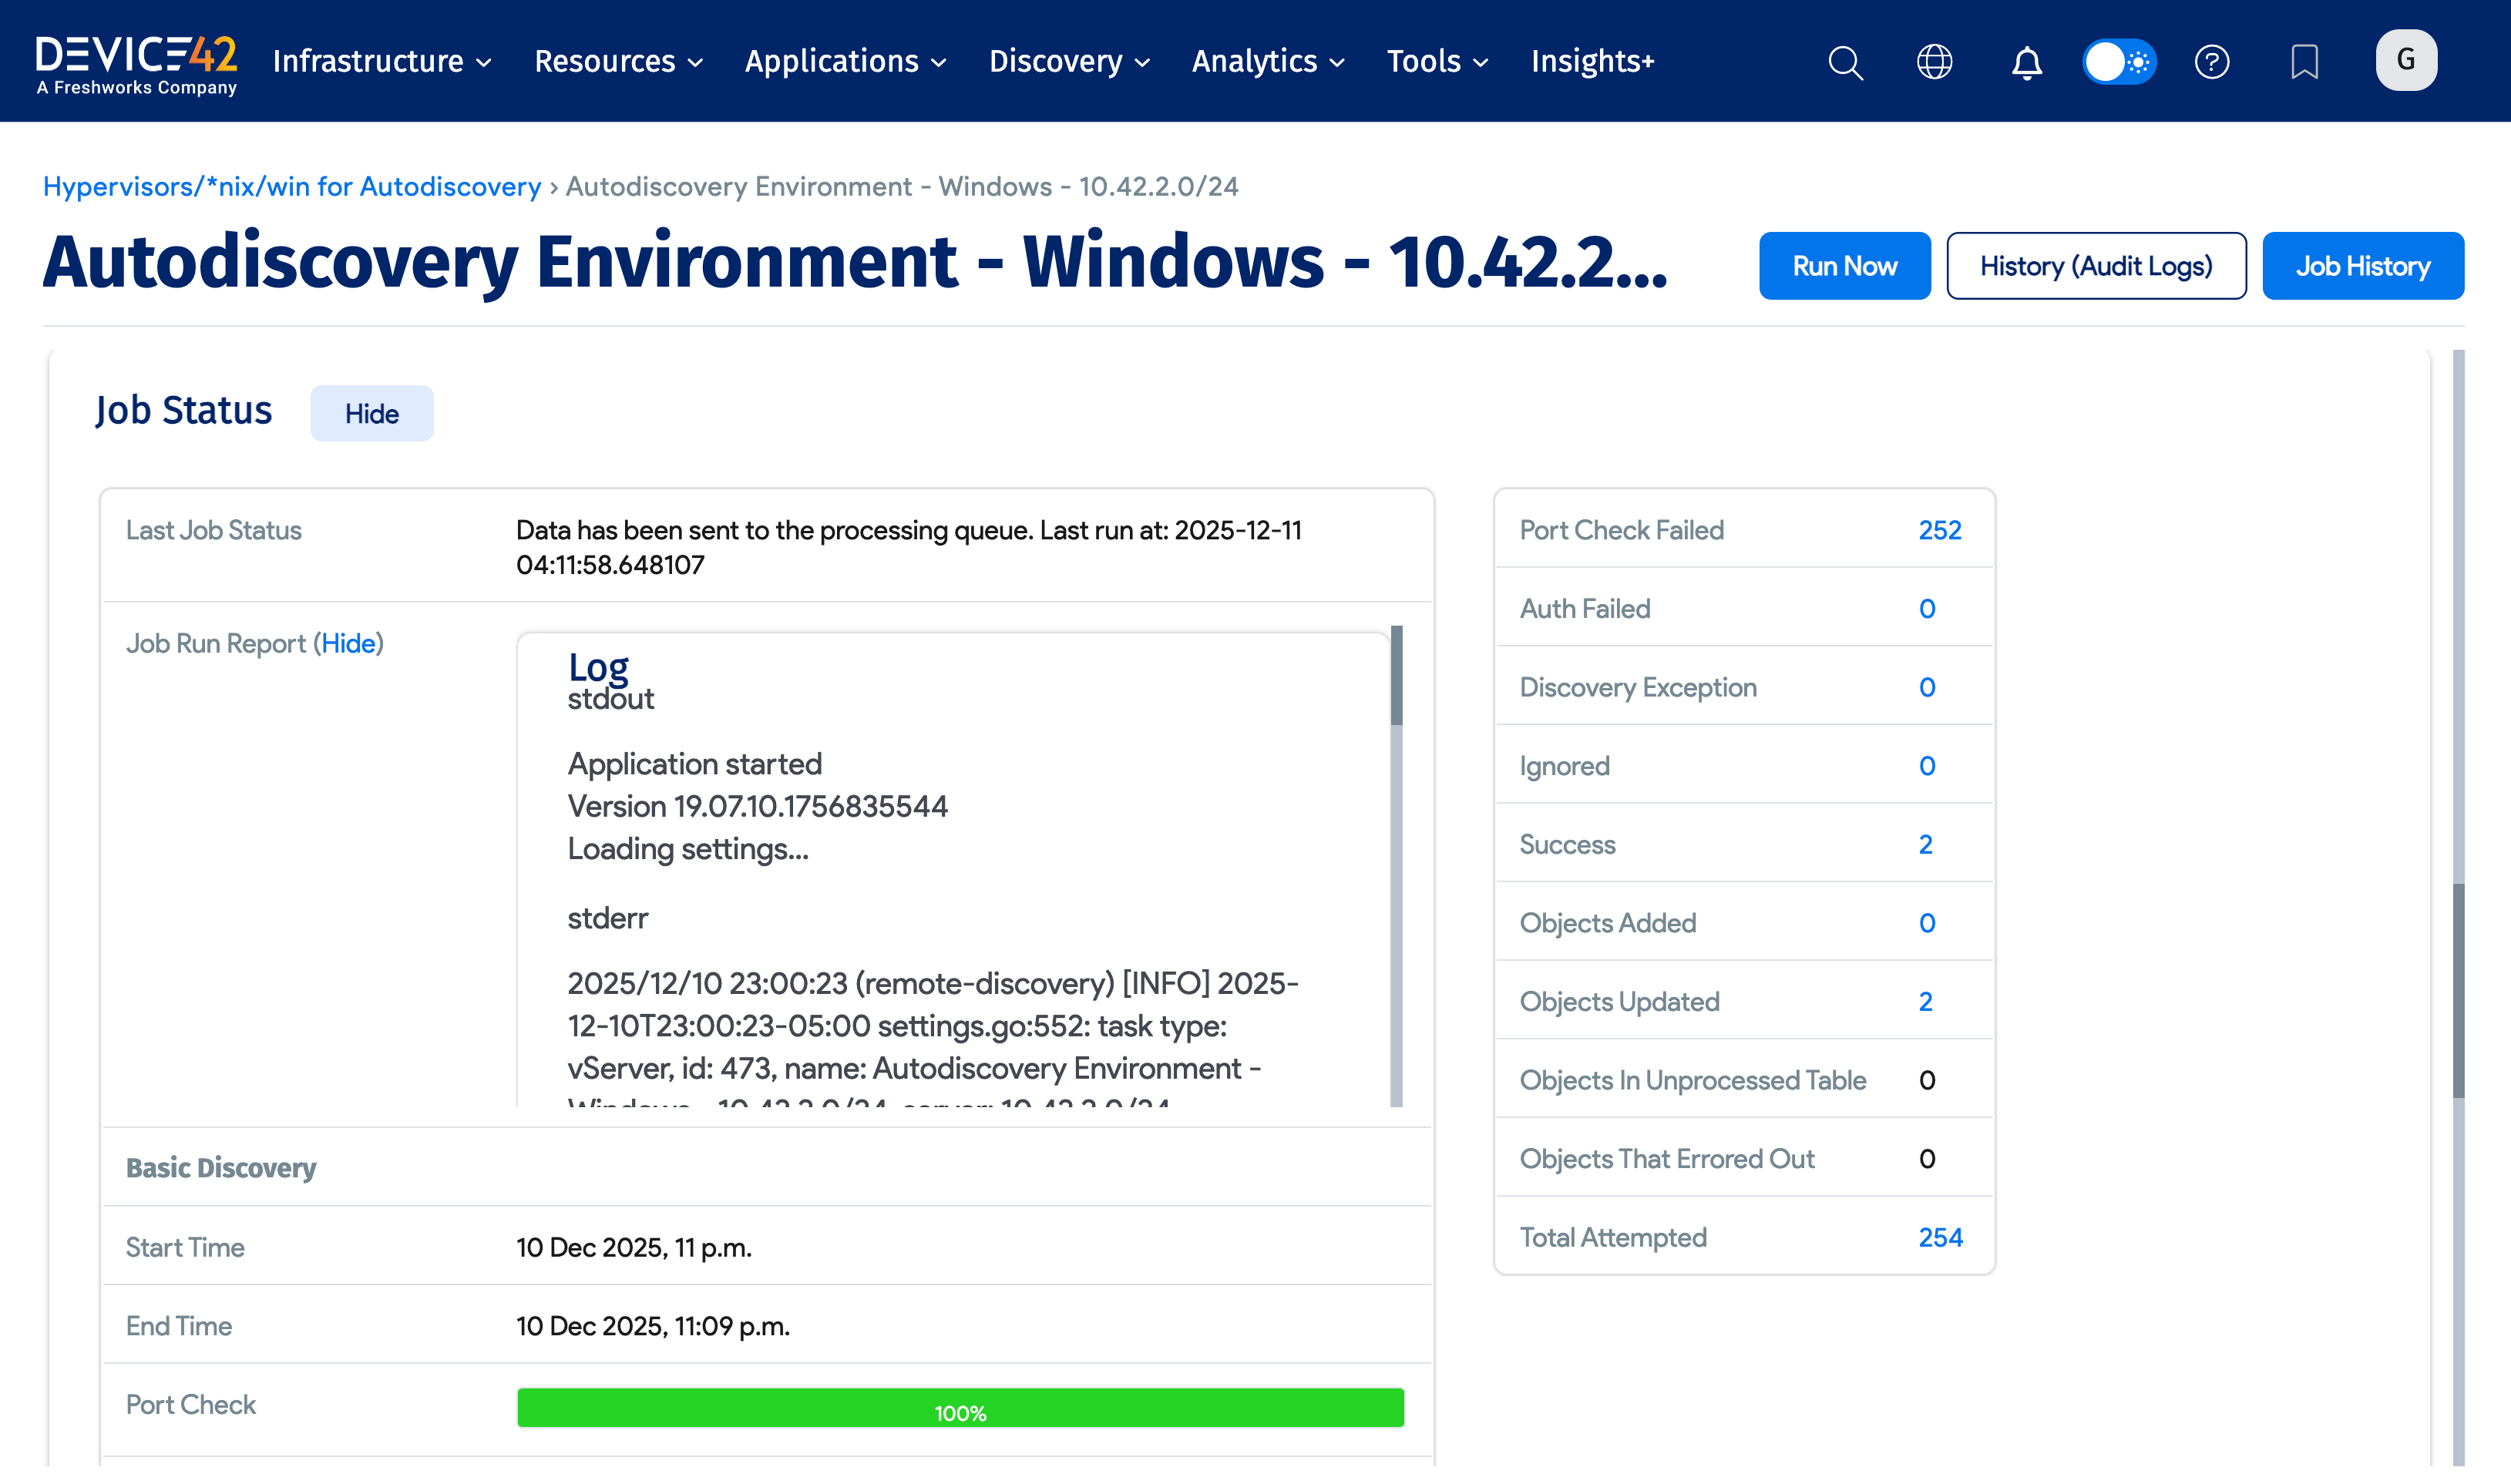
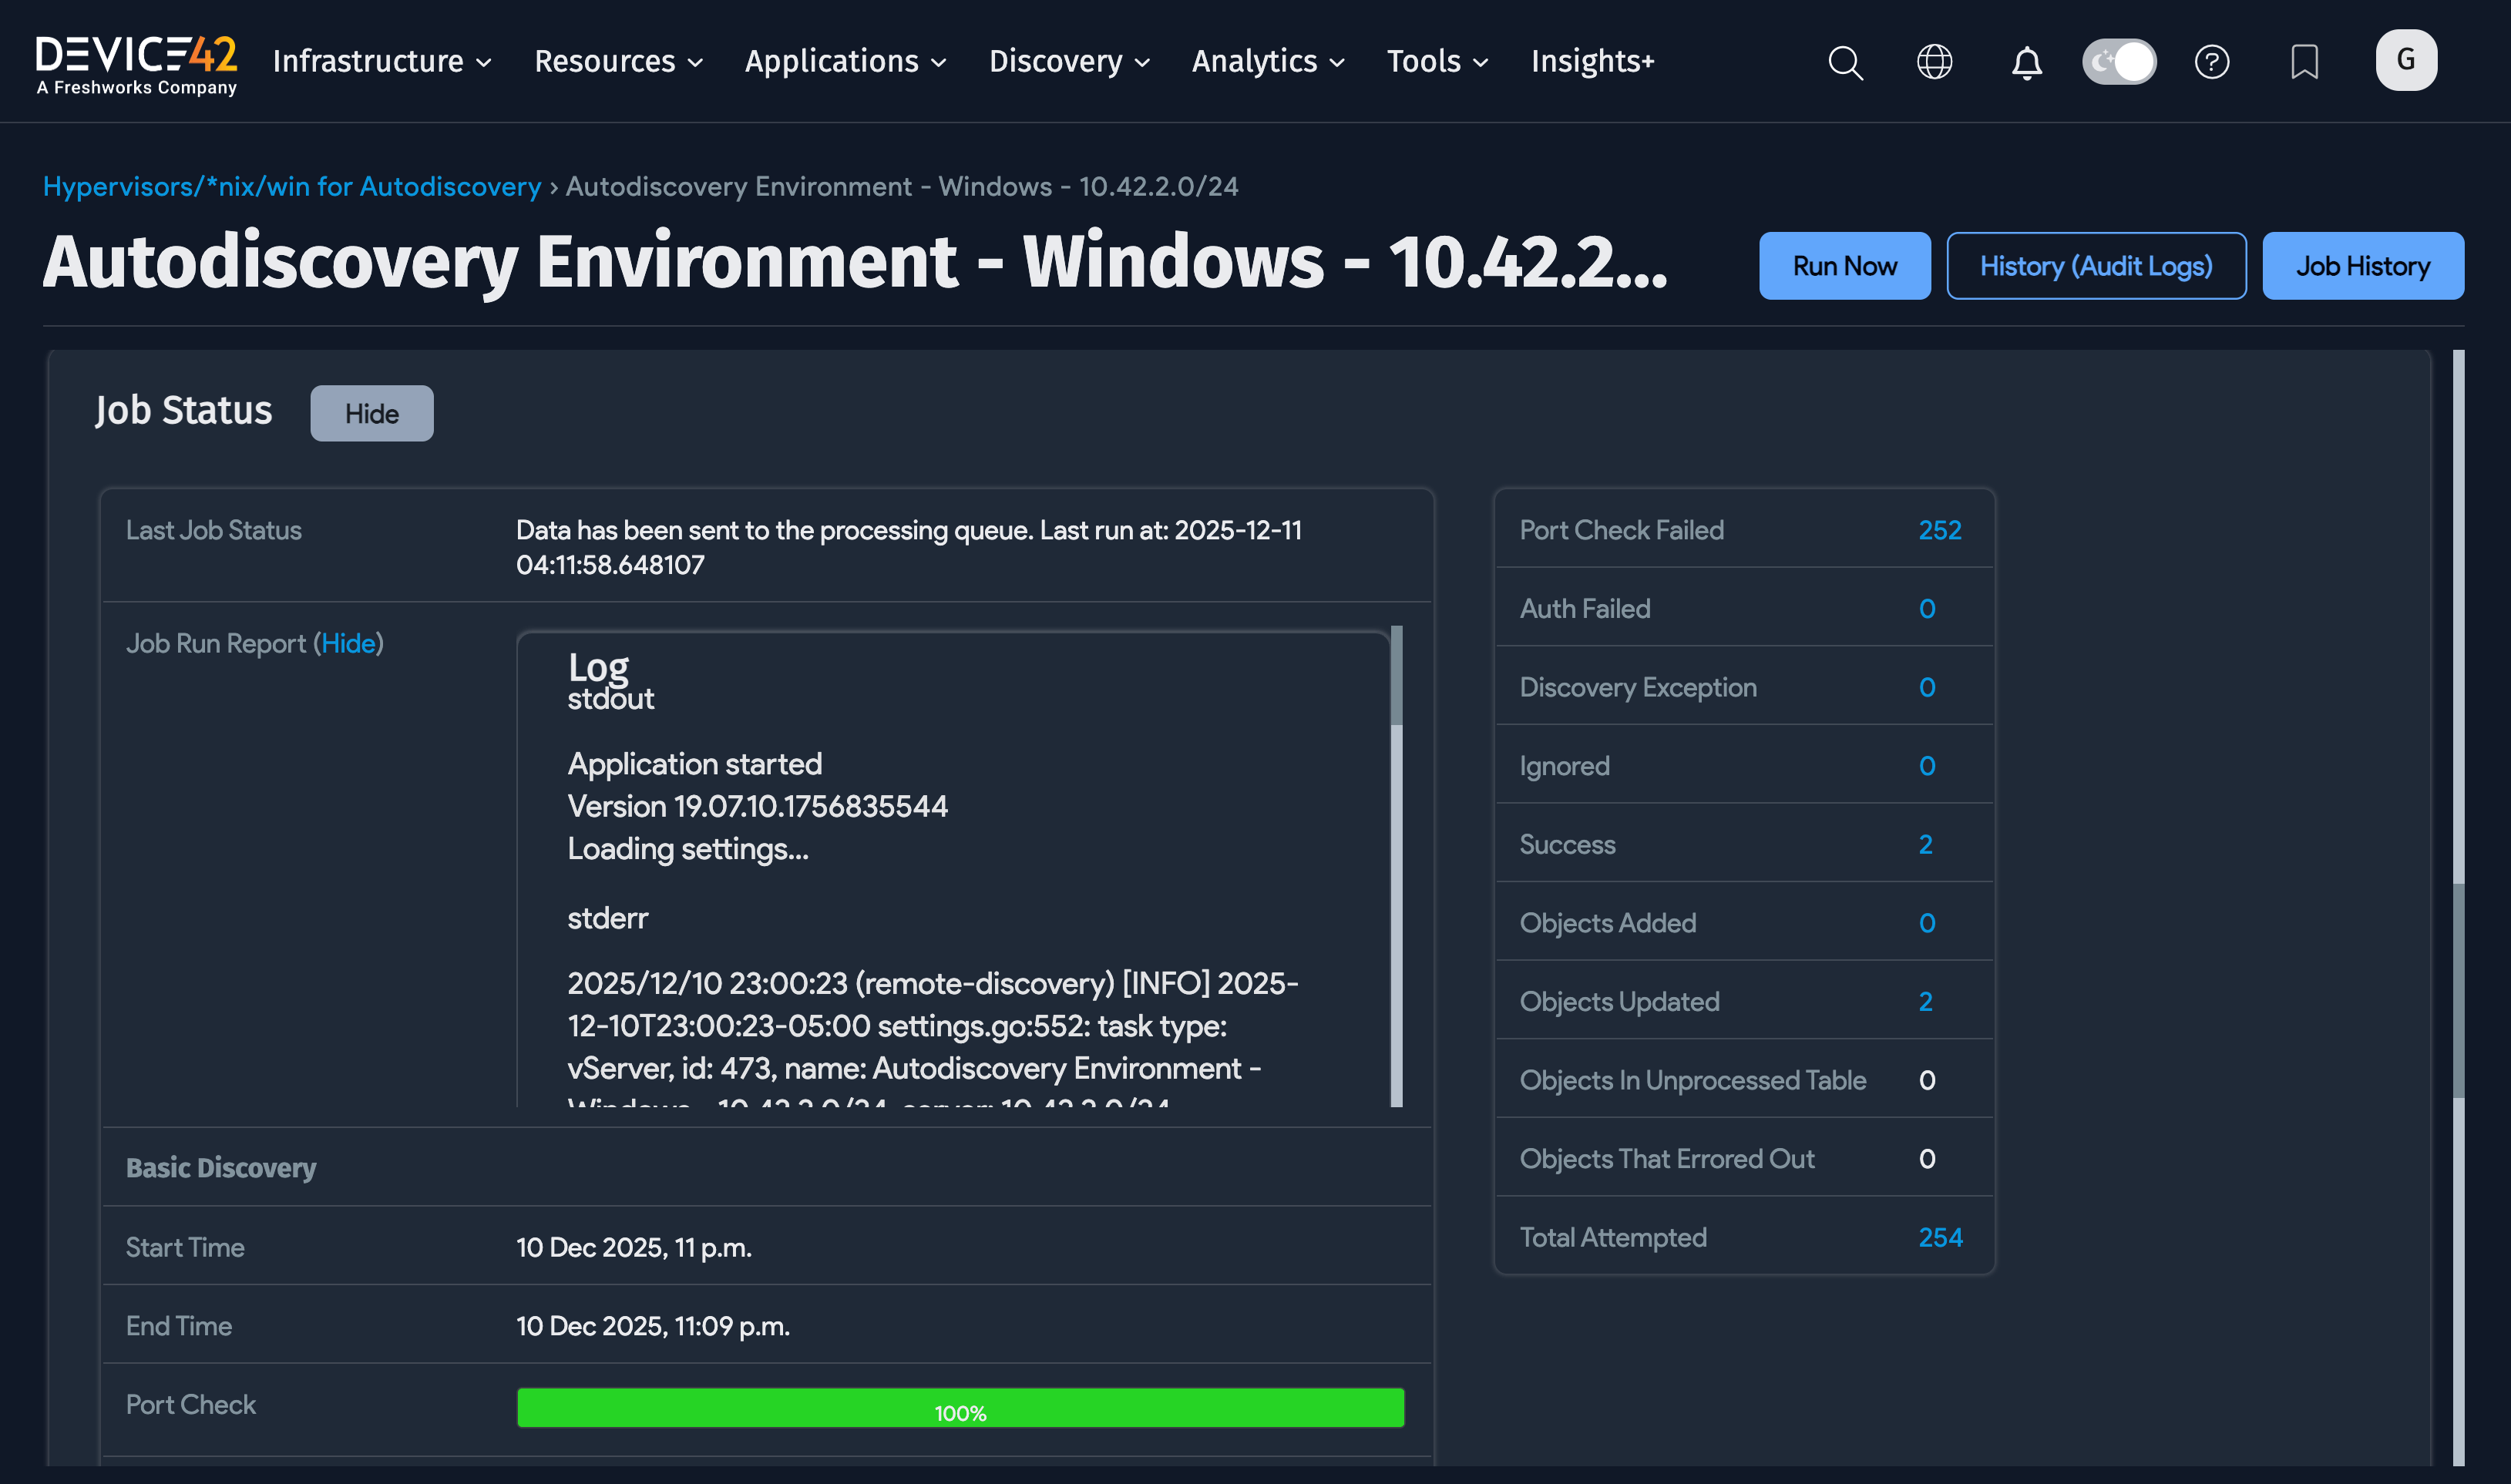
It will include:
- The Job Status section provides the Last Job Status, as well as Basic Discovery and Detailed Discovery results.
- You can click the Show link next to the Job Run Report to see the Job Report Log.
- You can see the Discover Breakdown (e.g. Port Check Failed, Auth Failed, and so on) and click the quantity value for these to link to the Discovery Scores for these items. From here you can link to the Discovery Target Details for each discovered item.
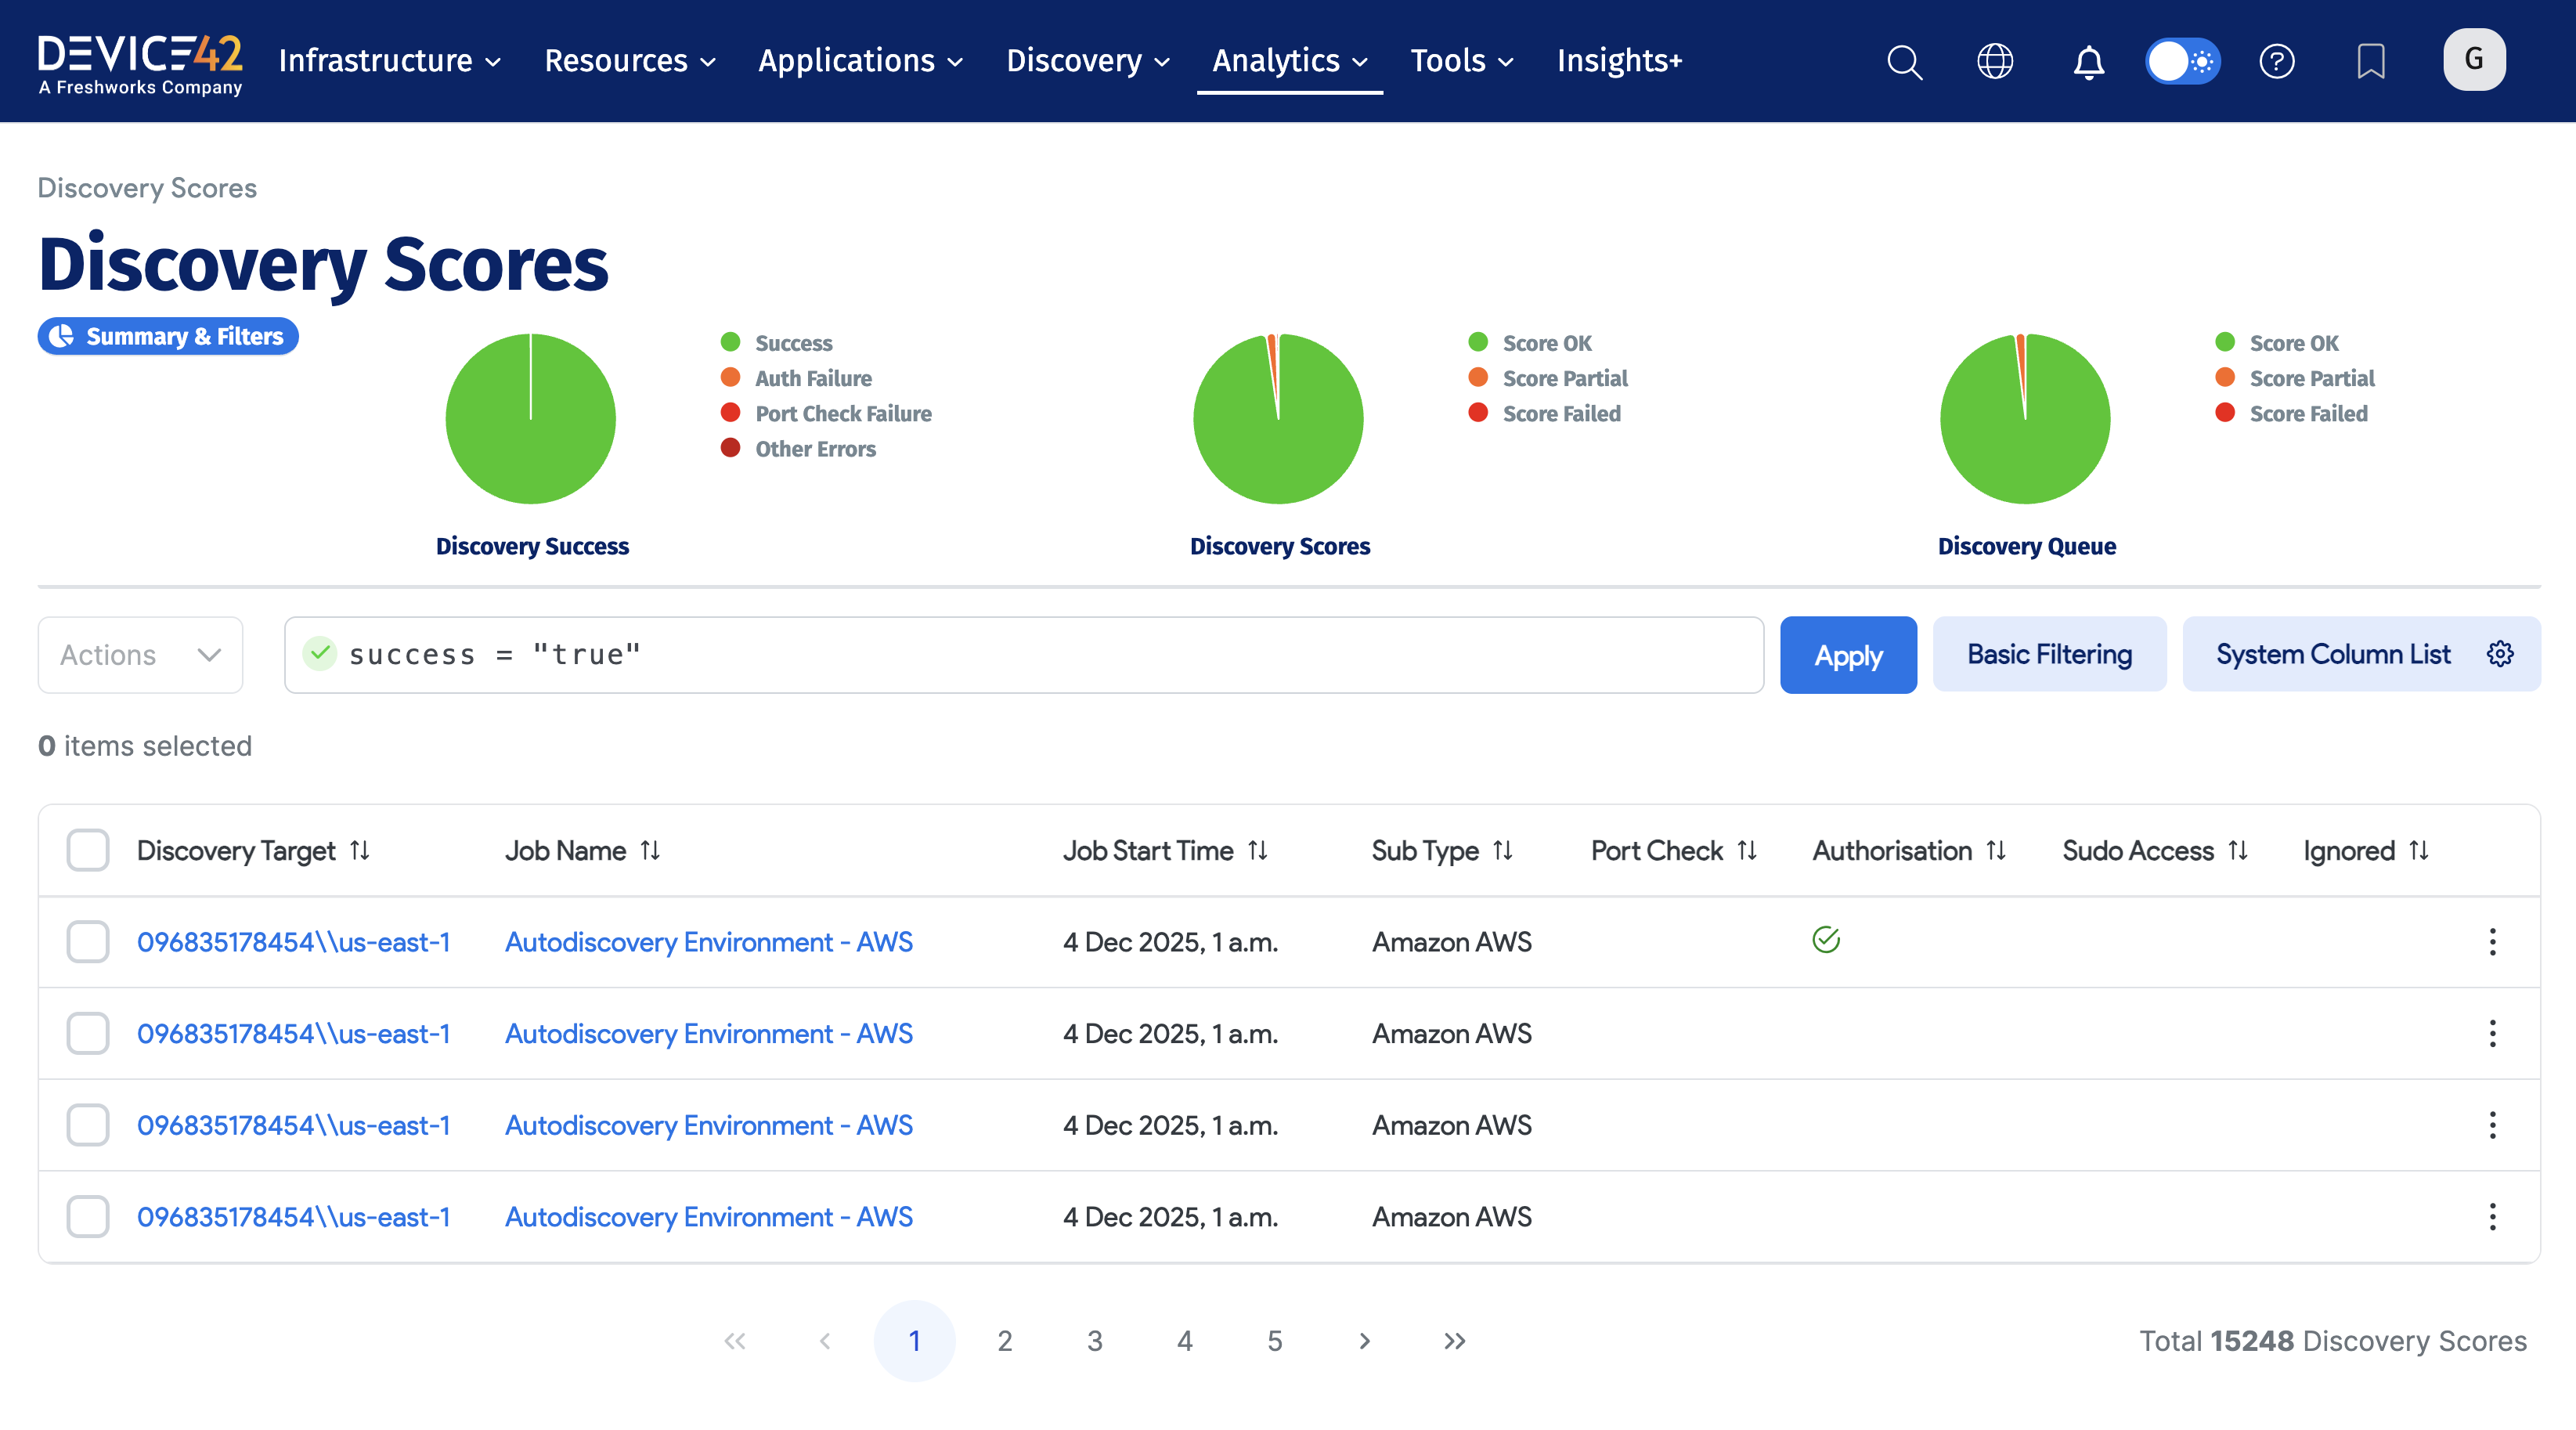
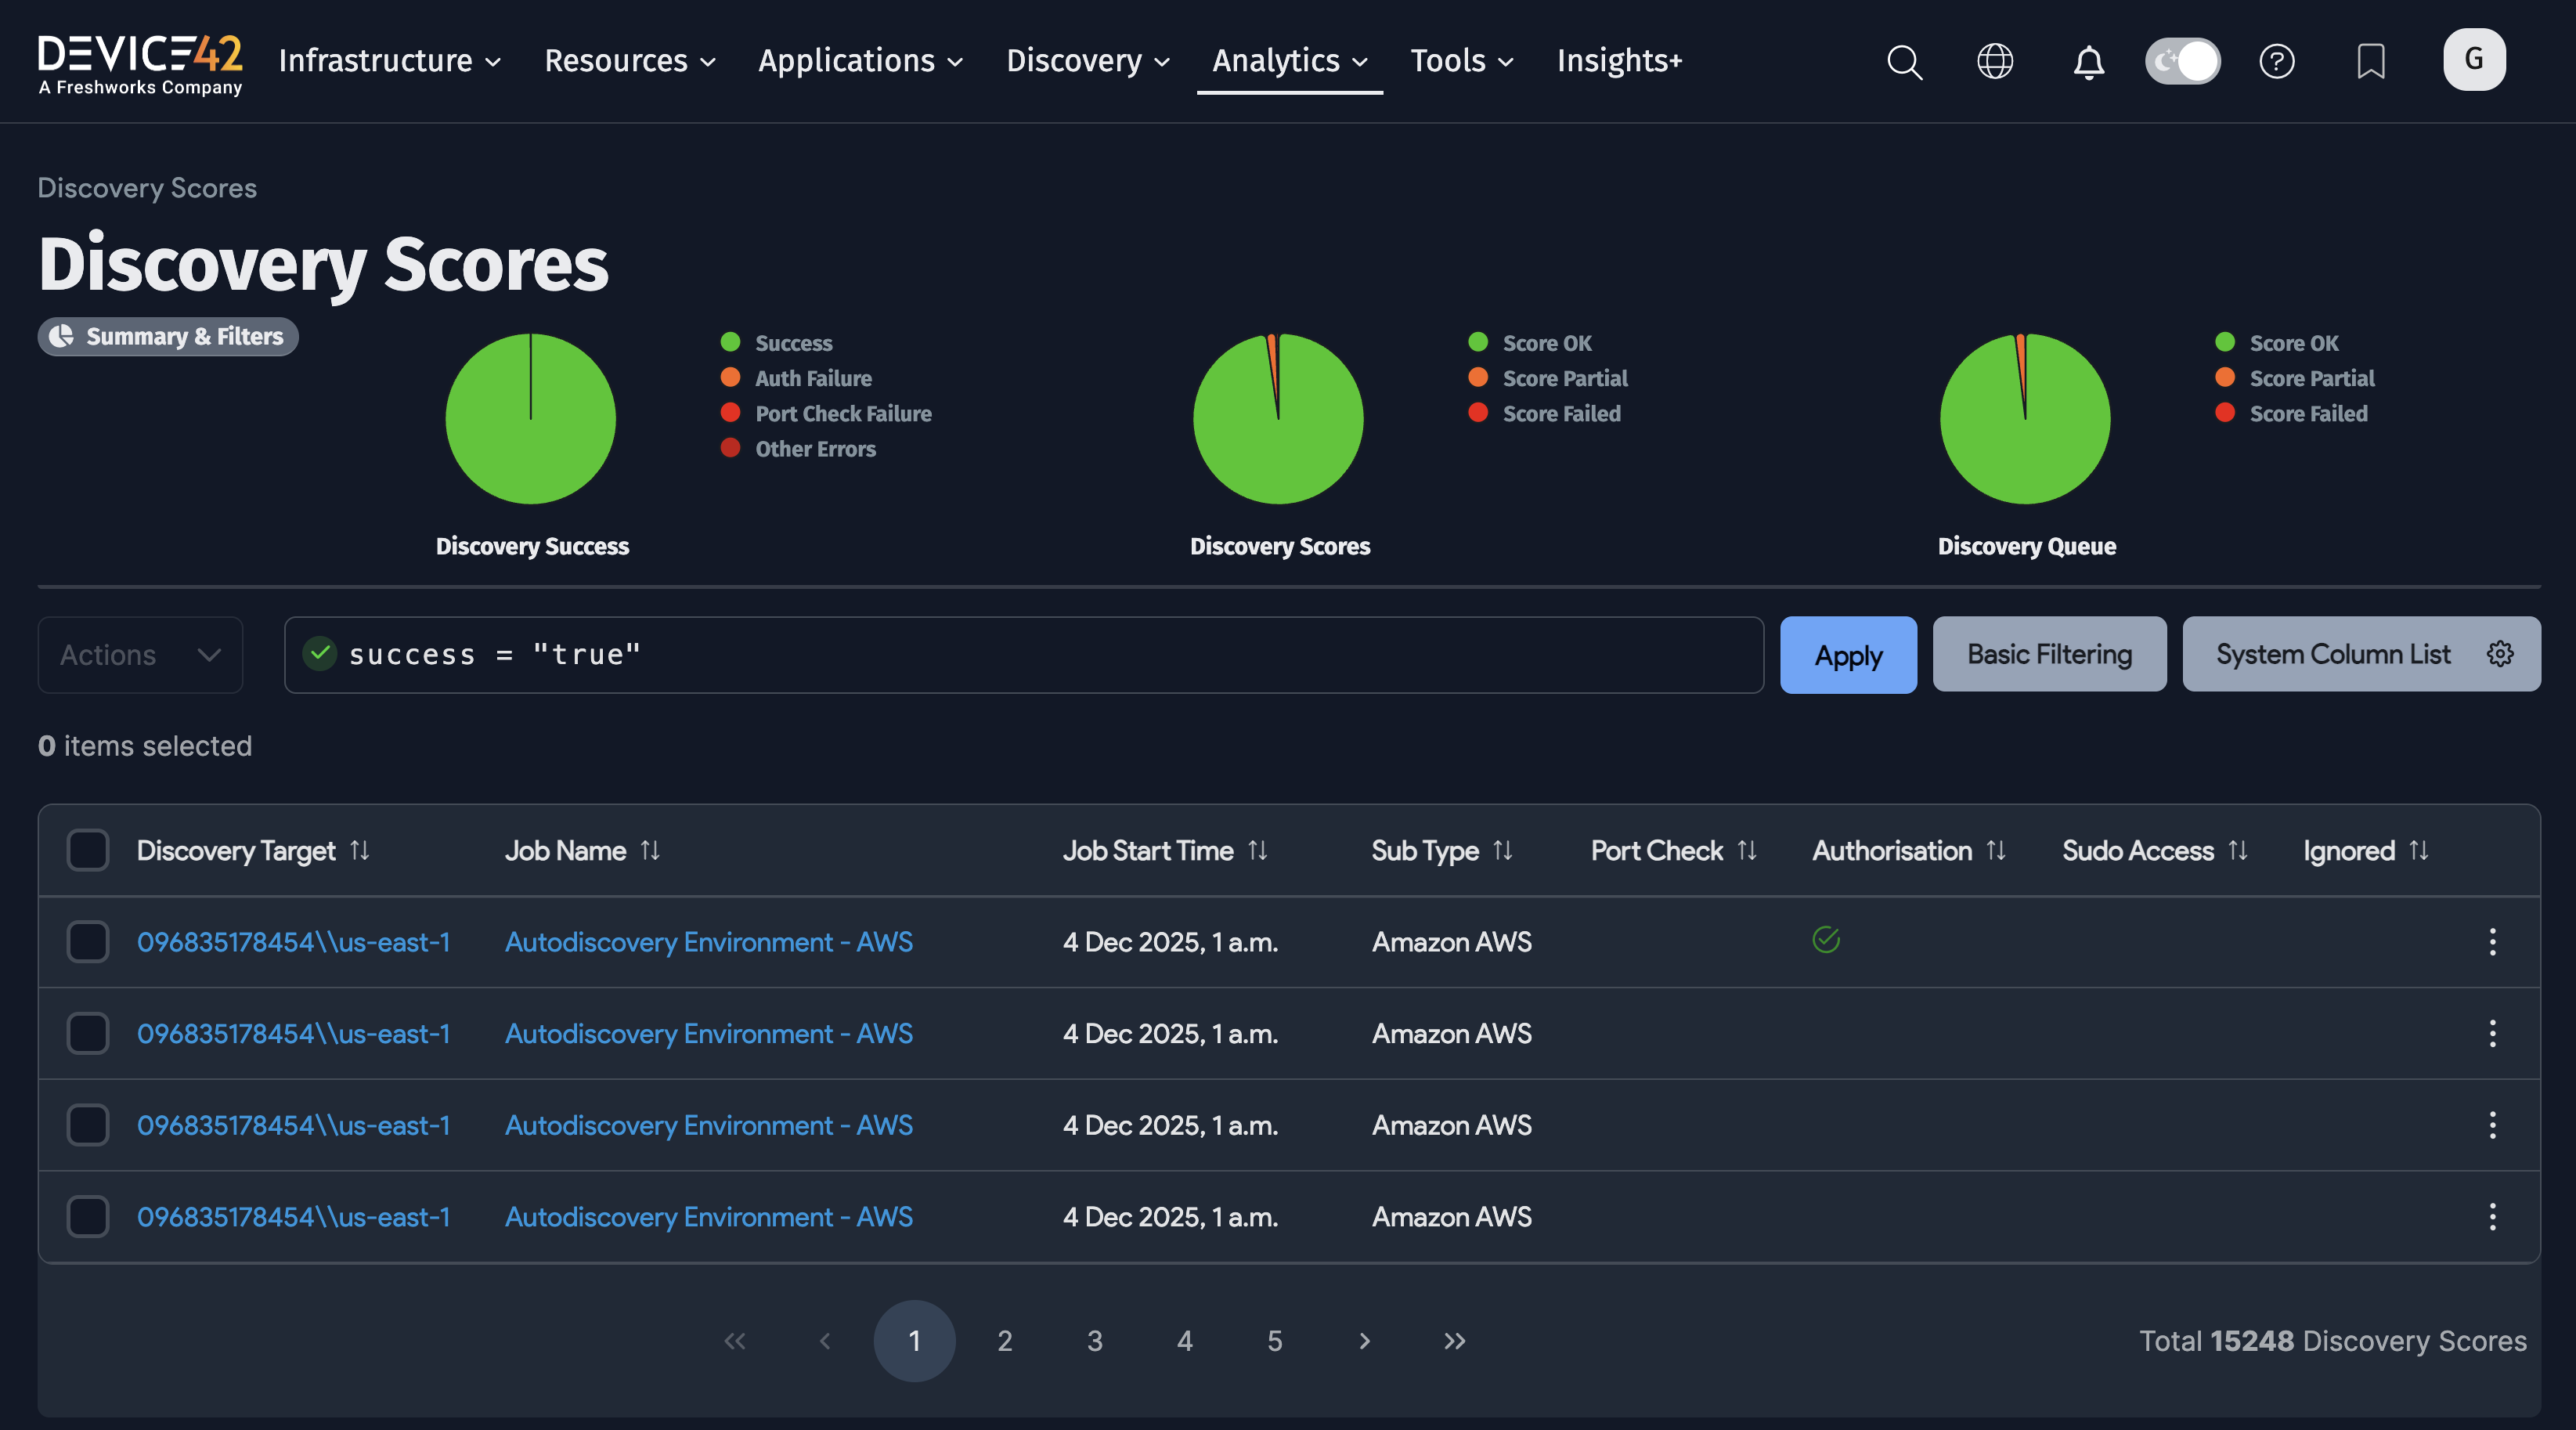
3.2 Discovery Scores
The Discovery Scores page enables you to view the success of your discovery jobs on a granular level. It provides an overall view of discovery success, discovery scores, and discovery queues. You can see each discovered device, the target IP it was discovered from (which is also a link to that job's page), the job name, cumulative score, and more.
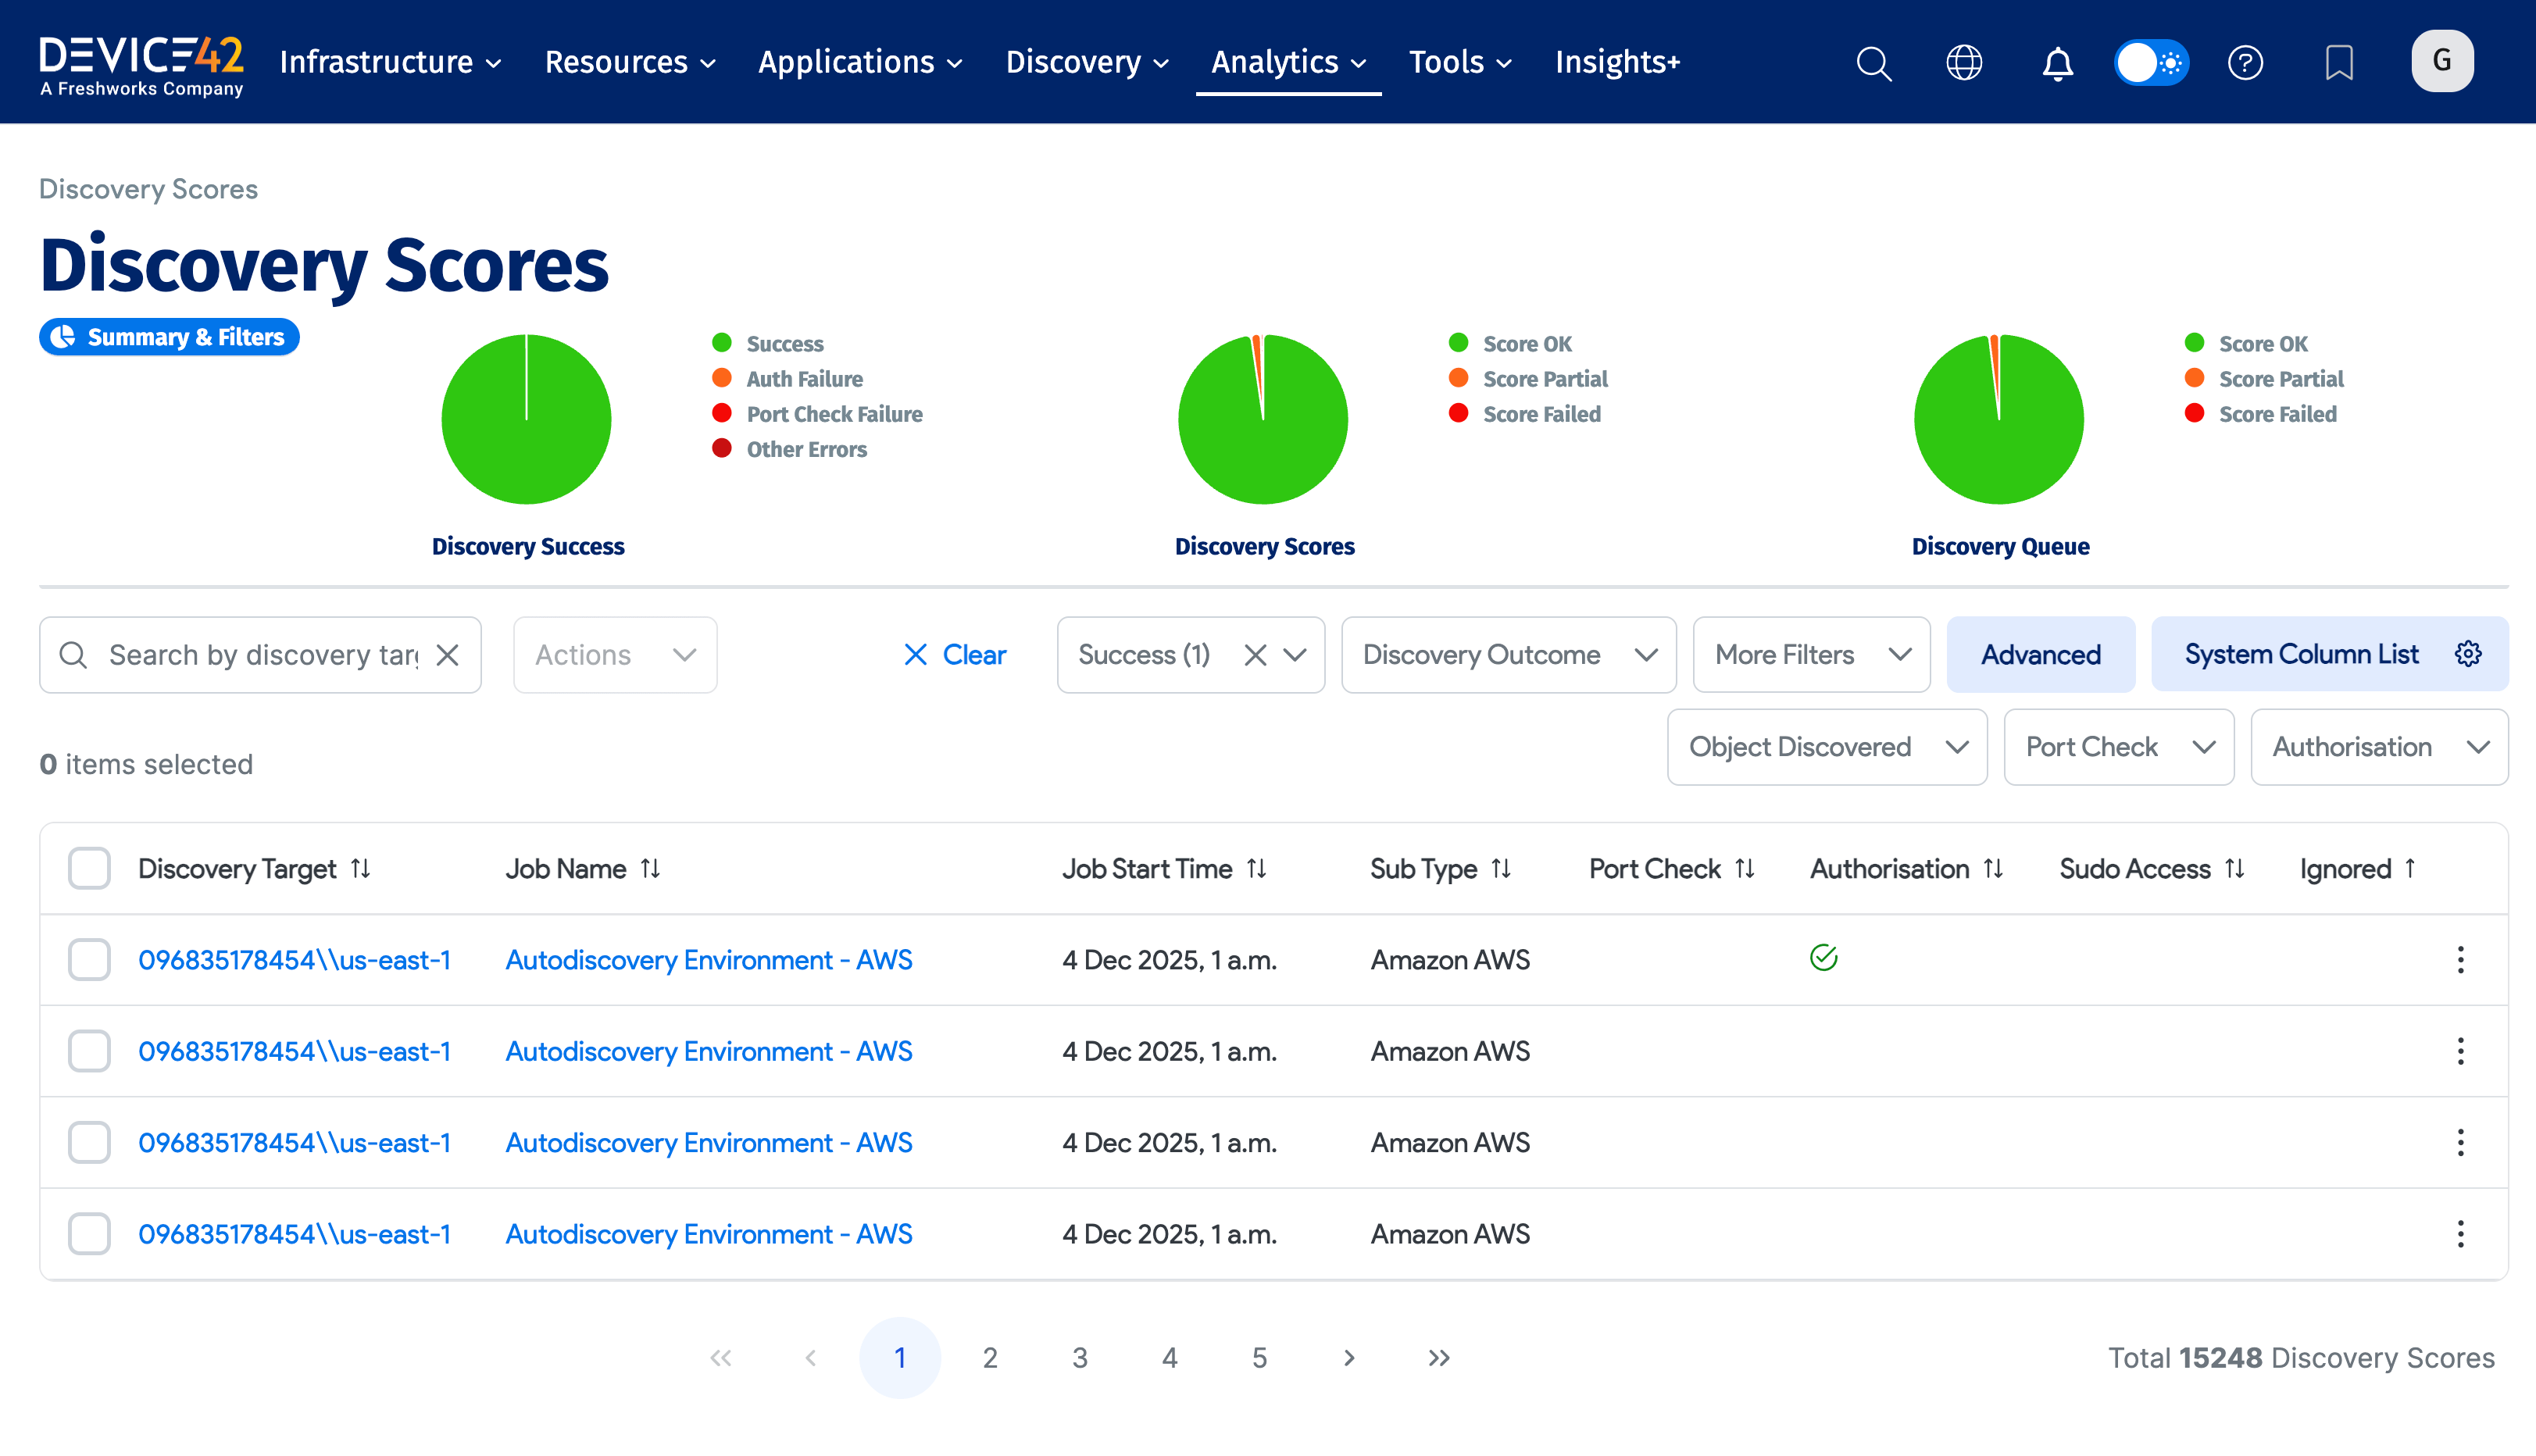
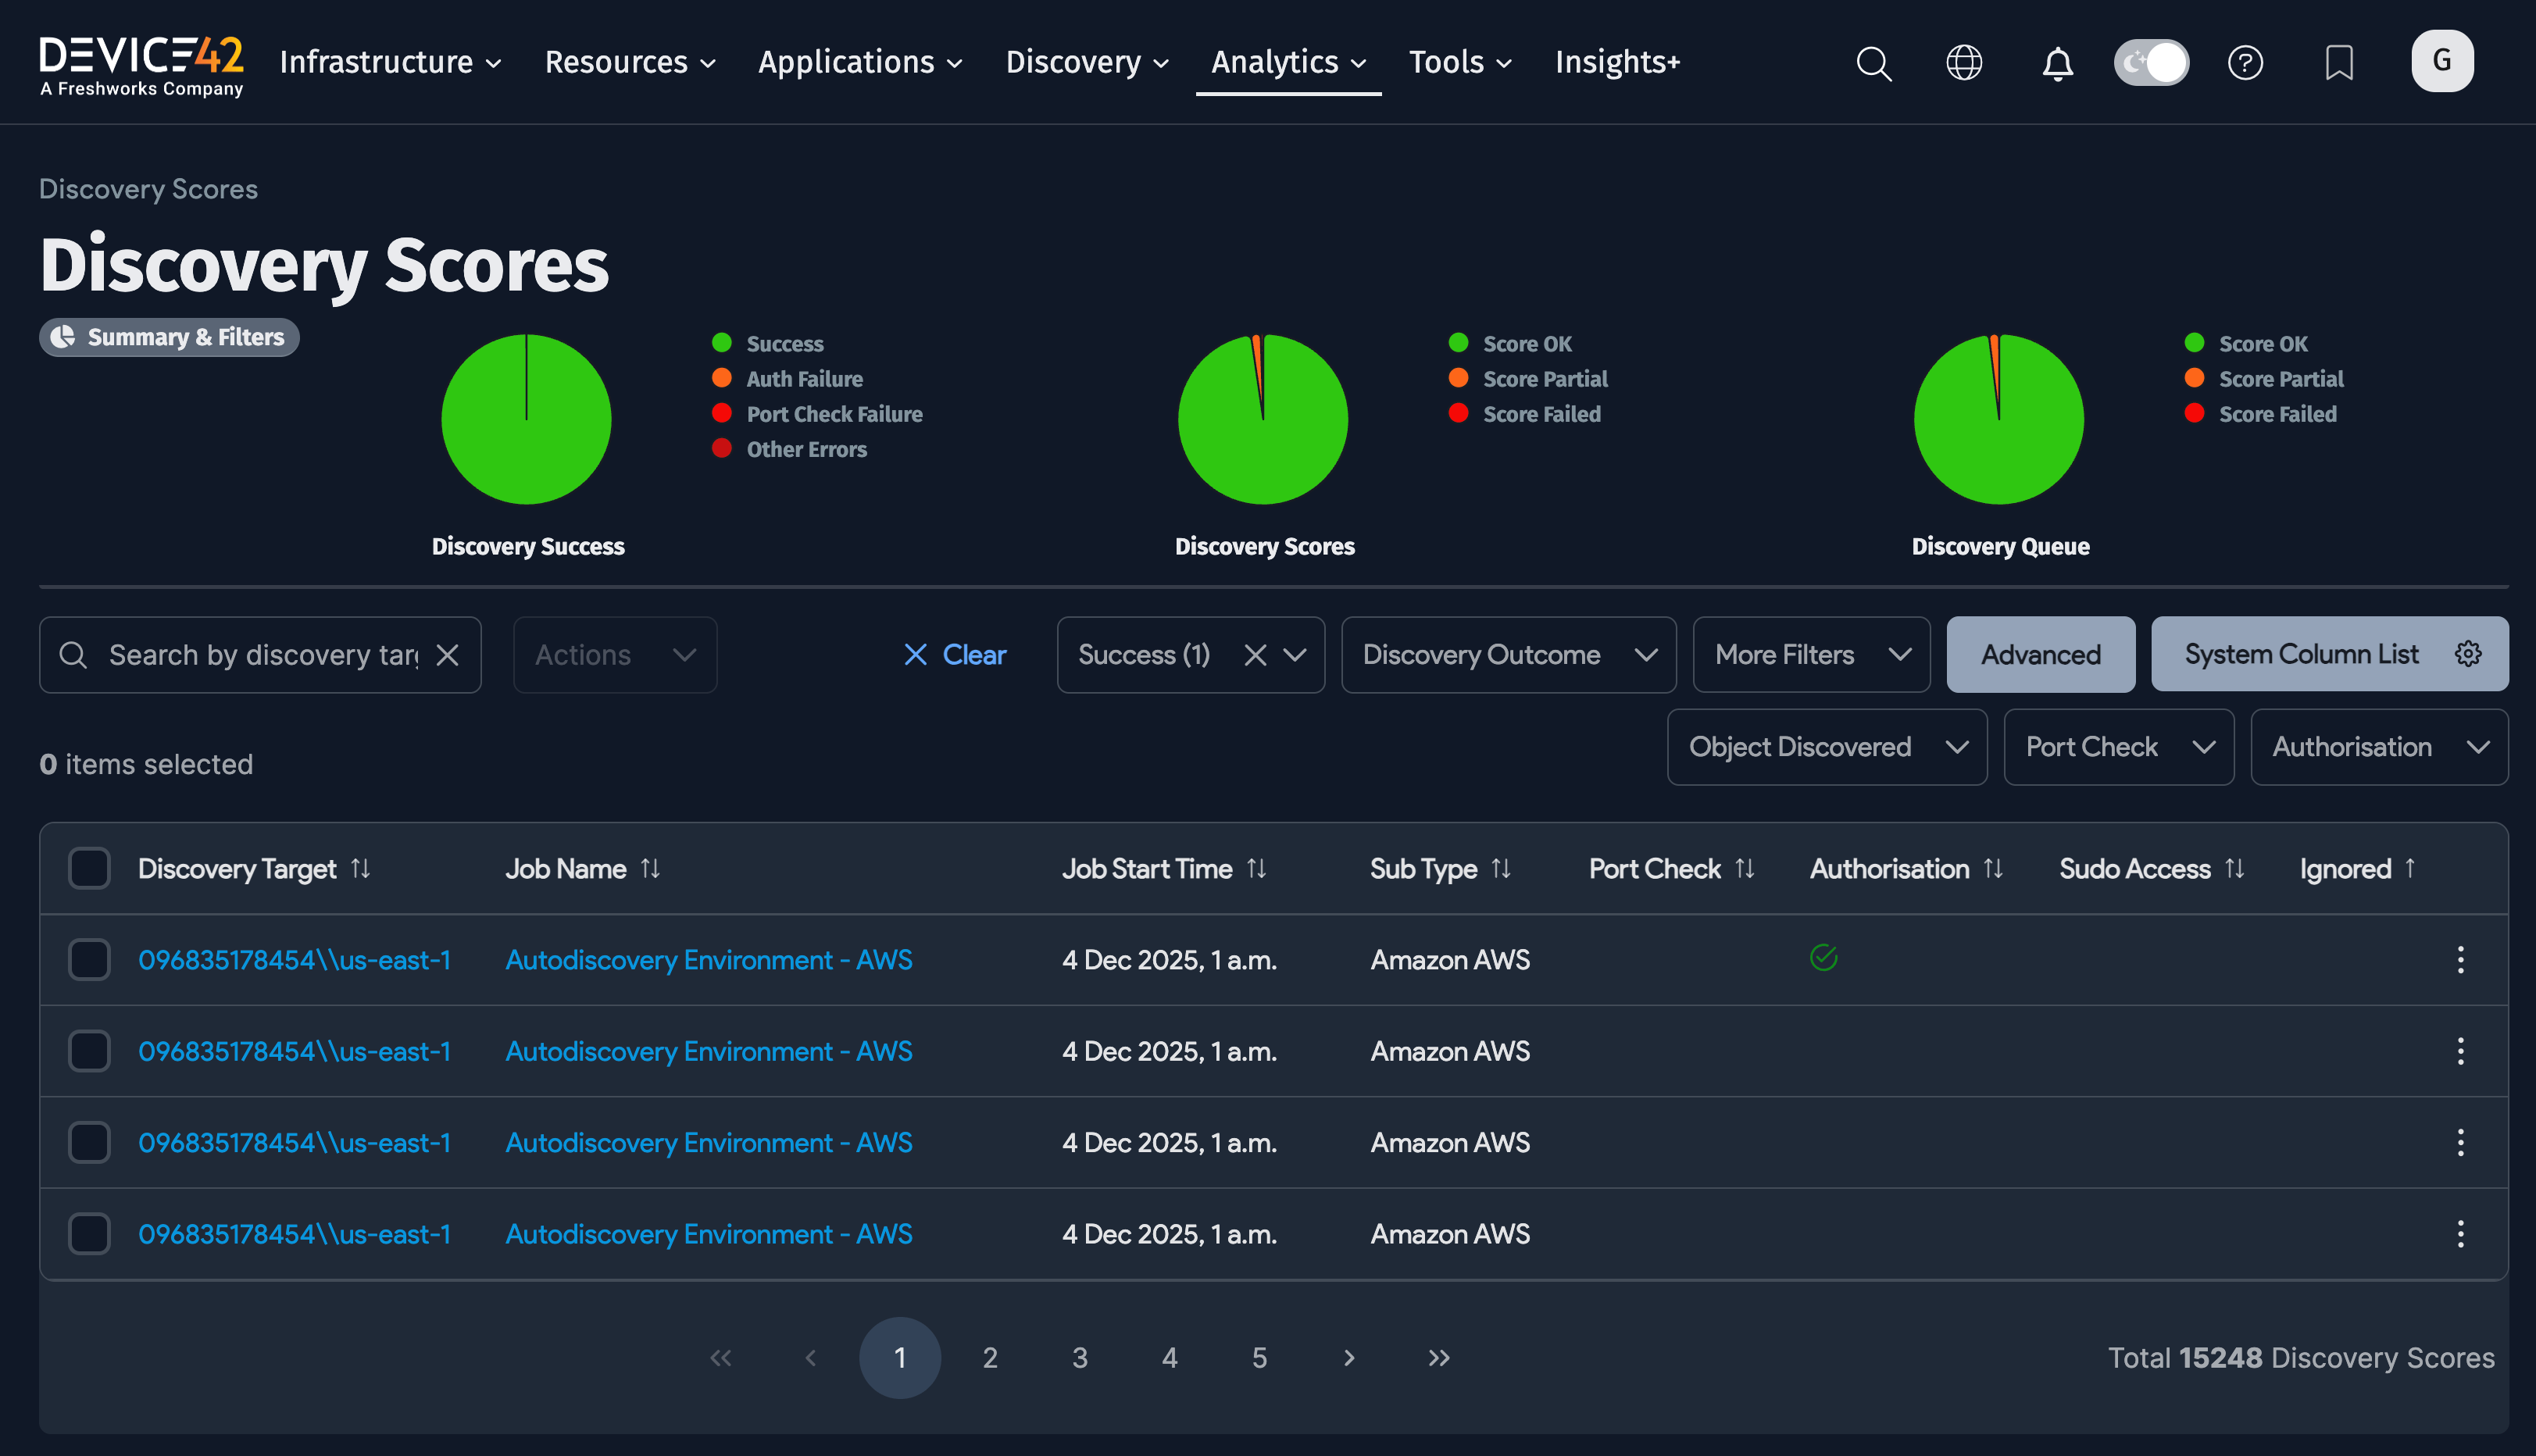
Discovery Scores can be accessed in a variety of ways, including Analytics > Discovery Scores.
Access Discovery Score Steps
To access Discovery Scores, perform the following steps:
- Choose Analytics > Discovery Scores.
- Hover over the pie charts to view summary data for each category. You can also click on a legend entry to filter in or out from the summary.
- View the scrollable list of discovered devices, sorted from newest to oldest by default. Each device is displayed on its own line and provides information such as Discovery Target, Job Name, Job Timestamp, and a red or green Success indicator.
- Click on any of the Discovered Targets to view the Discovery Target Details for that target.
- Click on the Job Name to navigate to the discovery job to which that device was a part. Here you can see the status of the overall job.
Click here for more information about Discovery Scores.
3.3 Discovery Target Details
Discovery Target Details provide discovery information for a single Discovery target (e.g. an IP Address) within a specific discovery job (e.g. a specific Cloud discovery job). You can access Discovery Target Details by clicking on a Discovery Target within Discovery Scores.
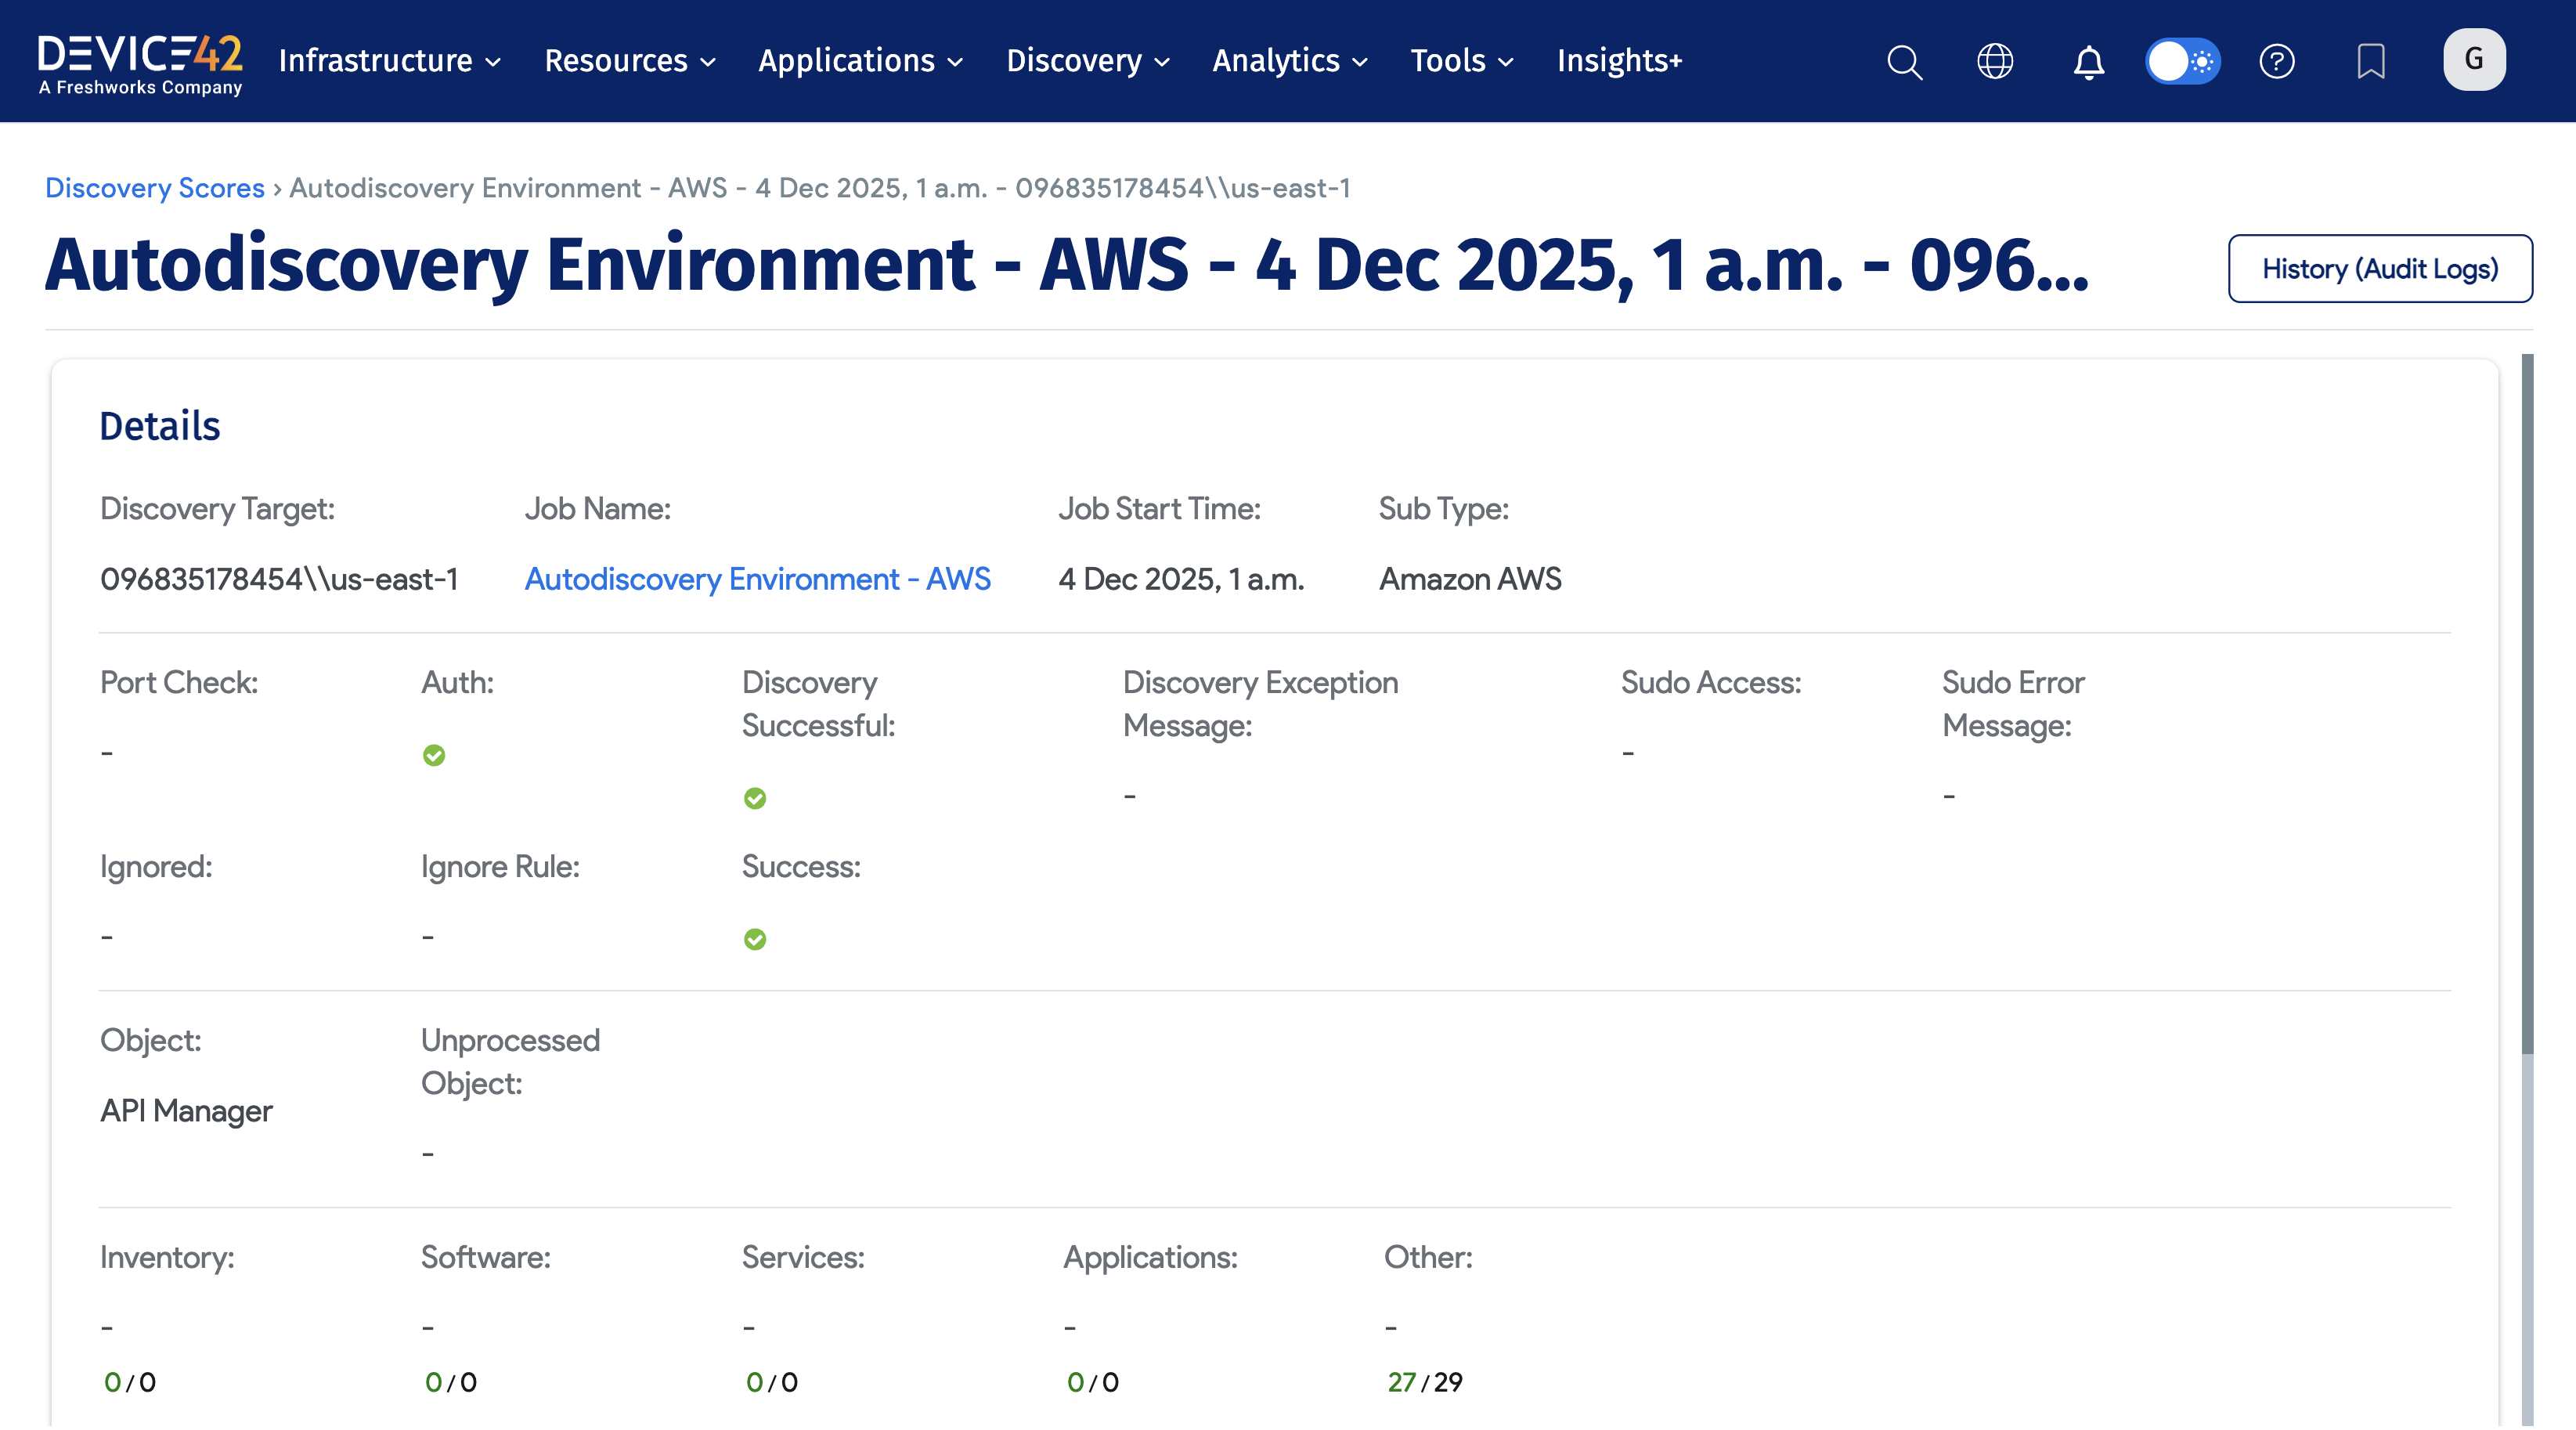
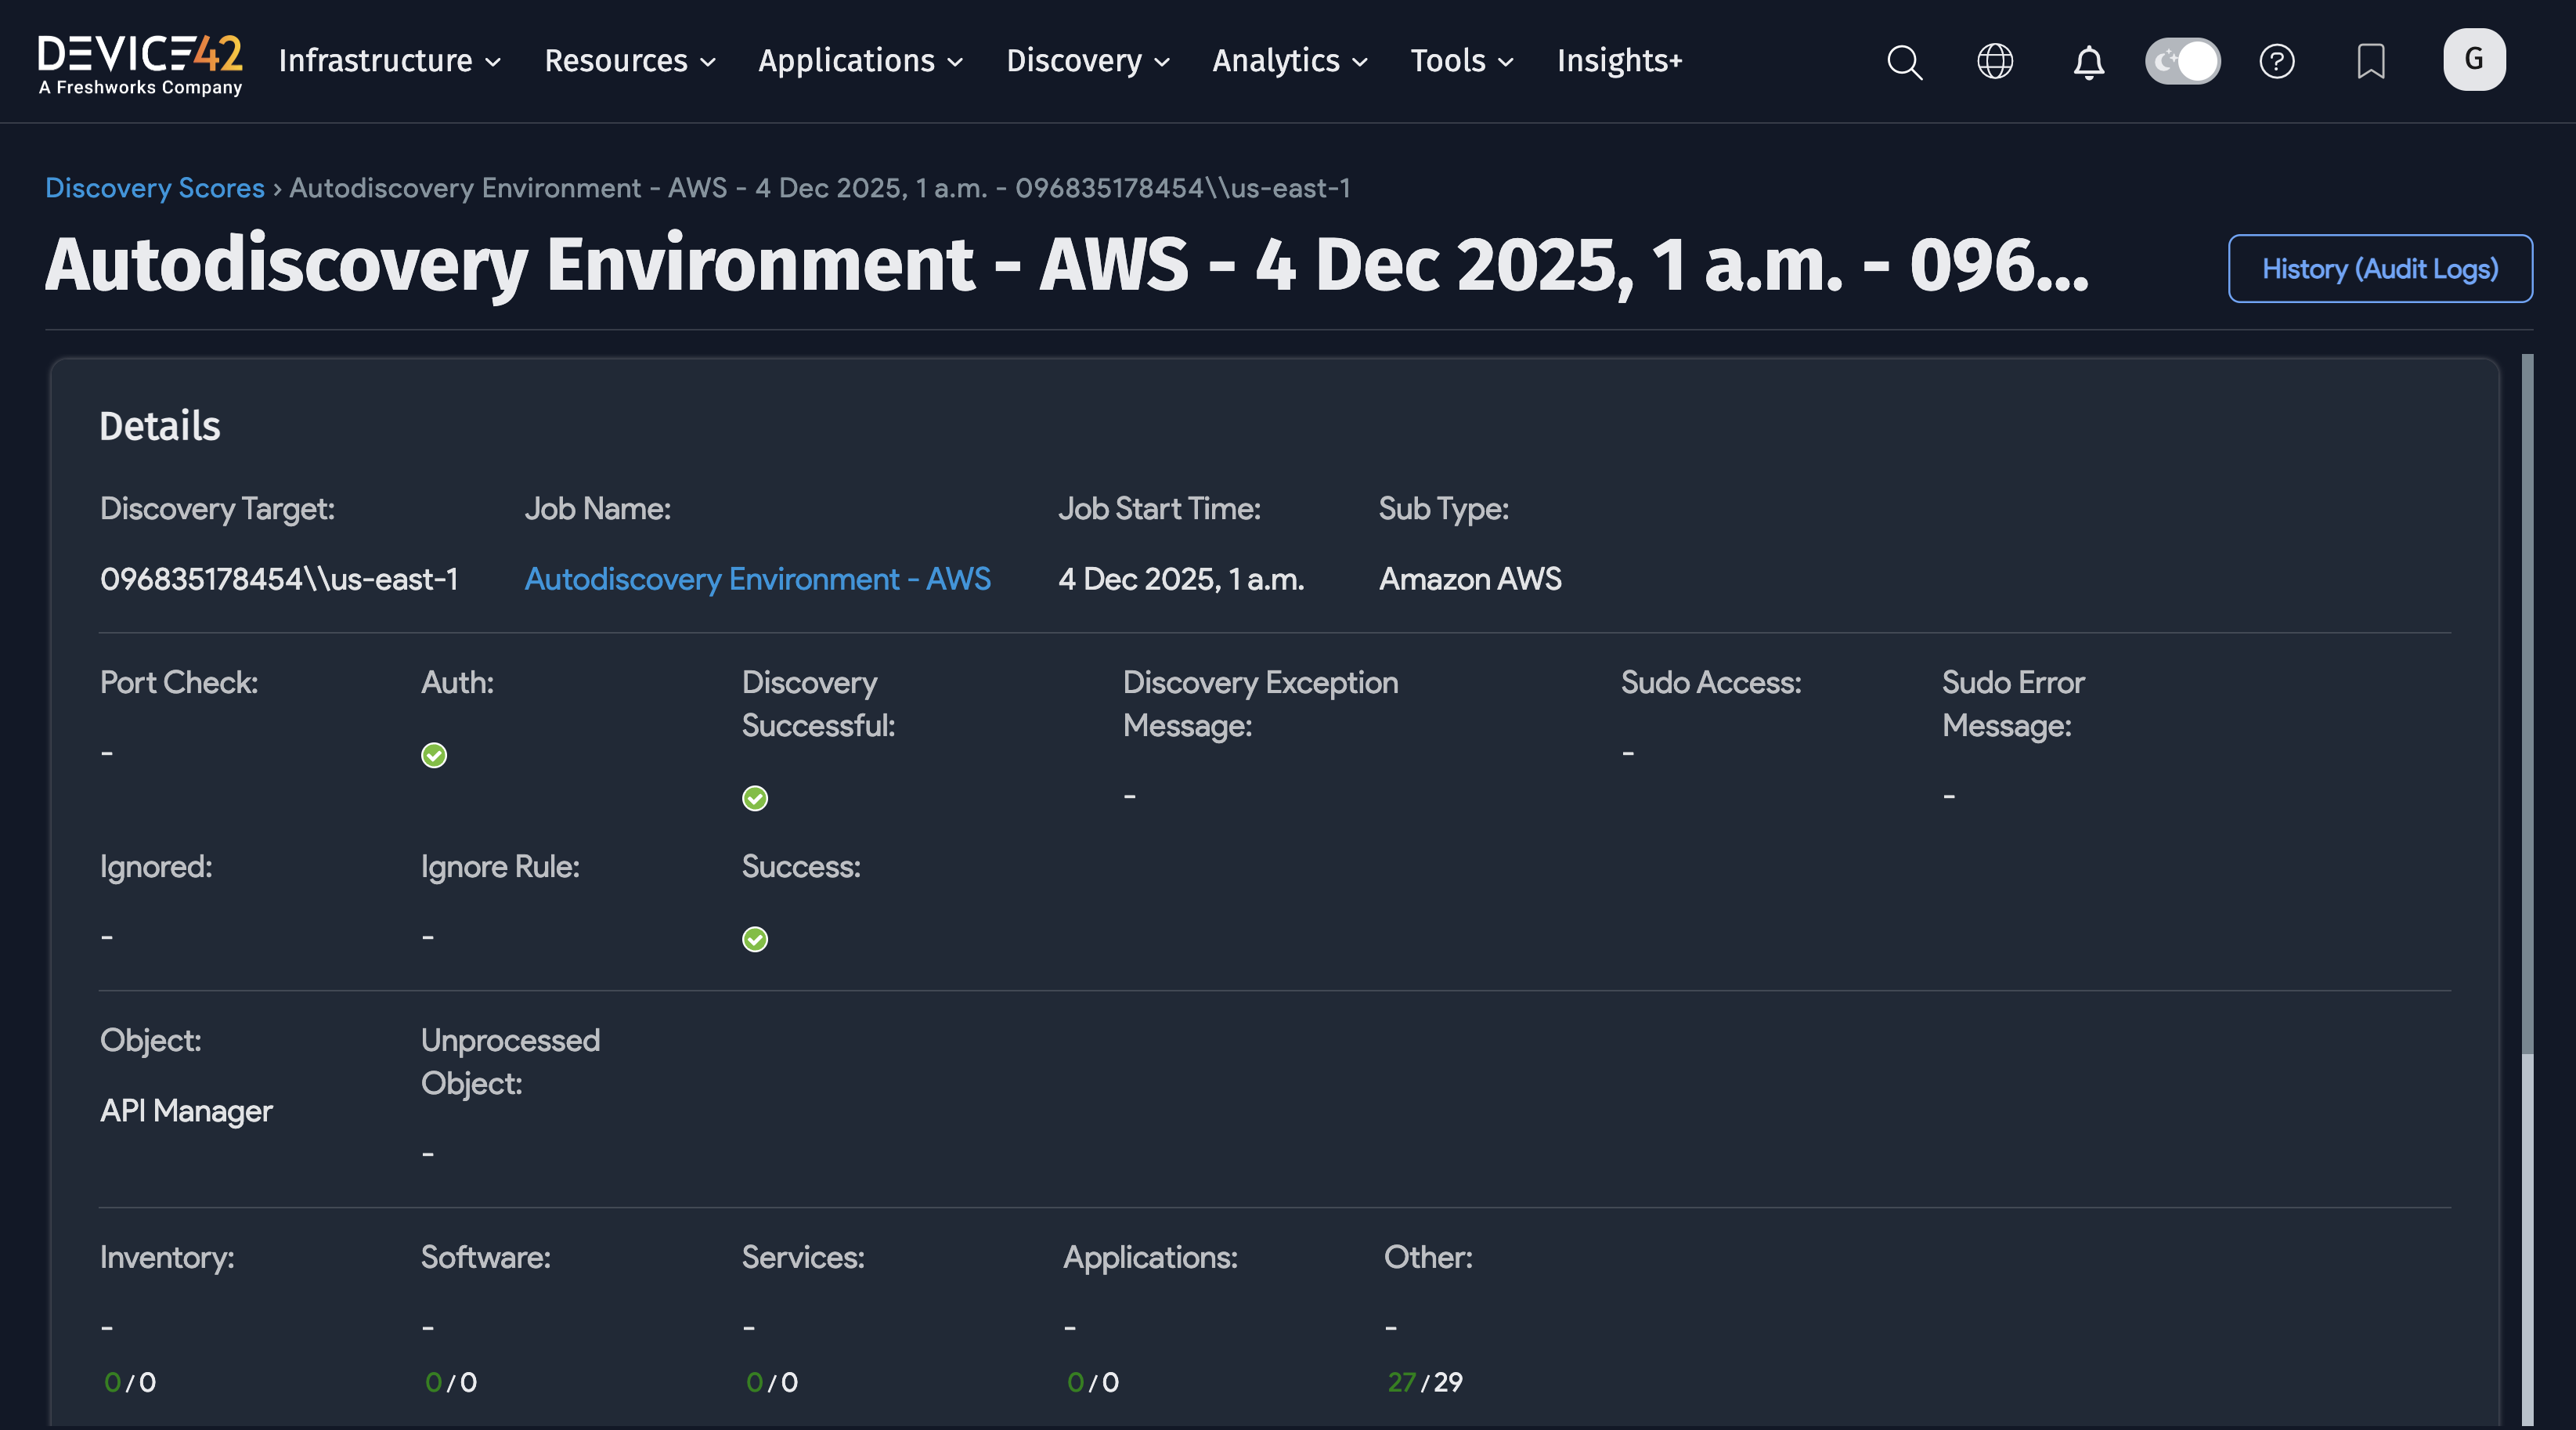
- The Details section provides the Discovery Target, Job Name, Discovery Status (e.g. Port Check, Auth, etc.), and other information.
- You can click the Show link next to Advanced Status, Detailed Discovery Scores, and Detailed Queue Scores sections for additional details.
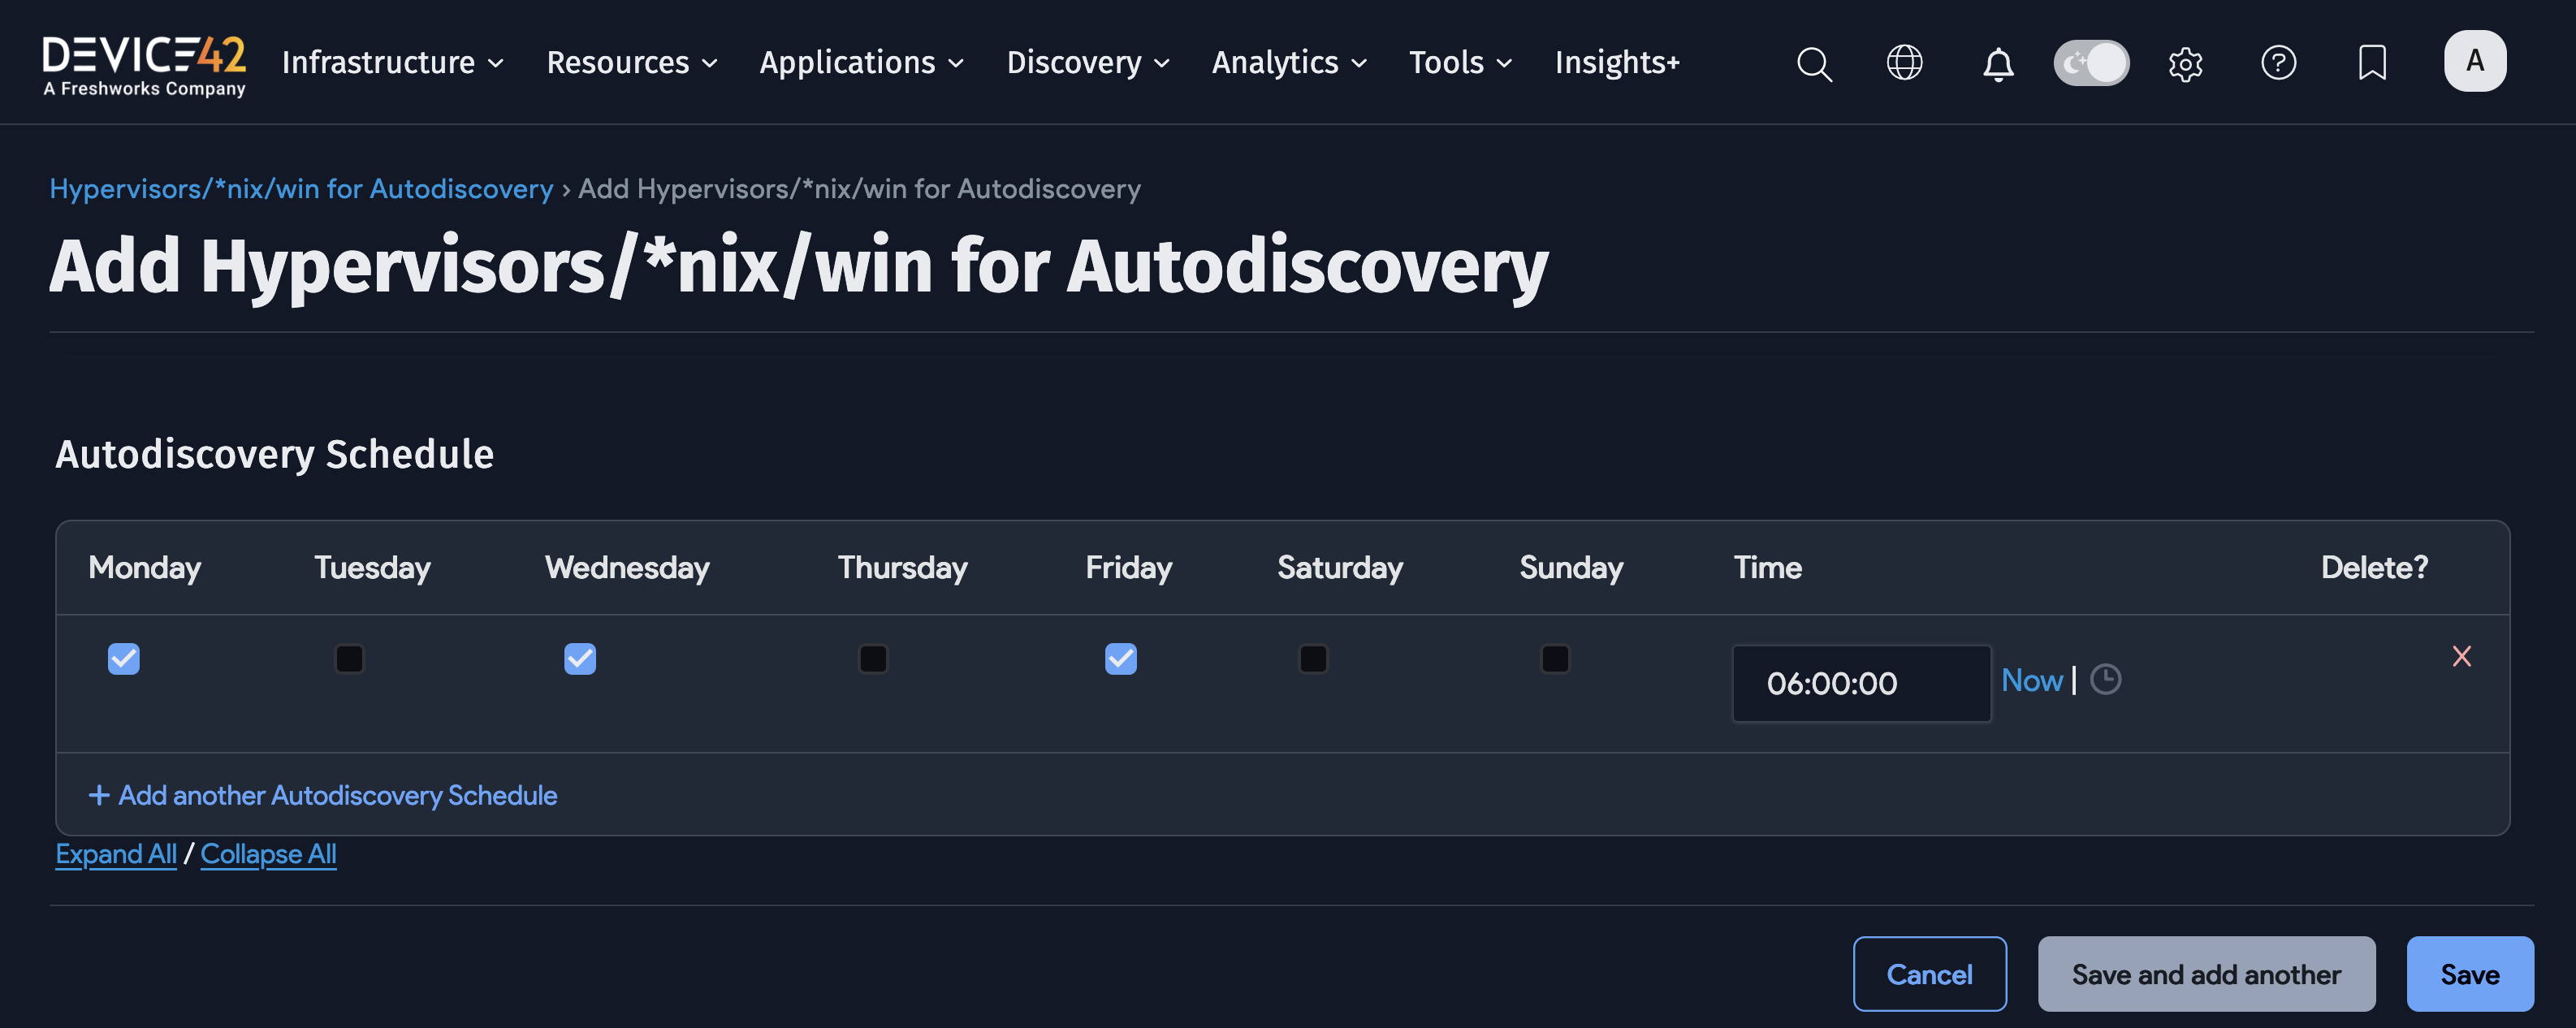
Task 4: Schedule Discovery Jobs
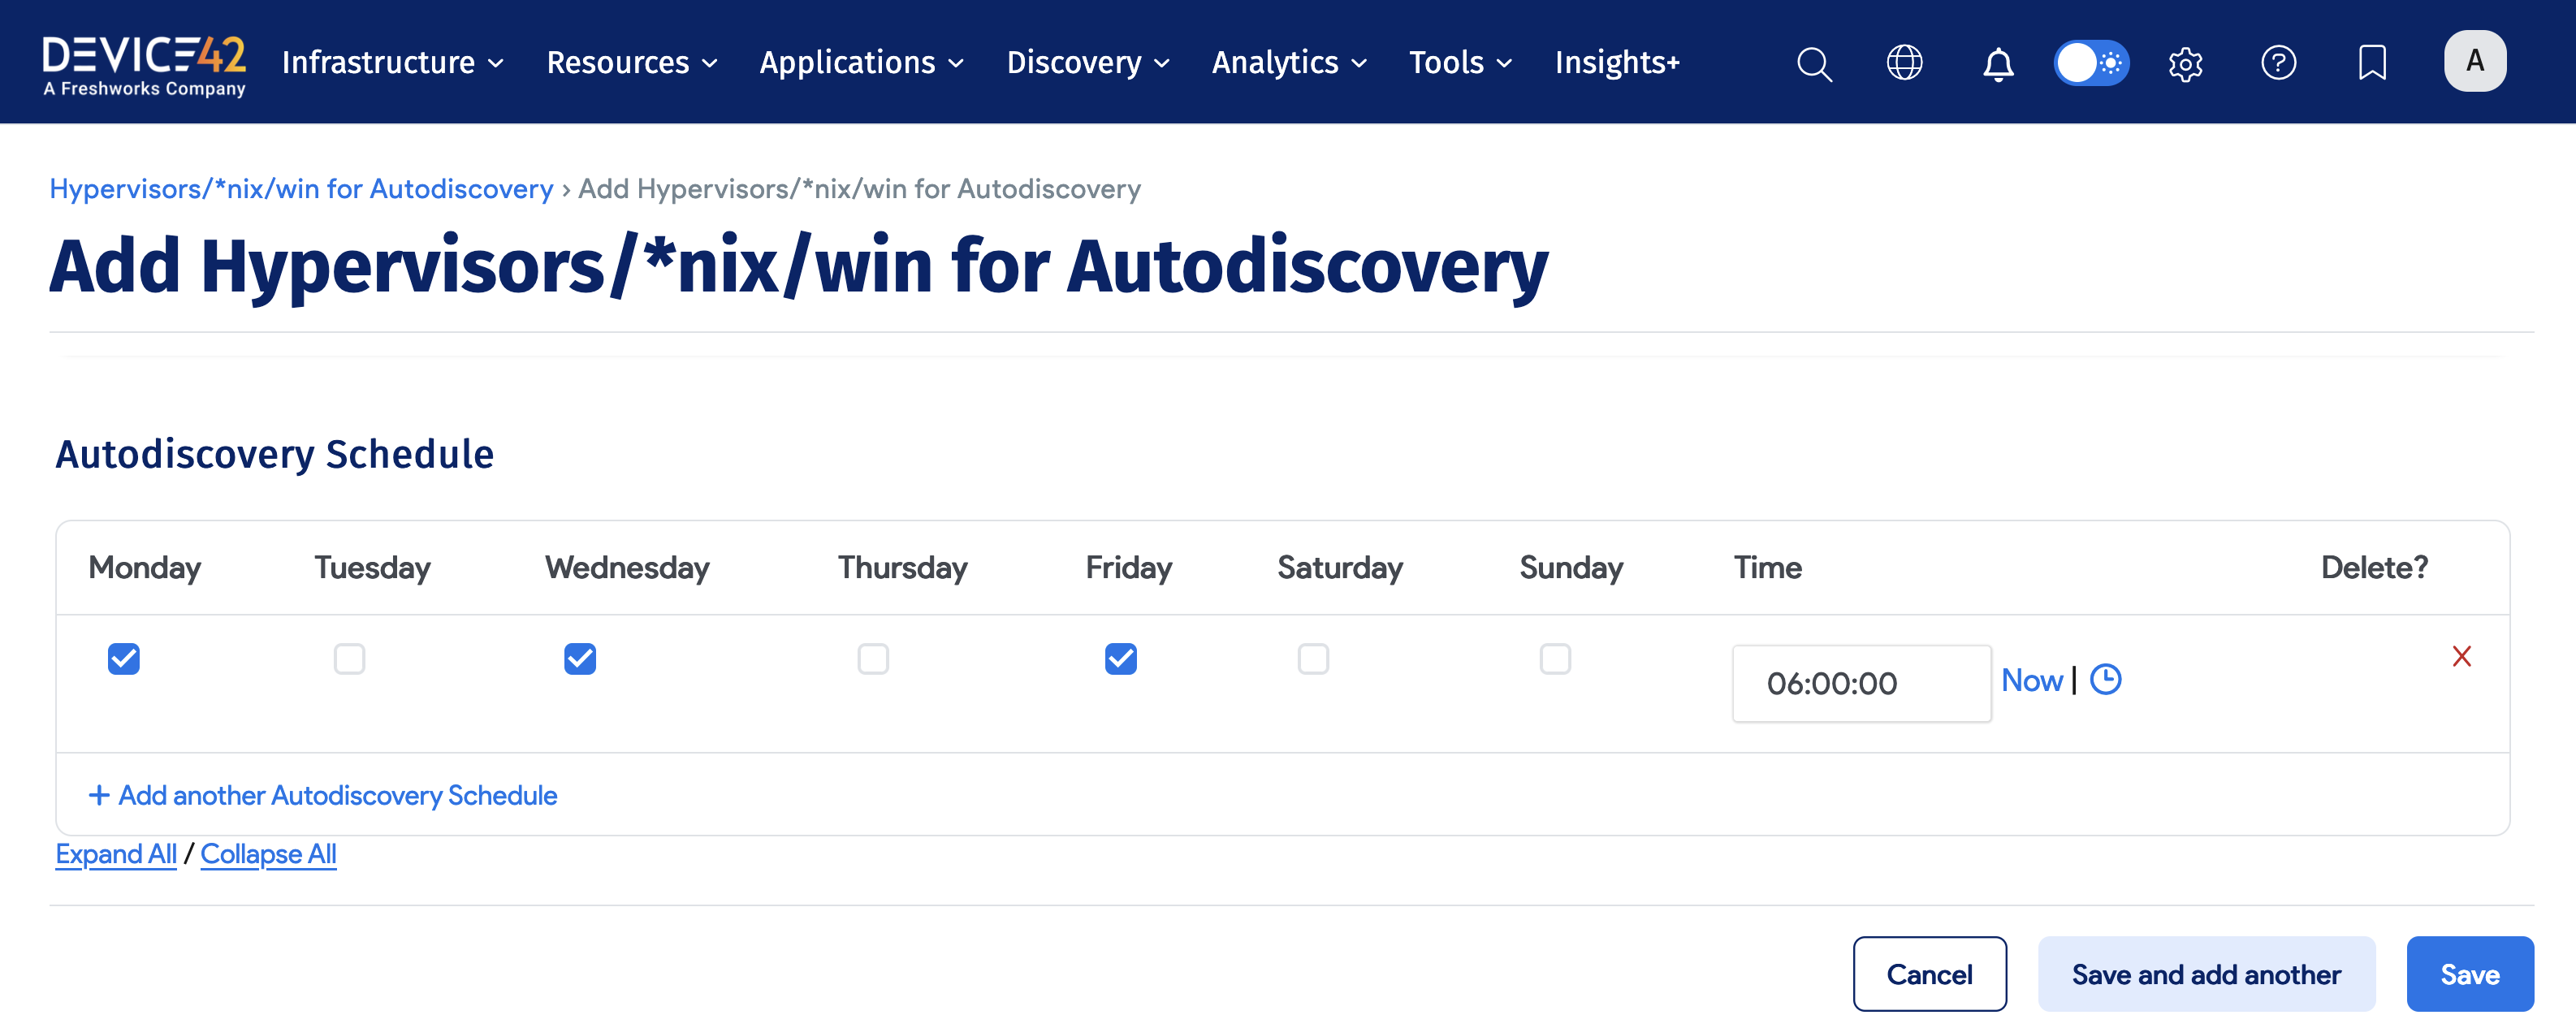
4.1 Scheduling a Discovery Job
Once a discovery job has been run and validated, it can be scheduled to automatically run. In the Autodiscovery Schedule section of each job, you can set as many different autodiscovery schedules as required to cover your environment. You can choose specific times and days of the week to run the autodiscovery job.
Steps to Schedule a Discovery Job
To schedule an existing discovery job, perform the following steps:
- Choose Discovery, then choose the type of discovery job you want to schedule.
- Click the name of the job you want to schedule.
- Click the Edit button.
- Scroll to the Autodiscovery Schedule section and click the + Add another Autodiscover Schedule link.
- Specify the schedule you want.
- Click the Save button.
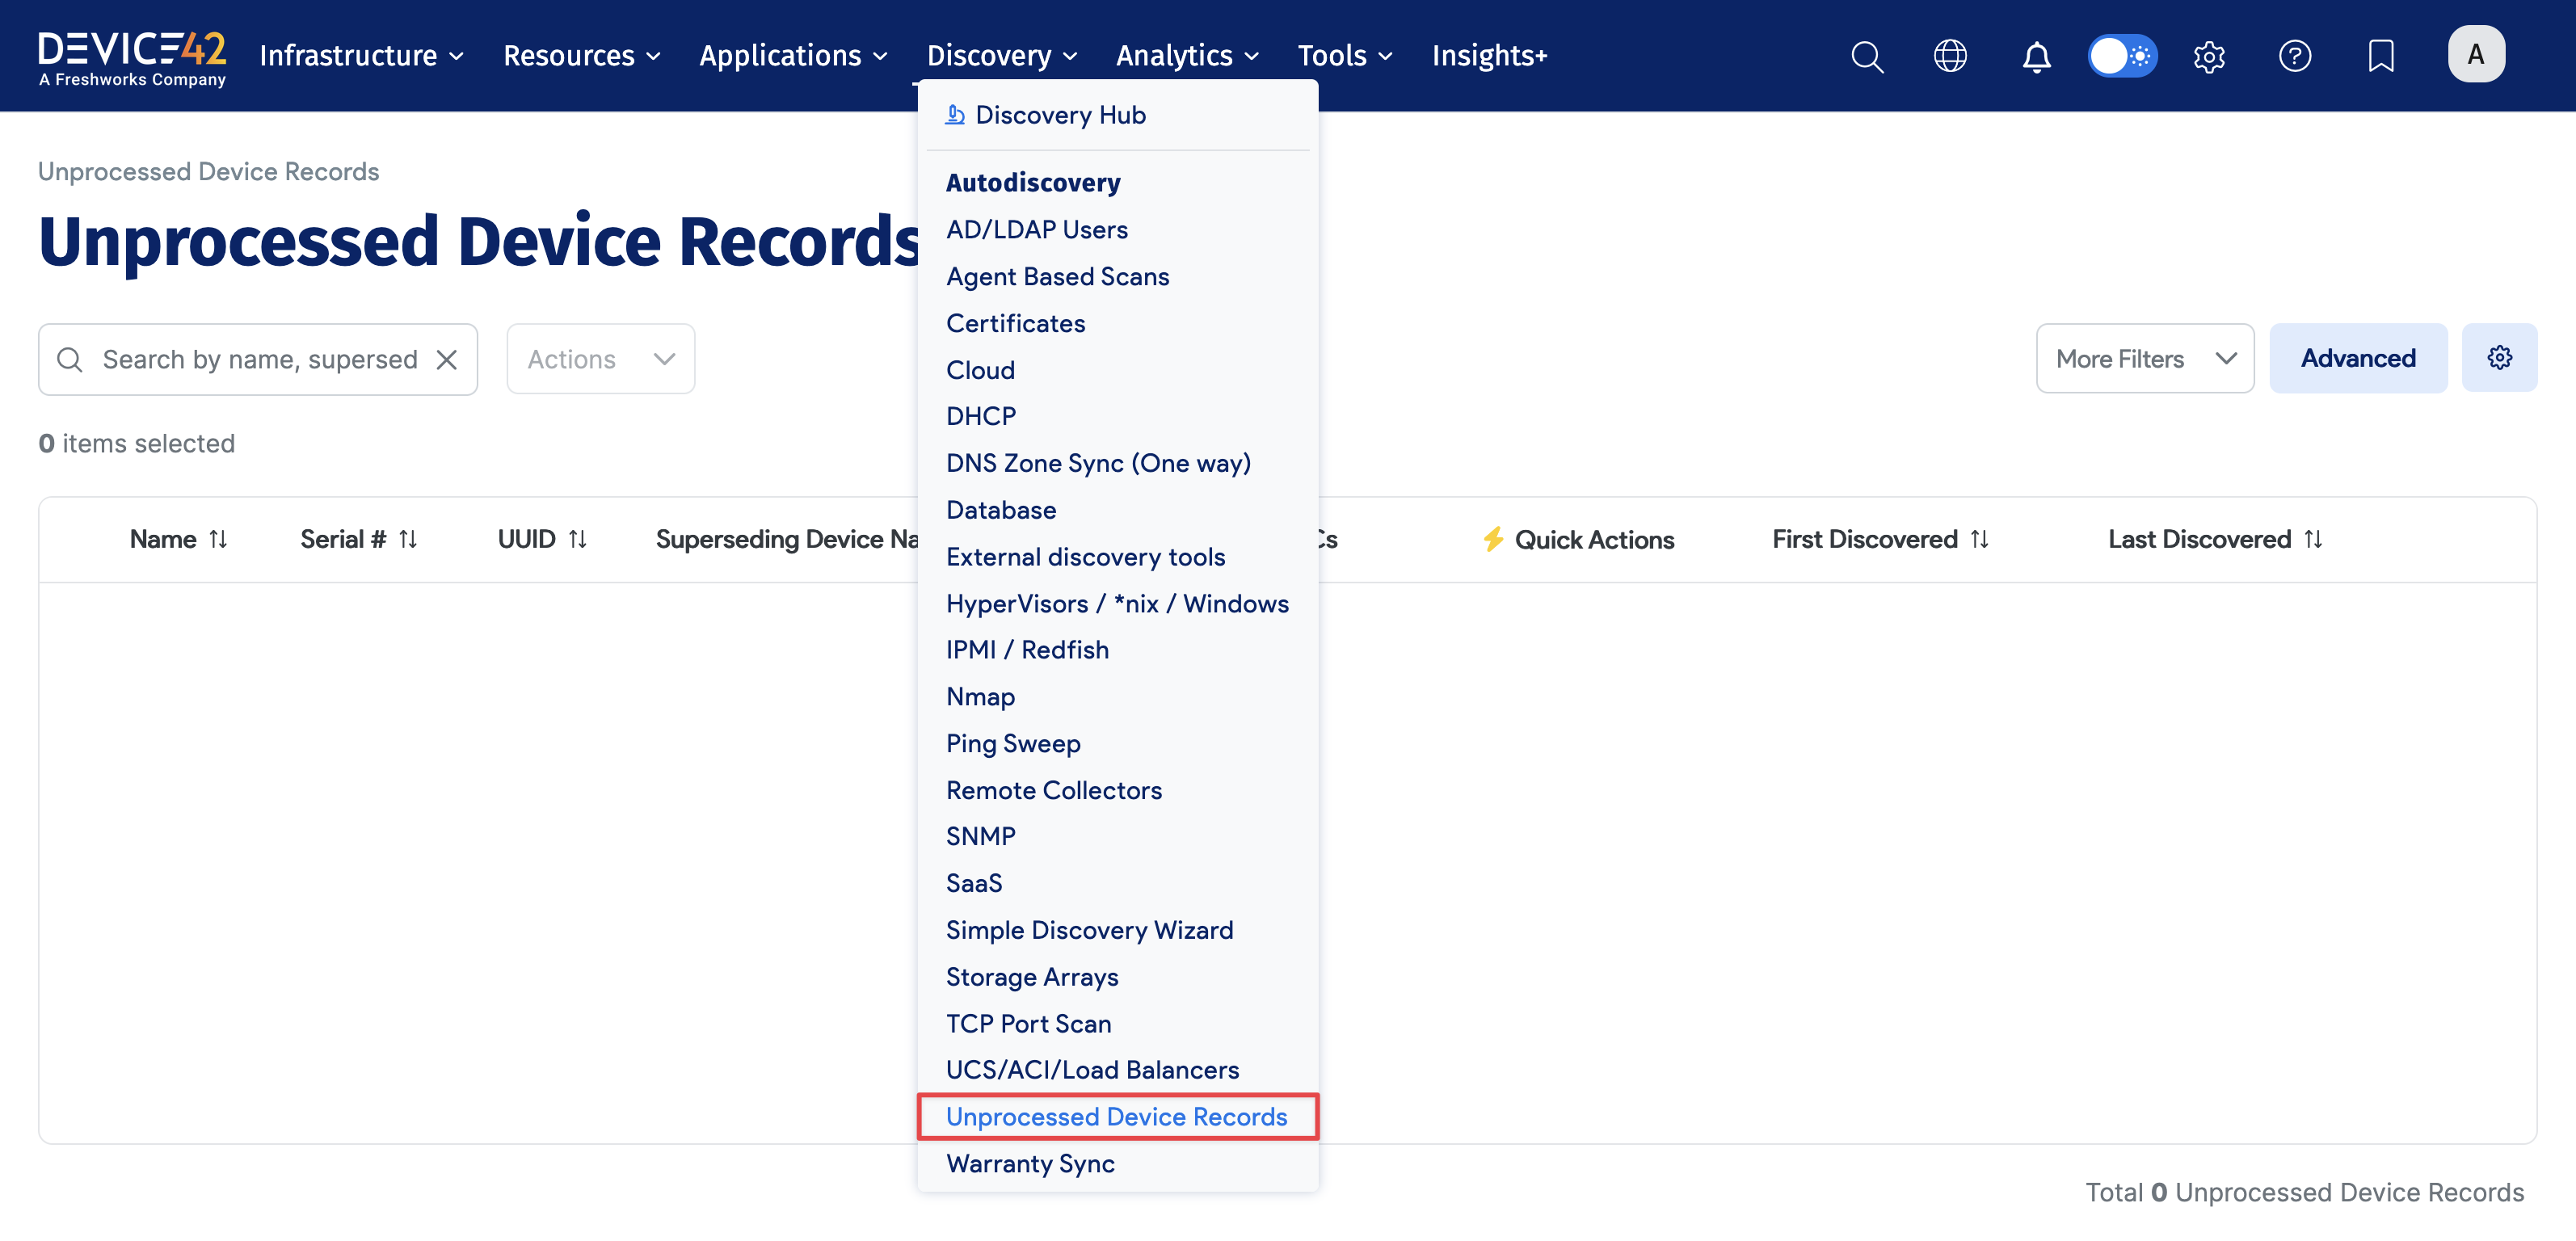
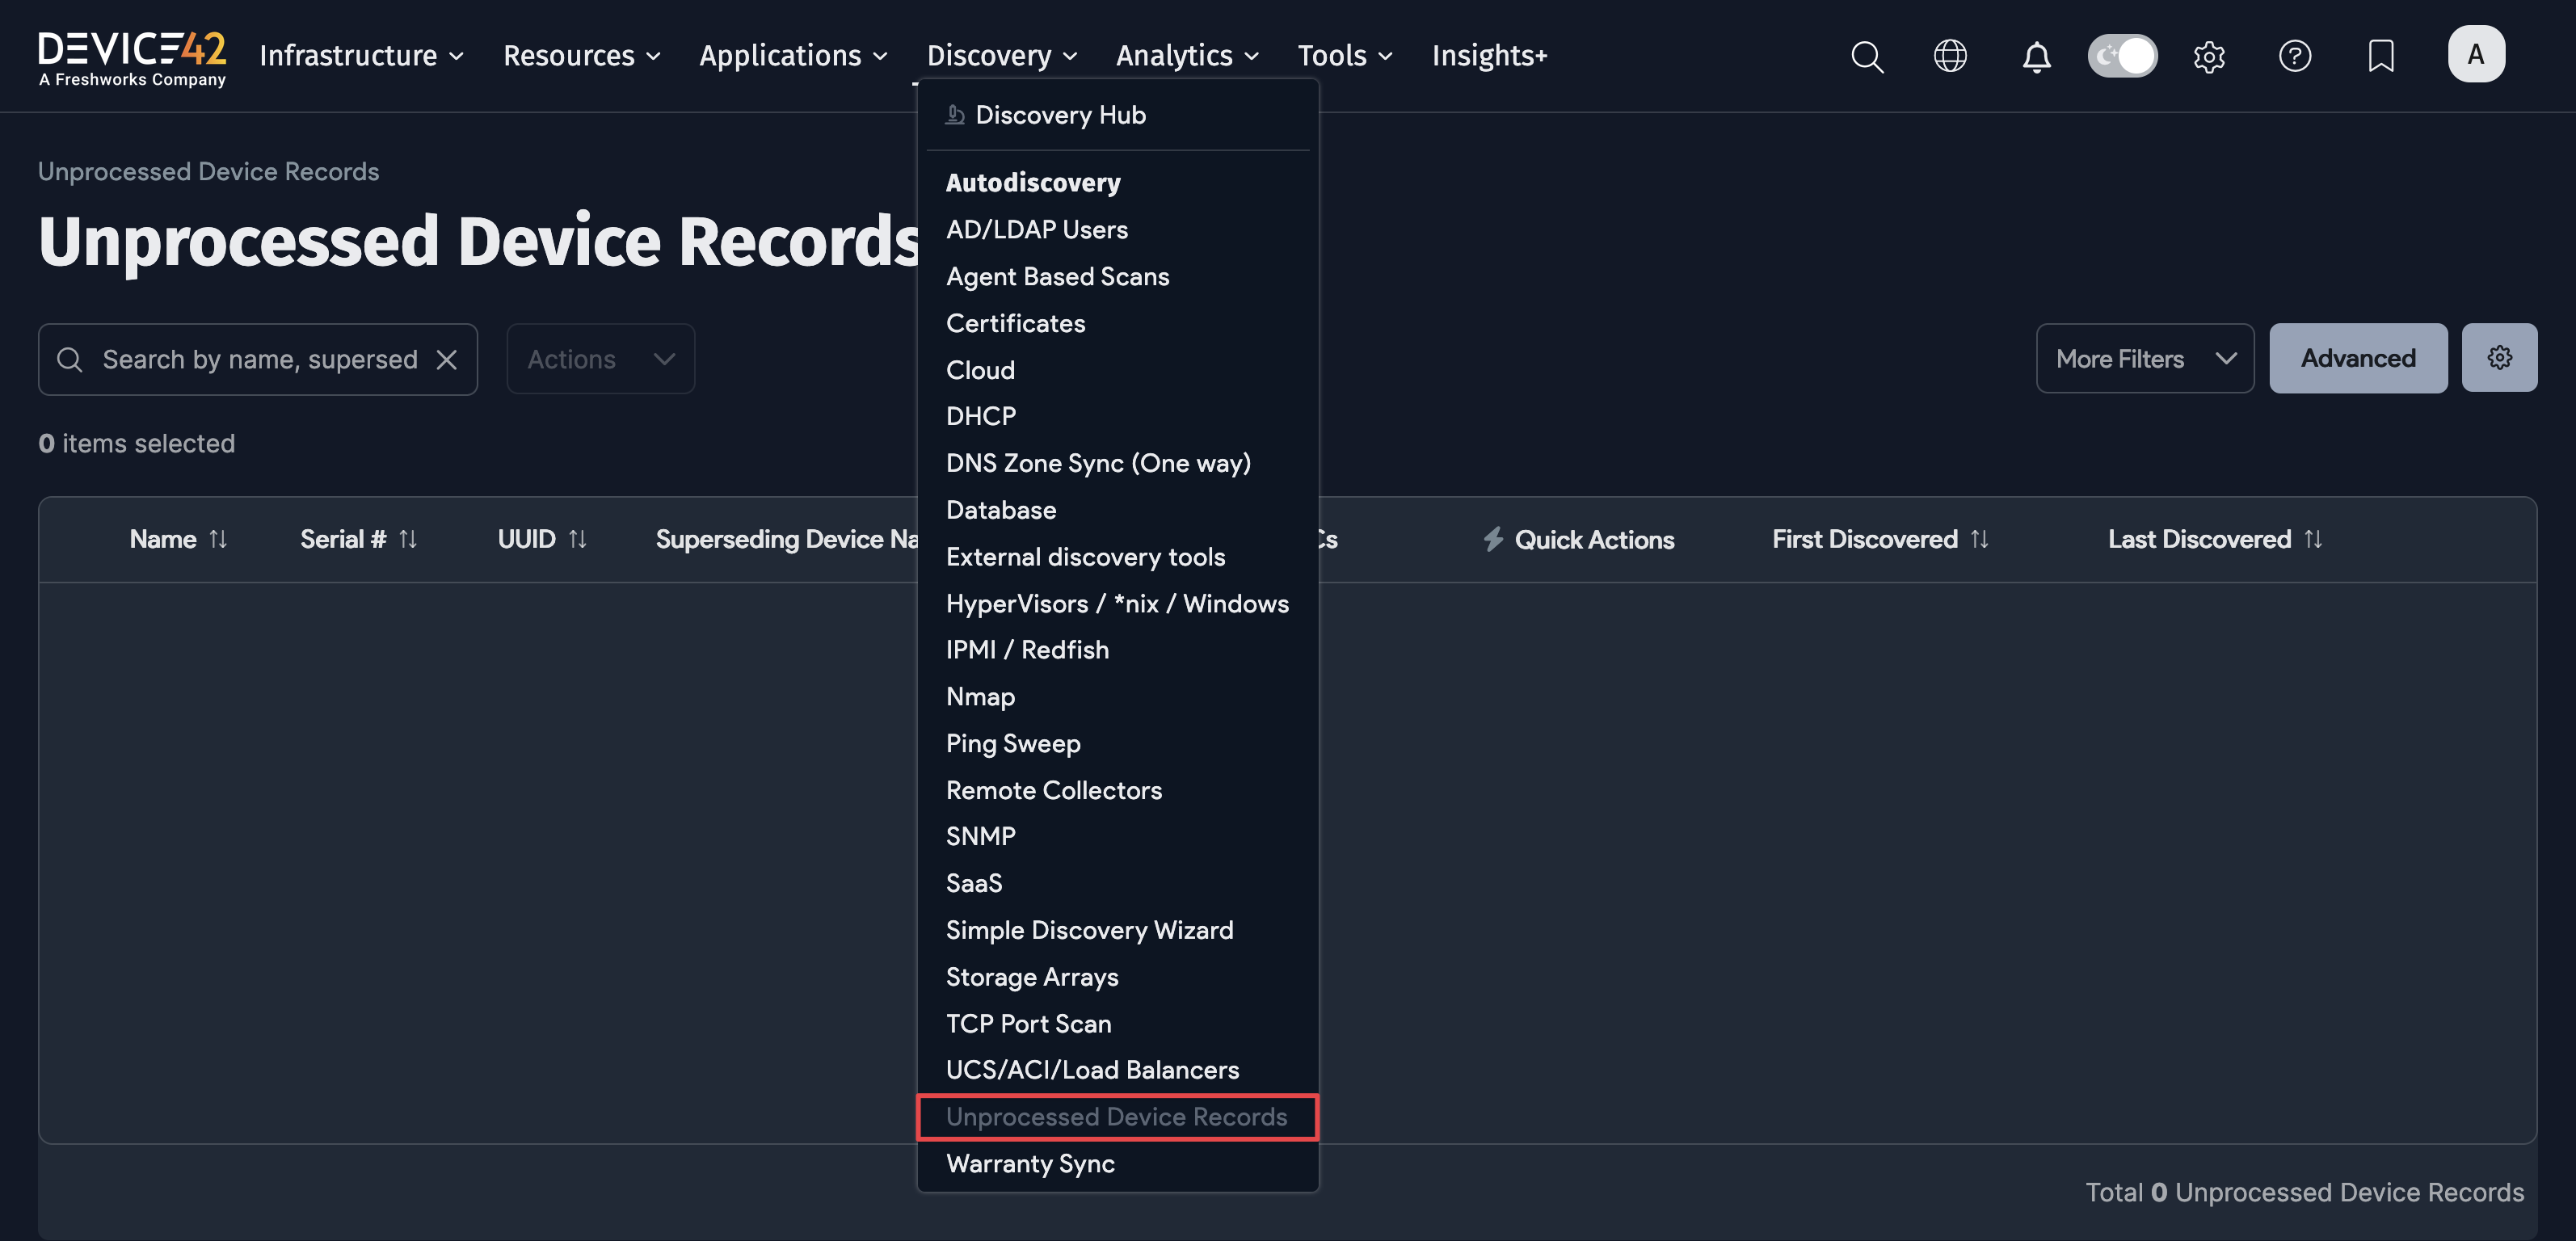
Discovery and Unprocessed Device Records
Unprocessed device records are discovered devices that could not be confidently matched to any existing device records based on the system's device matching criteria. This most commonly happens when using "Moderate" or "Conservative" matching levels, in which the system considers multiple data points (such as hostname, IP address, MAC address, serial number, and UUID) and requires a certain combined score to merge with an existing record. If this threshold is not met, the discovered device ends up as "unprocessed" and requires manual review or action.
Users can review these records and either merge them with existing assets, create a new record, or delete them if they are outdated or incorrectly discovered.
To view Unprocessed Device Records, hover over Discovery, then choose Unprocessed Device Records.
Unprocessed Device Records Best Practices
- Regularly check the Unprocessed Device Records page.
- Merge records that clearly belong to existing assets, and delete old or stale records. Implement Auto Clean rules to delete old or stale records when appropriate.
- Update discovery credentials and methods if frequent unprocessed records indicate incomplete data collection or matching failures.
- In environments where matching is challenging, switching to "classic" device matching level can reduce the incidence of unprocessed records.
Click here for more information about Unprocessed Device Records, including defining matching levels, enabling Enhanced Device Matching, and other information.
To view a video providing more information about Unprocessed Device Records, click here.
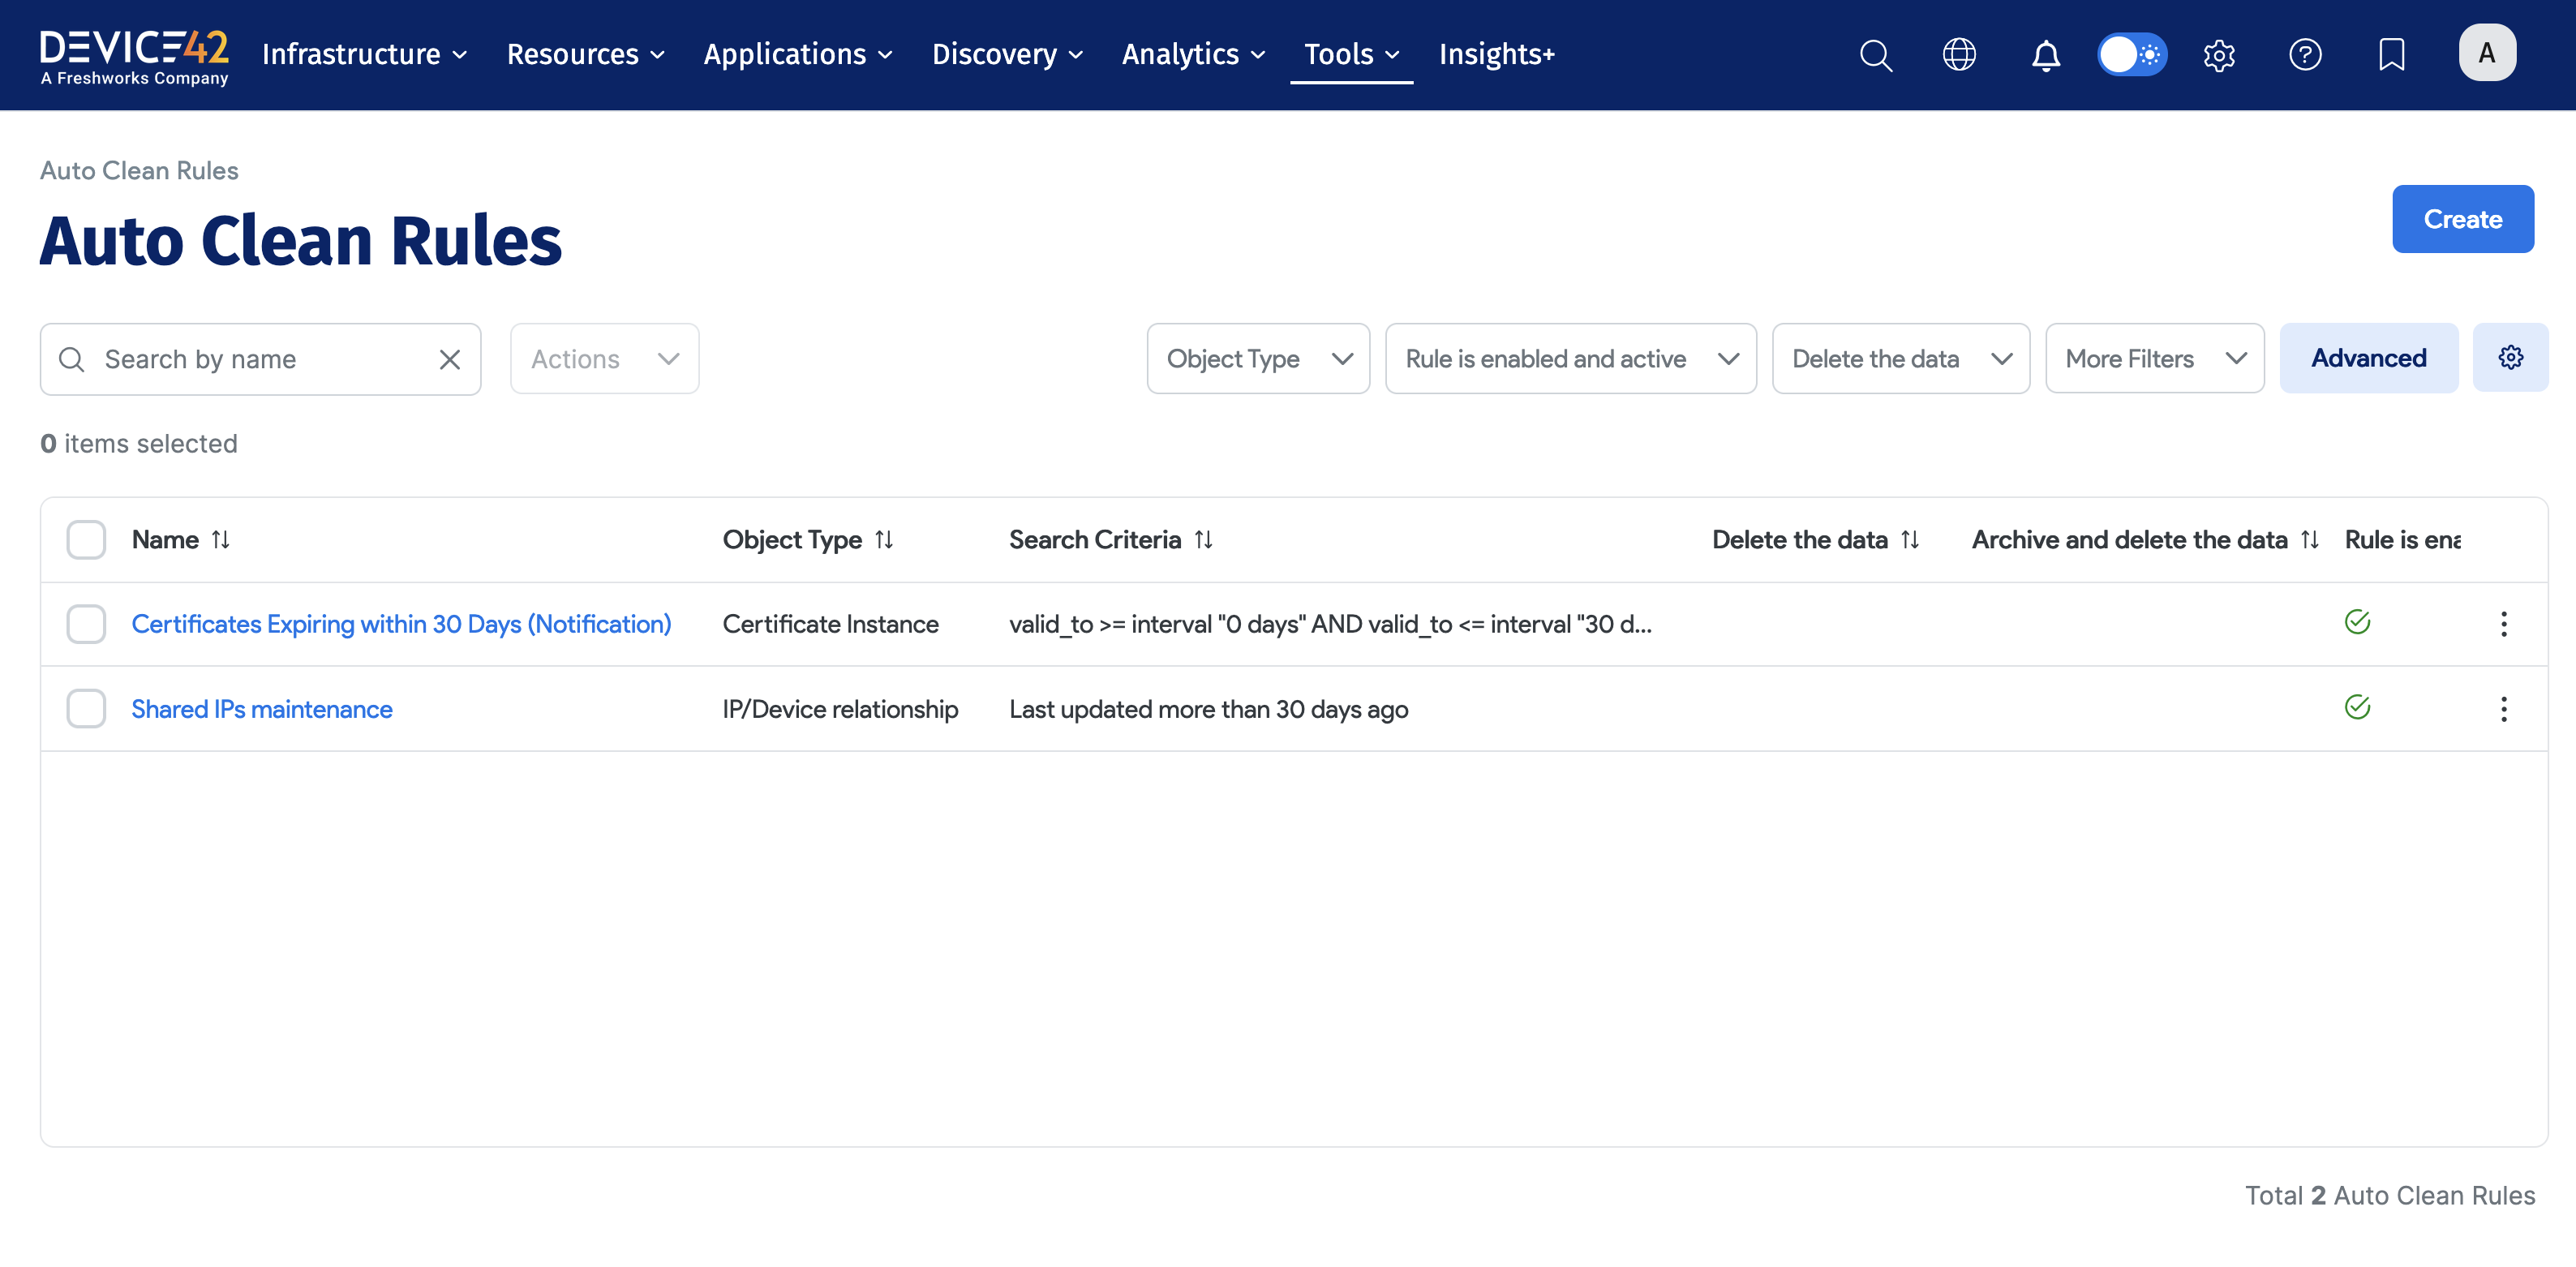
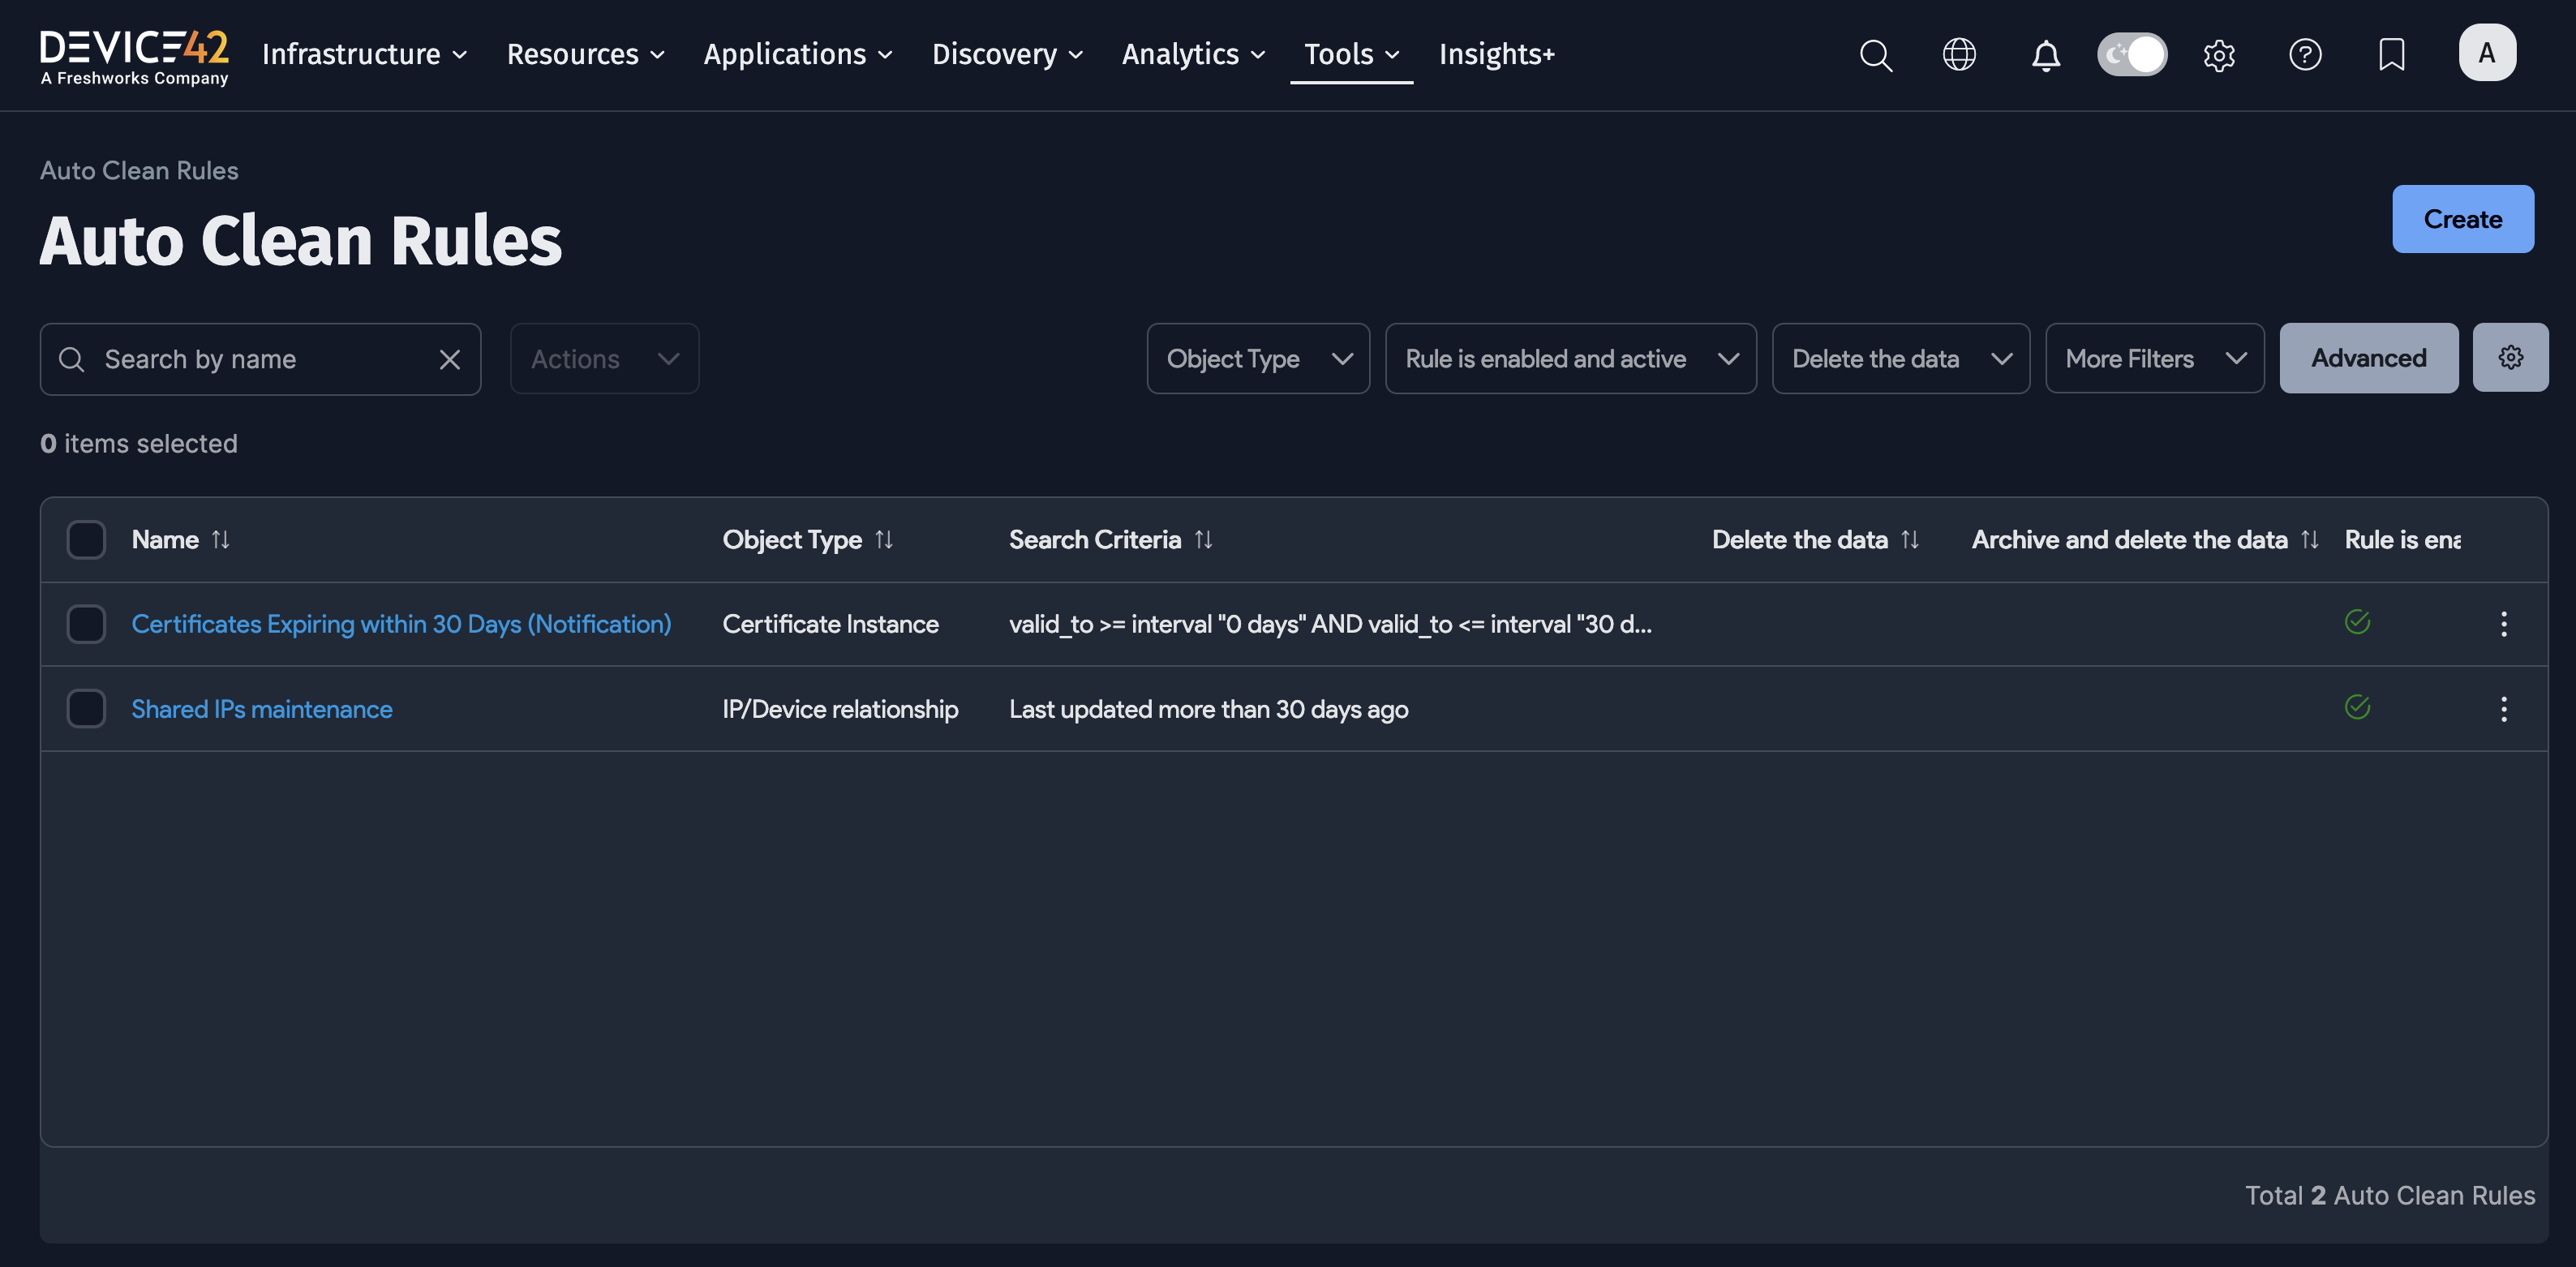
Discovery and Auto Clean Rules
AutoClean Rules enable you to automatically manage old and possibly stale data based on specific criteria you set. Data pertaining to objects (e.g a device or an IP address) that is not found in subsequent autodiscovery jobs can be automatically deleted, architect, or otherwise modified. Auto Clean rules are particularly relevant for cleaning up IP Addresses, Devices, and Software.
Click here for more information on adding Auto Clean rules, including instructions to create new rules.
To view a video on using Auto Clean rules, click here.
Additional Discovery Information
Click here to view the Autodiscovery main page, where you will find a wealth of autodiscovery information. This should be the first place to look for autodiscovery questions you may still have. It also includes a long list of sub-pages for each job discovery type.
Software License Management Discovery Jobs
Overview
As mentioned earlier, Software License Management (SLM) is a separate Device42 module that among other things, scans Windows, Linux, and other device instances to detect installed software.
SLM is configured by enabling certain options within HyperVisors / *nix / Windows discovery jobs, specifically when the following Platform values are chosen:
- *nix
- Classic WinRM
- IBM i/AS400
- IBM z/OS
- SCCM
- Windows
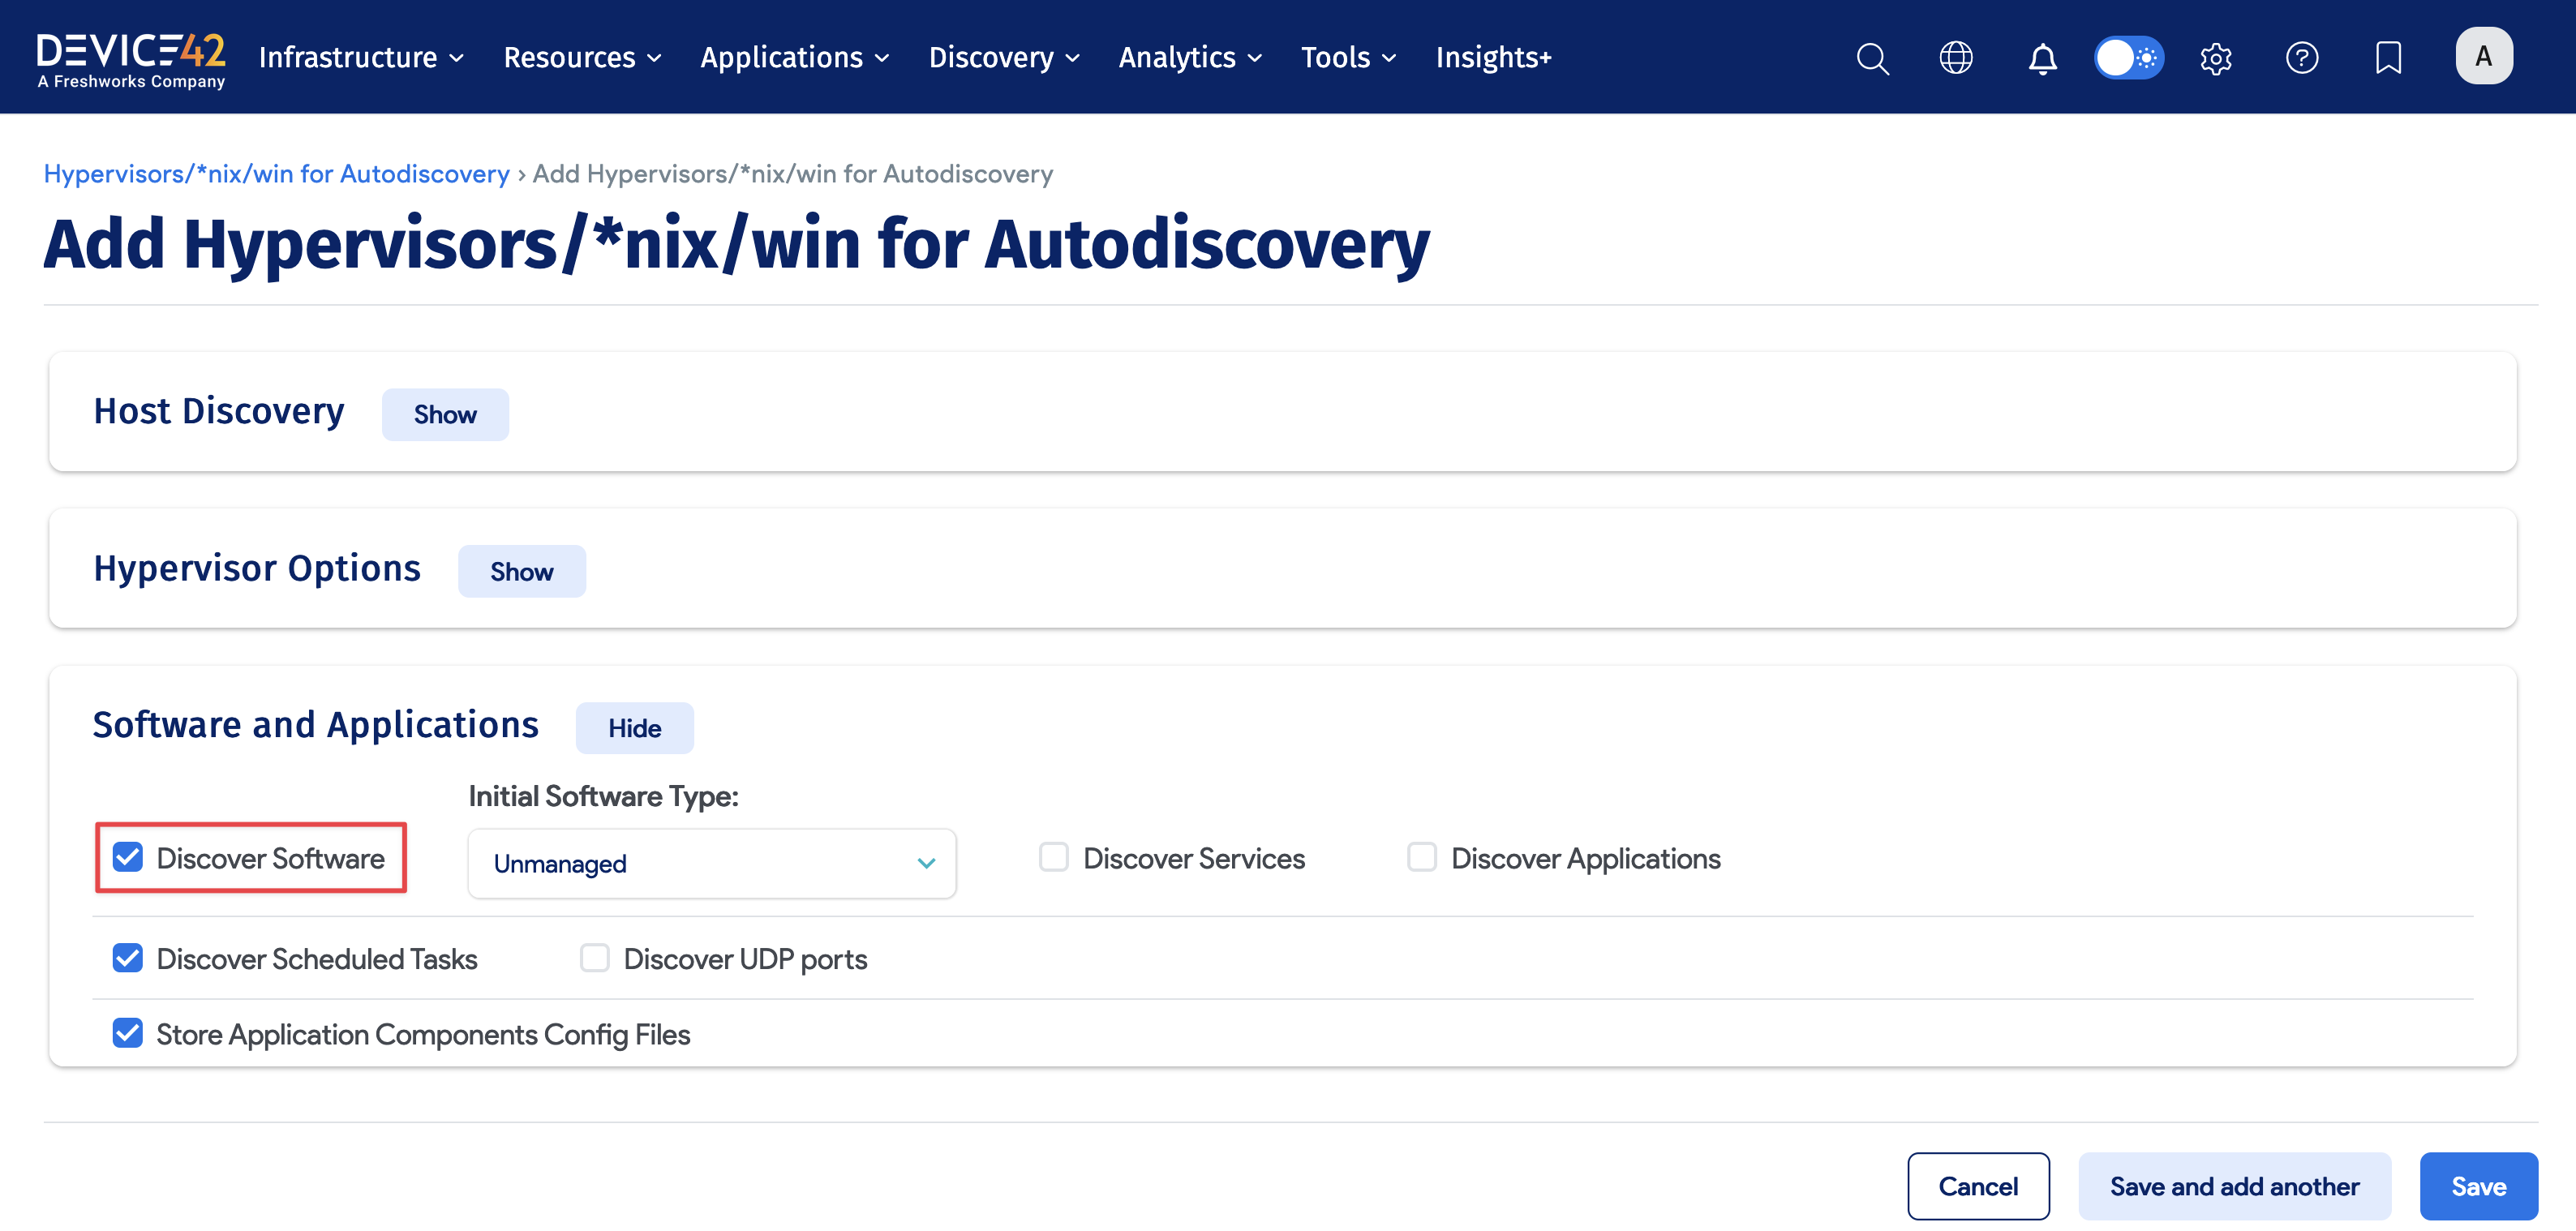
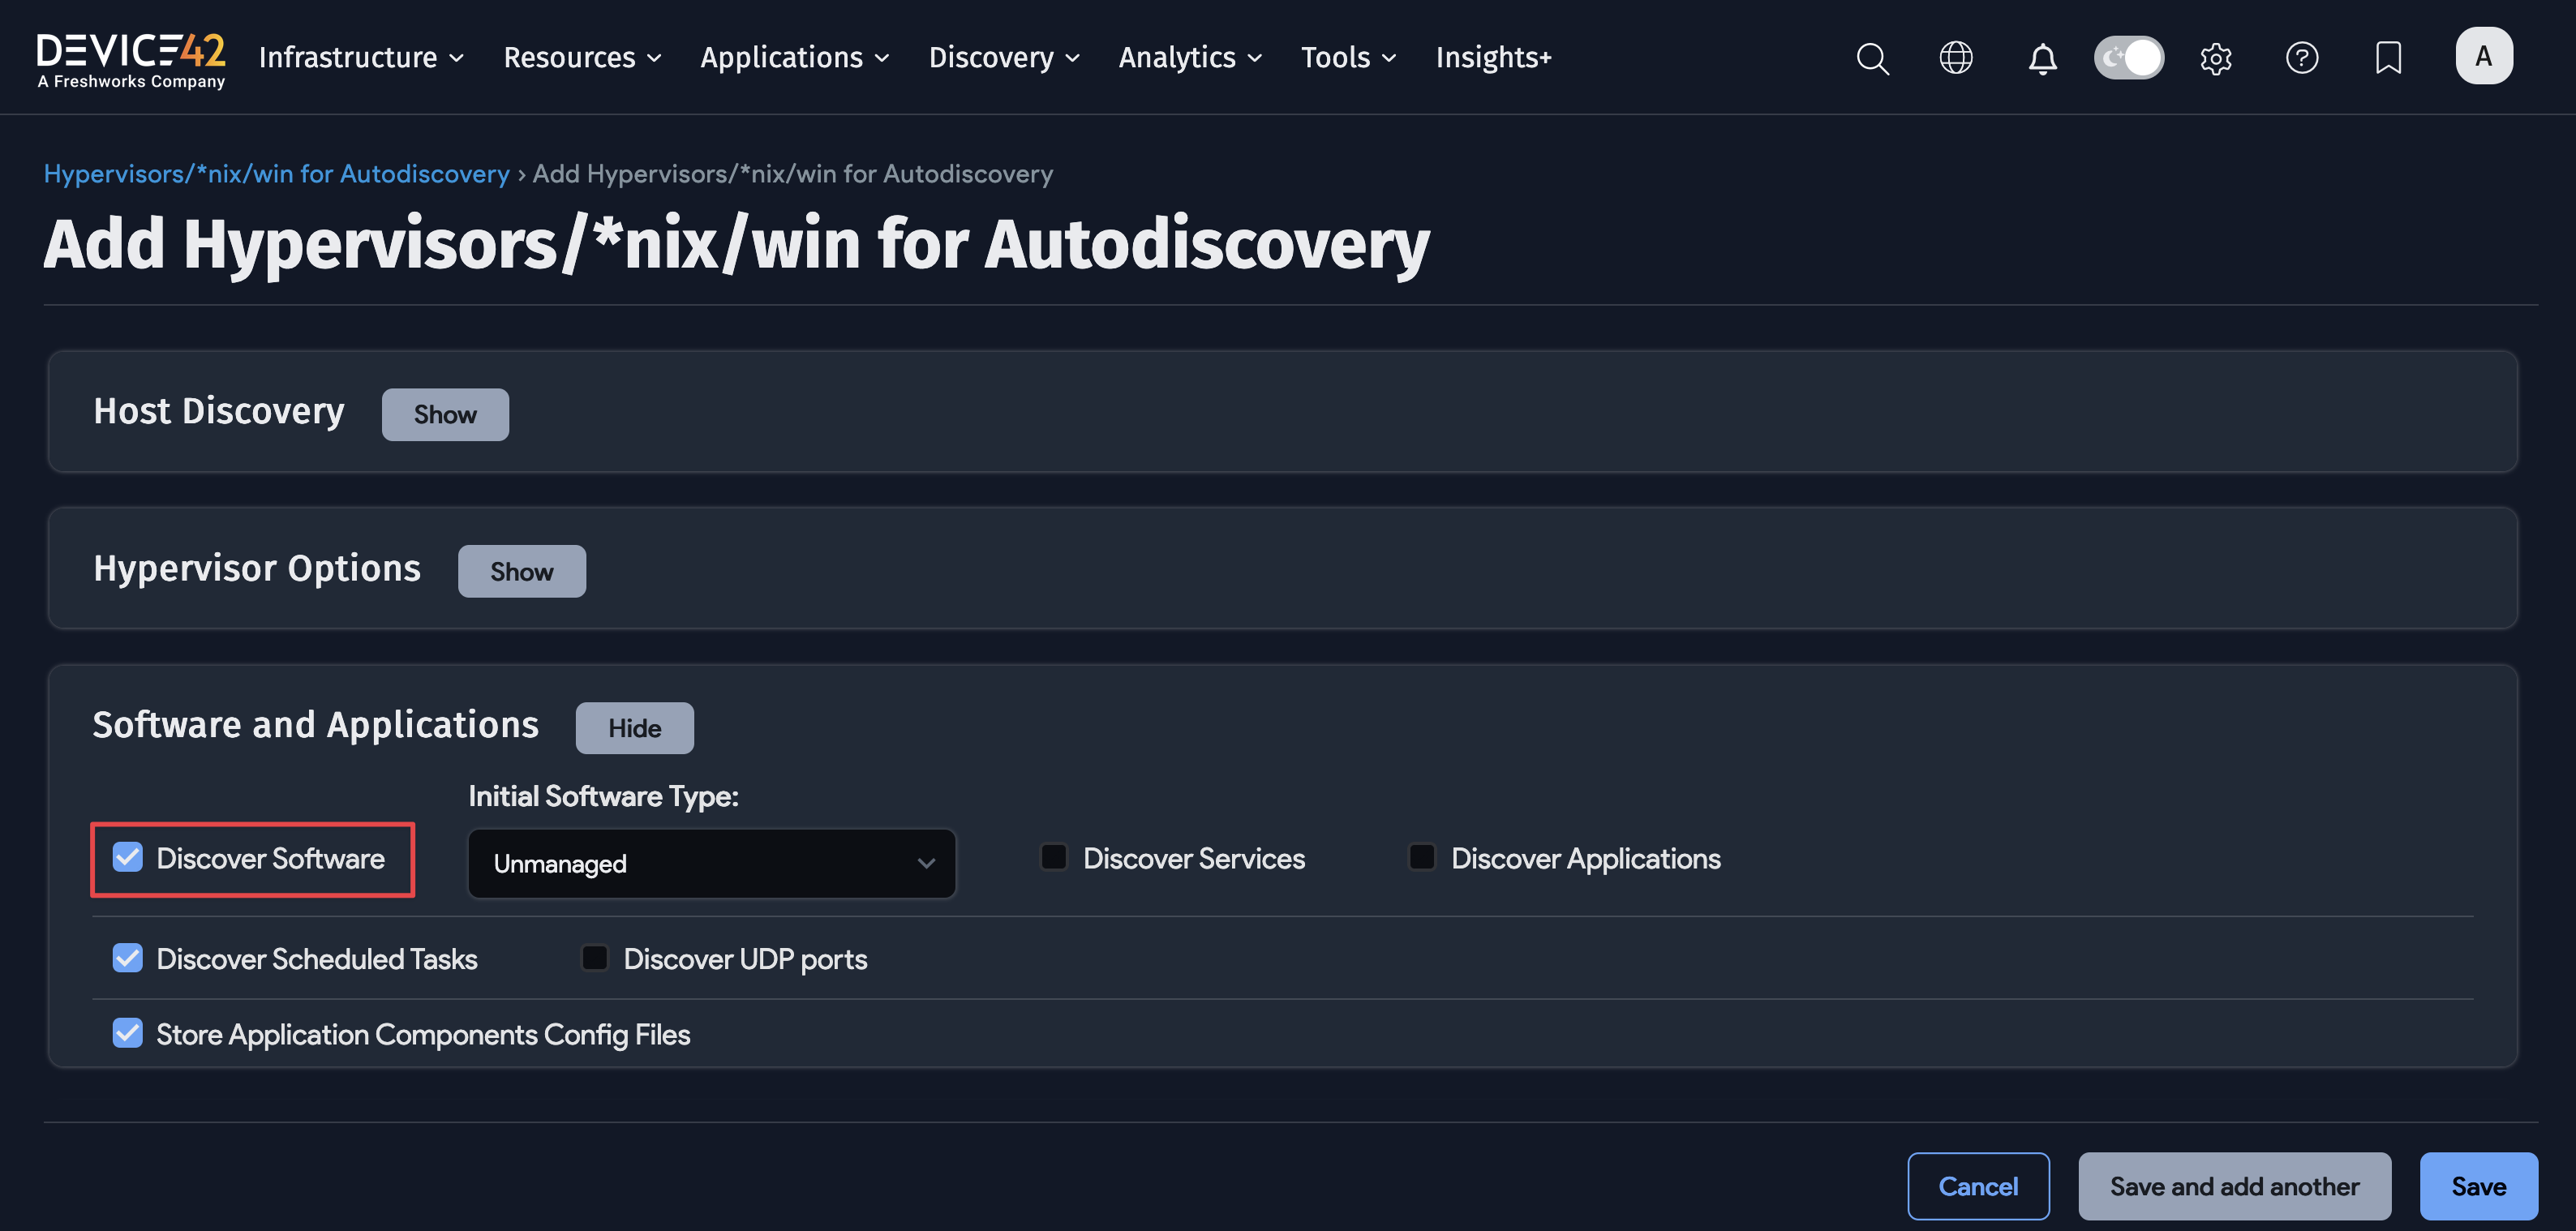
To enable software discovery for these discovery jobs, click the Software checkbox within the Software and Applications section of the job.
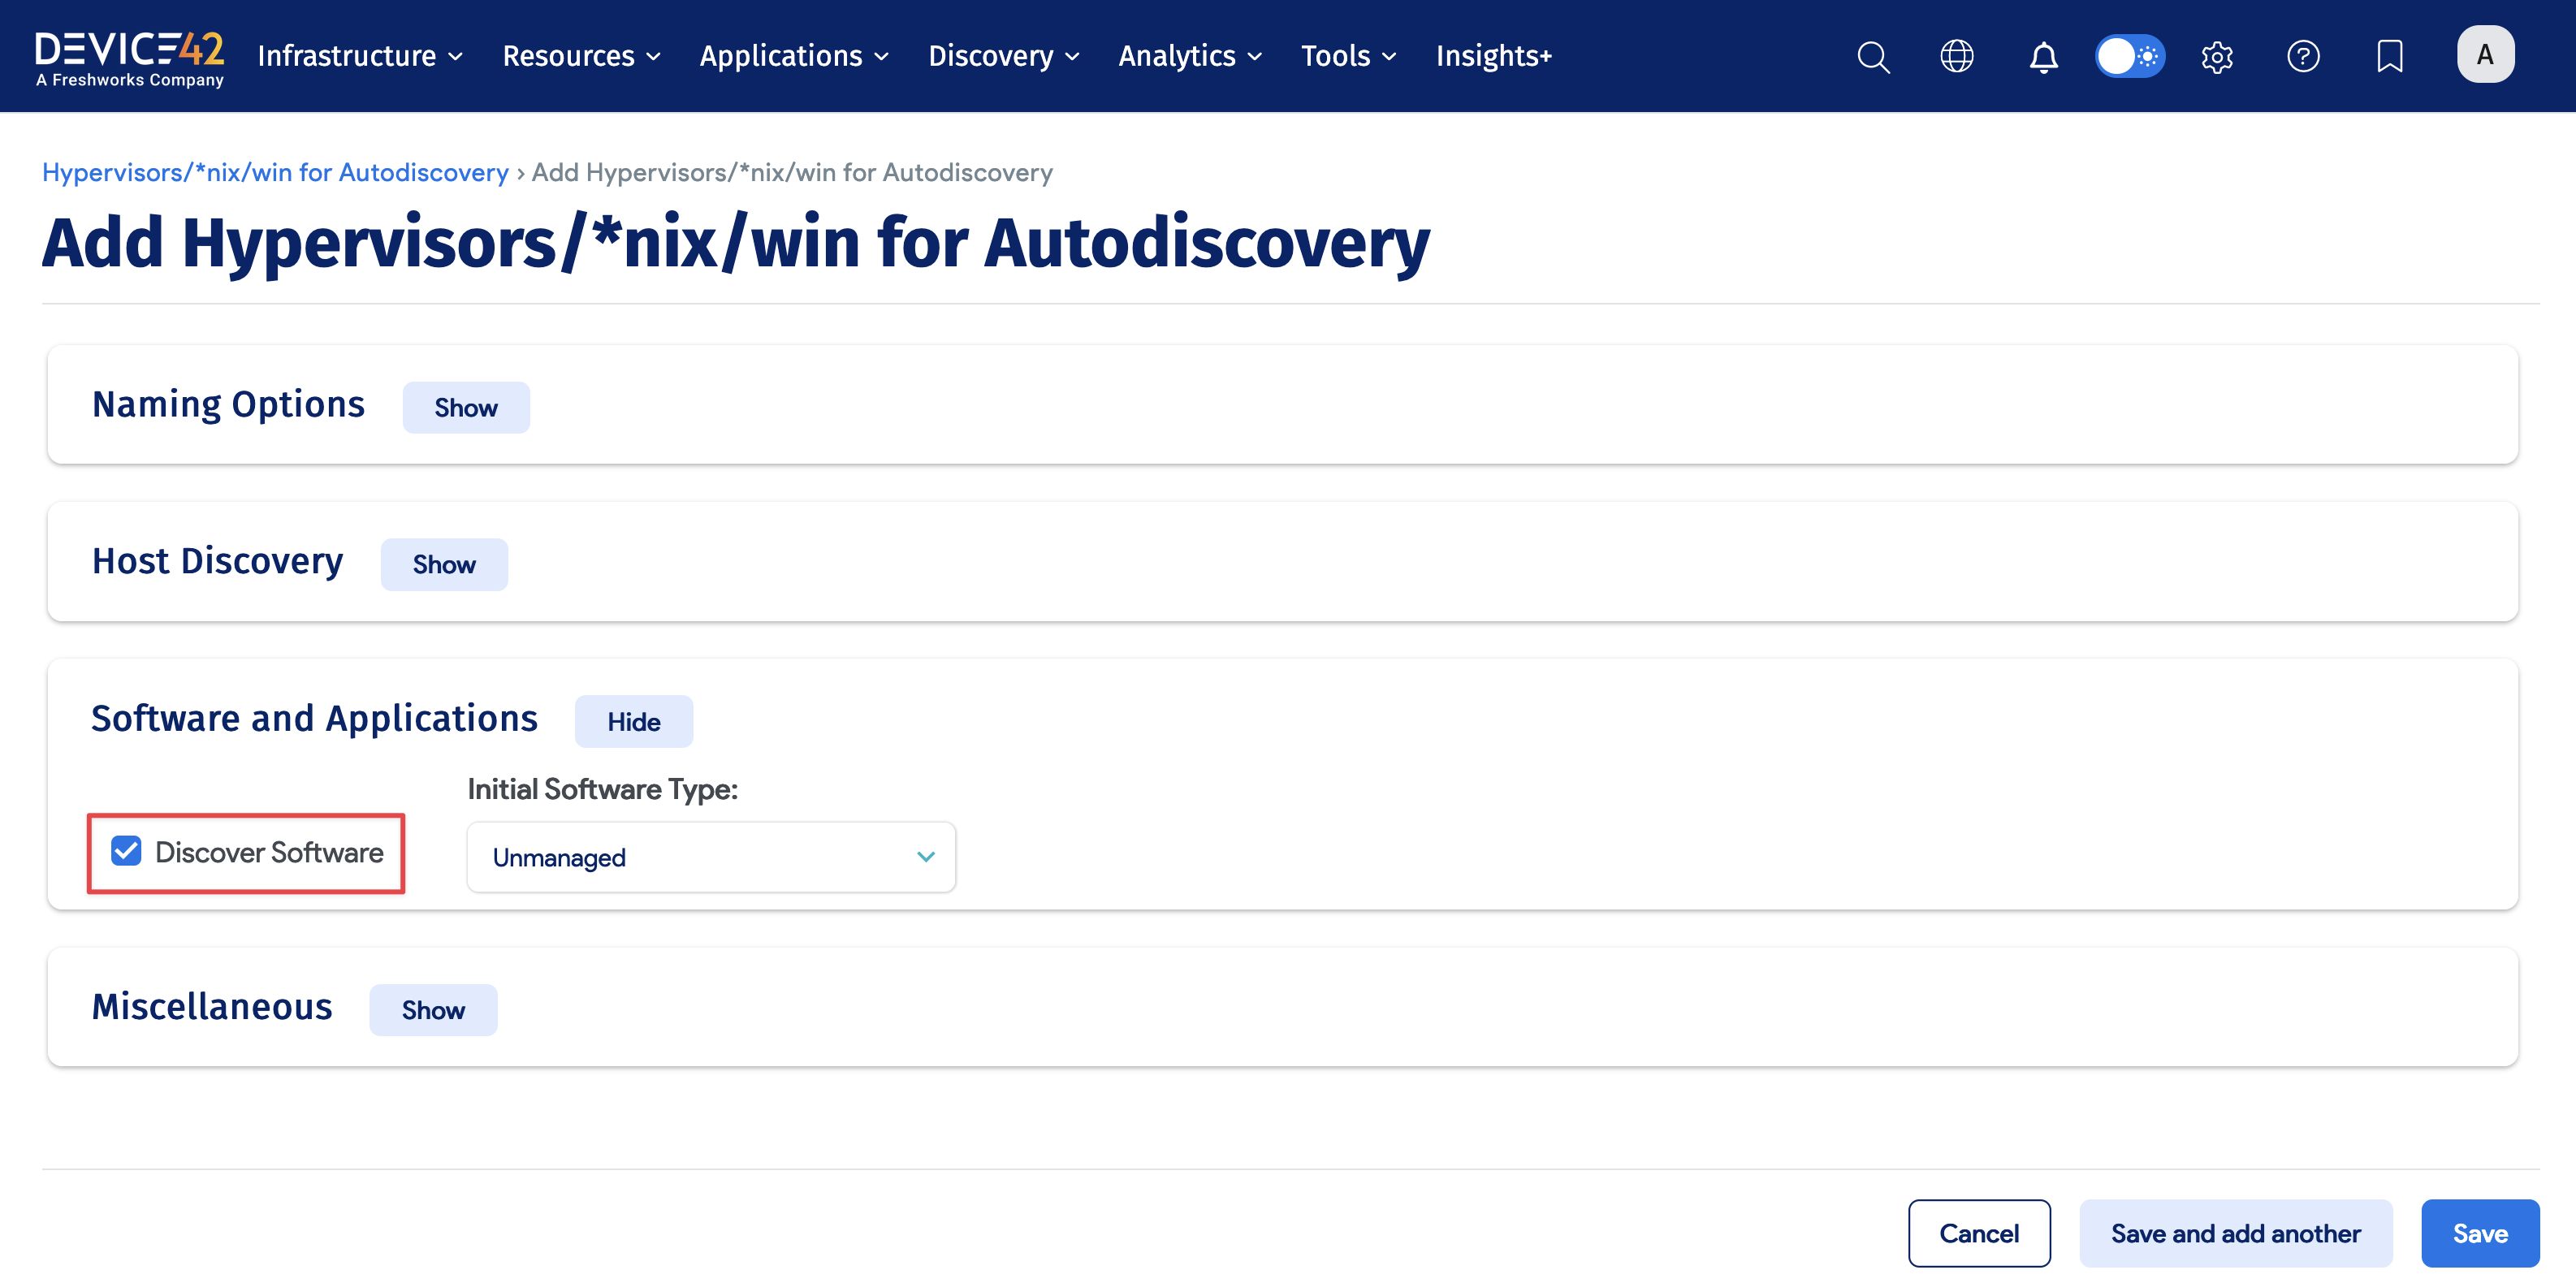
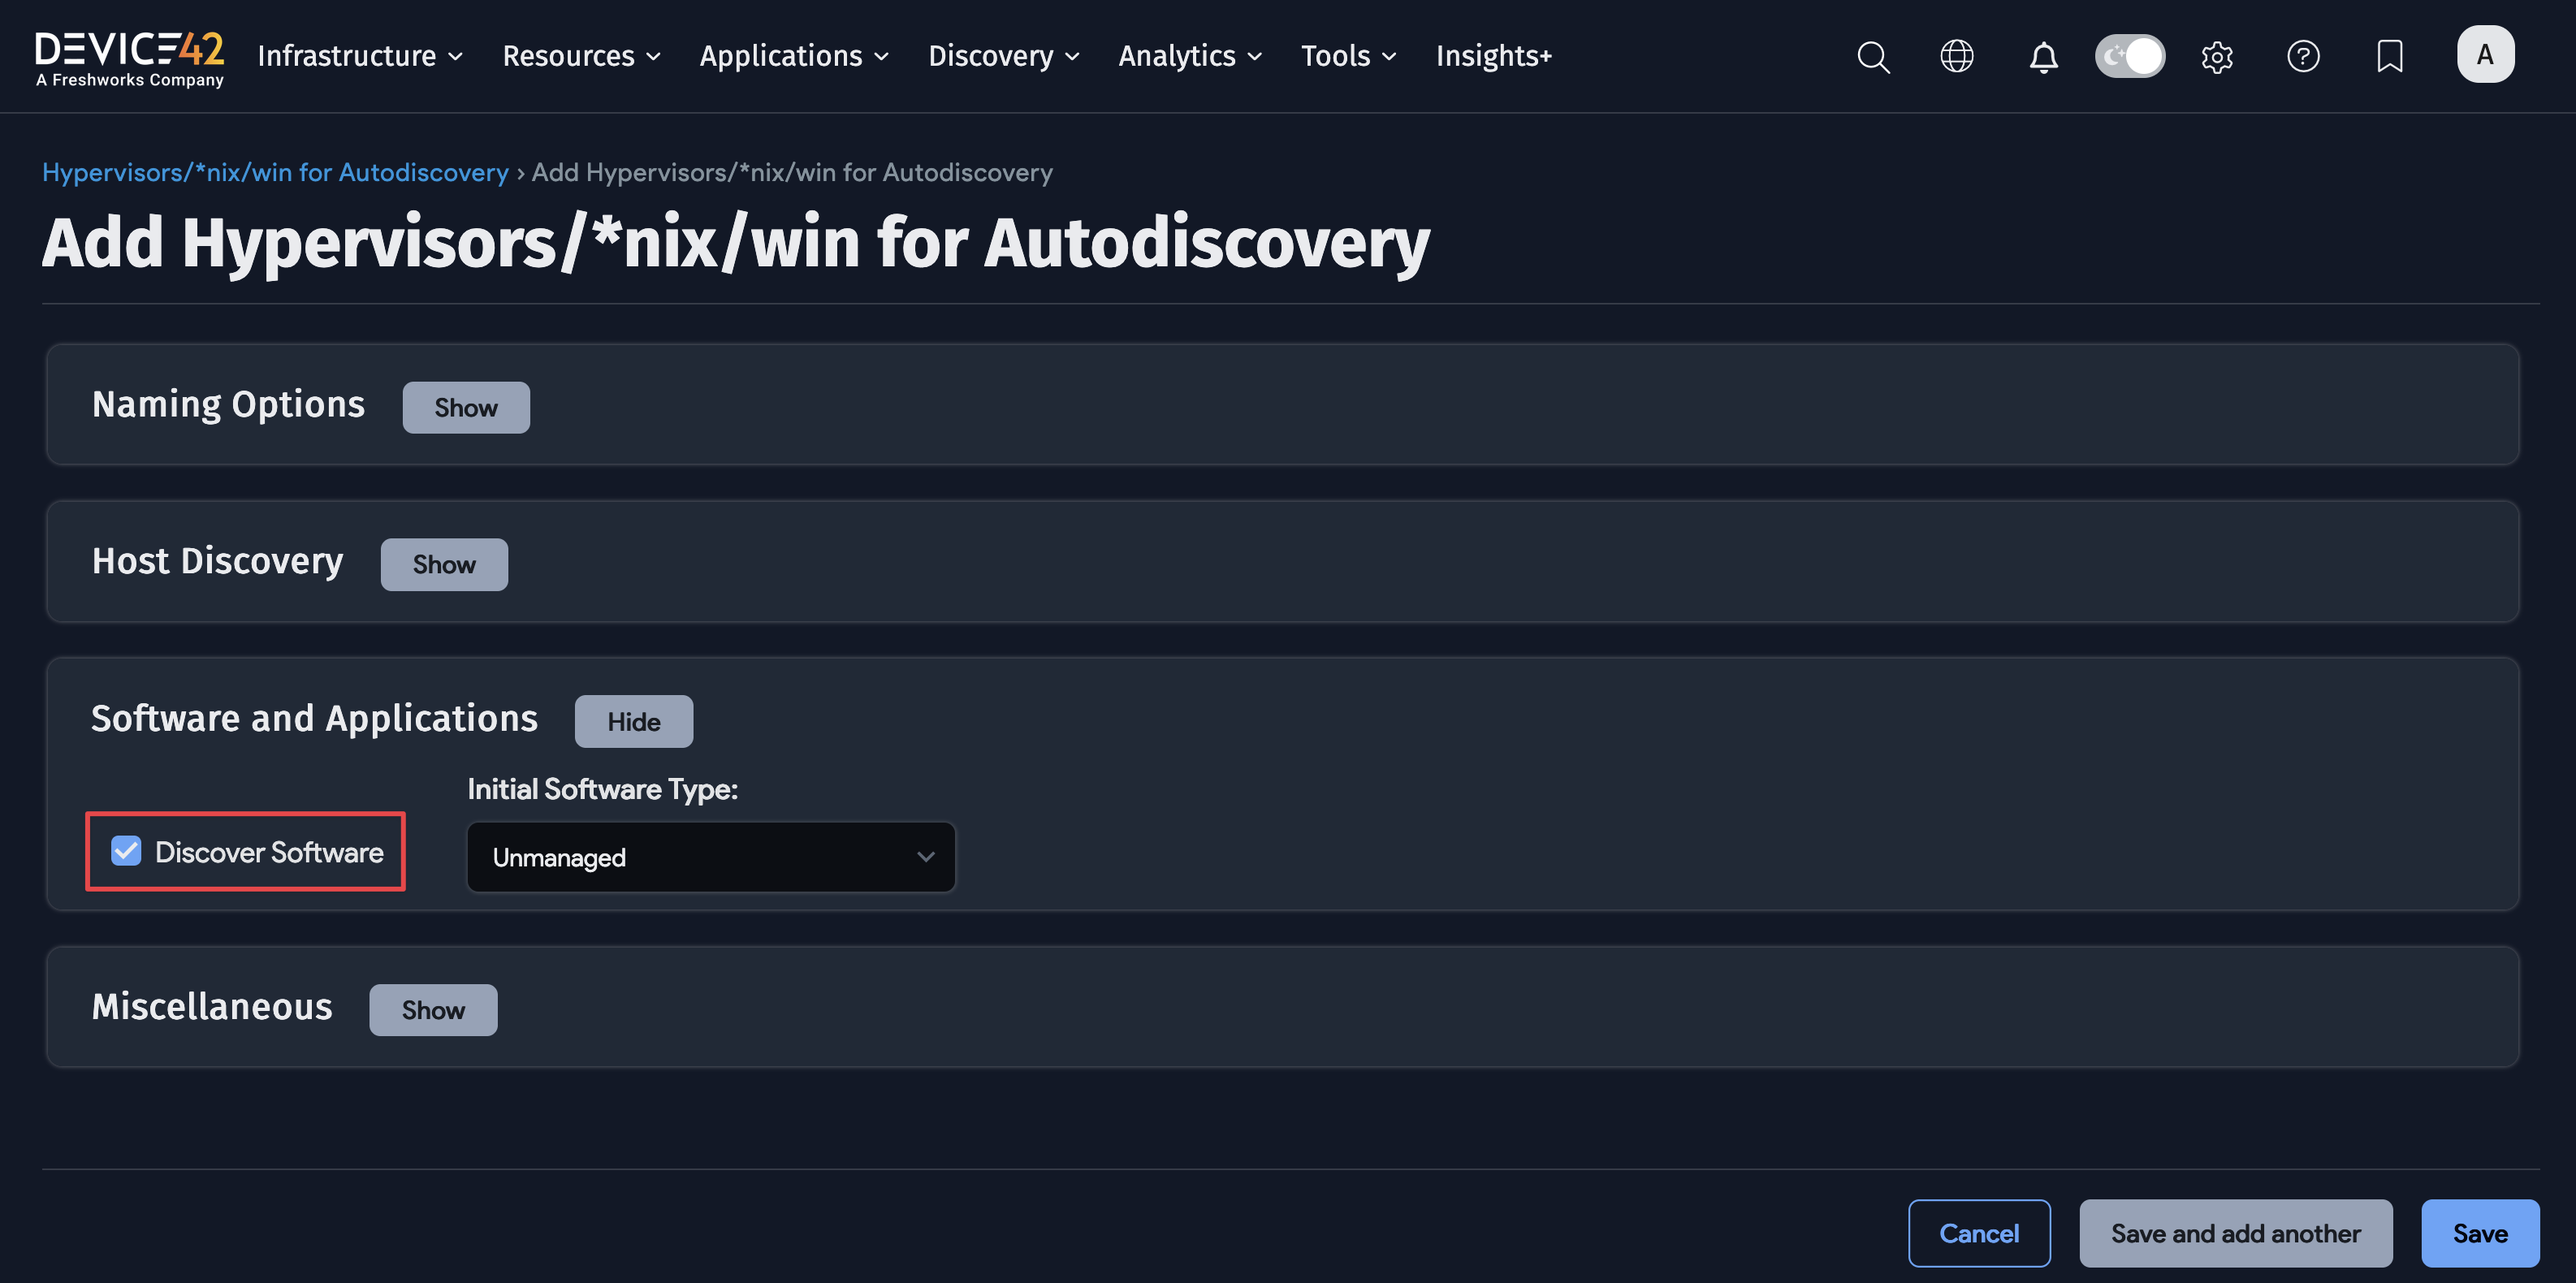
Click here to link to a page providing information on how to configure the SLM module, view discovered software, enable software alerting, run software reports, and more.
The Unknown Device Type
All non-virtual devices will initially be assigned the unknown device type during discovery.
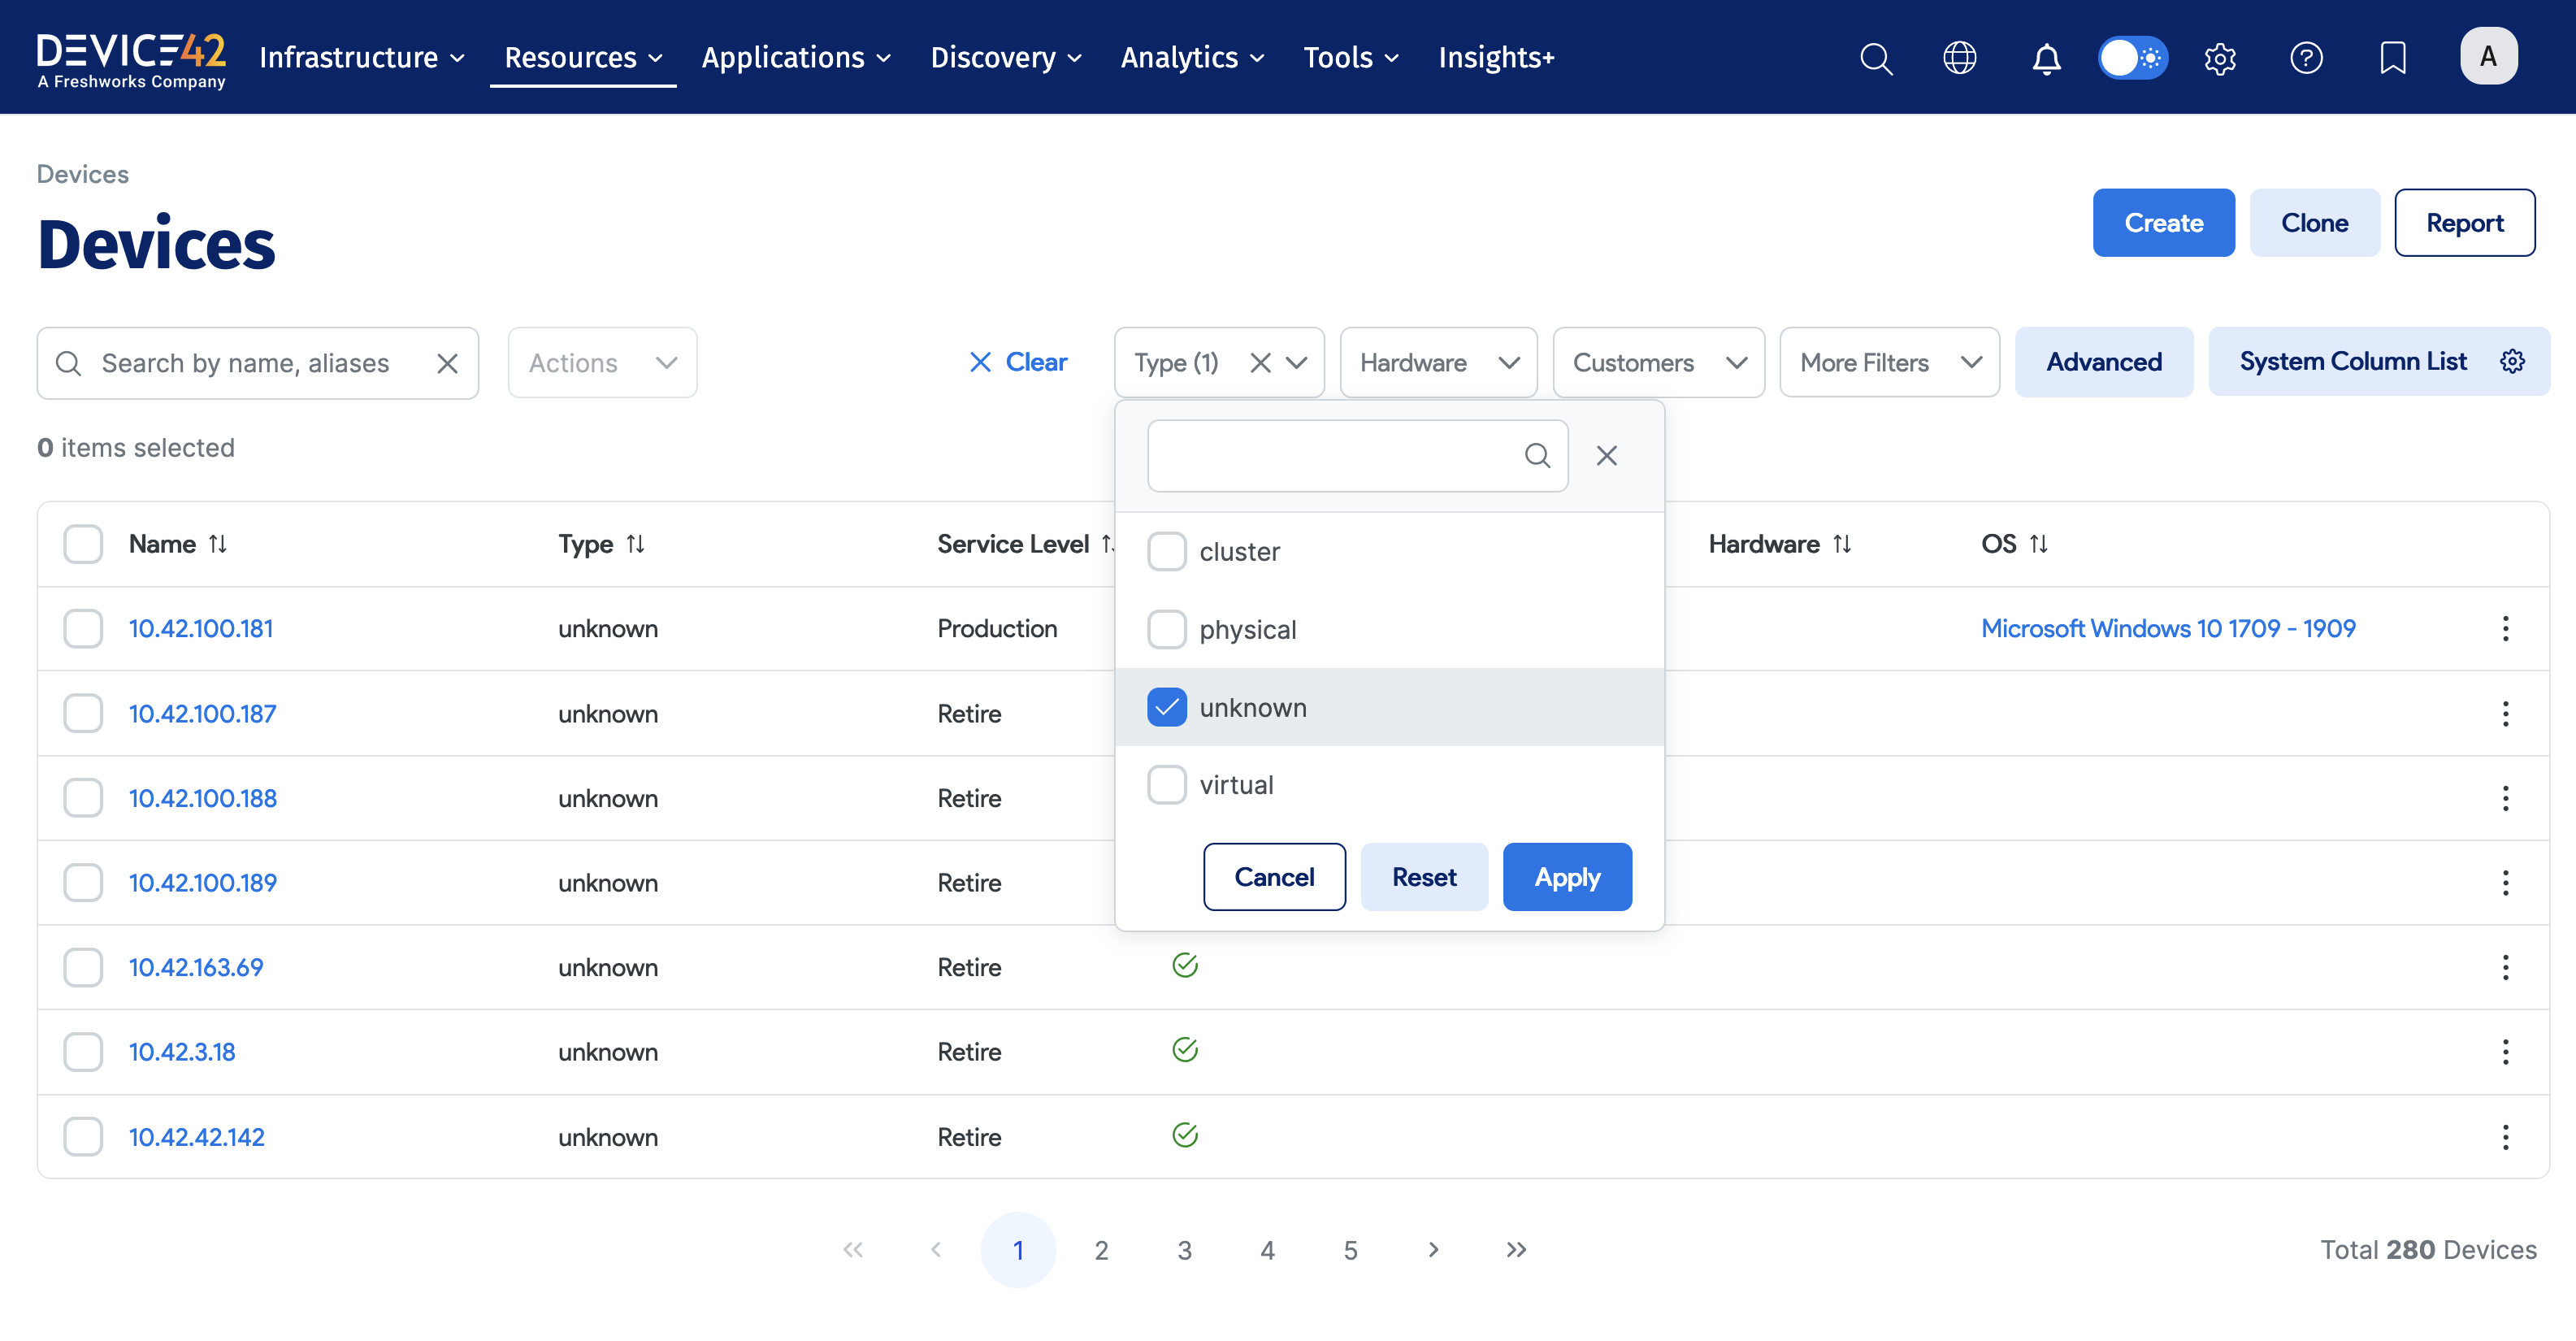
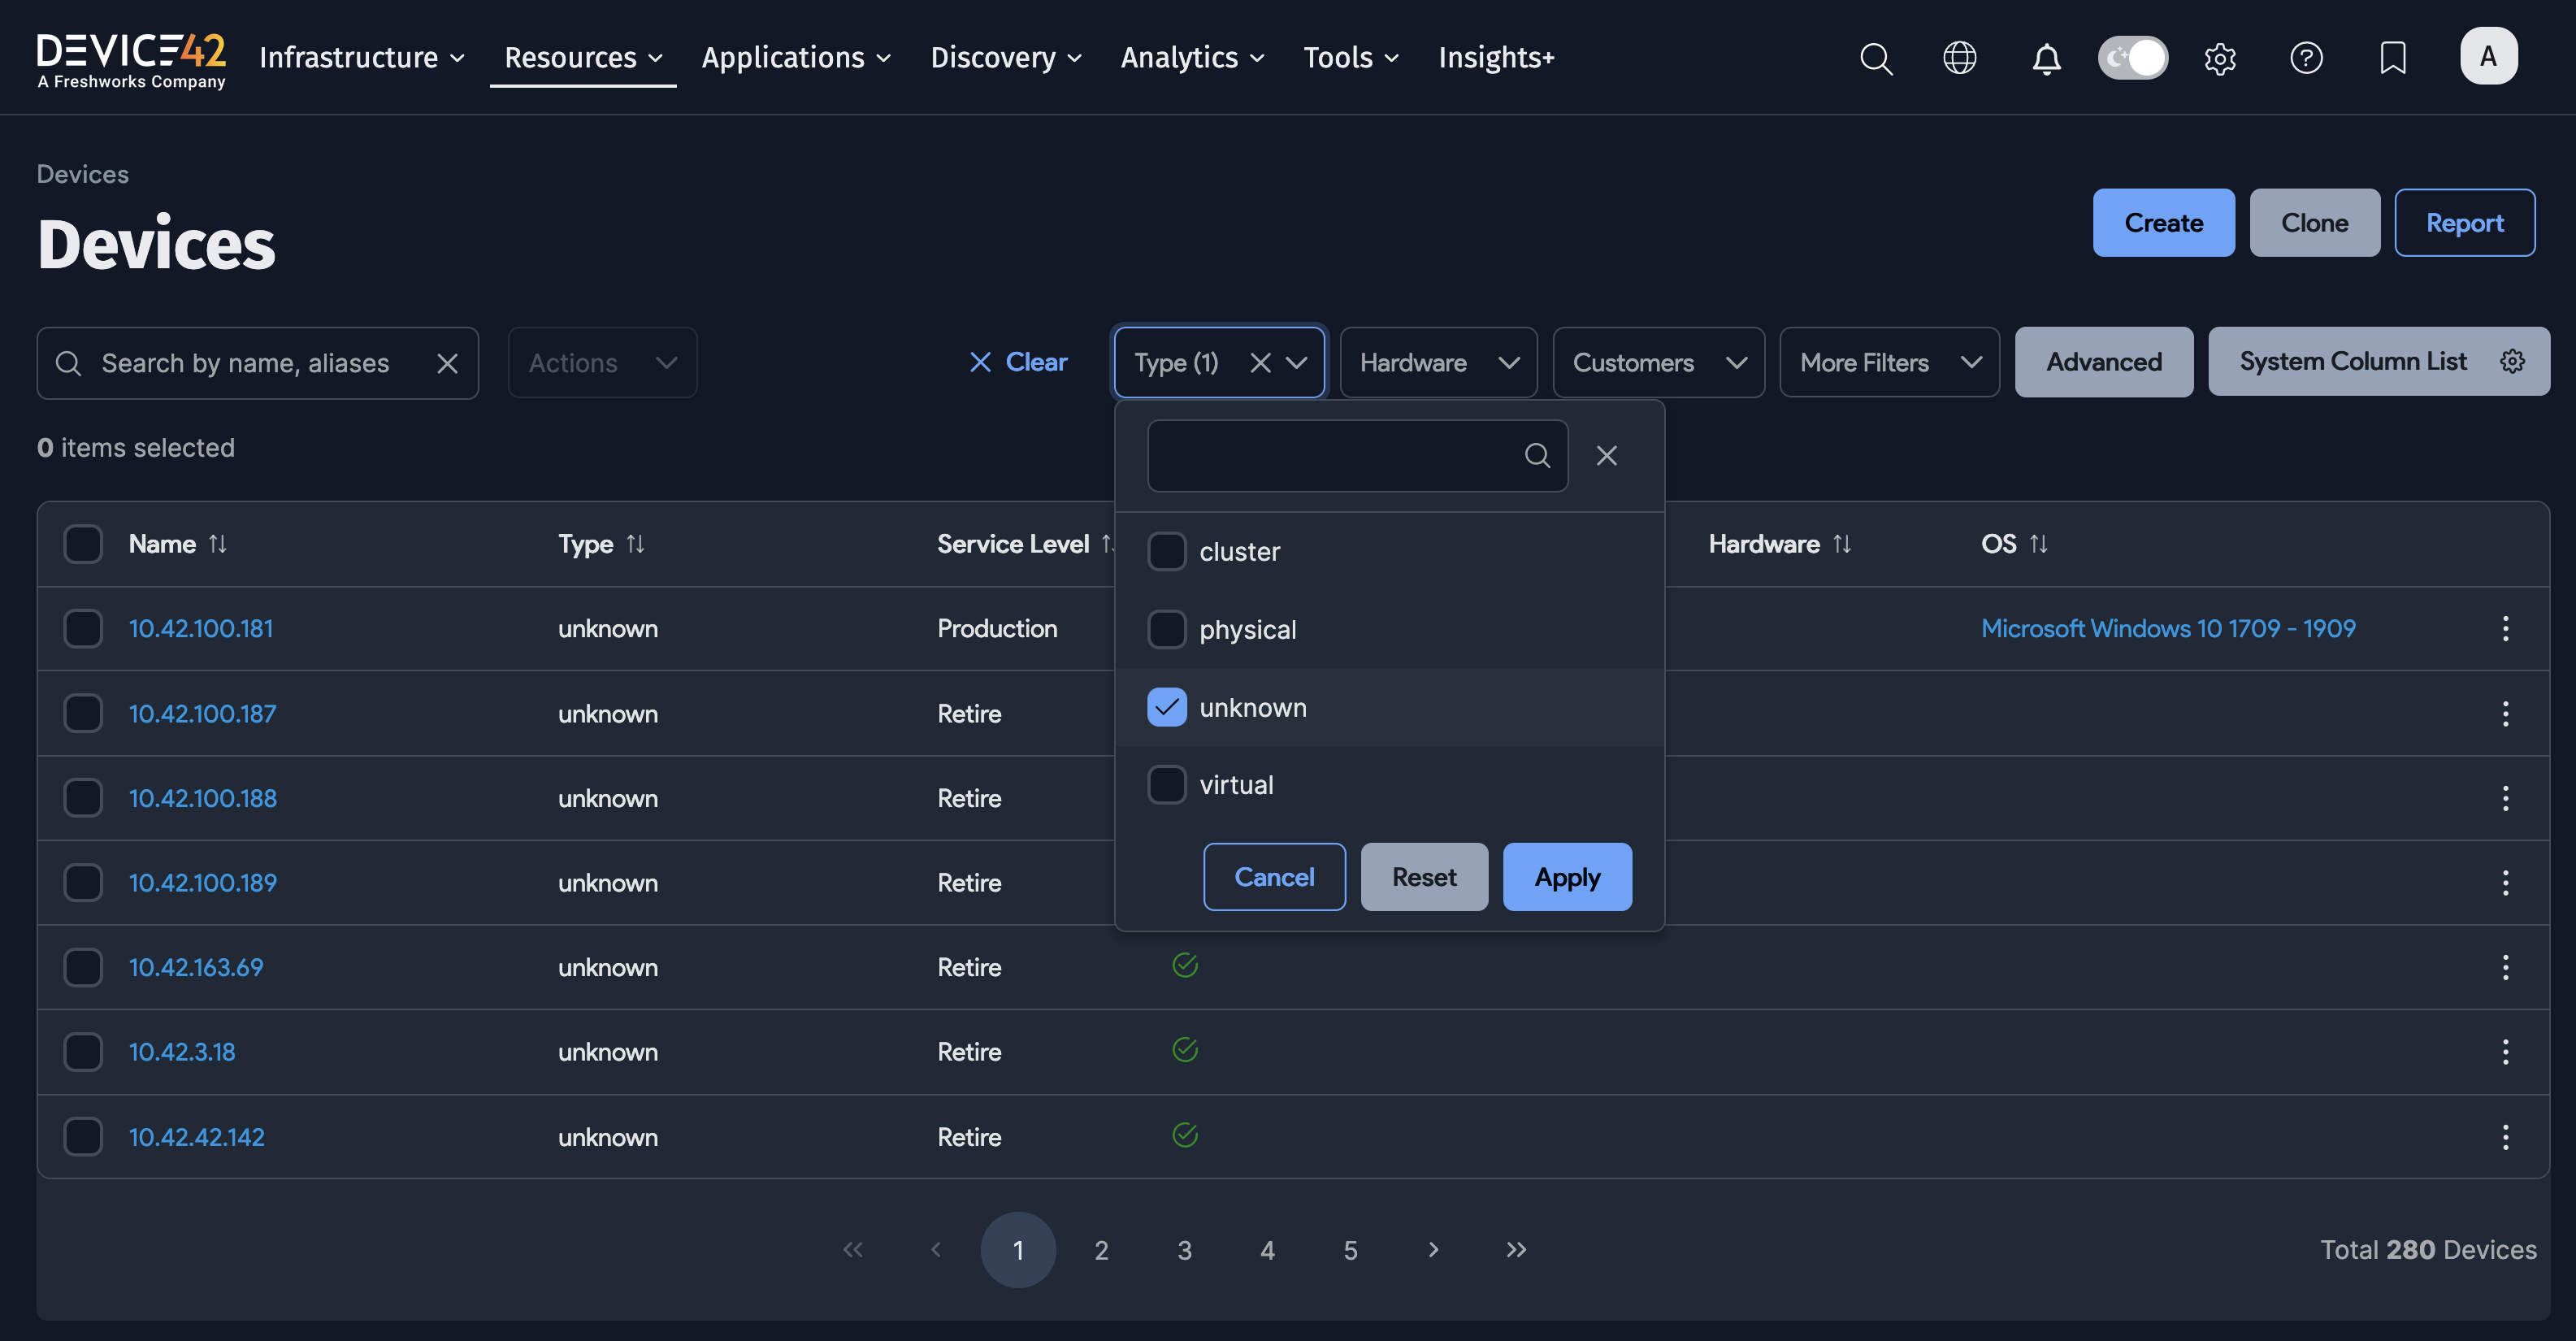
These devices have a hardware model. The appliance categorizes them as unknown because it has not yet been instructed which of the following types the hardware models belong to:
- Regular: Represents physical devices.
- Blade: Represents blade devices.
- Other: Represents "other" devices, like laptops, workstations, and network printers, that aren't rack-mounted.
Once you change a hardware type, all the corresponding devices that refer to that hardware and have been assigned the unknown type will automatically be categorized accordingly.
The hardware bulk edit feature allows you to change hardware properties in bulk for all undefined hardware types. It automatically categorizes all devices belonging to a specific category. See the Bulk Edit video or Bulk Edit documentation for more information.
Once a hardware type has been defined, any newly imported or discovered devices will go into the correct category.
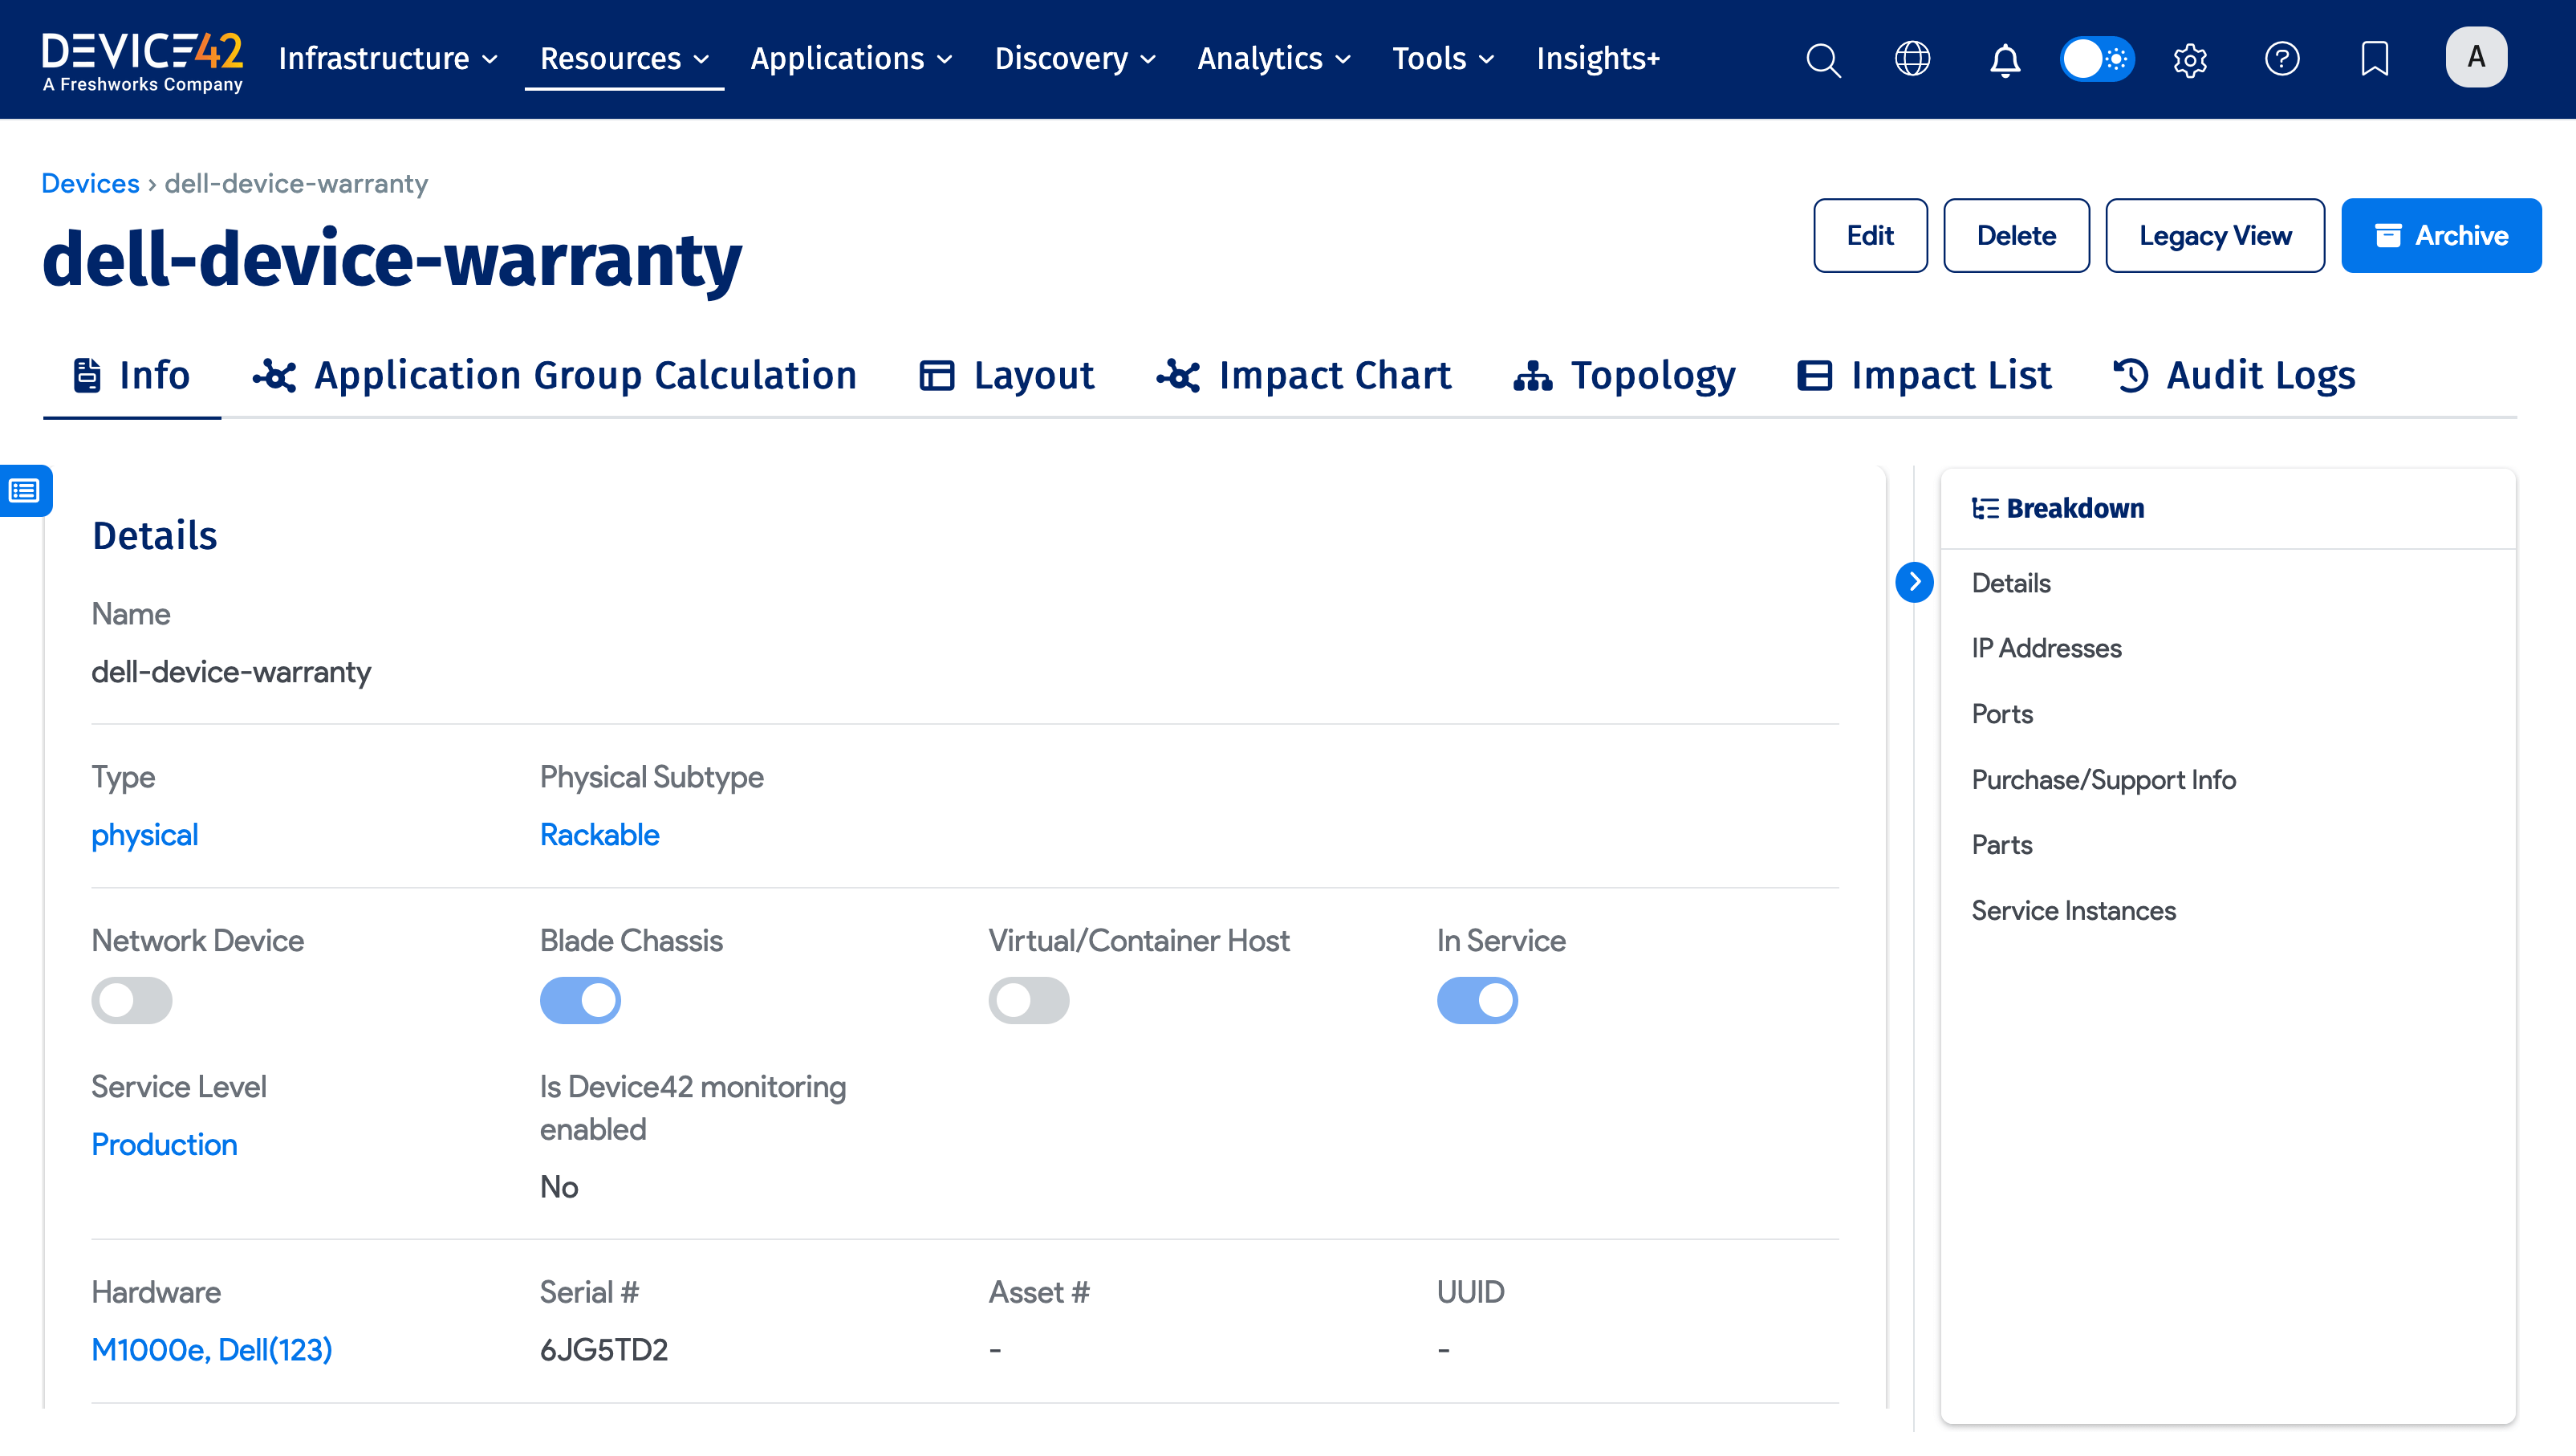
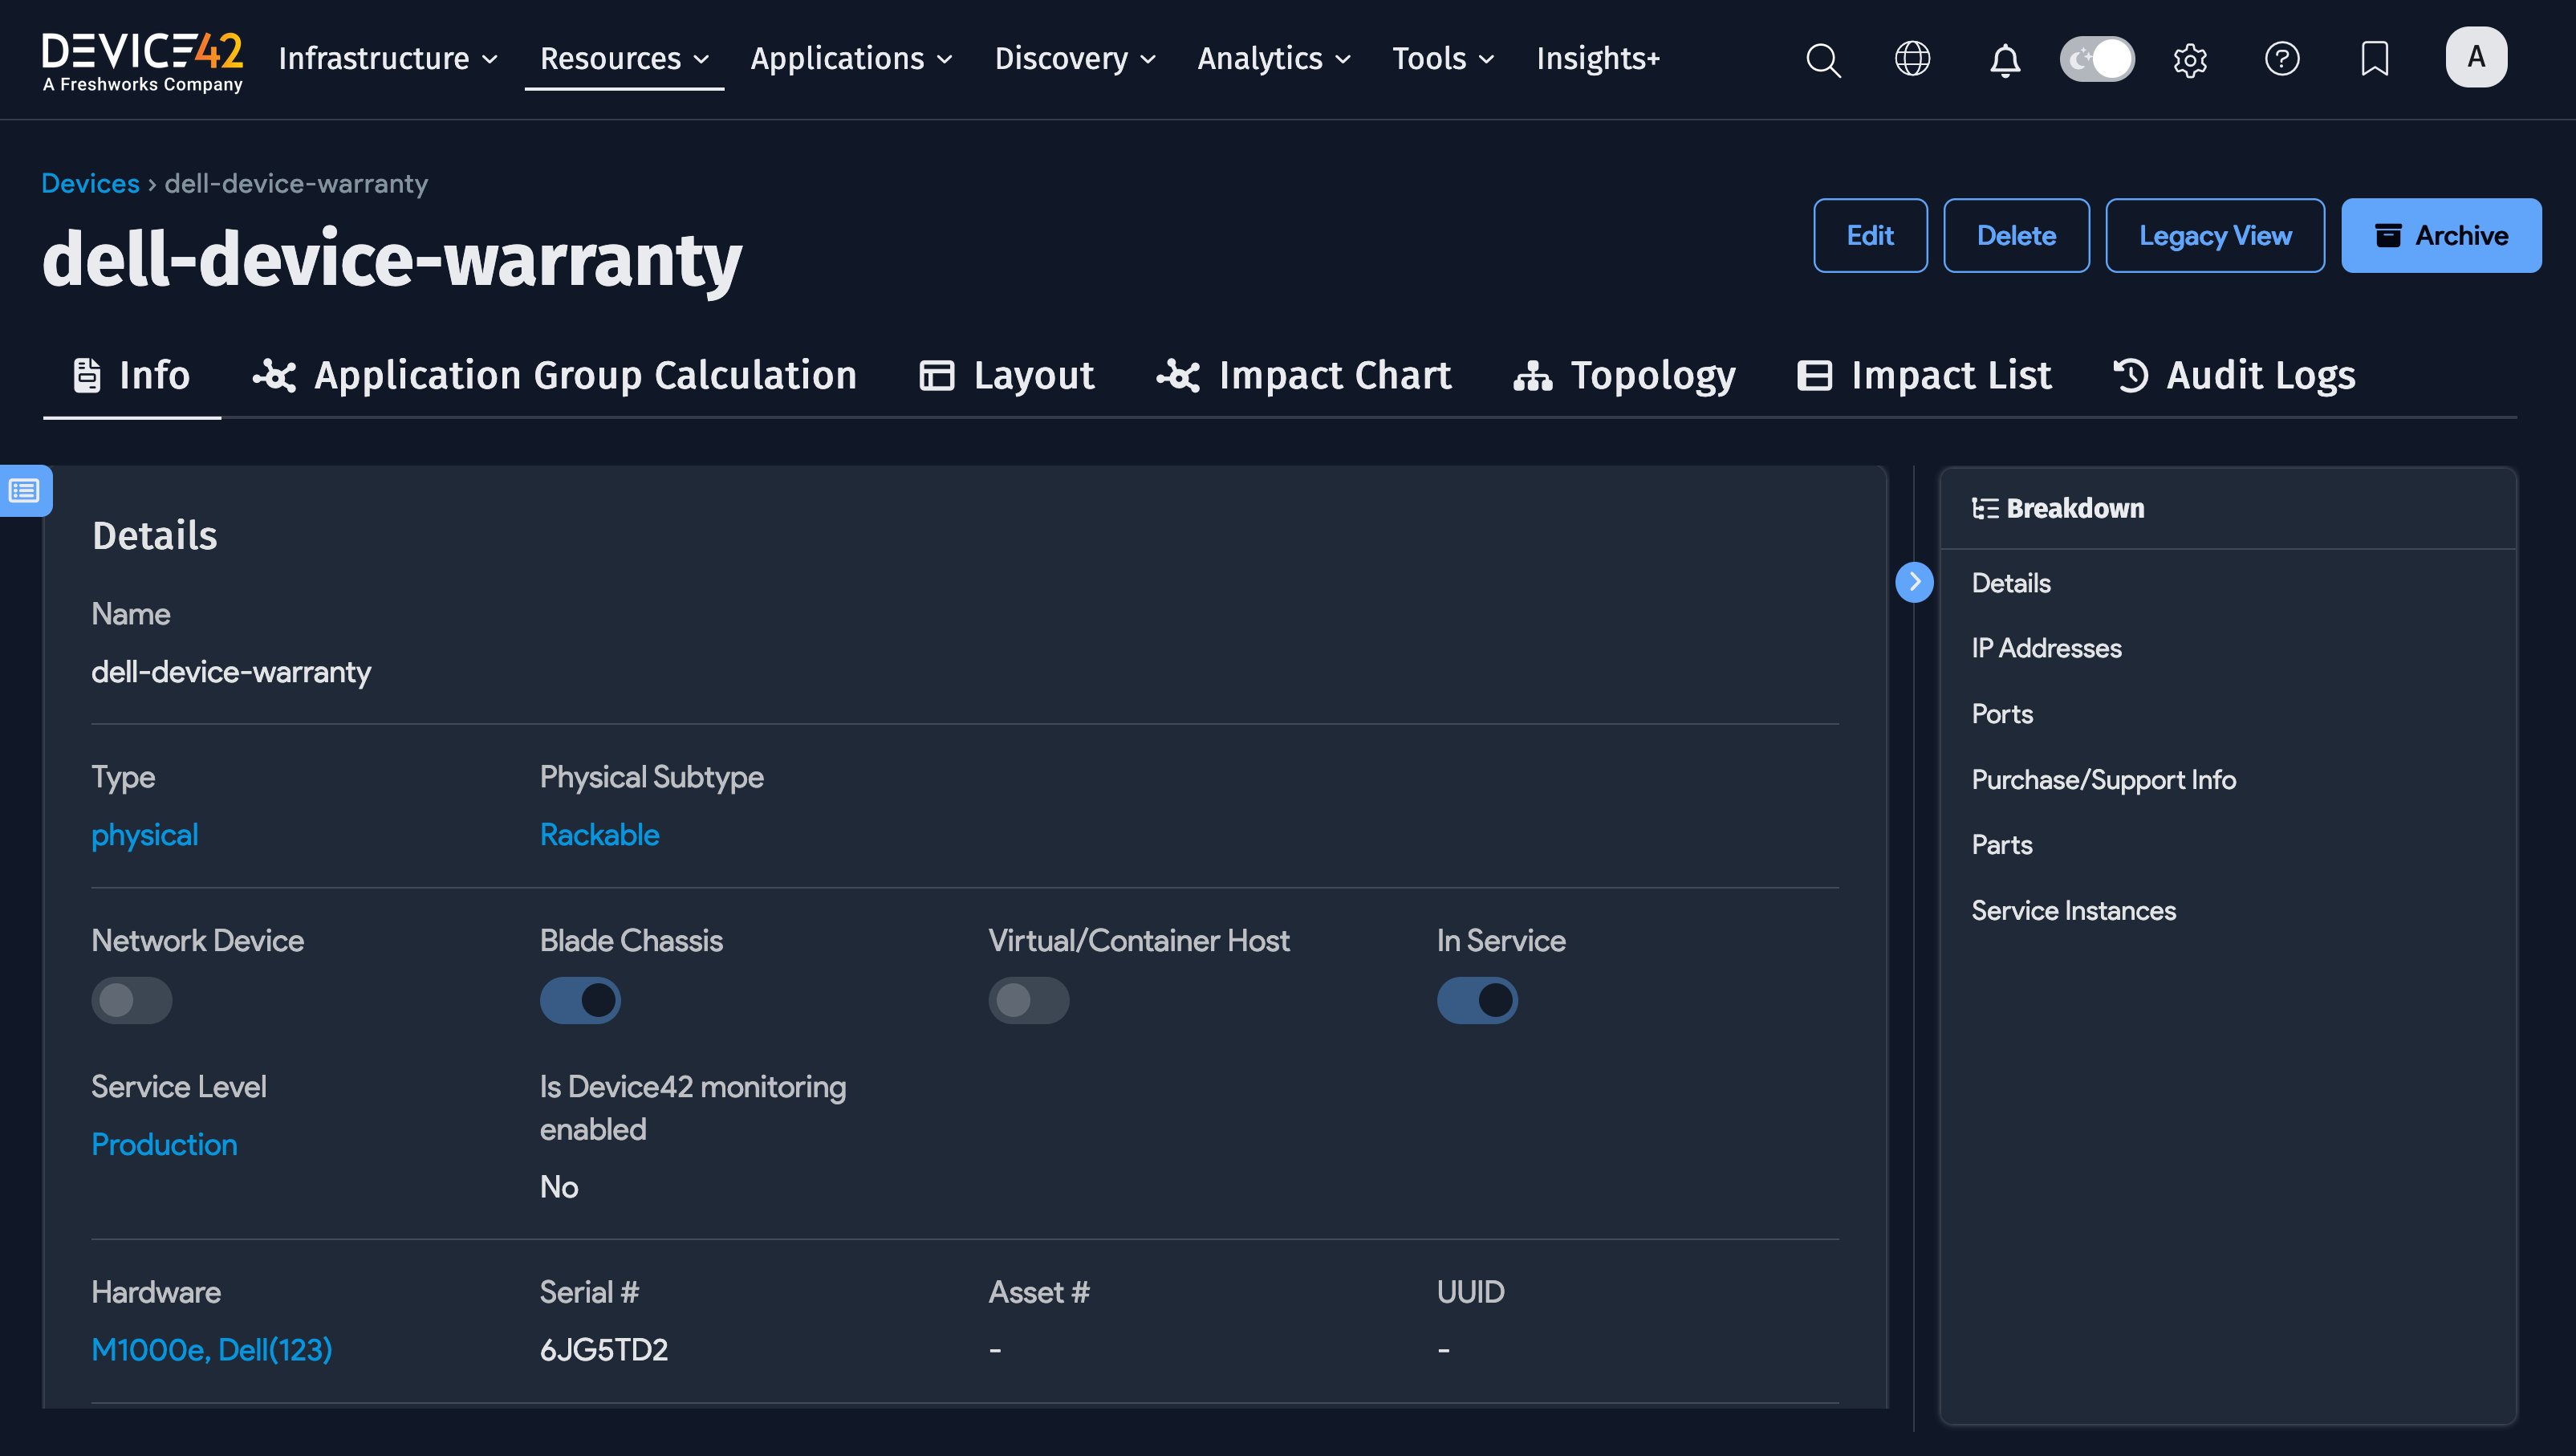
Viewing the Details of Discovered Items
To view the details of a discovered item type, navigate to that item type's list page and select an item from the table.
For example, you can go to Resources > All Devices and click on a device name to view that device's details. Depending on the device and information available, fields like Hardware, Serial #, Total CPUs, RAM, OS, and IP Addresses may be populated.
Discover Phase Checklist
The Discover phase is considered complete when:
- You have defined your subnets.
- You have defined the discover jobs that will deliver the maximum return to your organization.
- You have determined how you want to organize and name your discovery jobs.
- You have created and run your discovery jobs, making sure to include only those targets relevant to each job, and making sure to limit the quantity of targets to ensure the jobs successfully complete.
- You have viewed your Unprocessed Device Records and have taken the appropriate actions (e.g. delete records, merge records).
- You have verified your discovery jobs were successful by reviewing Discovery Job results, Discovery Scores, and Discover Target Details.
- You have scheduled your discovery jobs, making sure to run them only as frequently as is needed, to schedule them during times when it will have minimal network impact, and to schedule jobs to run on different days and at different times so as to not overwhelm the Main Appliance.
Discover Phase Support
At the conclusion of the Discover phase you should have created and configured your relevant discovery jobs, validated that the jobs ran successfully, and scheduled those jobs to automatically run at specific intervals.
You may access the Device42 Support page where you can submit a request, access our Knowledge Base, or access other general information.