Jira (self-managed) Integration
Atlassian Server is in the process of being discontinued and the future of self-managed products is via the Atlassian Data Center.
Integration Prerequisites
To use the self-hosted Device42-Jira integration, users must have:
- A running Device42 virtual appliance, populated with configuration items (CIs) to sync to Jira.
- A properly configured self-hosted Jira instance with administrator access.
*If you are looking to integrate Device42 with Jira Service Management and/or Jira Cloud, see the Device42-Jira Service Management/Cloud integration page.
Device42-jira Self-hosted Integration Features
The Device42-Jira integration offers users the following functionality:
- Synchronize select Device42 data with Jira, automatically (and/or manually)
- Attach configuration items synced from Device42 to Jira issues
- Search for Jira issues relating to a Device42 CI(s) and/or CI data
- Create custom fields and apply them to specific projects, create custom field sets, and populate custom fields using built-in stackable filters to create a customized set of Device42 CIs.
- Store filter templates for the fast future usage
- Automate common IT workflow with validators and conditional functions, based on the Device42 custom field values
- Automatically request the next free IP address on a subnet, and acquire it when an issue transitions
Install the Device42-Jira App
The Device42 - CMDB with REST APIs for Jira app is the part of Atlassian Marketplace, so you can easily install it using the Universal Plugin Manager (UPM). The app's search capability is provided by Jira from the Jira search box.
If you have some specific environment that blocks Jira from accessing the internet, you can install Device42 plugin manually. Download the latest version of the app from this Atlassian Marketplace link. Or copy and paste the following URL into your browser:
https://marketplace.atlassian.com/apps/1213601/device42-cmdb-with-rest-apis-for-jira?tab=overviewhttps://marketplace.atlassian.com/apps/1213601/device42-cmdb-with-rest-apis-for-jira?tab=overviewhosting=datacenter
Please note that the app requires a stable connection between the server hosting your Jira application instance, and your Device42 application instance to operate properly.
Automatic Installation
To install the app from your Jira instance:
-
Log in as a user with the 'Jira System Administrators' global permission.
-
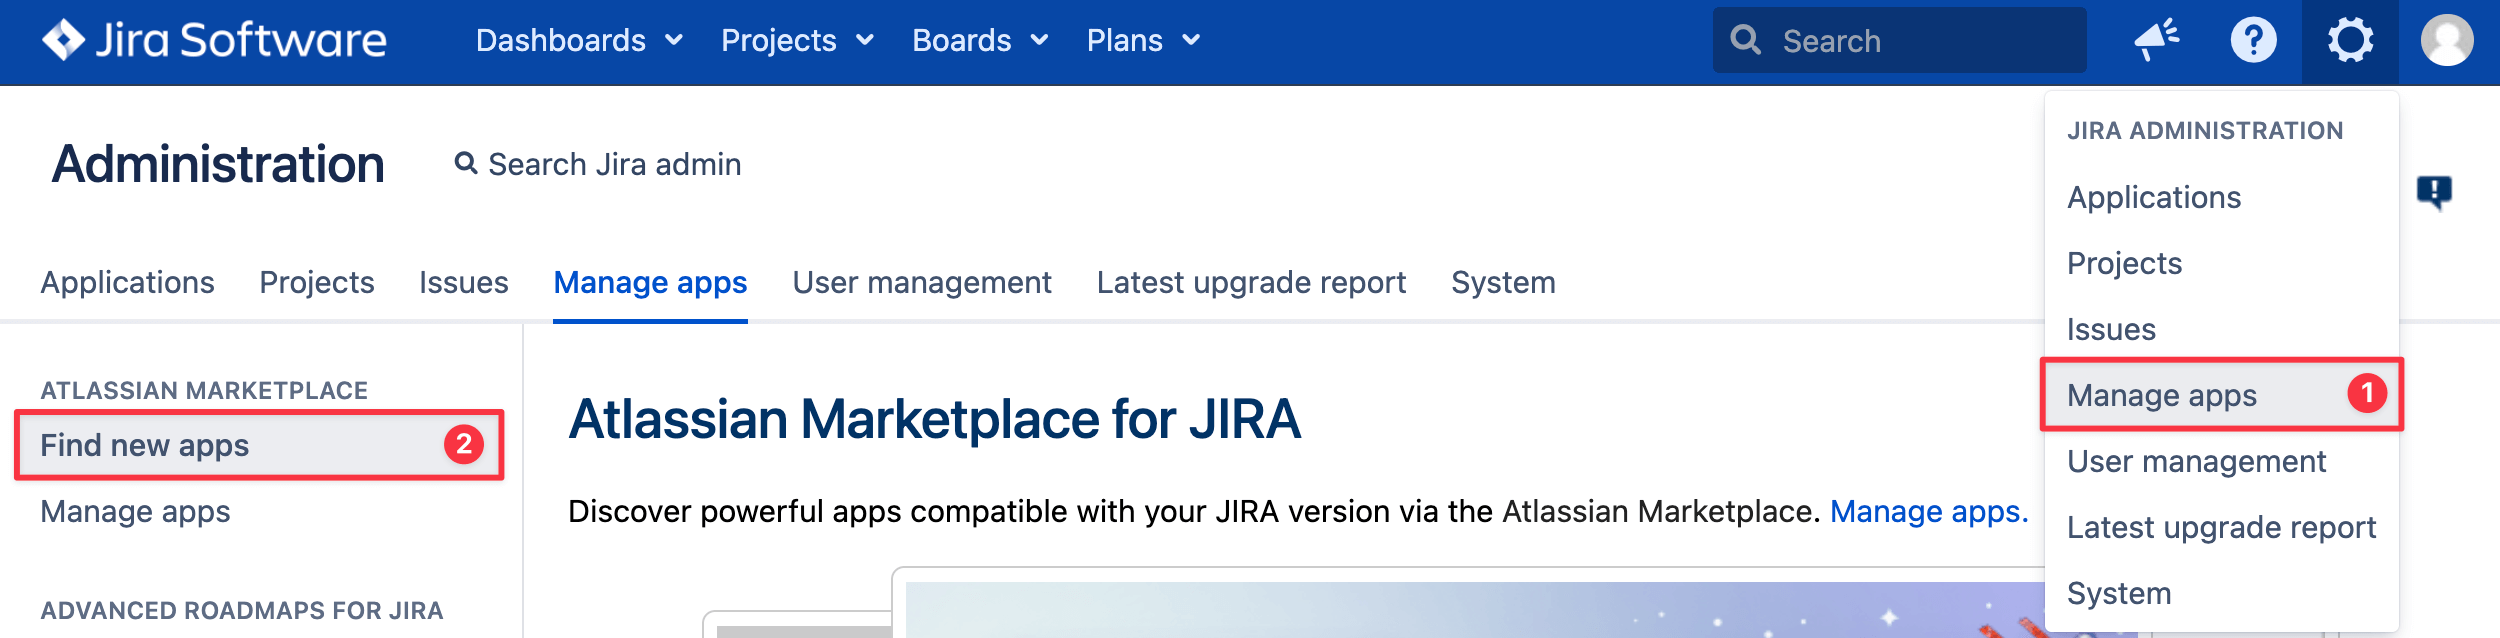
From the Jira administration console, select the Manage apps option and in the left panel, click on Find new apps.
-
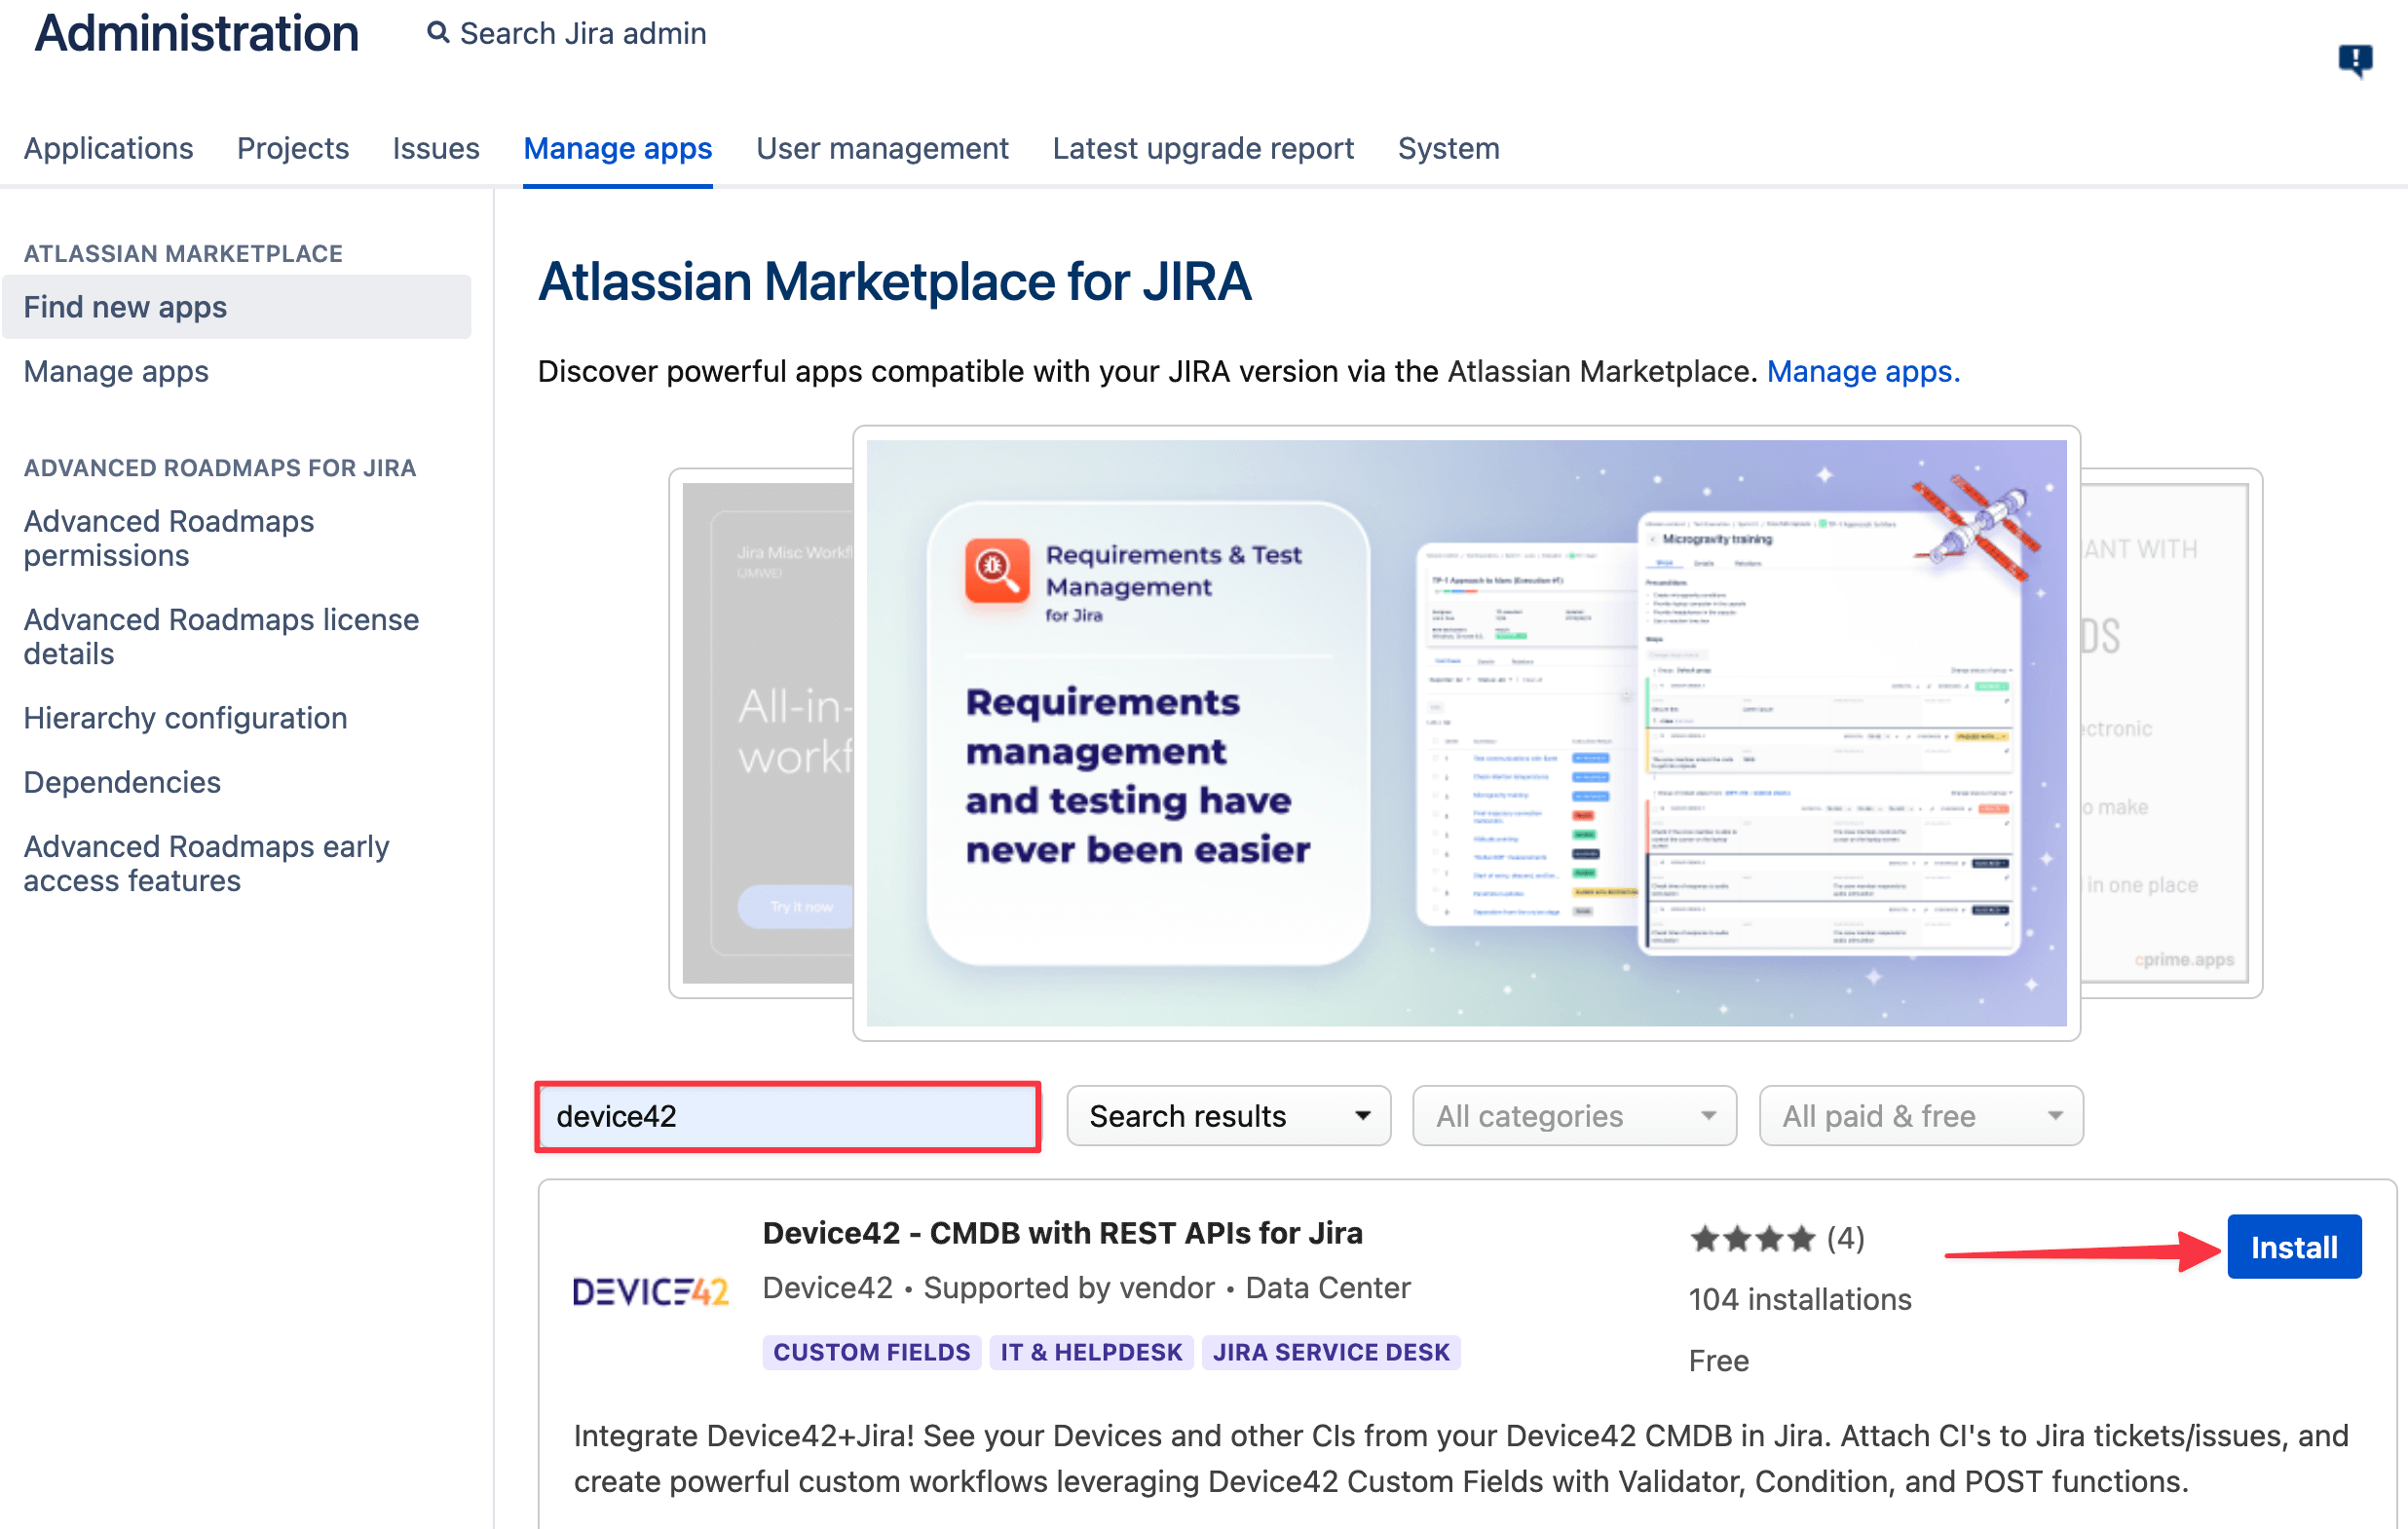
Type device42 in the search bar and press Enter.
-
Find the Device42 - CMDB with REST APIs for Jira app and click its Install button.
-
A confirmation message appears when the app is successfully installed. You can now manage the app from the Manage apps tab.
Manual Installation
To manually install the app to your Jira instance:
-
Go to the Atlassian Marketplace and lick on the Get it now button to download the
.jarfile of the latest version of the app. If you don't have an internet connection available (i.e. a secured sandbox environment), you can download the.jarfile on a network with internet access, and transfer it via a USB thumb drive or other external media.
-
Log in with Jira administrator access and click on the Manage Apps tab, and select the Manage apps from the left panel.
-
Click on the Upload app link at the top right side of the page. The following dialog appears:
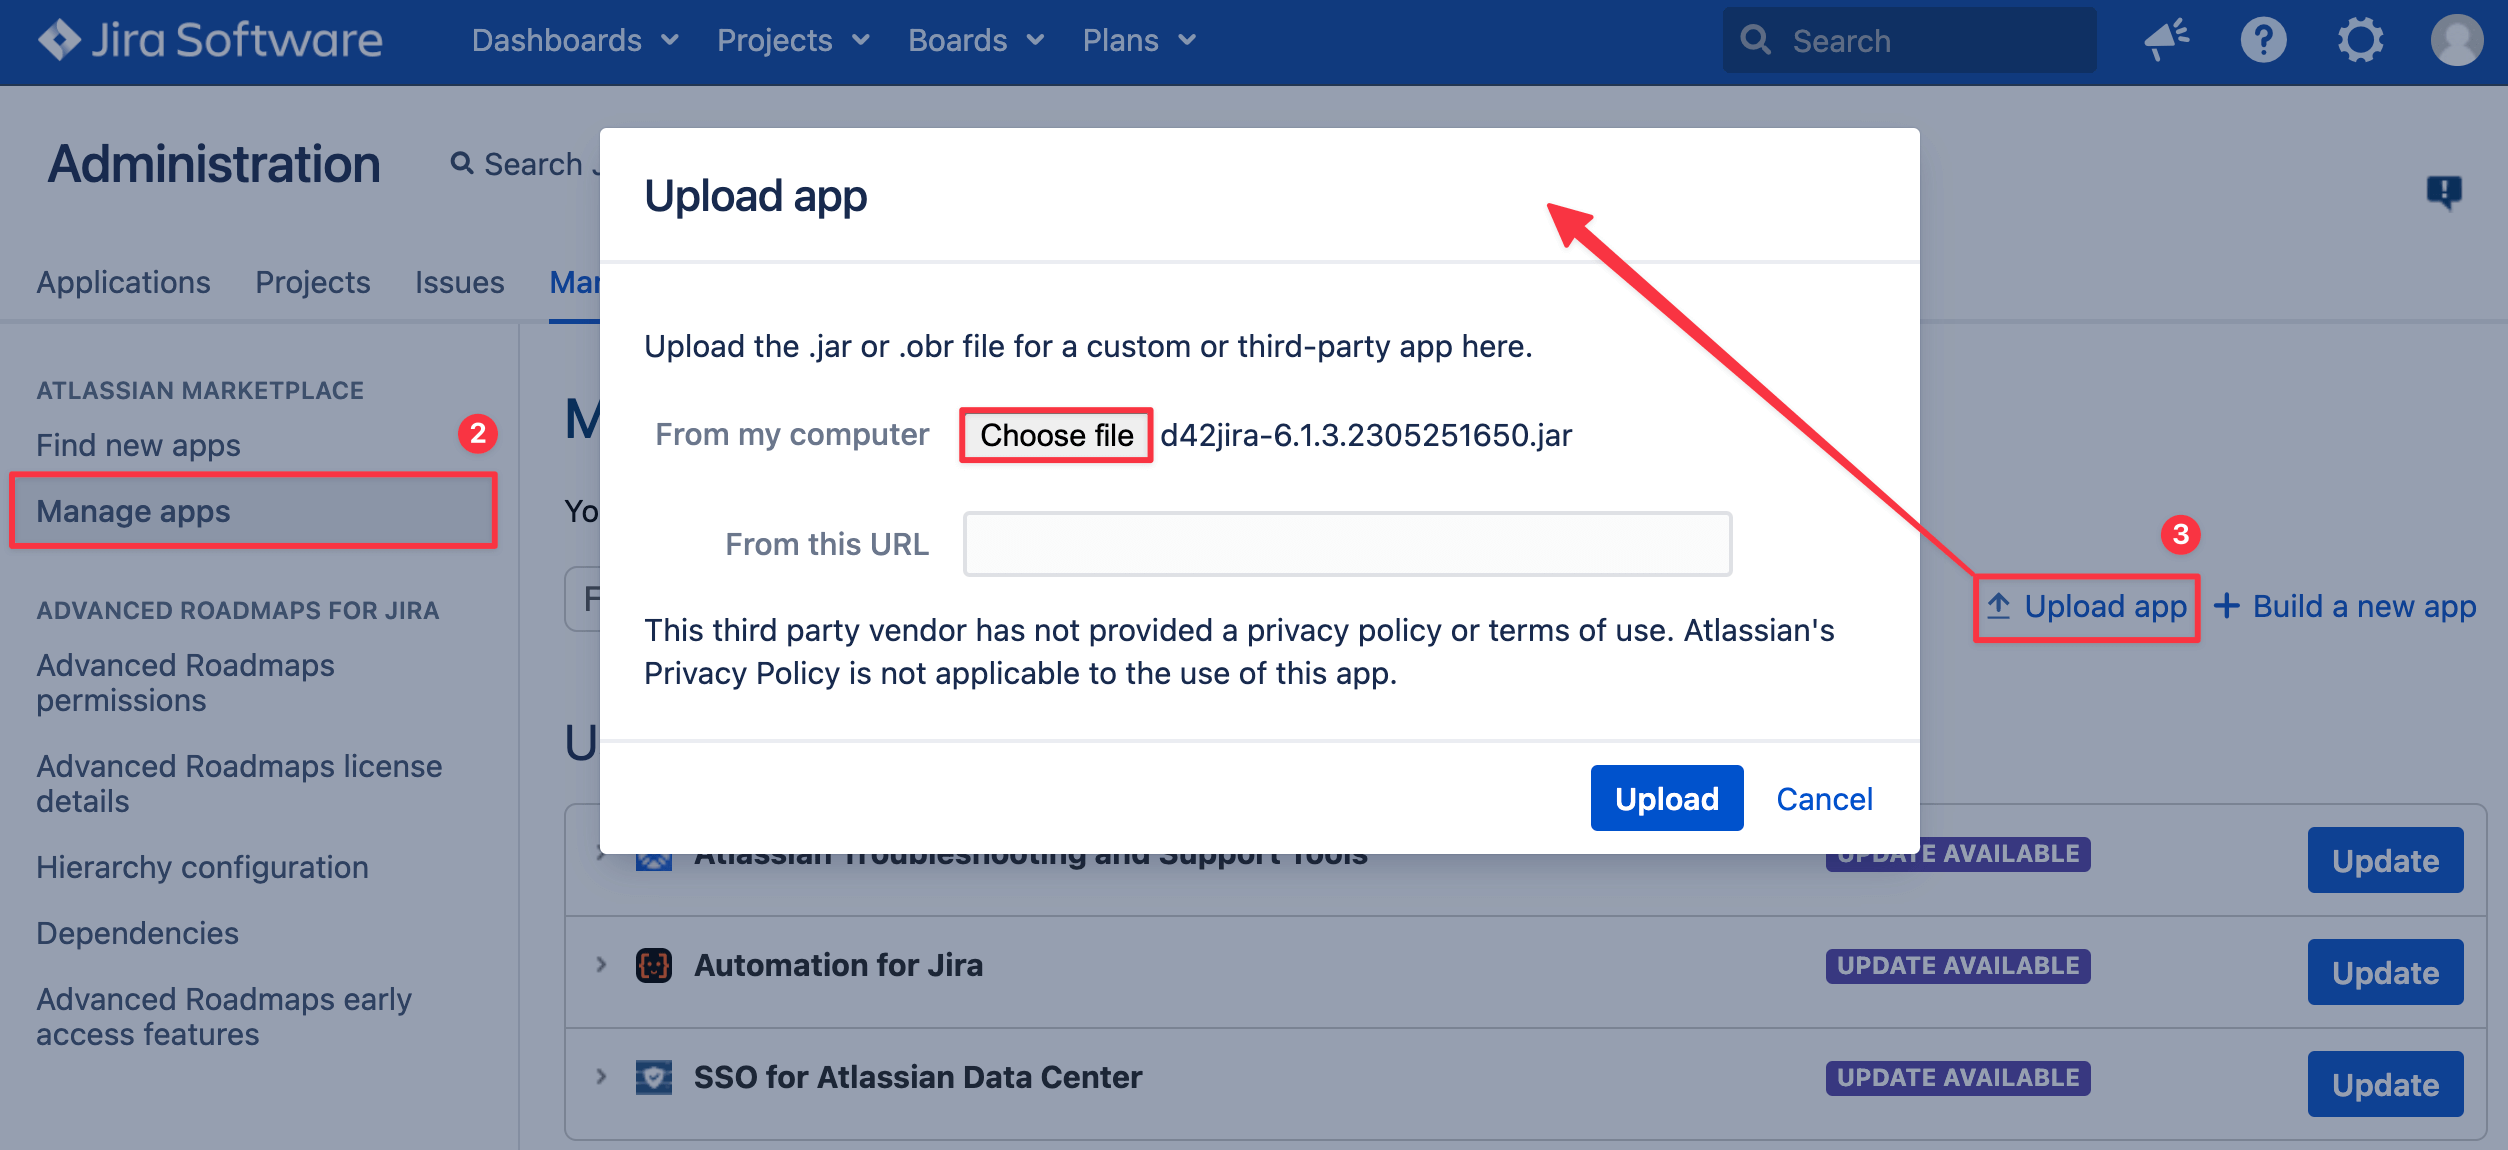
-
Click on the Choose file button to open file browser and select the
.jarfile you downloaded from the Atlassian Marketplace. -
Click on the Upload button. When the app has been successfully installed, a confirmation notice will appear.
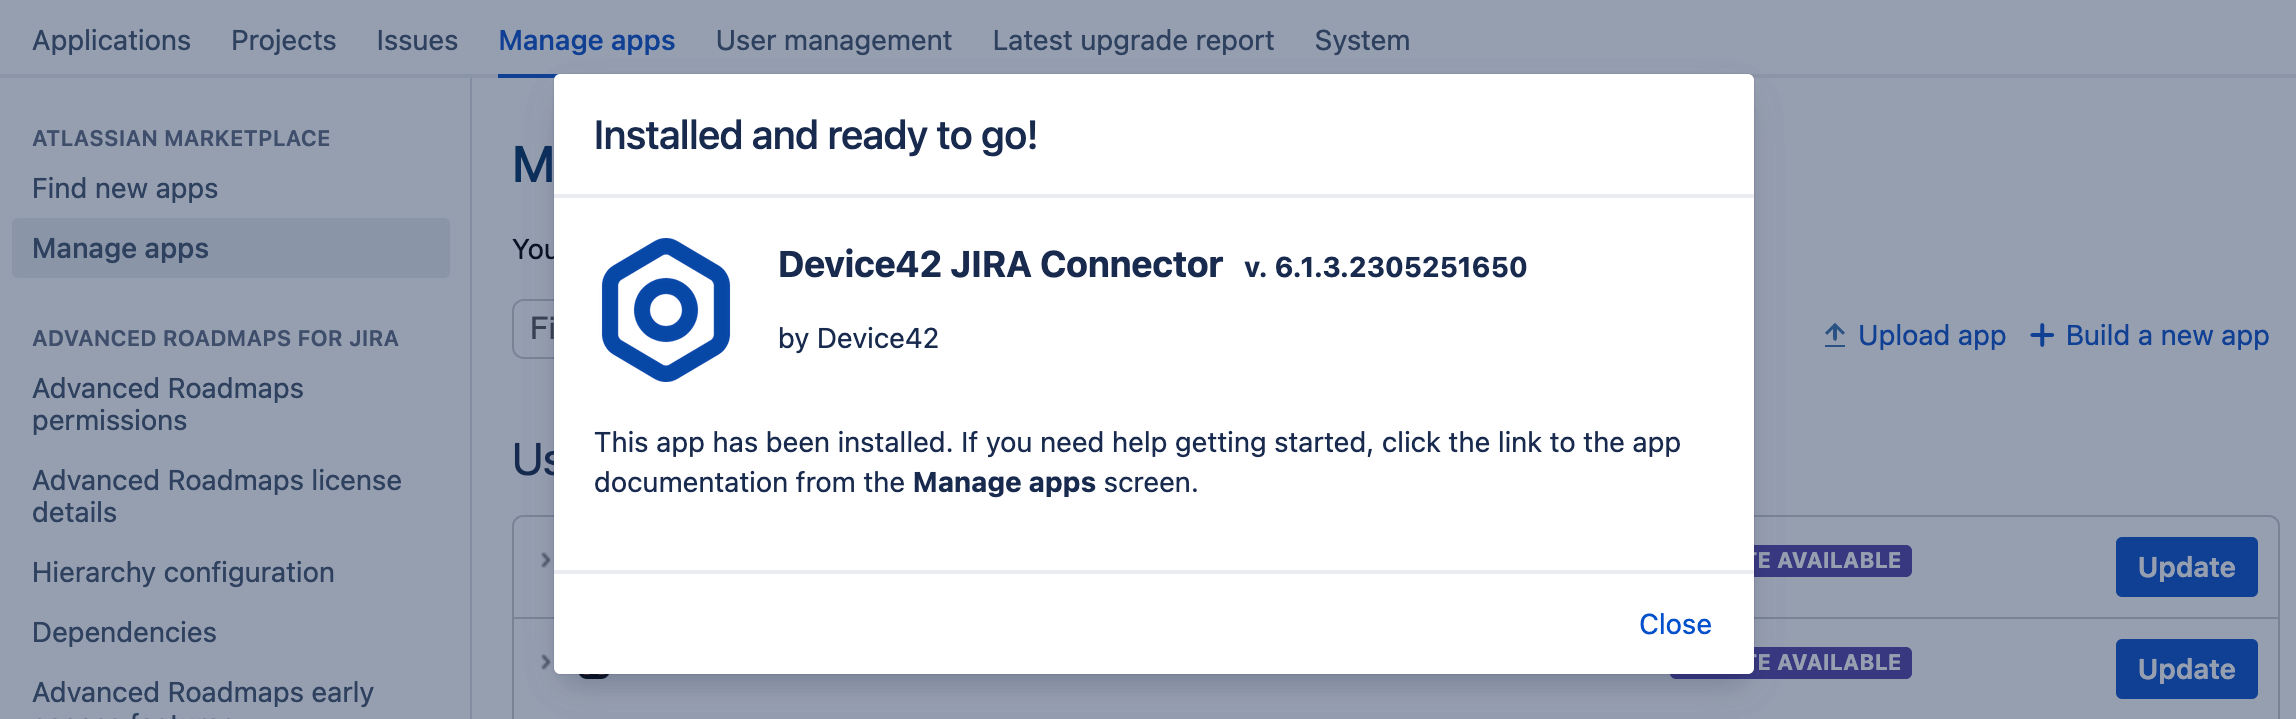
You can now manage the app from the user installed app list from the Manage apps tab.
Configure the Integration
A brand new installation of the app requires the following initial configuration steps from your Jira instance:
-
After the app has been successfully installed, click on the Configure link to setup connection to your Device42 instance.
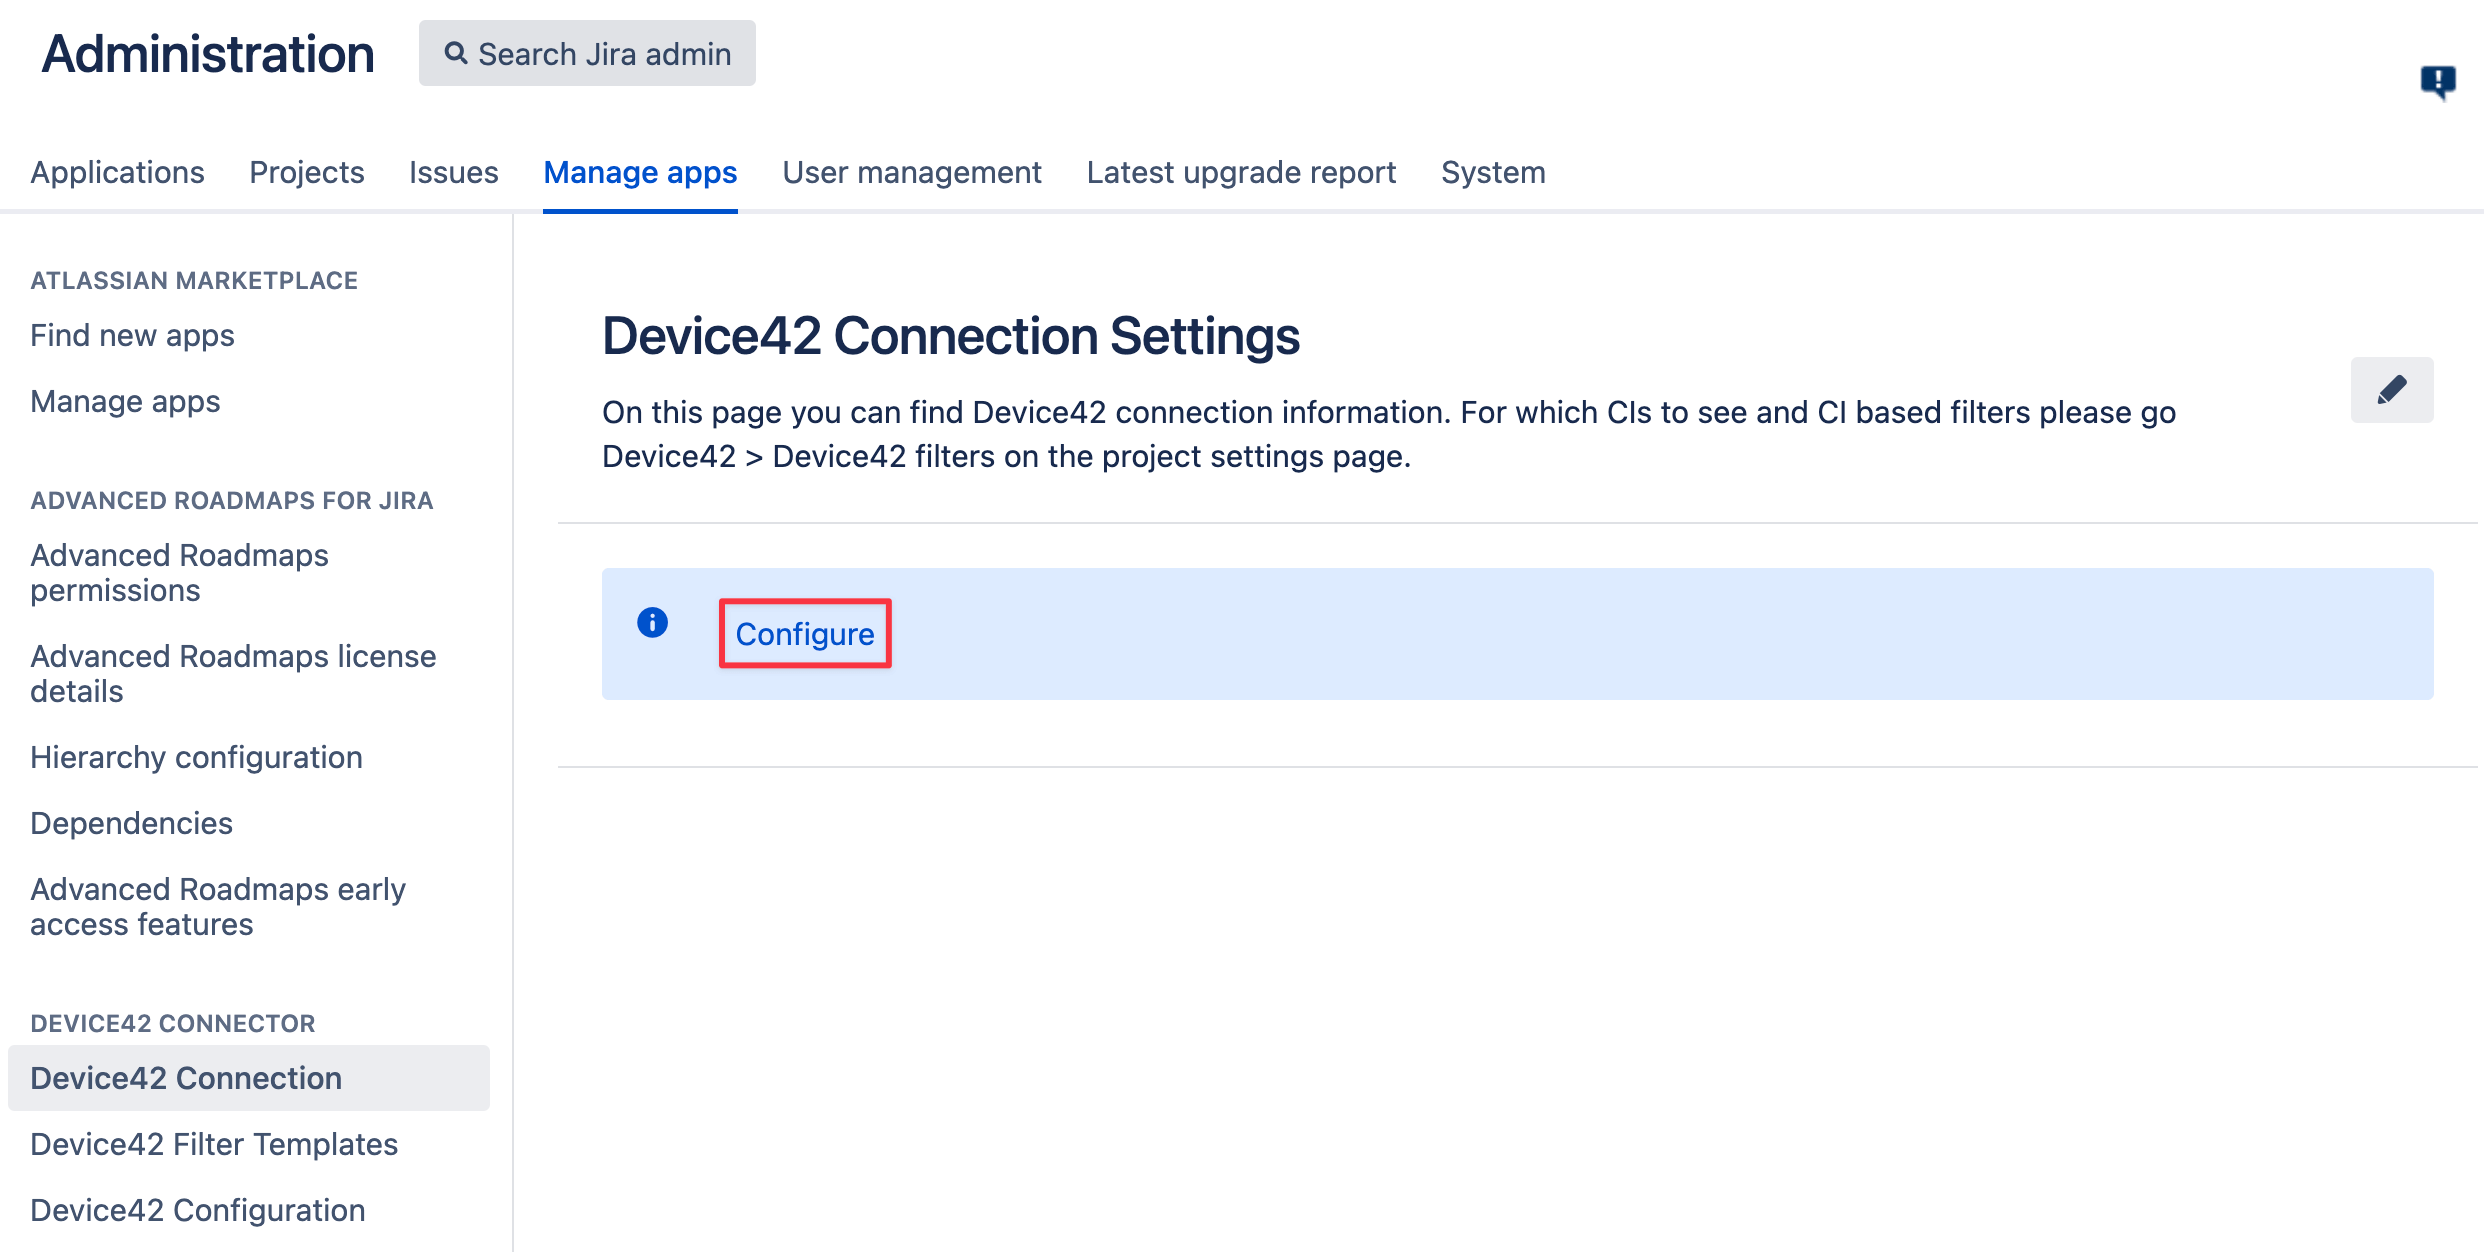
-
Enter your Device42 Base URL, Username, and Password and click on the Save button.
-
If the connection is successful, you will see the saved details on the configuration view screen.
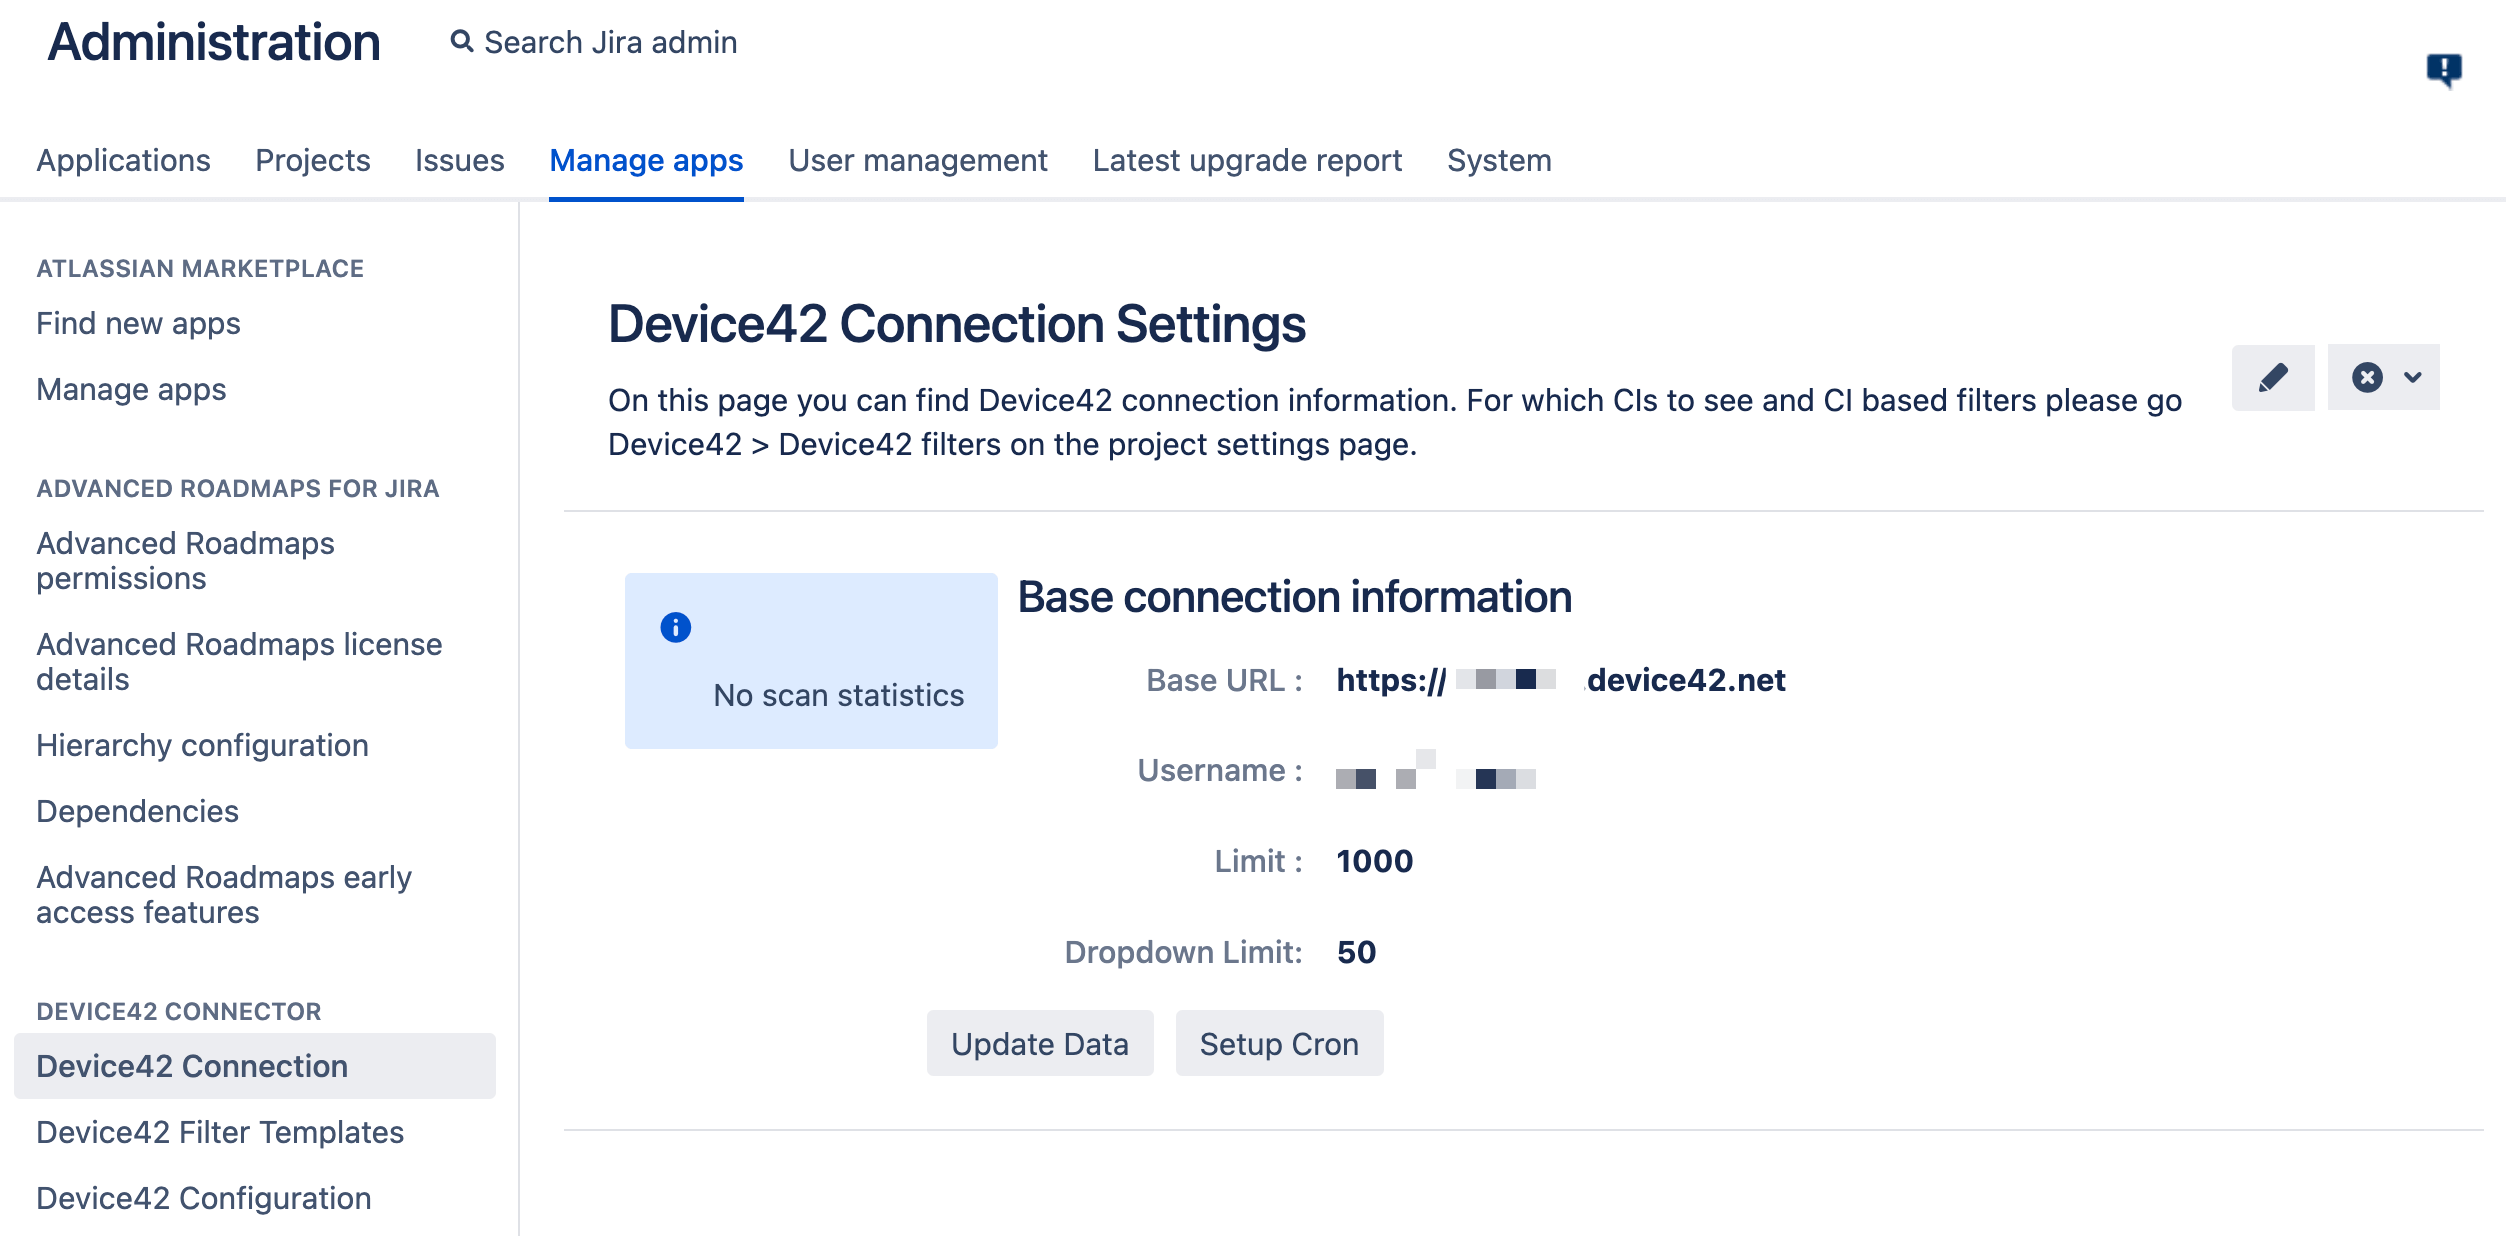
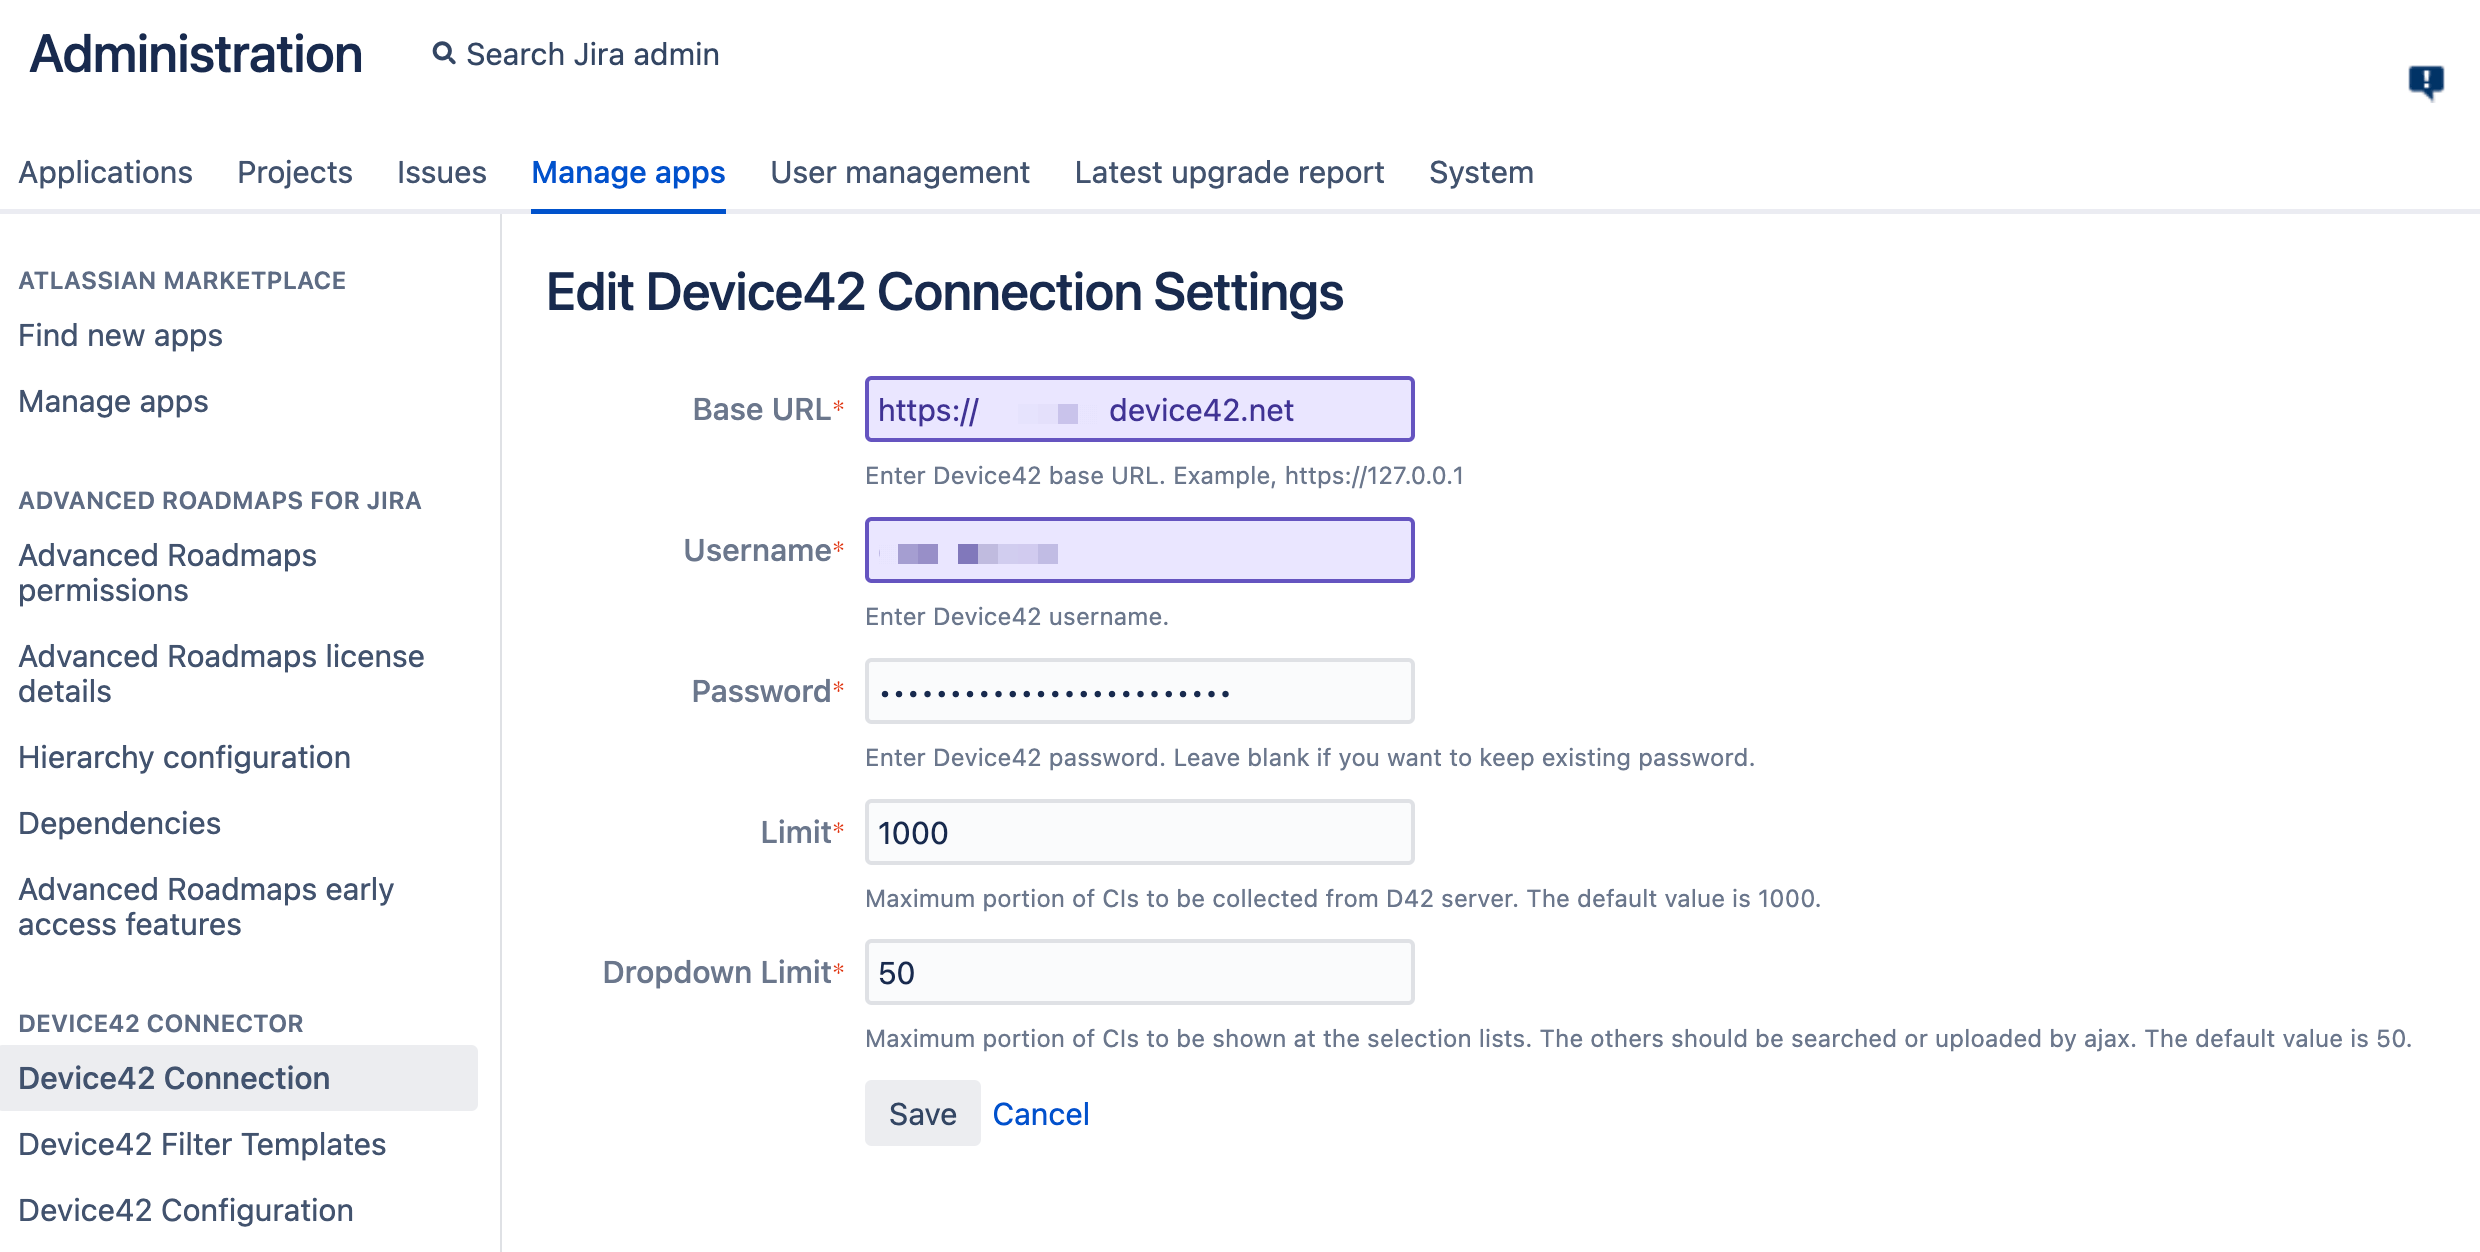
Edit the Connection Settings
To edit the connection settings:
-
Log in as a user with 'Jira Administrators' global permission.
-
Use the shortcut to navigate to the Device42 Connection page. Press g twice and type Device42 into the search bar. Select the Device42 Connection option. Alternatively, click on the Manage apps tab and select the Device42 Connection option from the left sidebar.
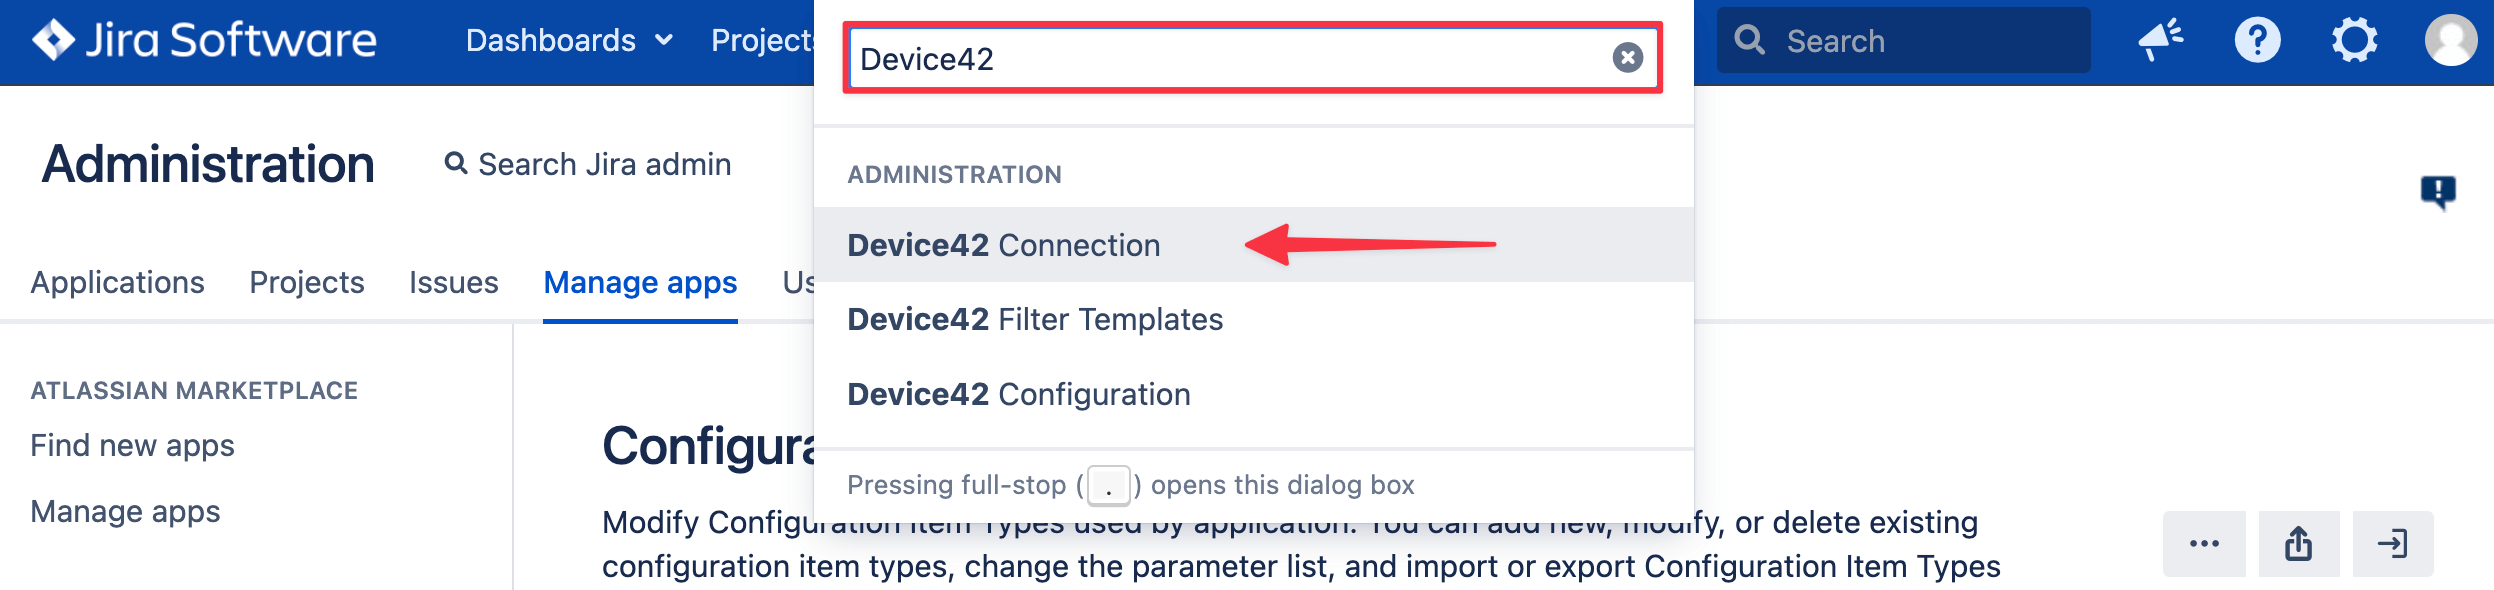
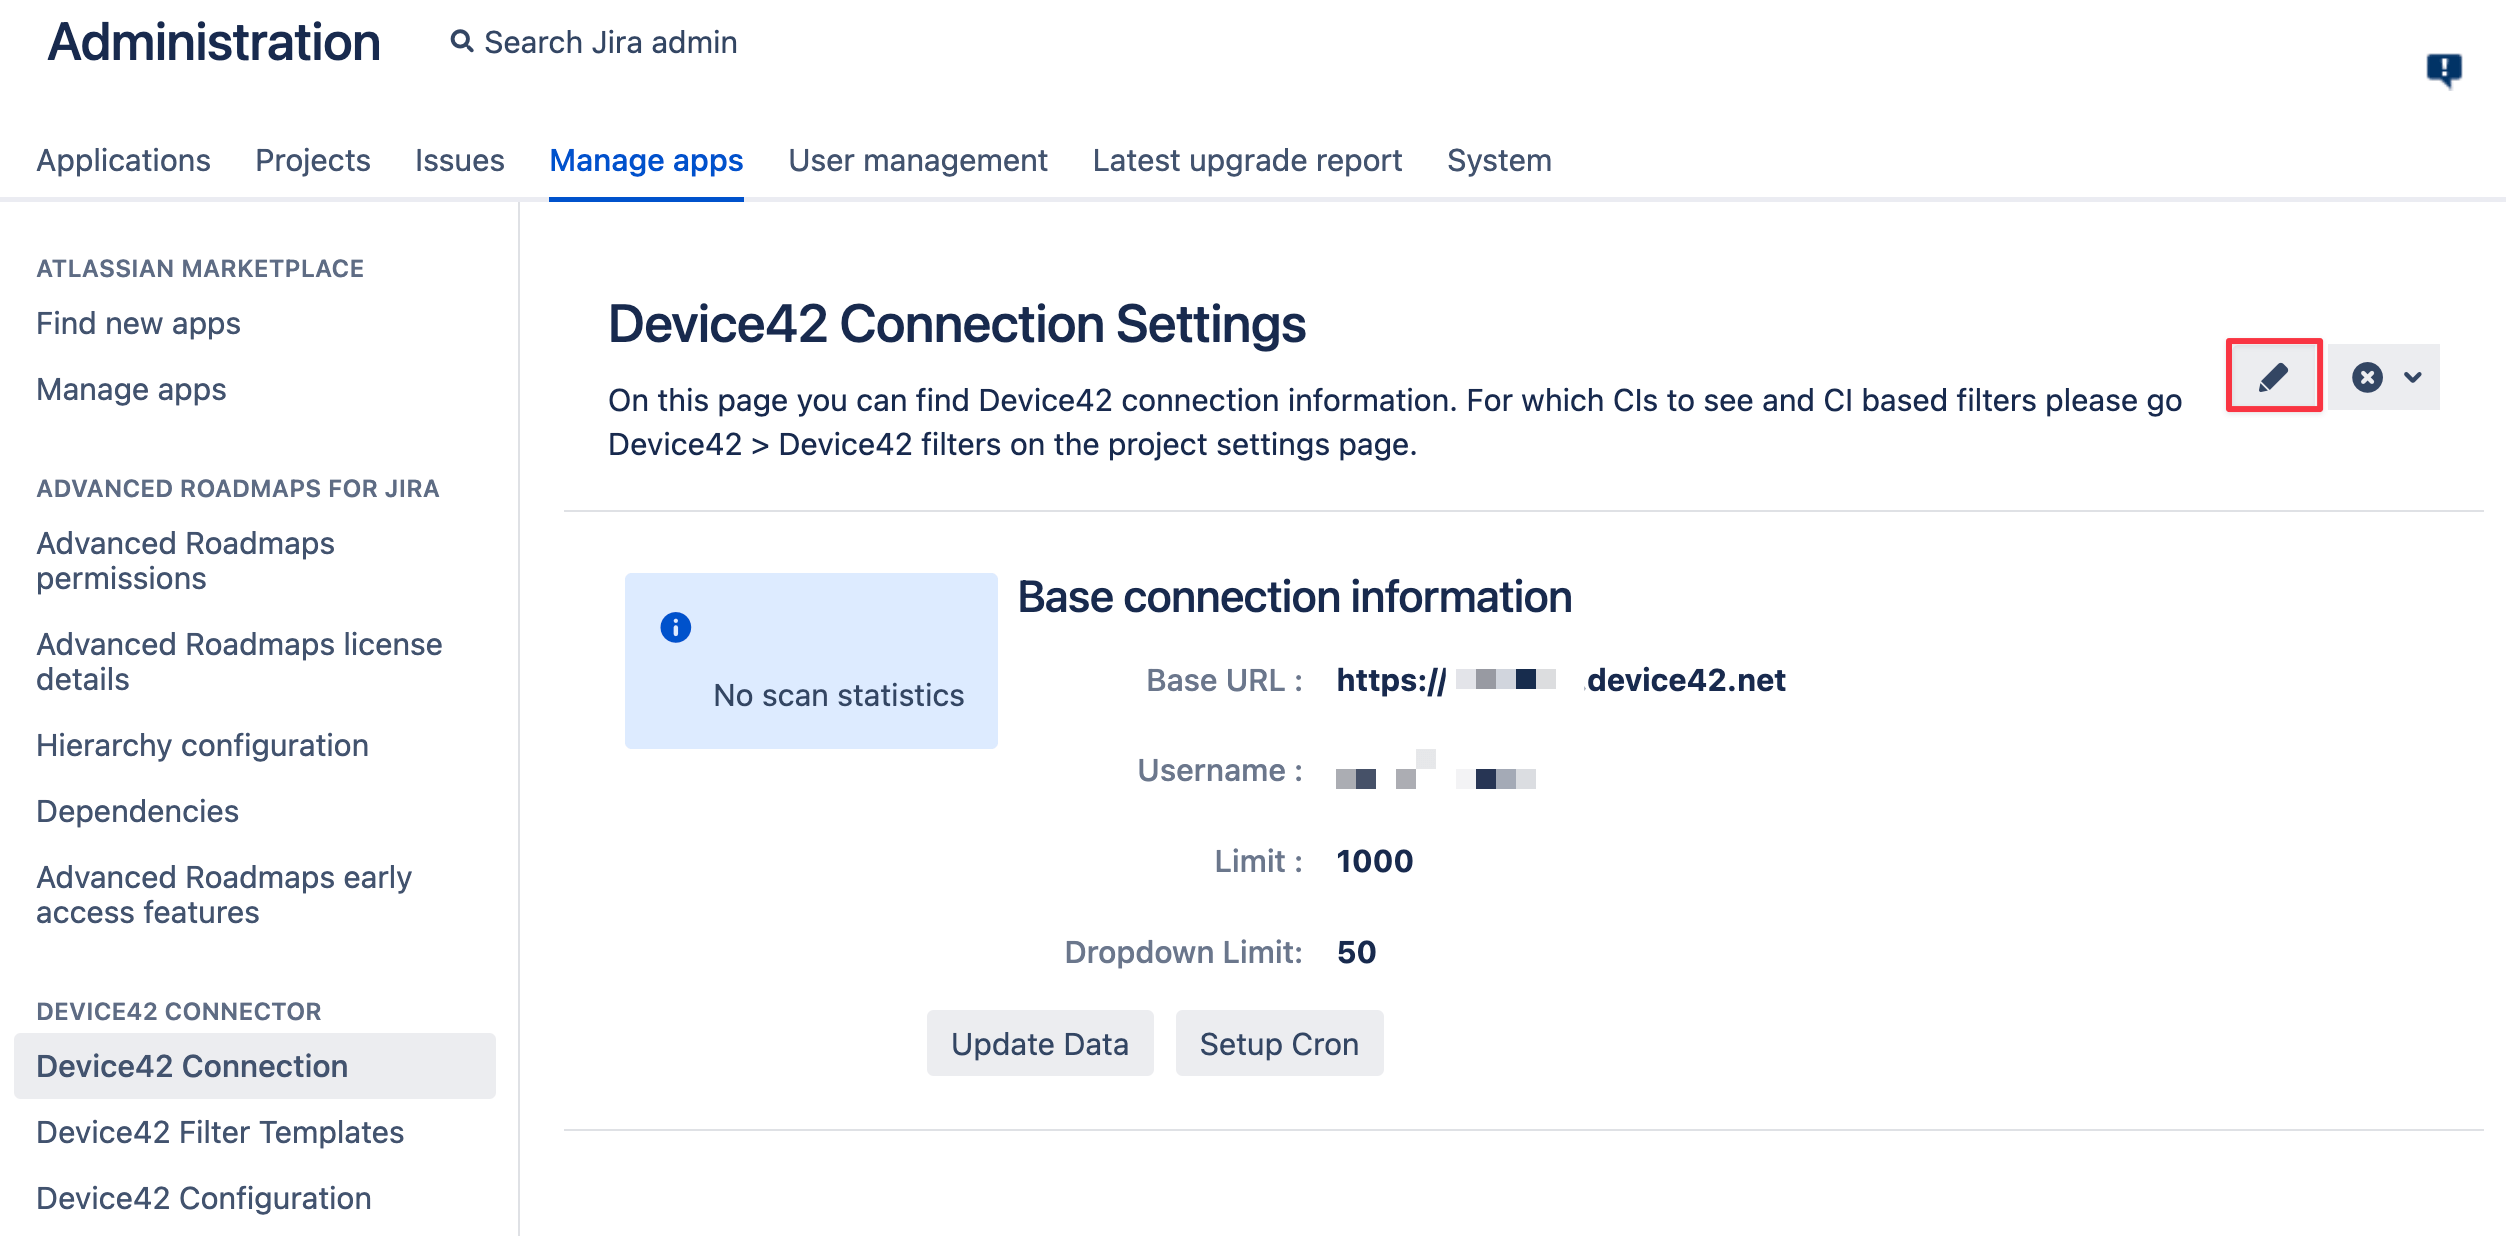
-
Click on the pencil icon to the right to open the connection information form for editing.
Manual Synchronization
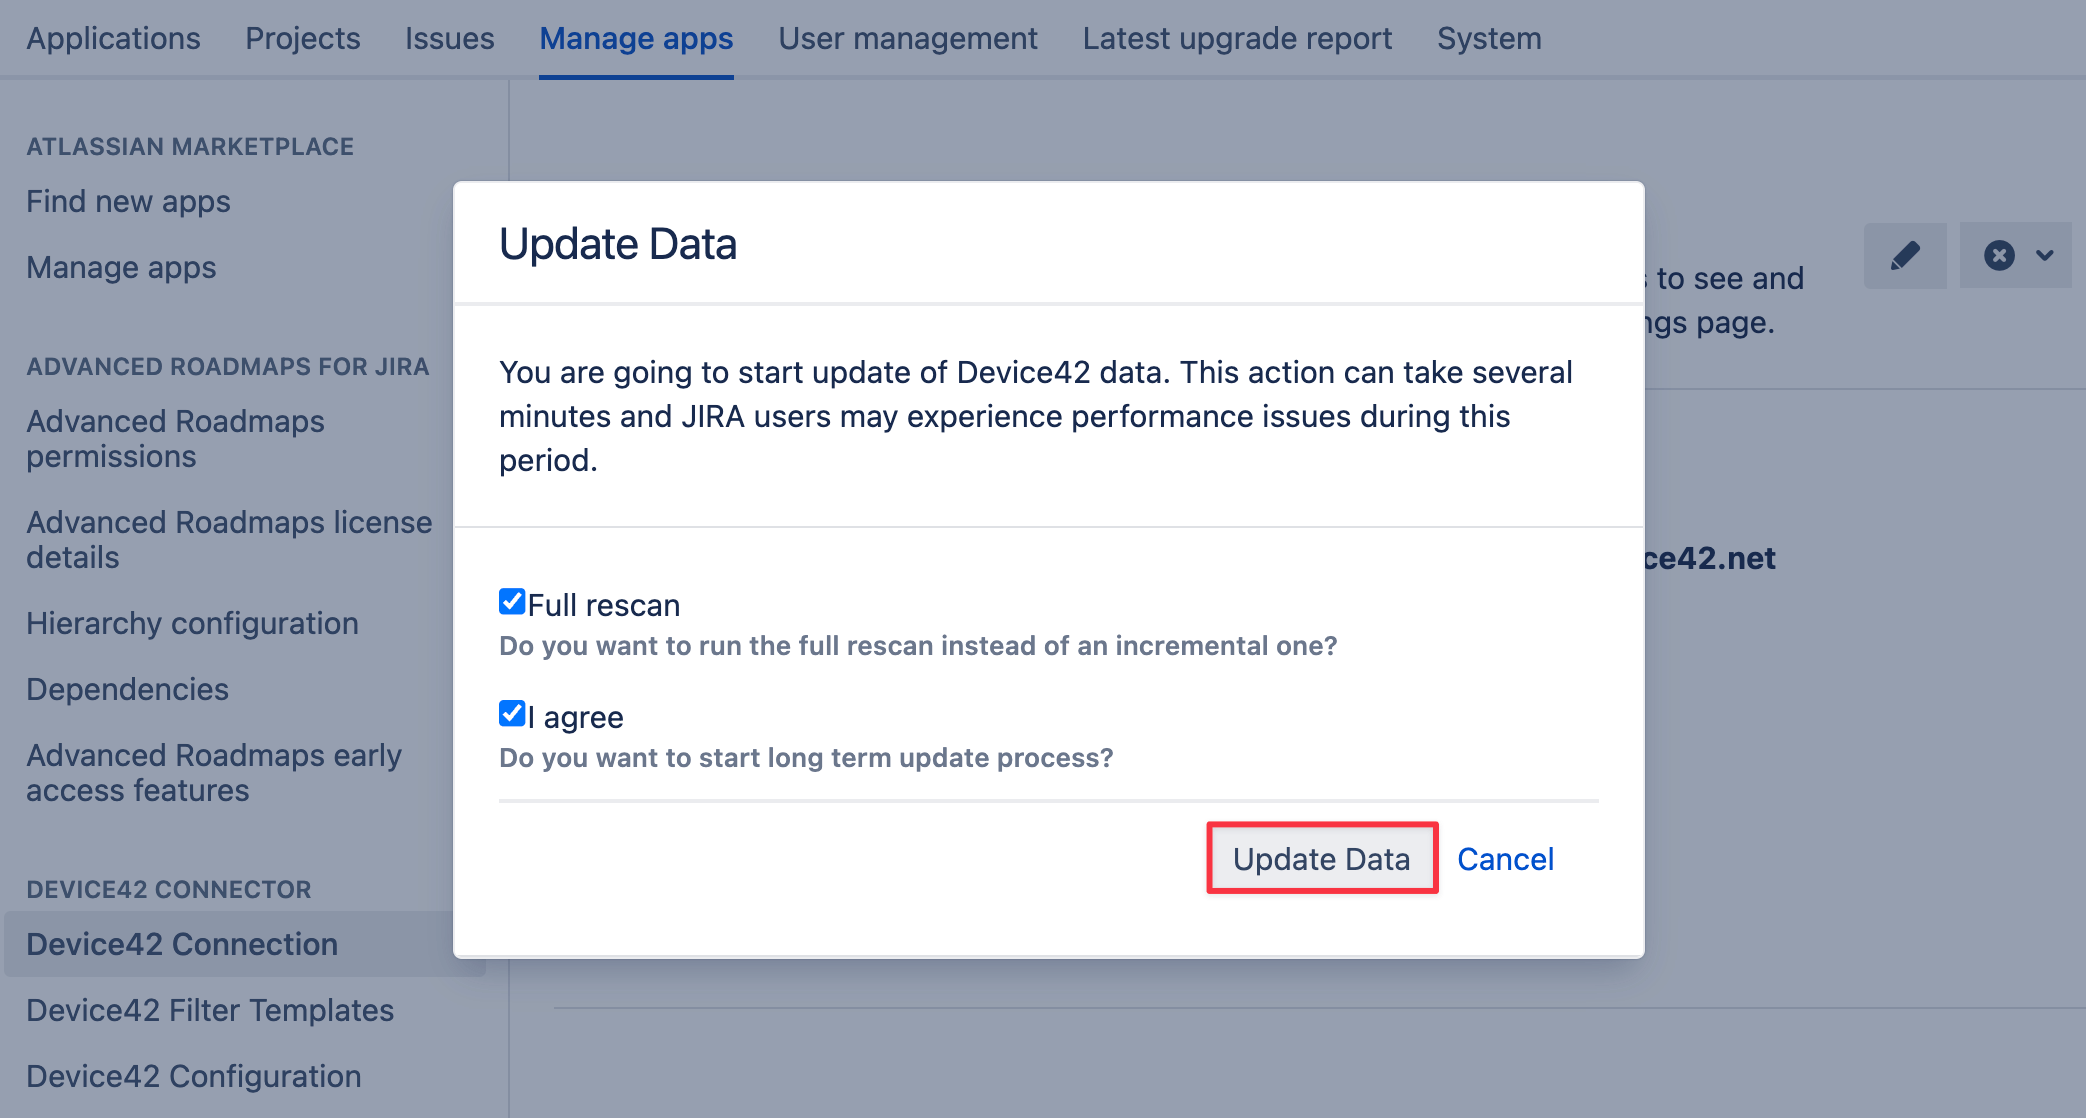
The data from the Device42 instance is cached inside the internal Jira database. To ensure it is up-to-date, it should be periodically synchronized. Manually perform an immediate synchronization as follows:
-
On the configuration information page, click on the Update Data button.
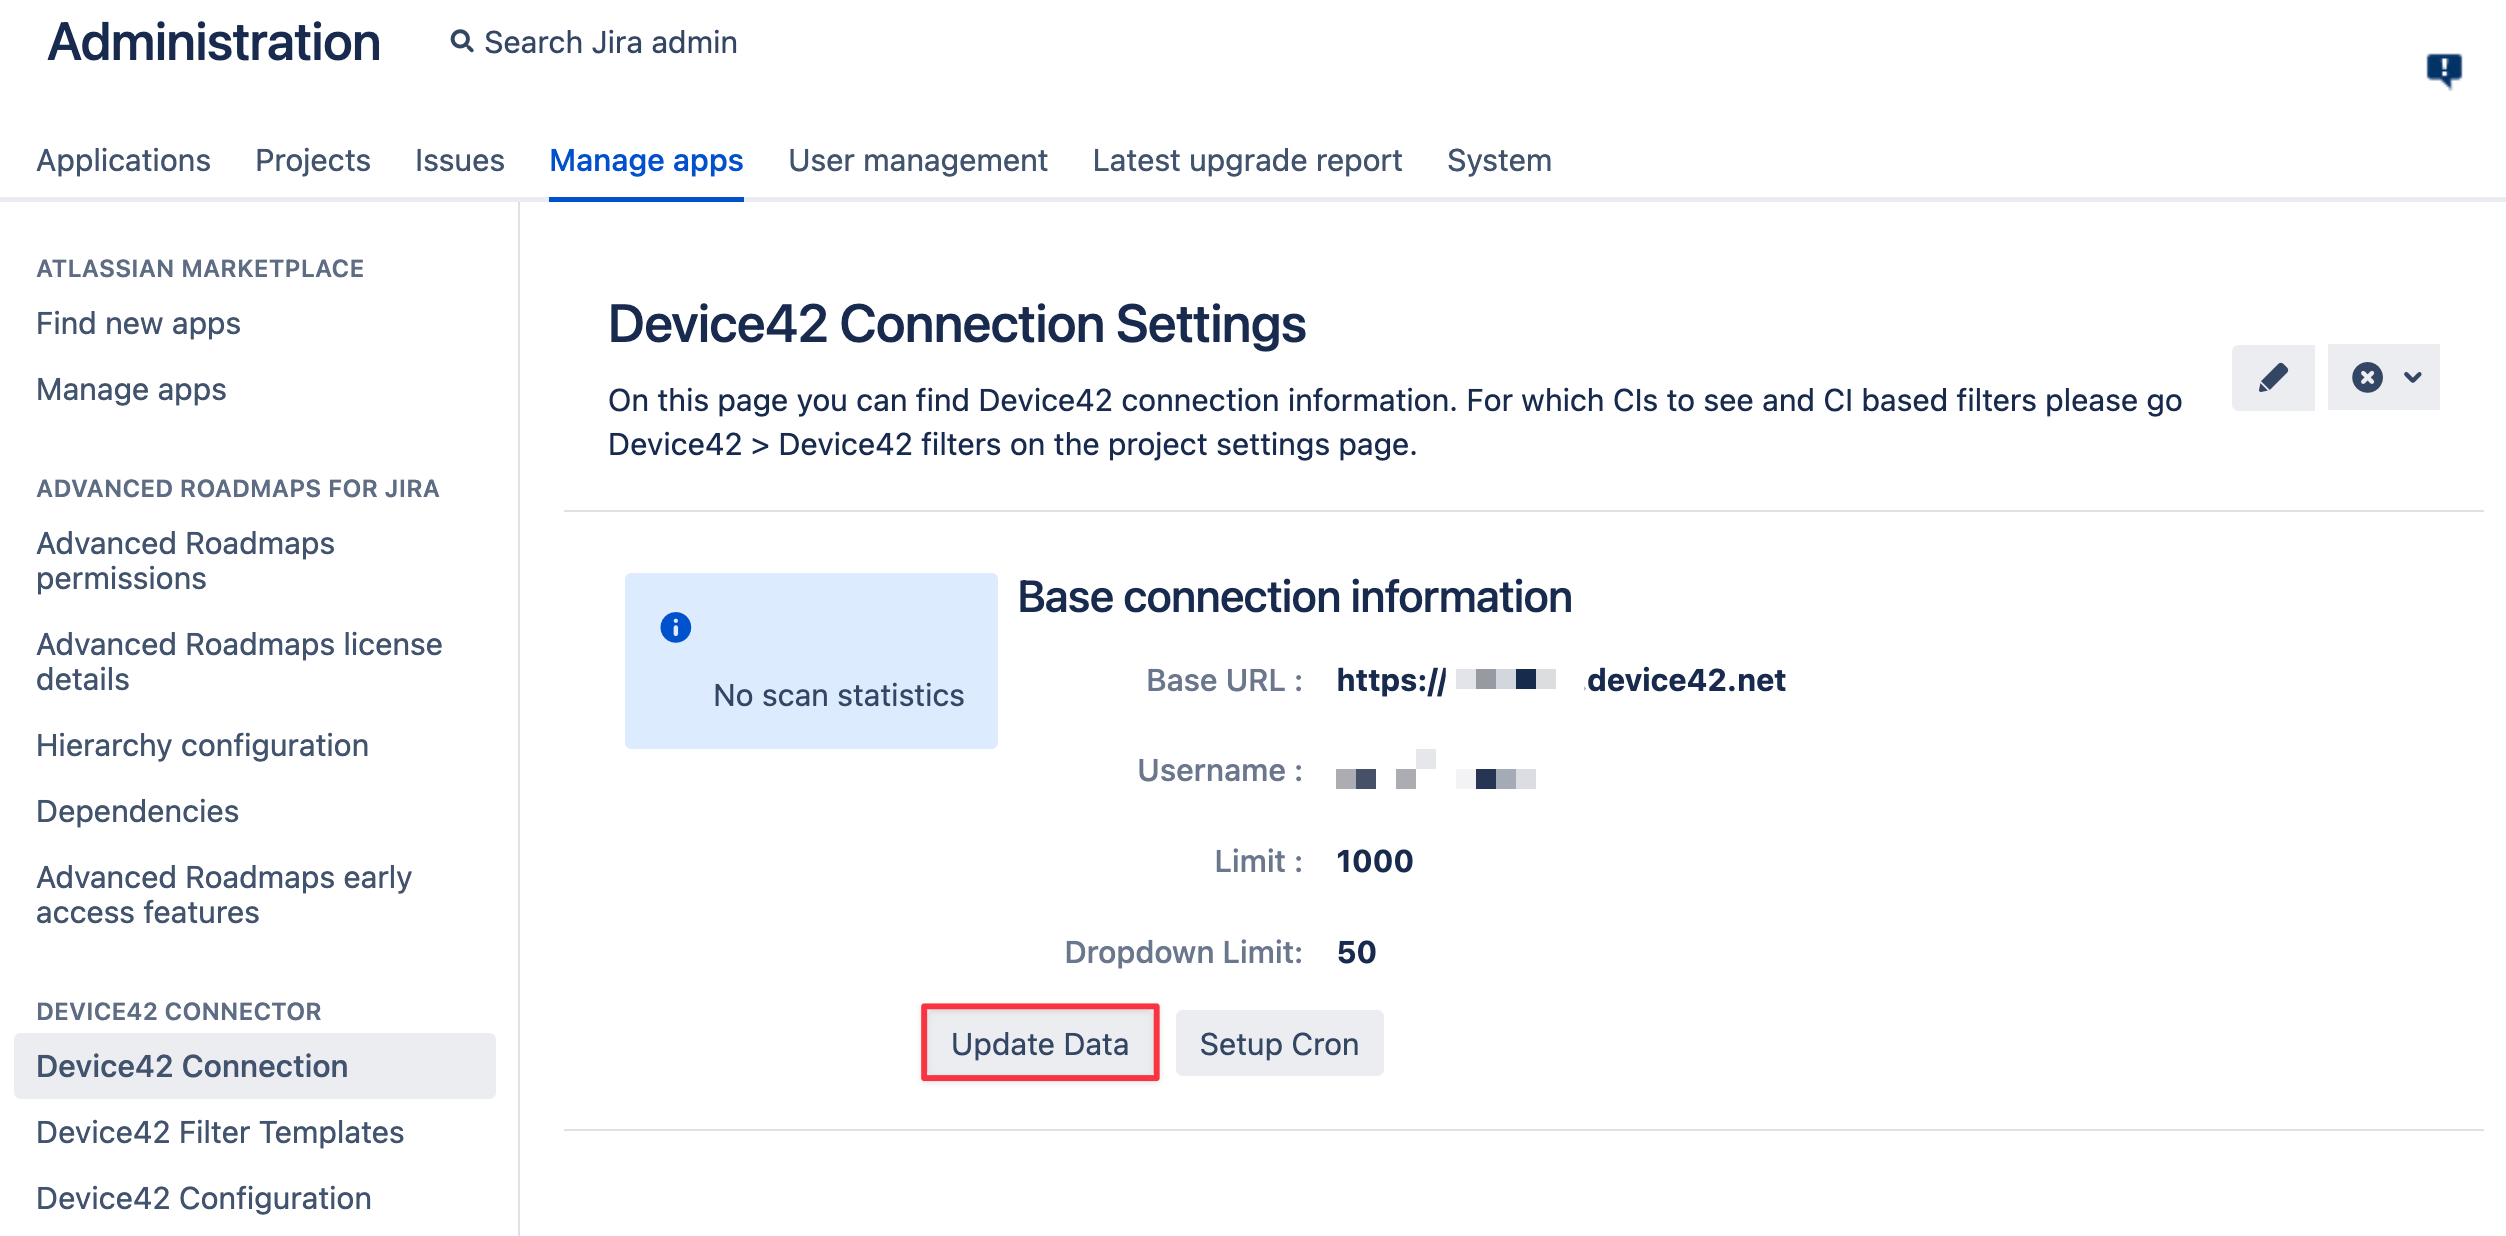
-
A confirmation dialog will appear; click on the Update Data button to confirm.
-
You will see the initial collection statistics data. For a manual scan, you will see the warning message that scan is pending to be started that is shown for about 15 seconds.
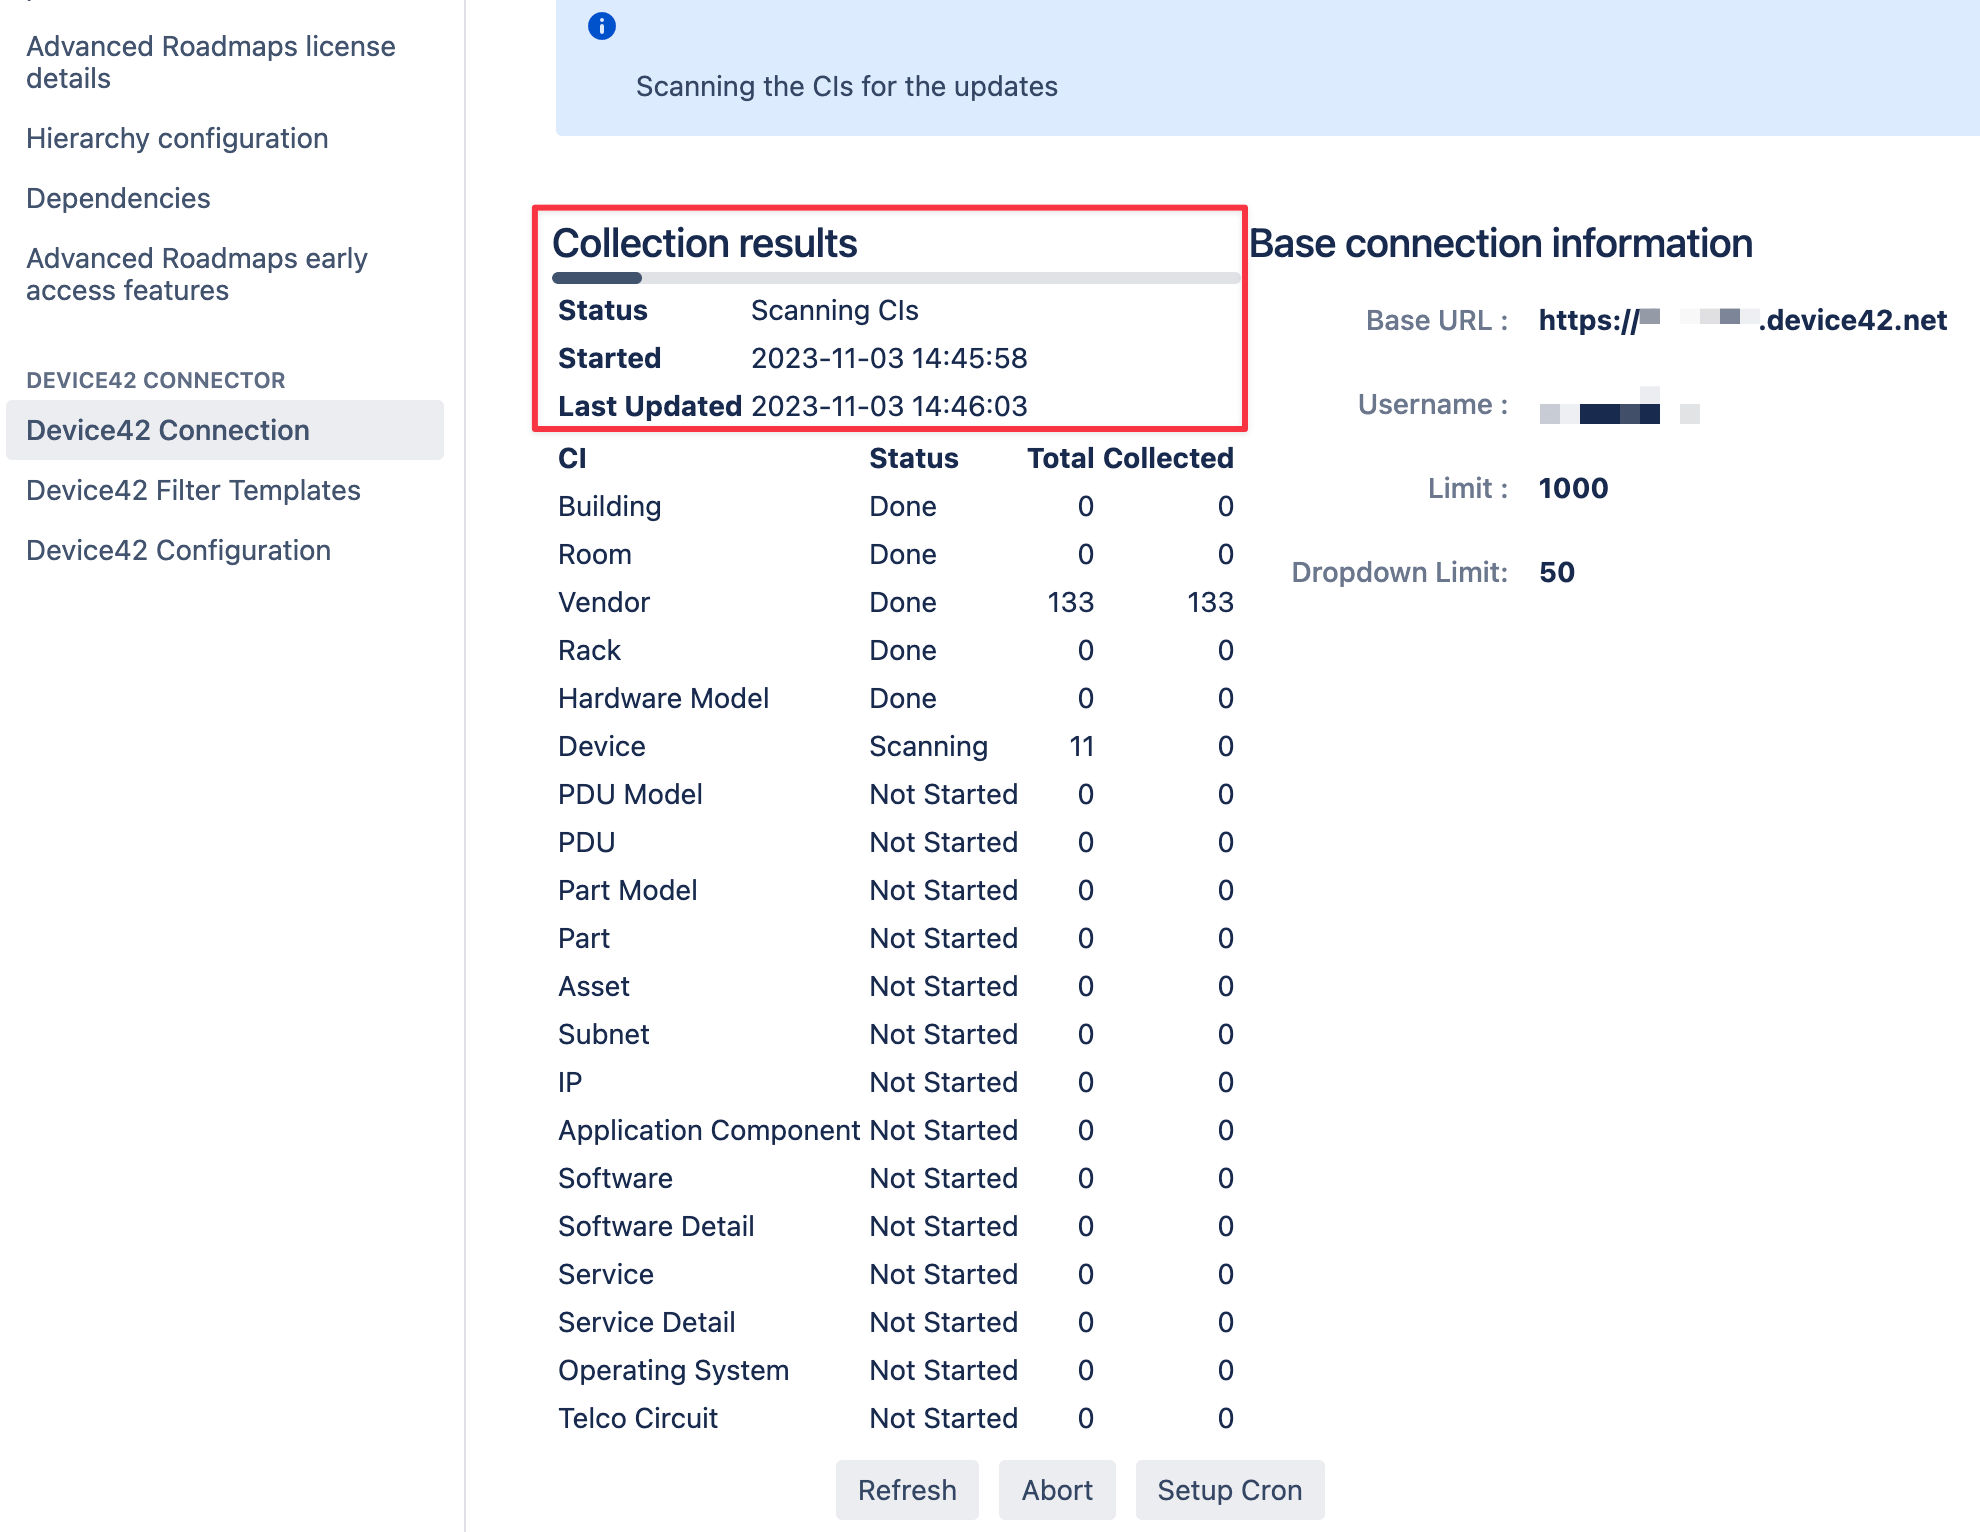
-
Click on the Refresh button. Under Collection results you can see a progress bar for the entire scan and below that selection, under the Status column, you can view the sync progress of individual CIs.
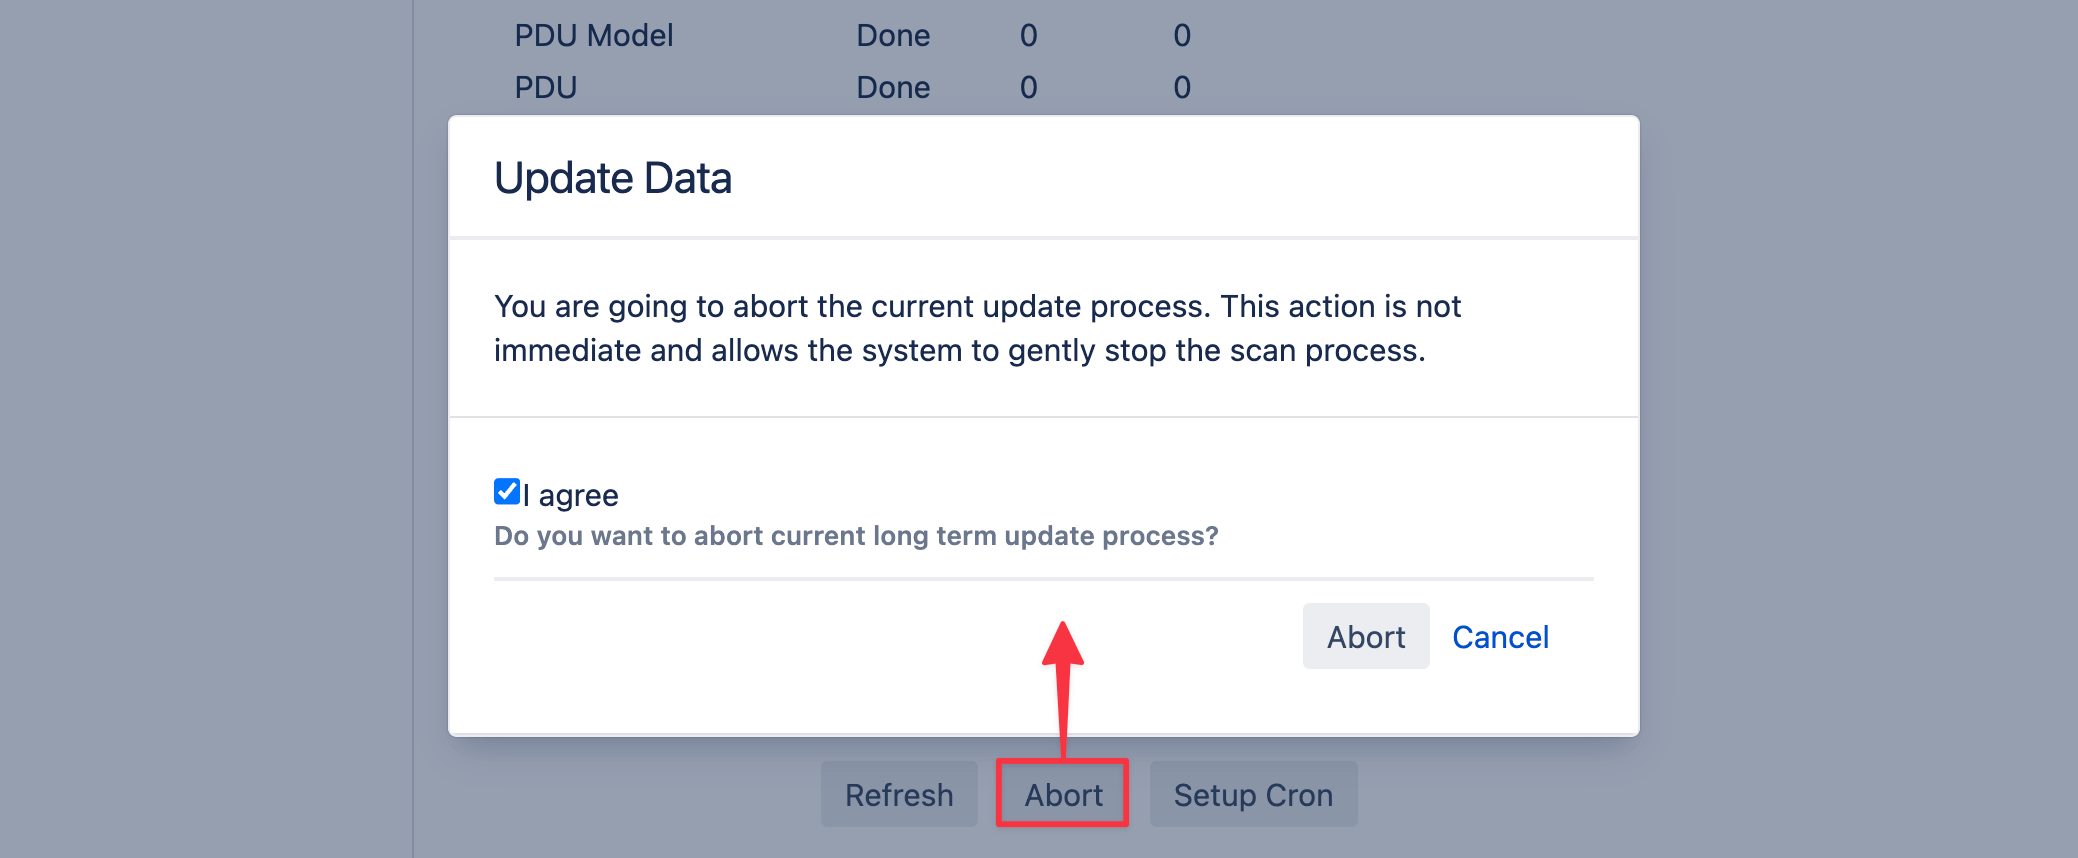
-
If you wish to stop current scan you, click the Abort button, tick the I agree checkbox and select Abort to confirm. Please note, that the currently scanned Configuration Item list will be synchronized partially.
-
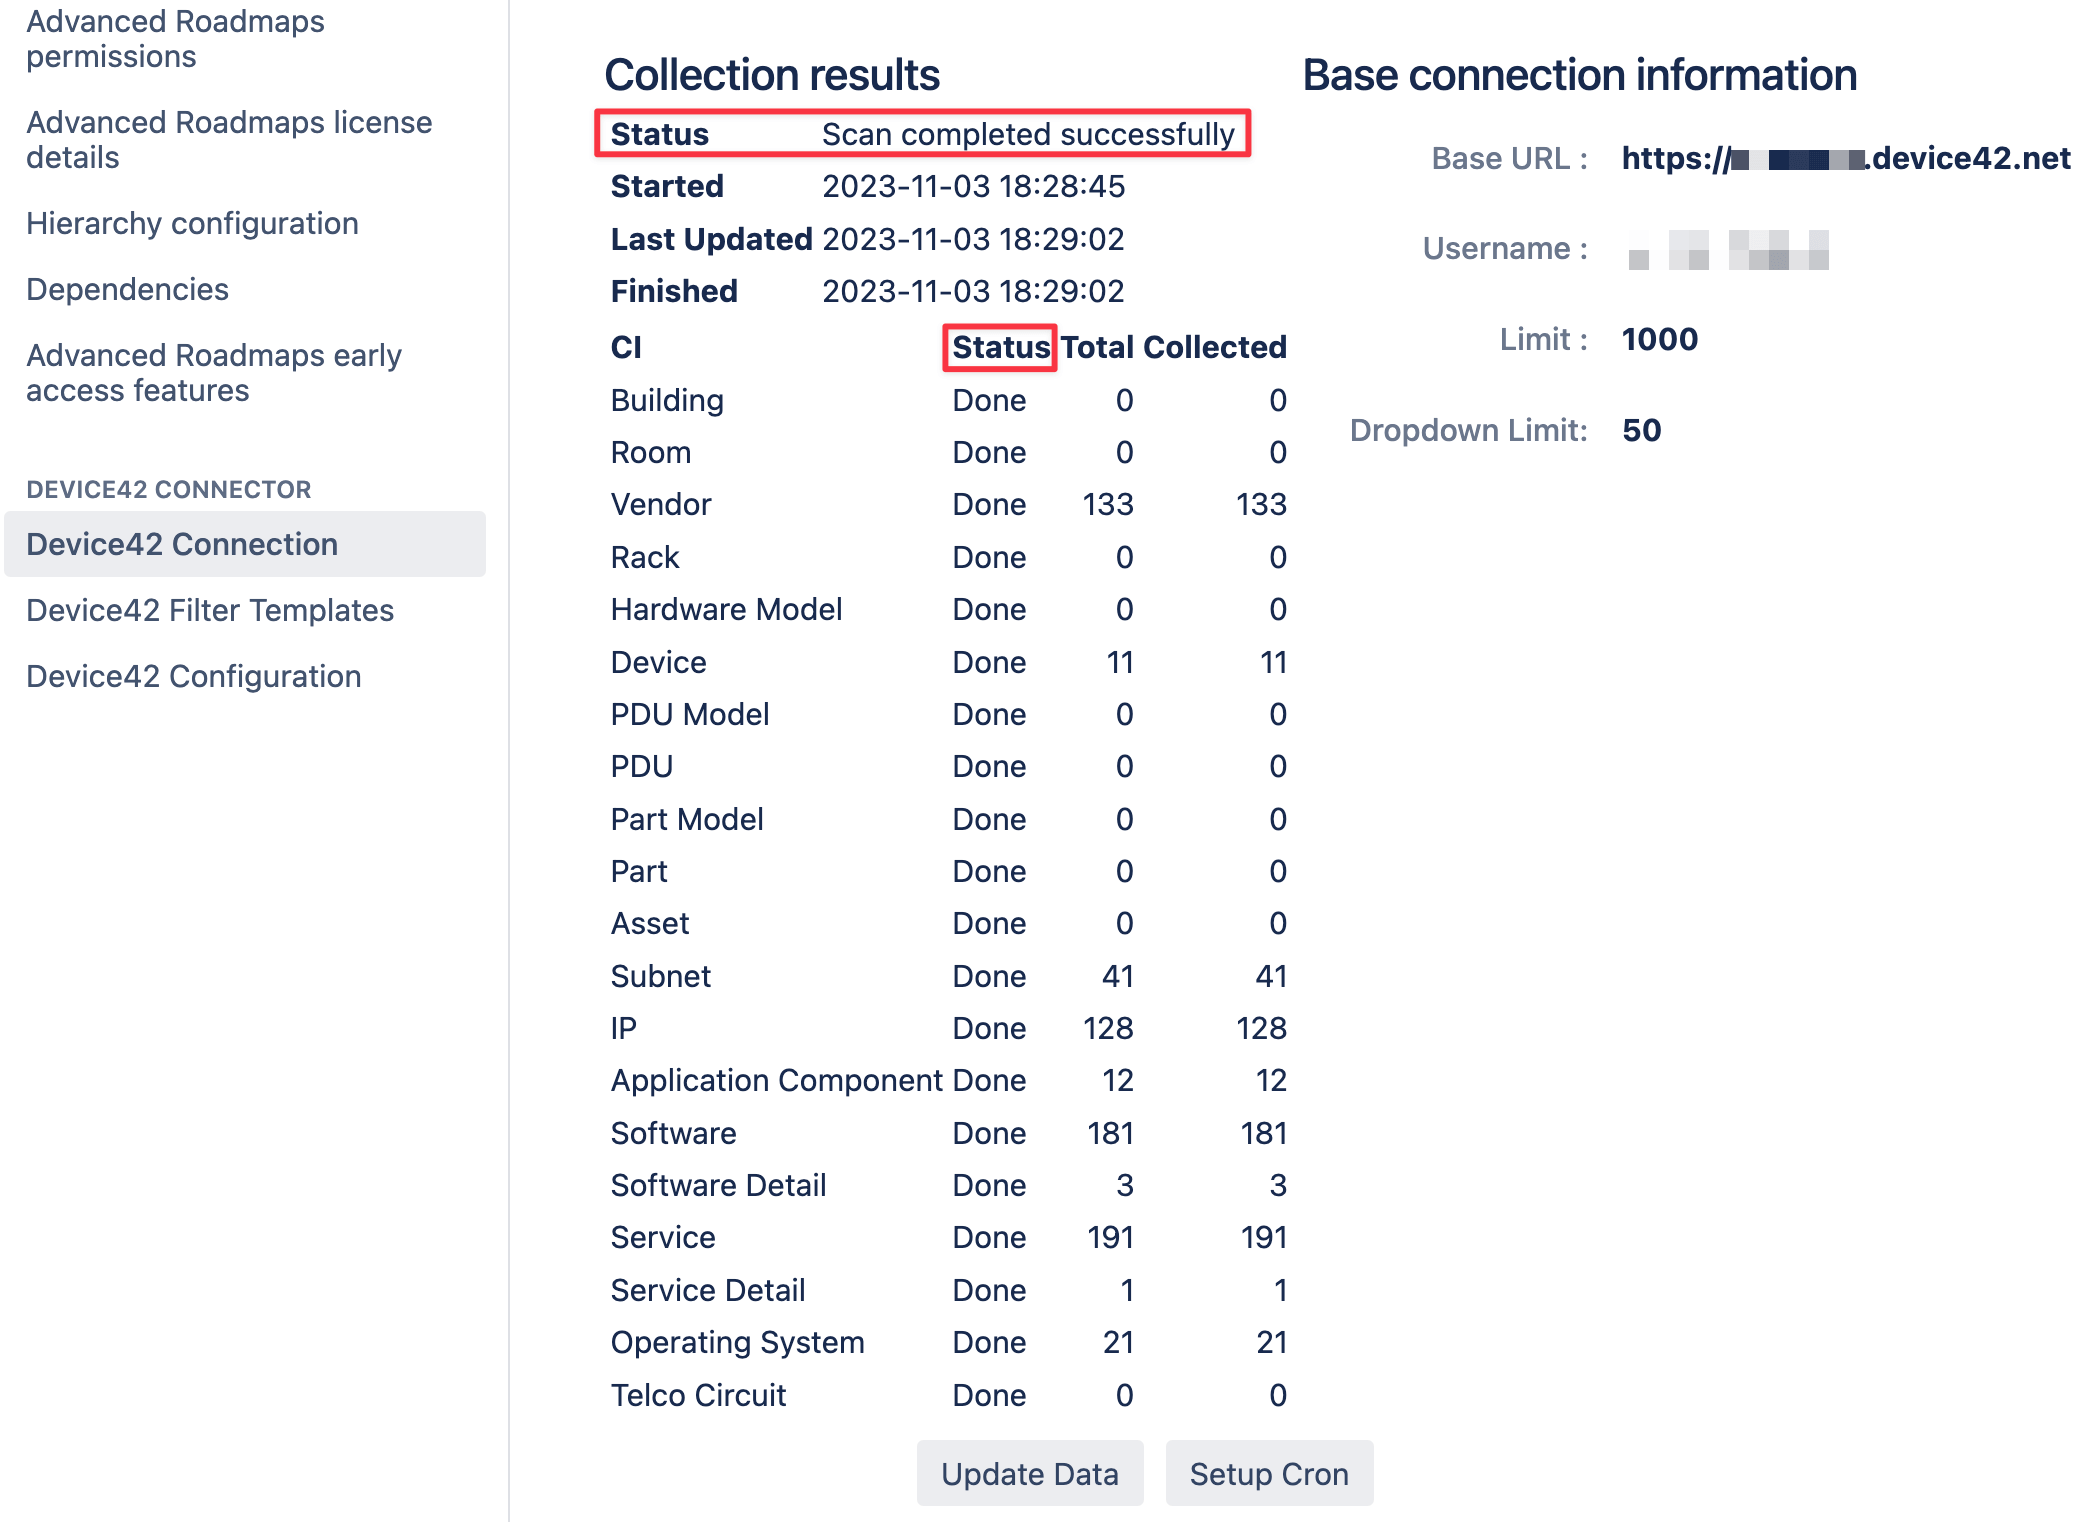
After the synchronization is complete, the warning message will disappear and the status of individual CIs will be listed as Done.
Configure Automatic Synchronization
Automatic sync updates are configured using regular cron expressions. Visit this tutorial for a quick explanation of cron expressions.
-
From the Device42 Connection tab, where the sync statistics are listed, click on the 'Setup Cron button.
-
Enter the cron expression inside the cron configuration dialog box. In this example, the cron expression
0 0 0 1/1 * ? *means "00:00:00 (midnight) every day".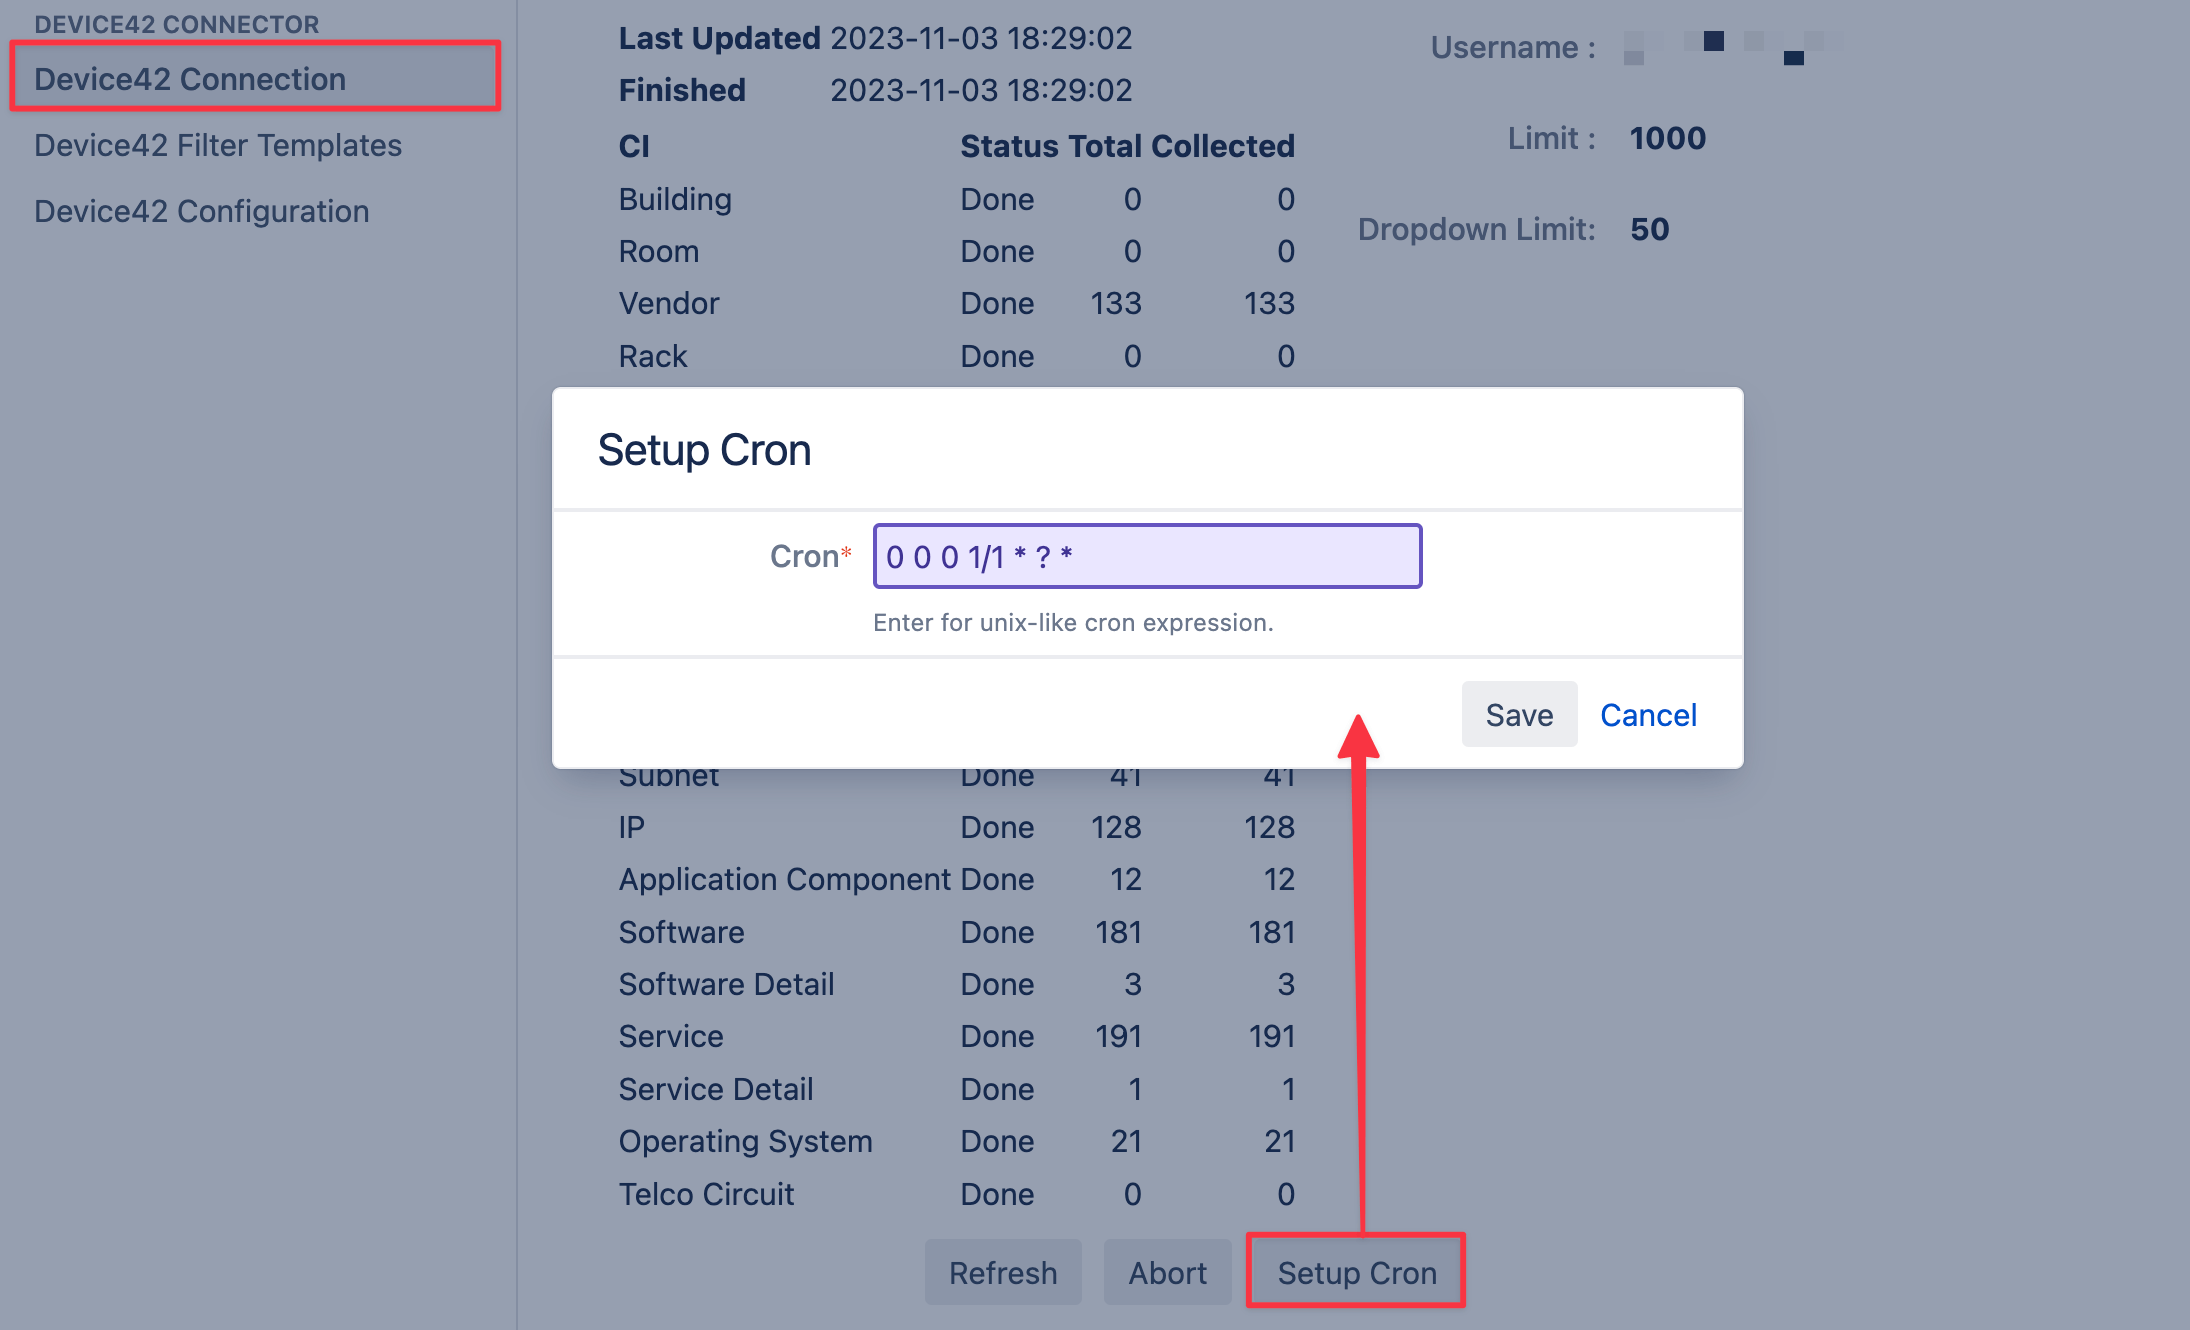
-
Click on the Save button
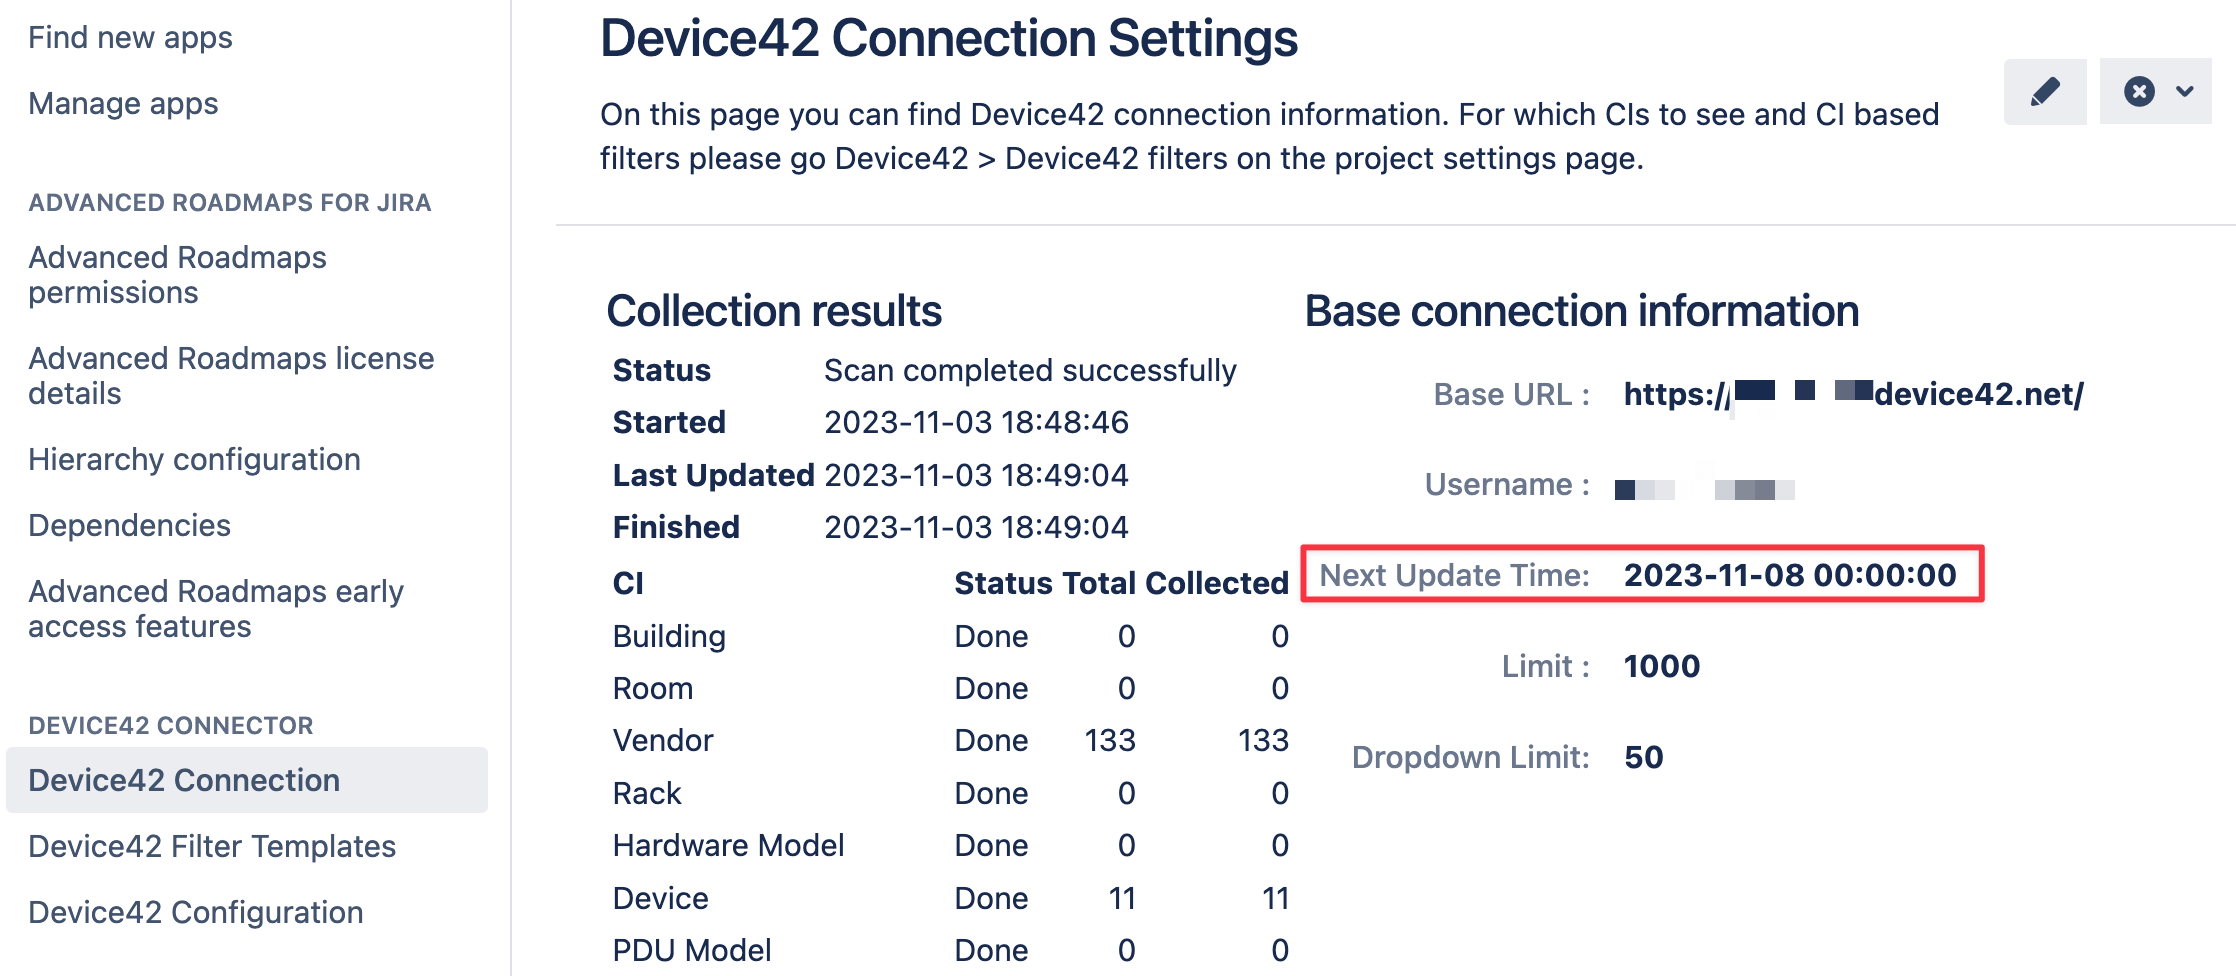
-
You will see the Next Update Time listed on the configuration view screen below your username.
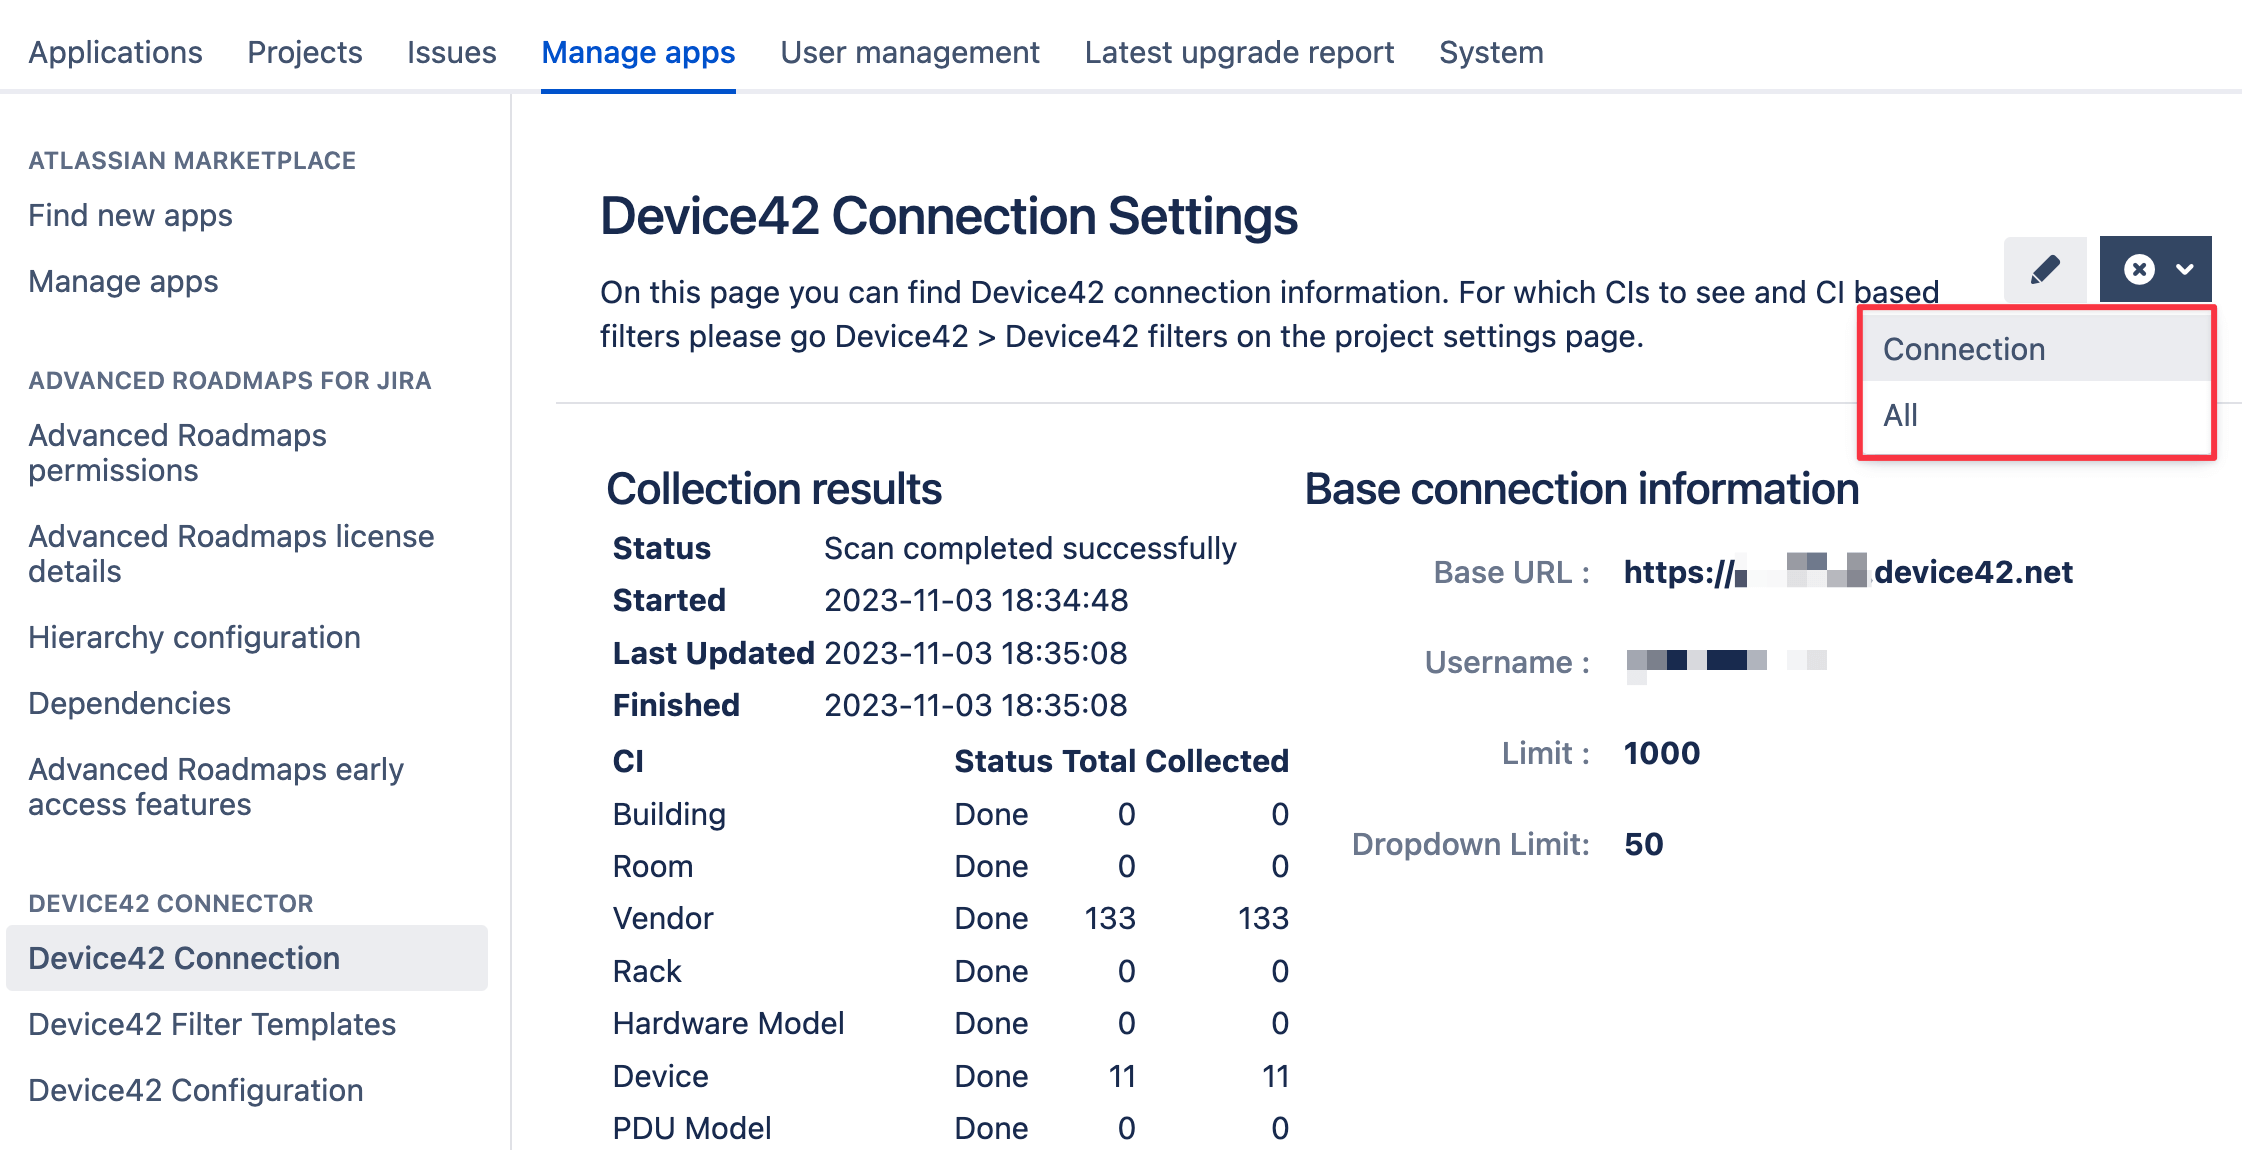
Delete App Data
If you wish to clear up the app data, select one of the two delete options in Jira as follows:
-
Click on the X icon at the top right of the Connection Settings page.
-
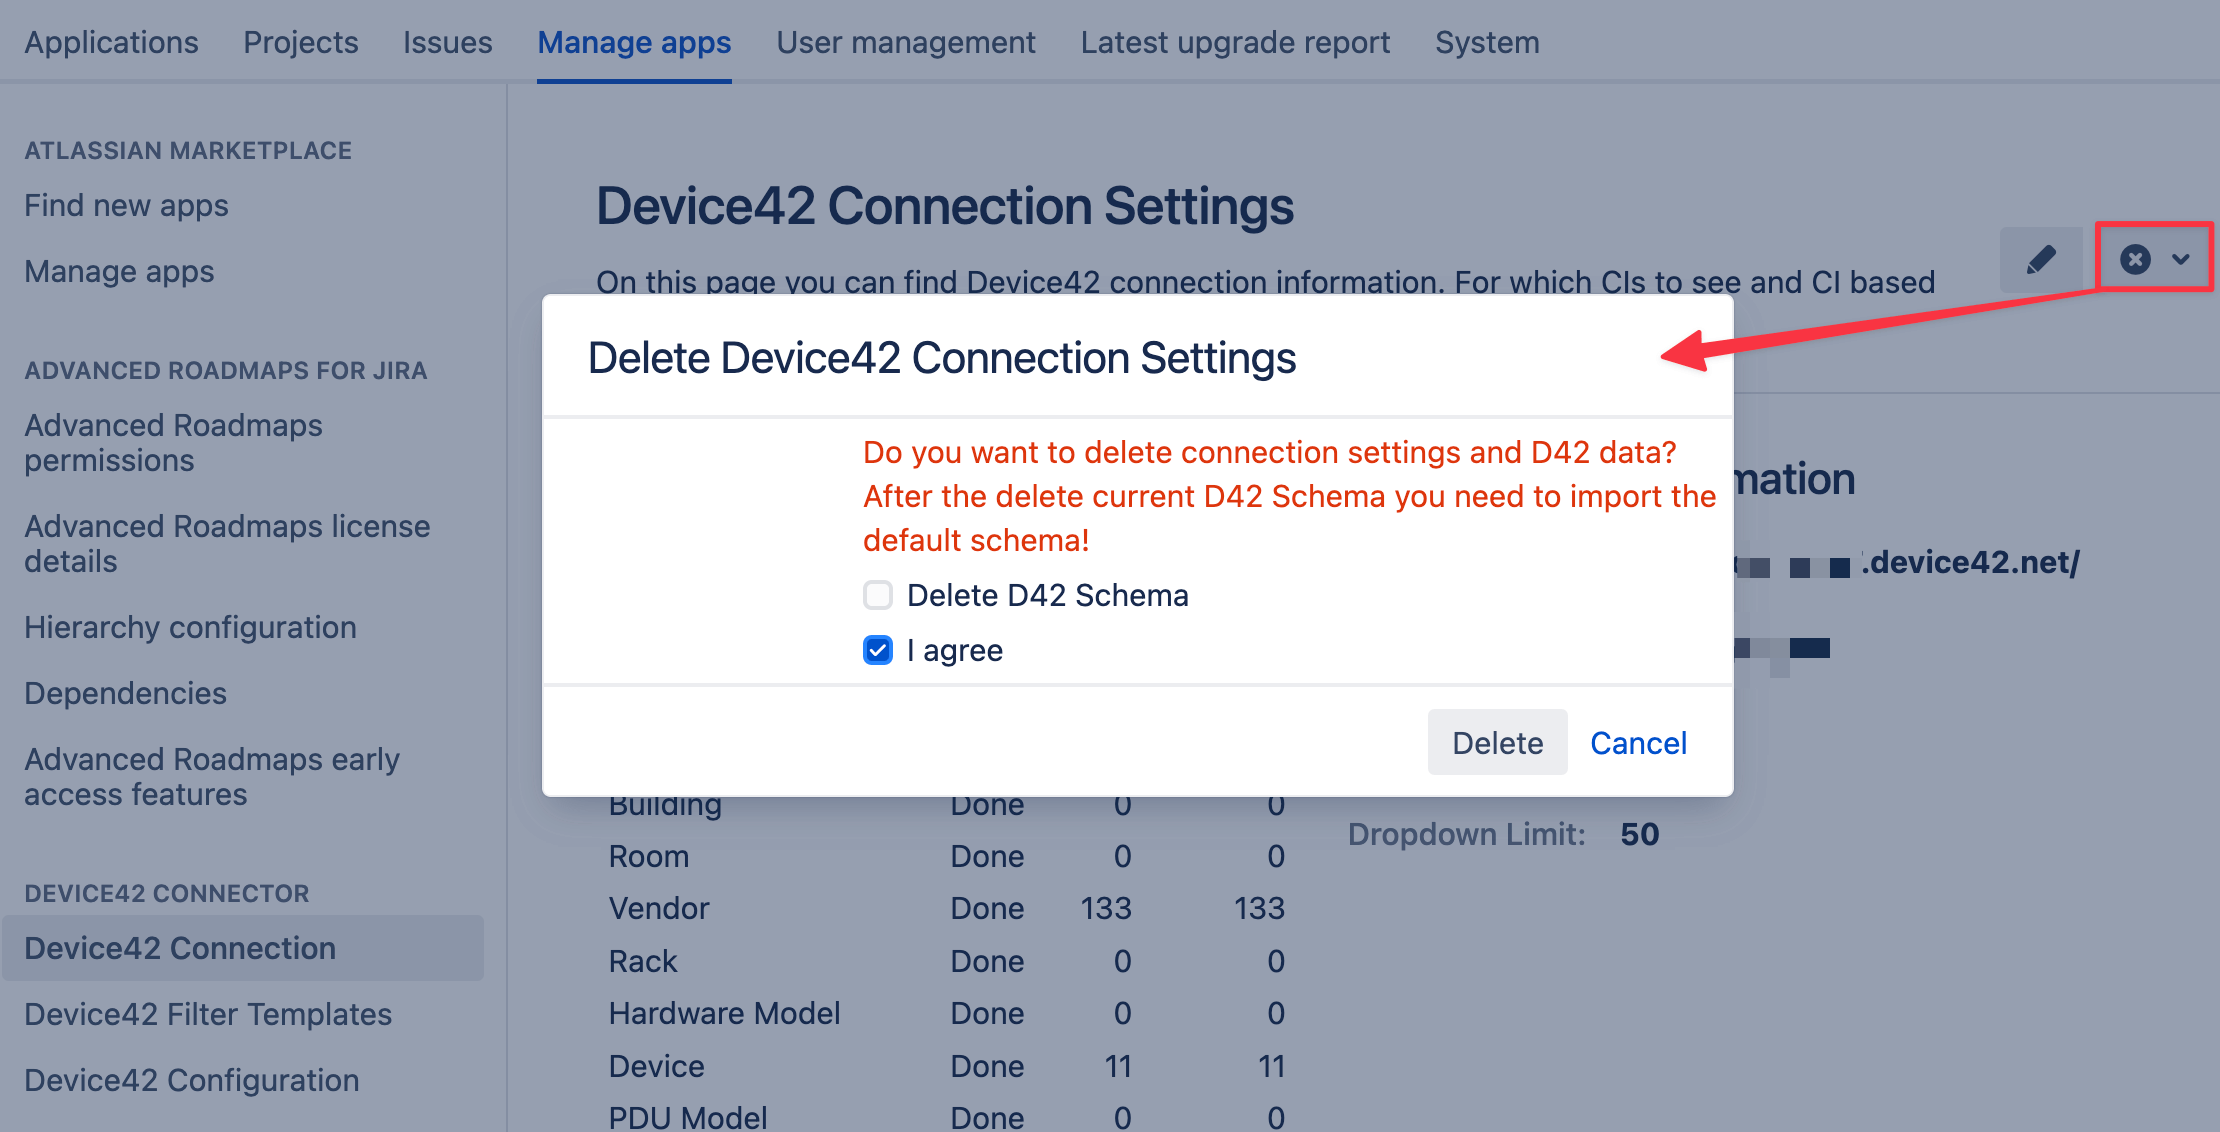
Select either the Connection or All option. The Connection option removes your connection settings, all filter data, and scan results of the configuration items. The All option deletes all data including custom field entries.
-
Check the I agree confirmation checkbox and click on the Delete button to confirm. Note that selecting the Delete D42 Schema will require you to import the default schema again.
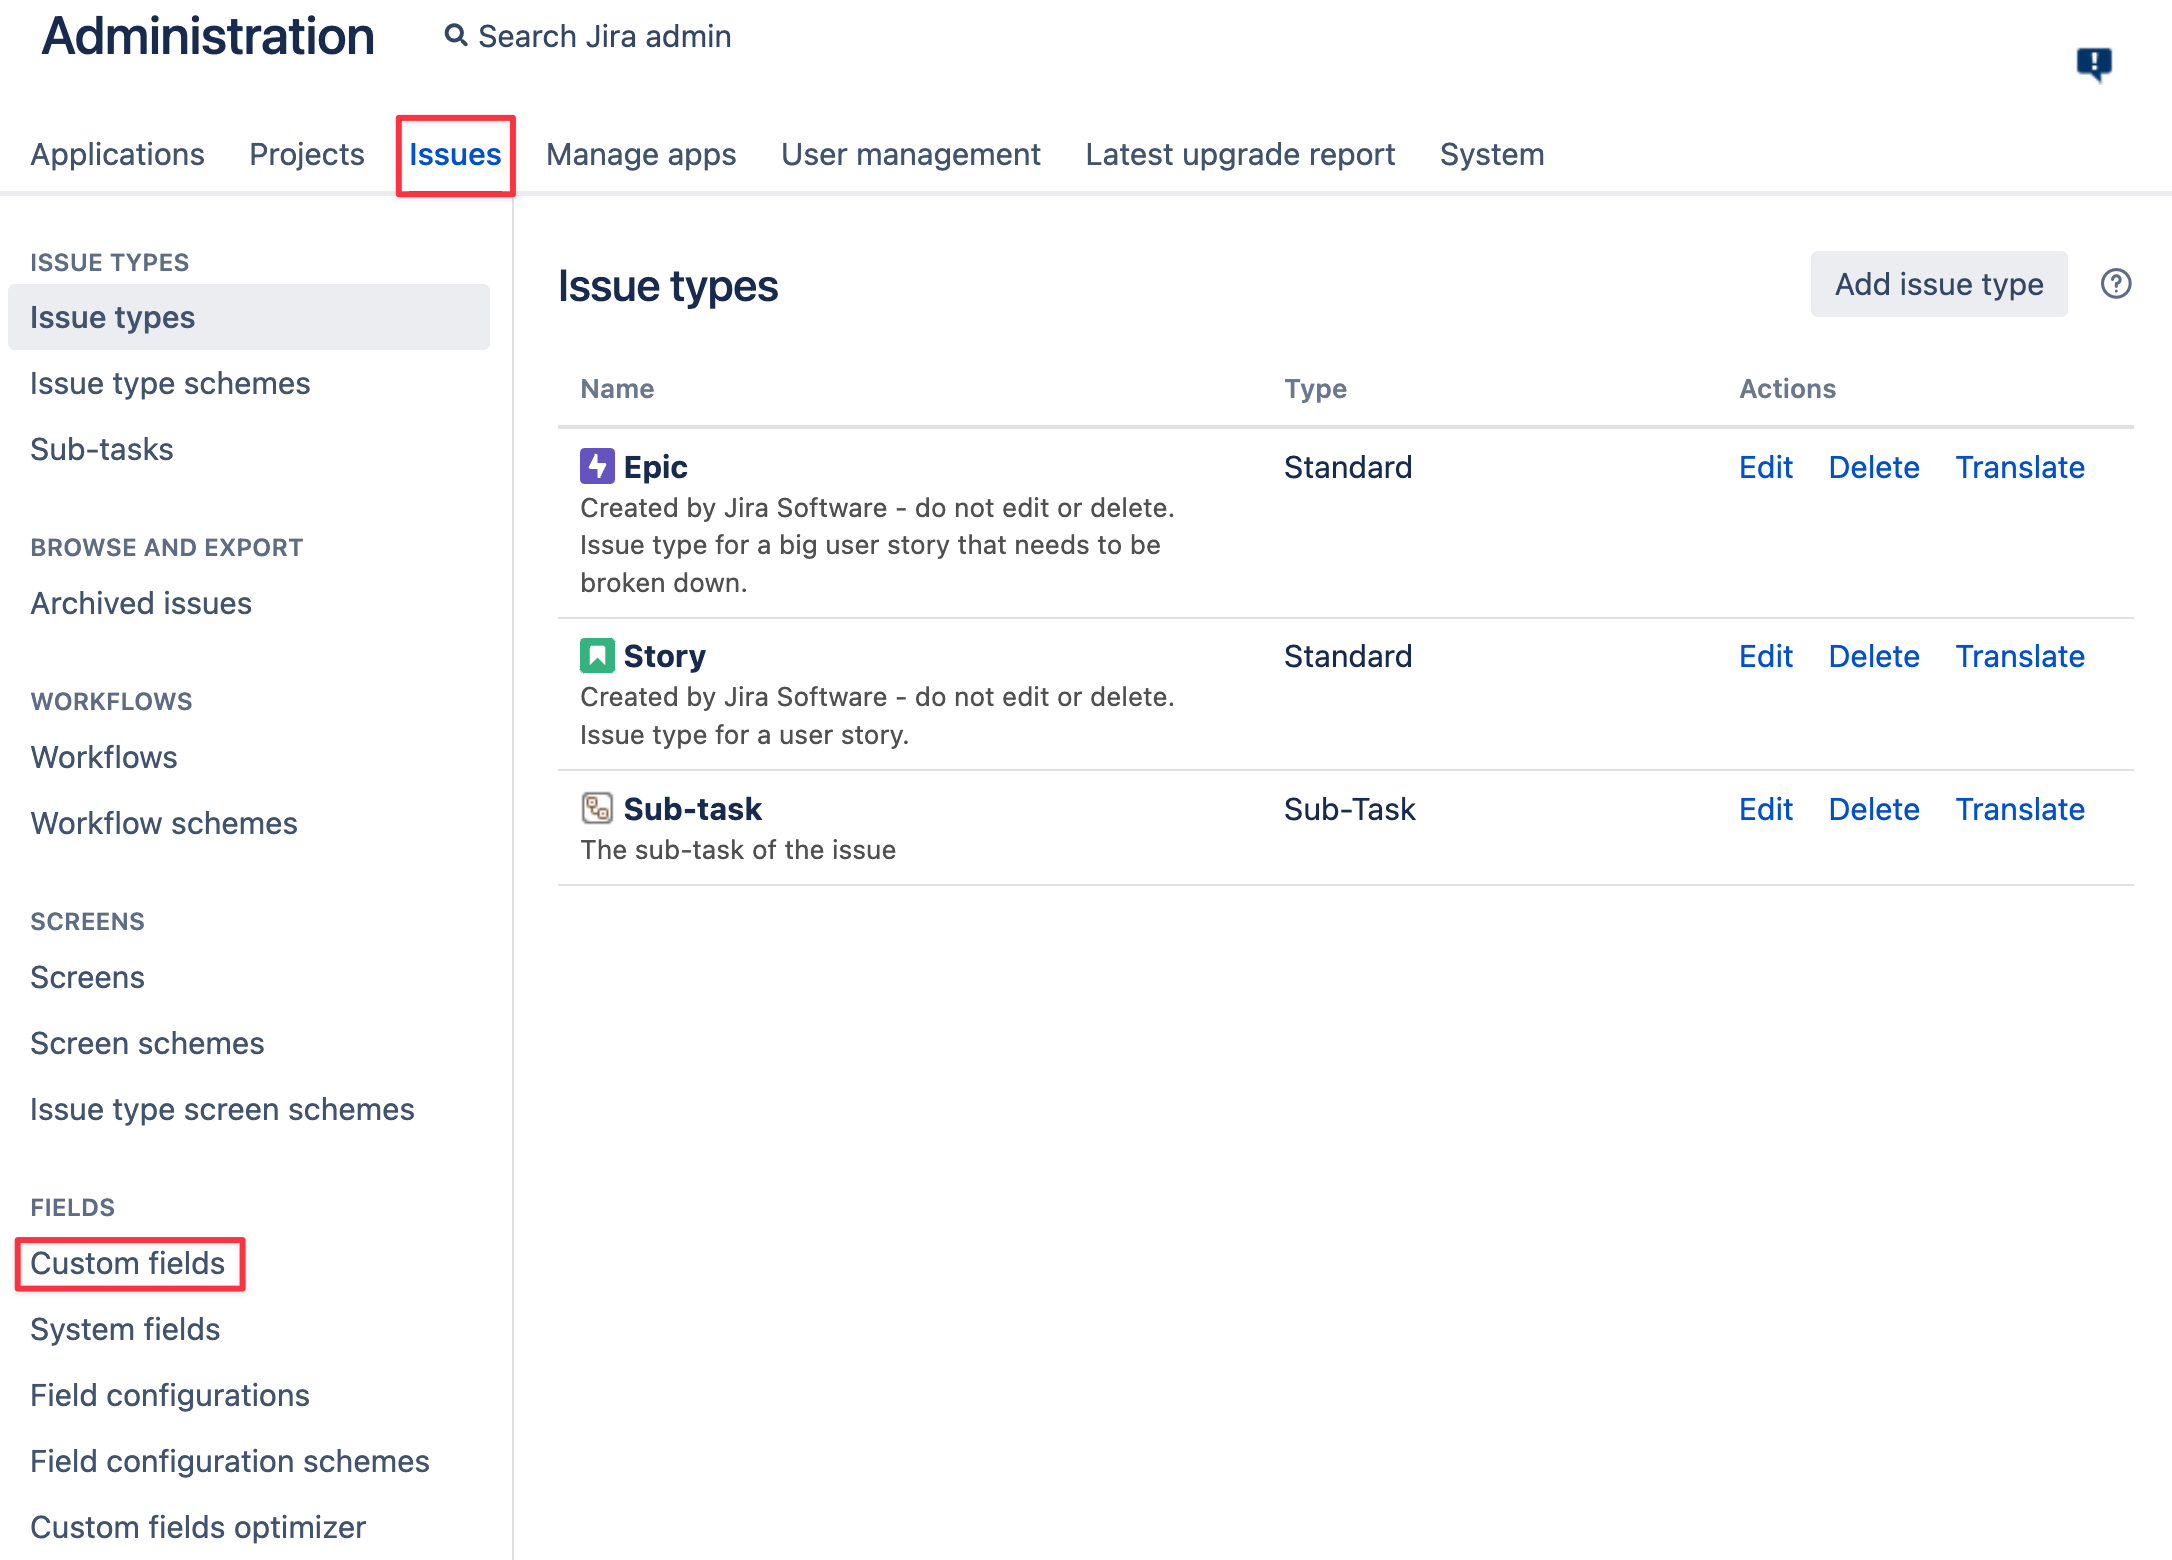
Custom Fields
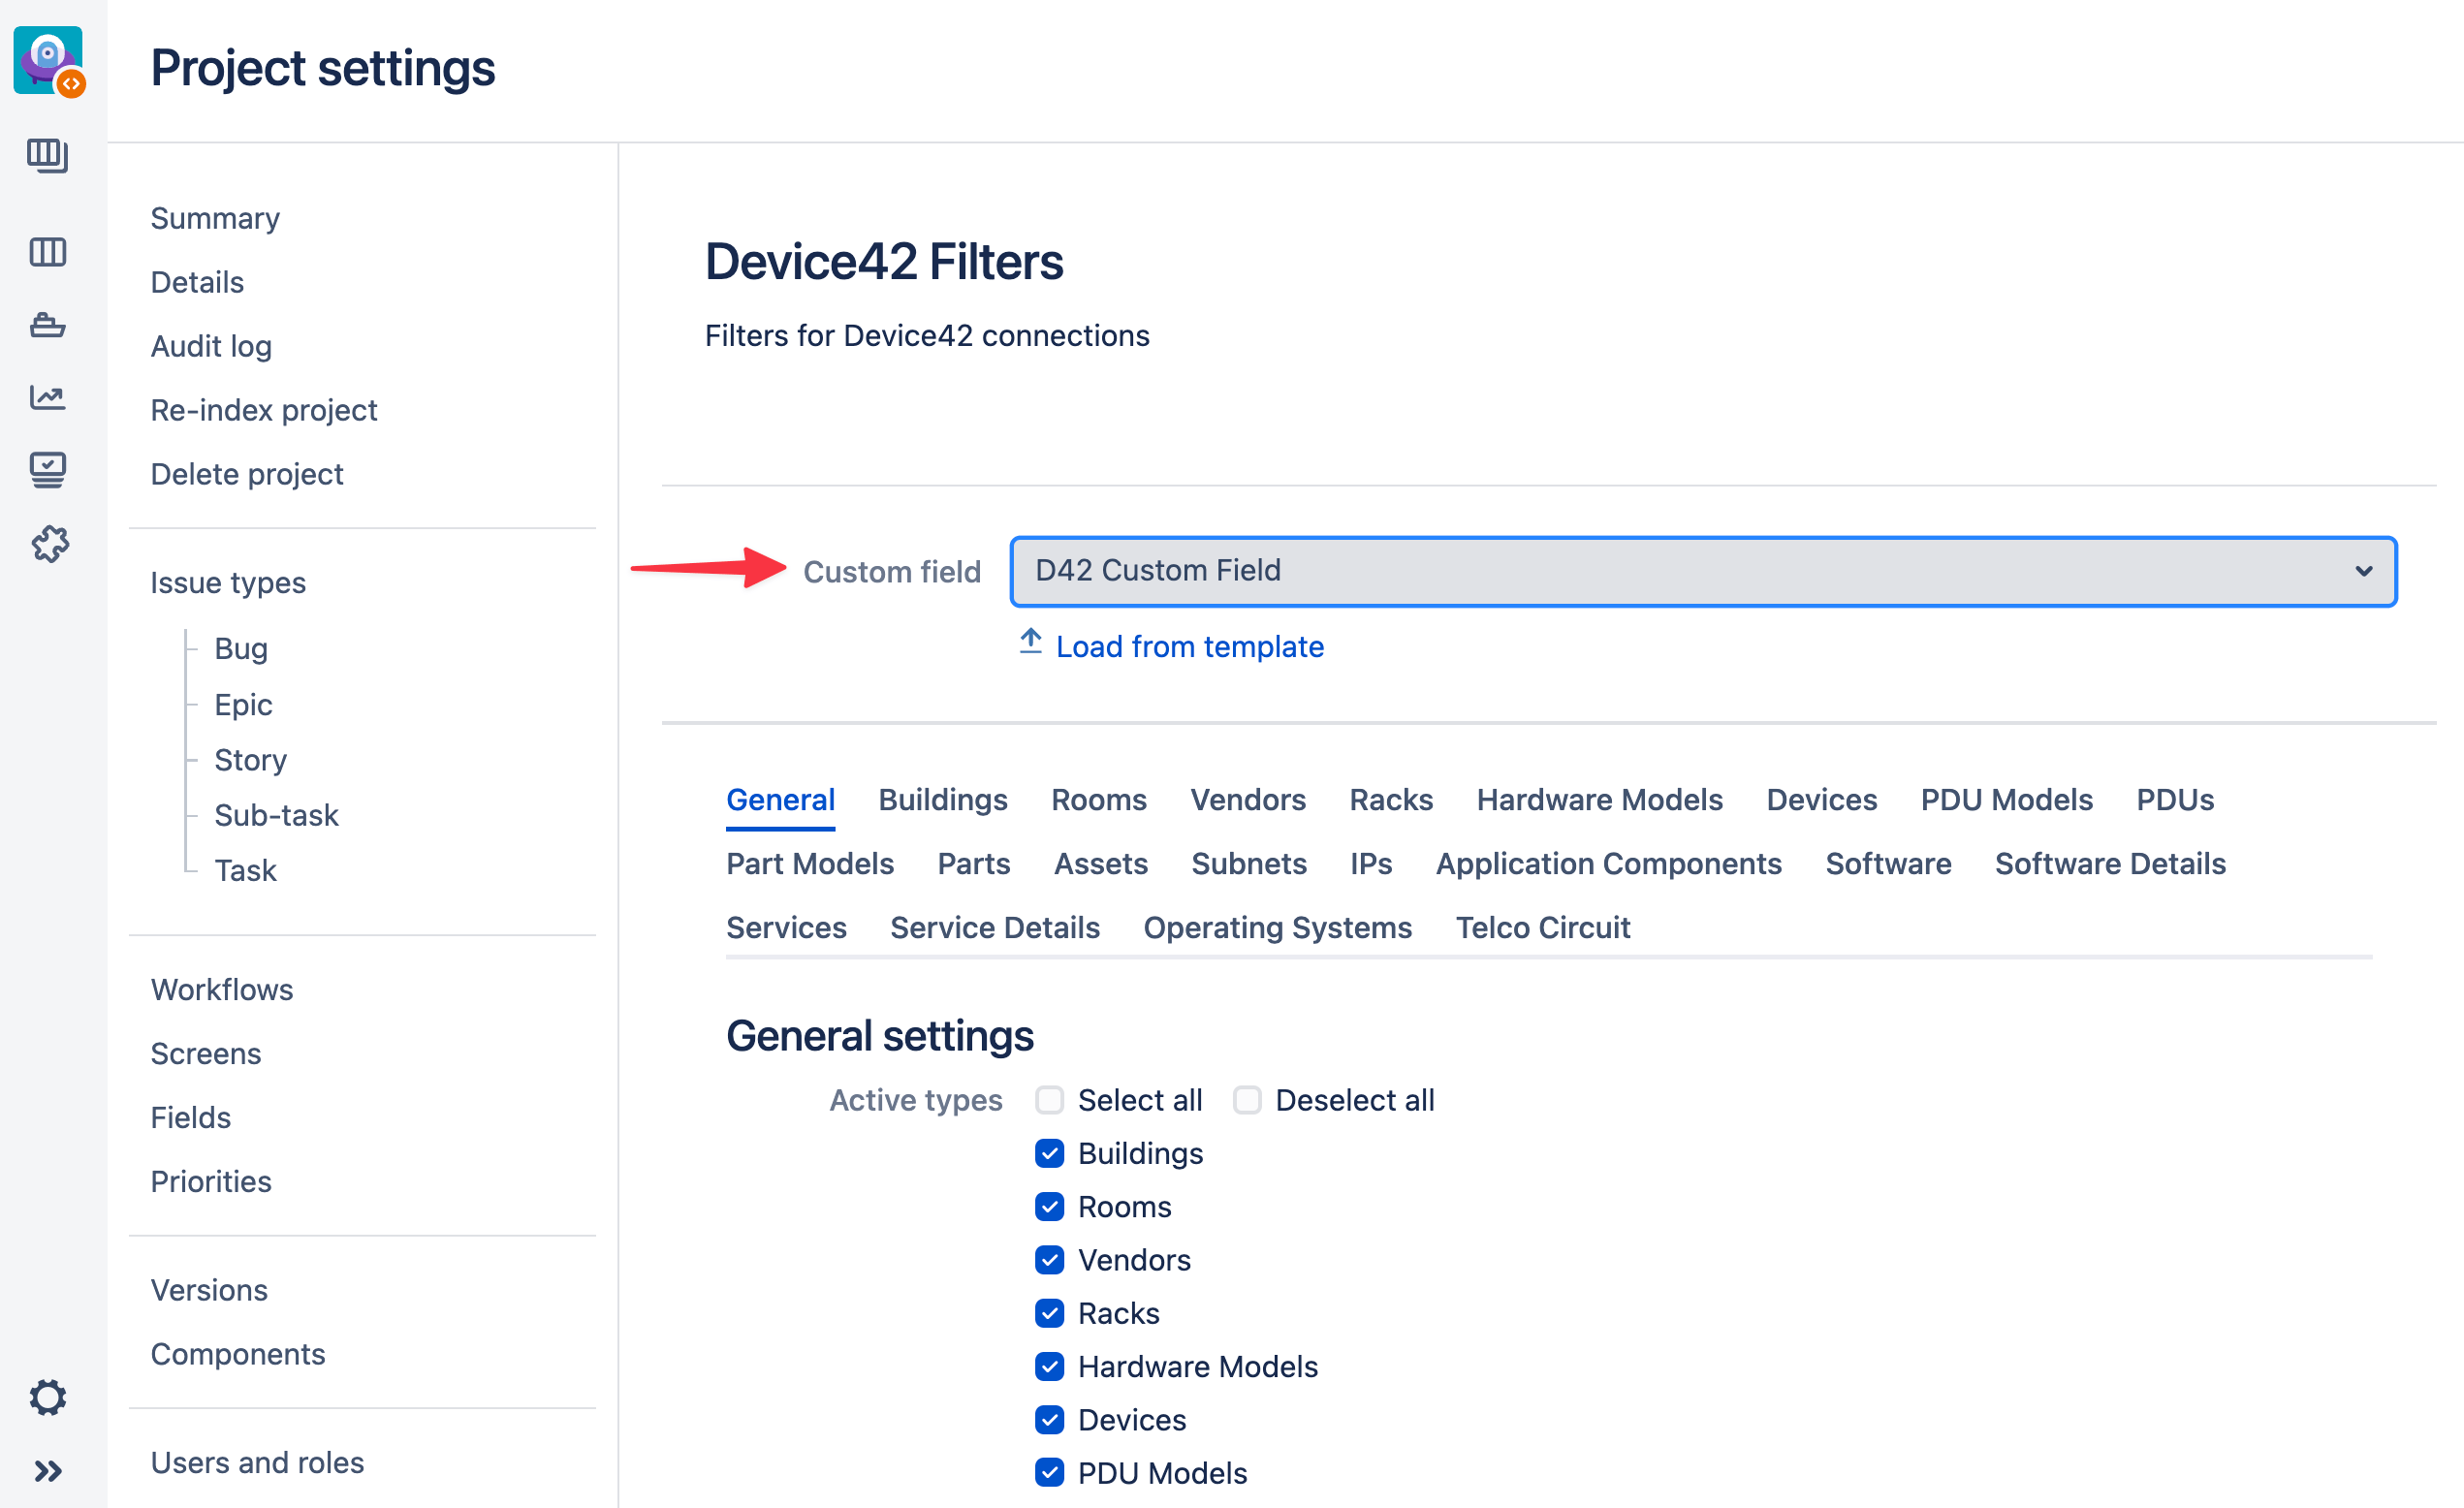
Device42 custom fields can be used to link the Configuration Items (CIs) to Jira issues. You can have multiple independent Device42 custom fields per issue. You can link multiple CIs of the same type (for example, devices only) to a issue using one custom field. You can apply a project filter globally to the list of the possible CIs you want available within a specific project. Also, you can apply the filter to the each of the Configuration Items category. See the Custom Field Filters section for details.
Create a new Device42 custom field as follows:
-
Log in as a user with Jira administrator access.
-
From the Jira administration console, click on the Issues tab and select Custom fields from the left panel, or press the G key twice and search for custom fields.
-
Click the Add custom field button to open the following dialog box:
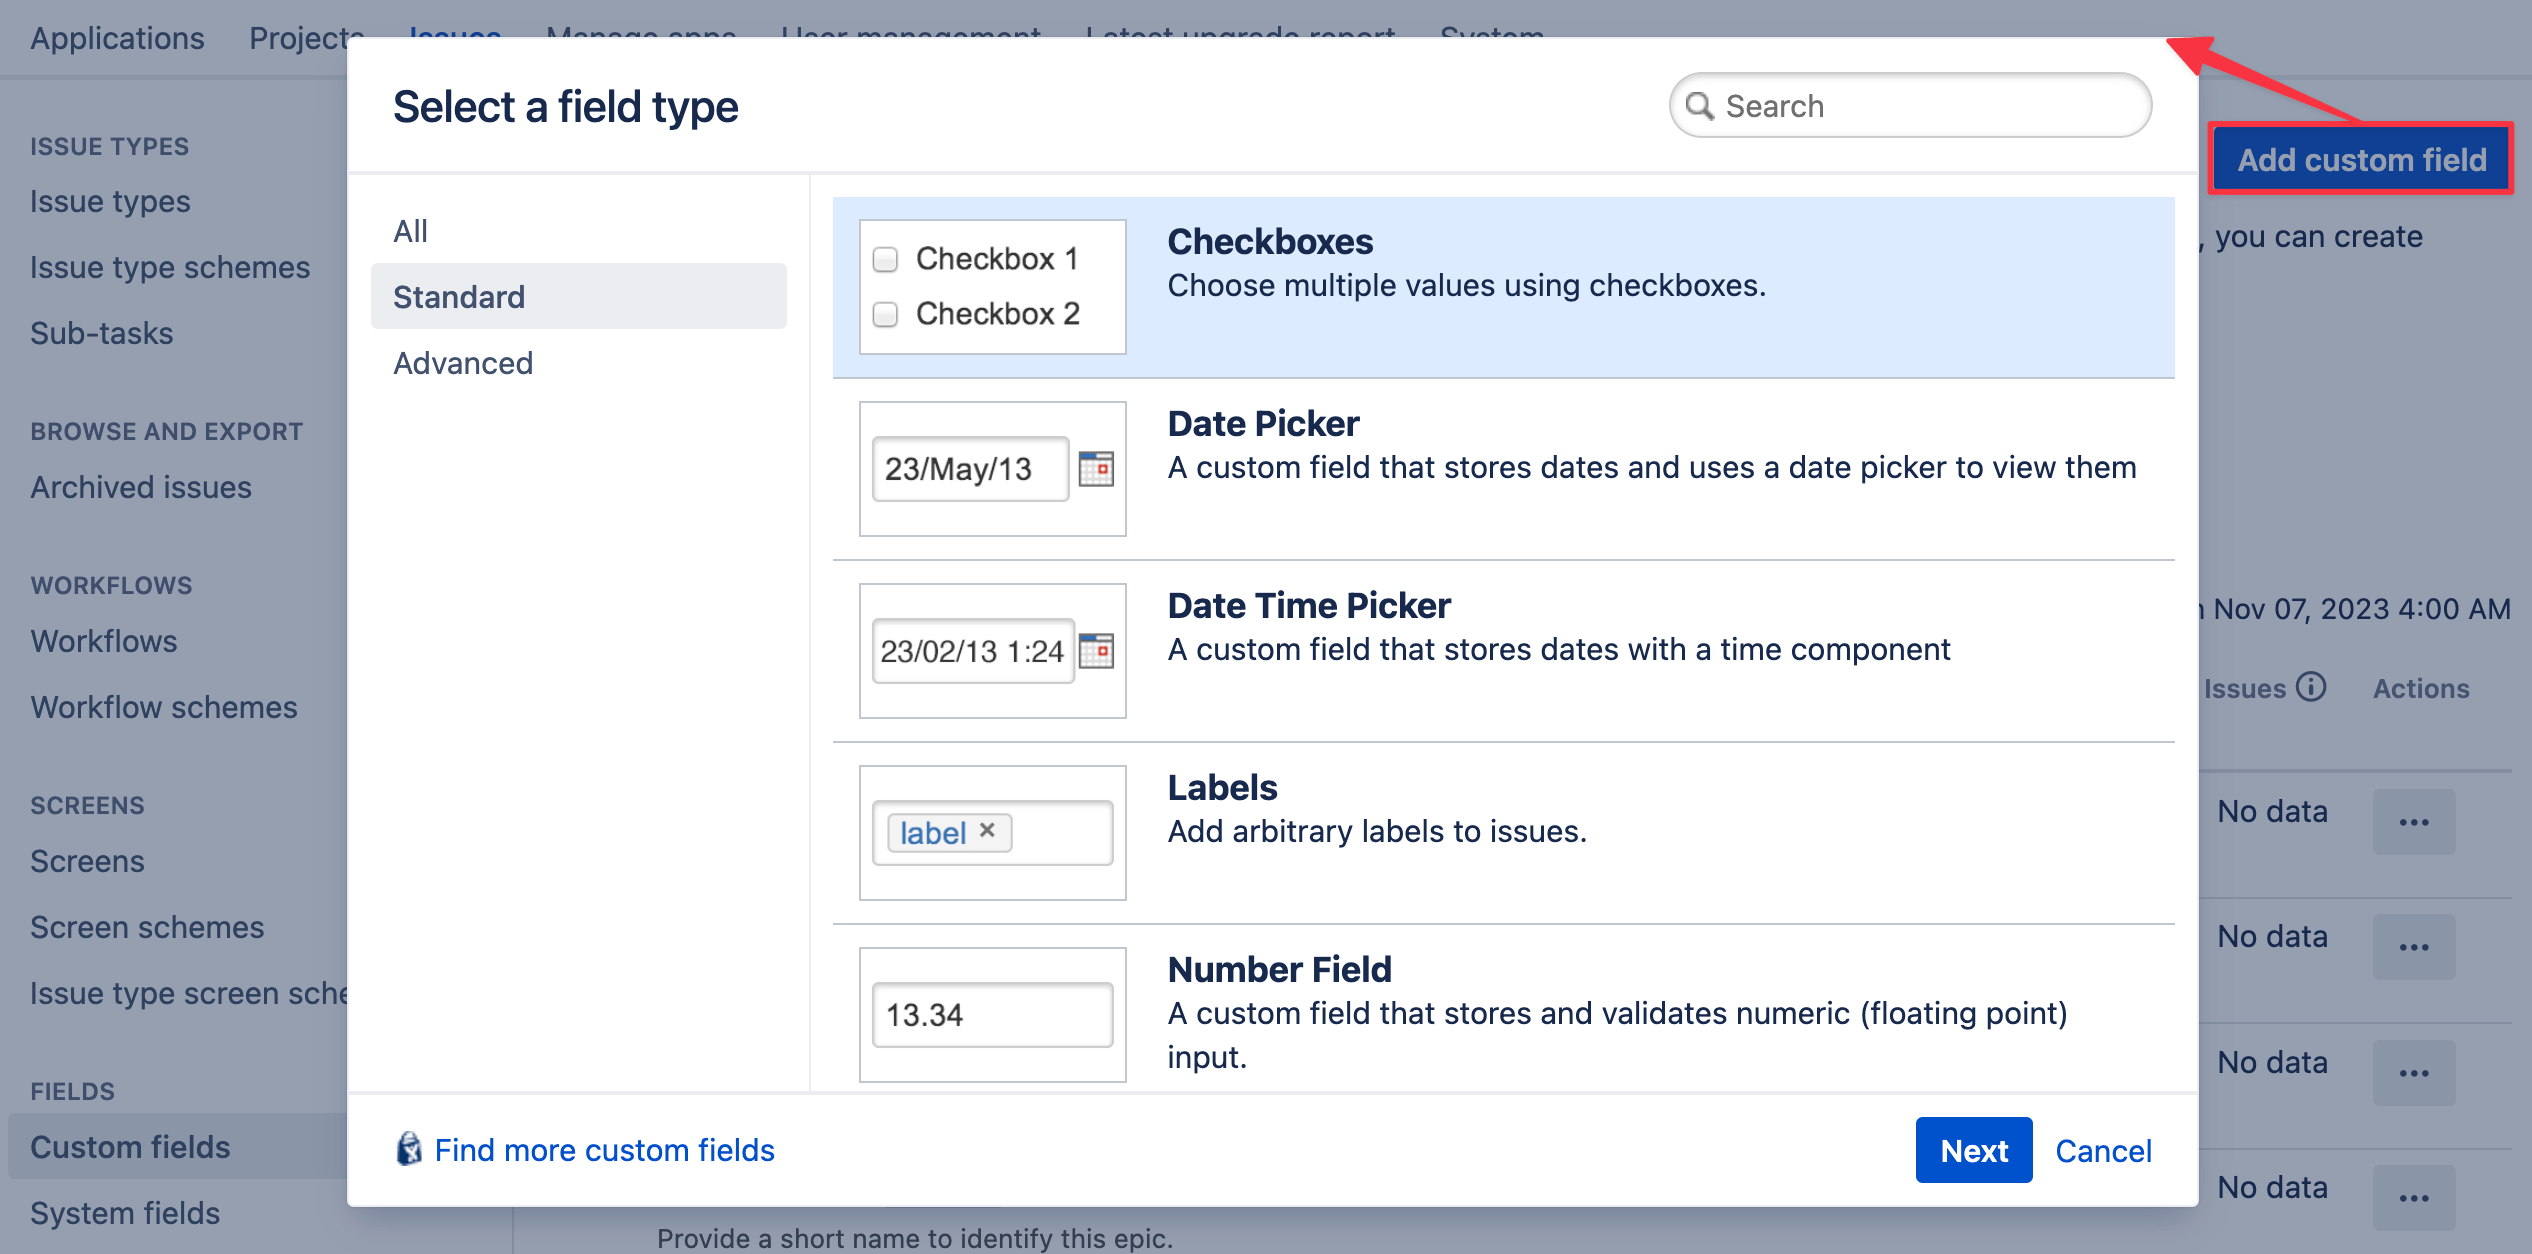
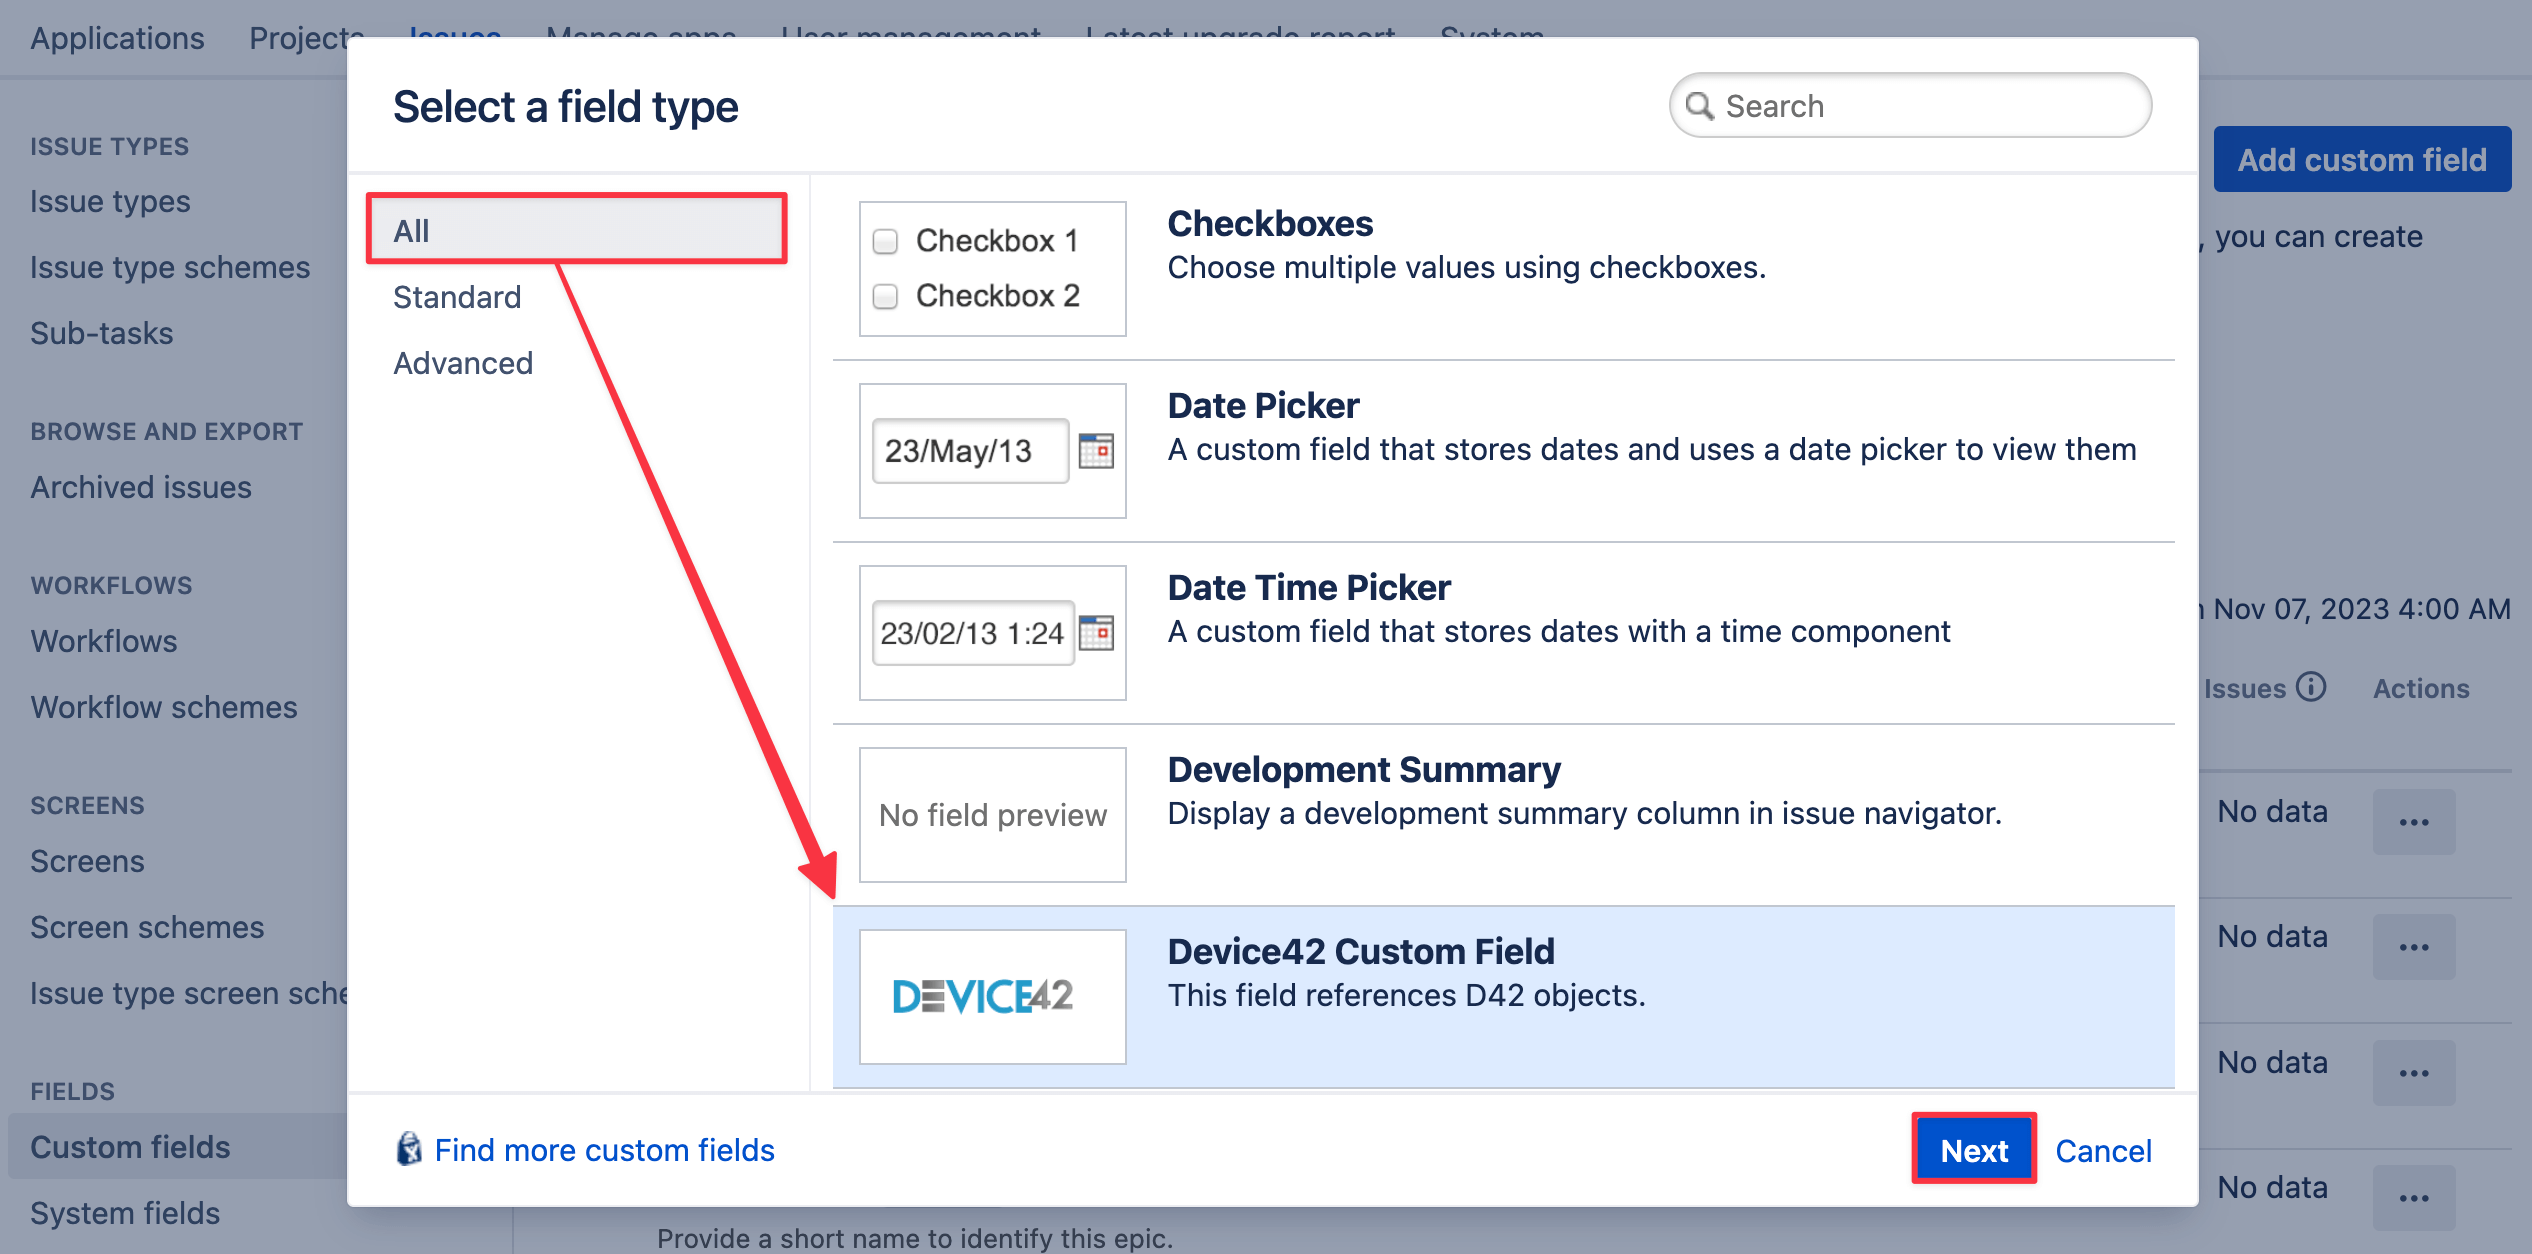
By default, the left navigation bar displays the Standard list of custom fields. Choose All or Advanced to access the list that includes the Device42 custom field type.
-
Select the Device42 Custom Field option or type device42 in the top-right search bar and select the Device42 custom field type:
-
Click Next.
-
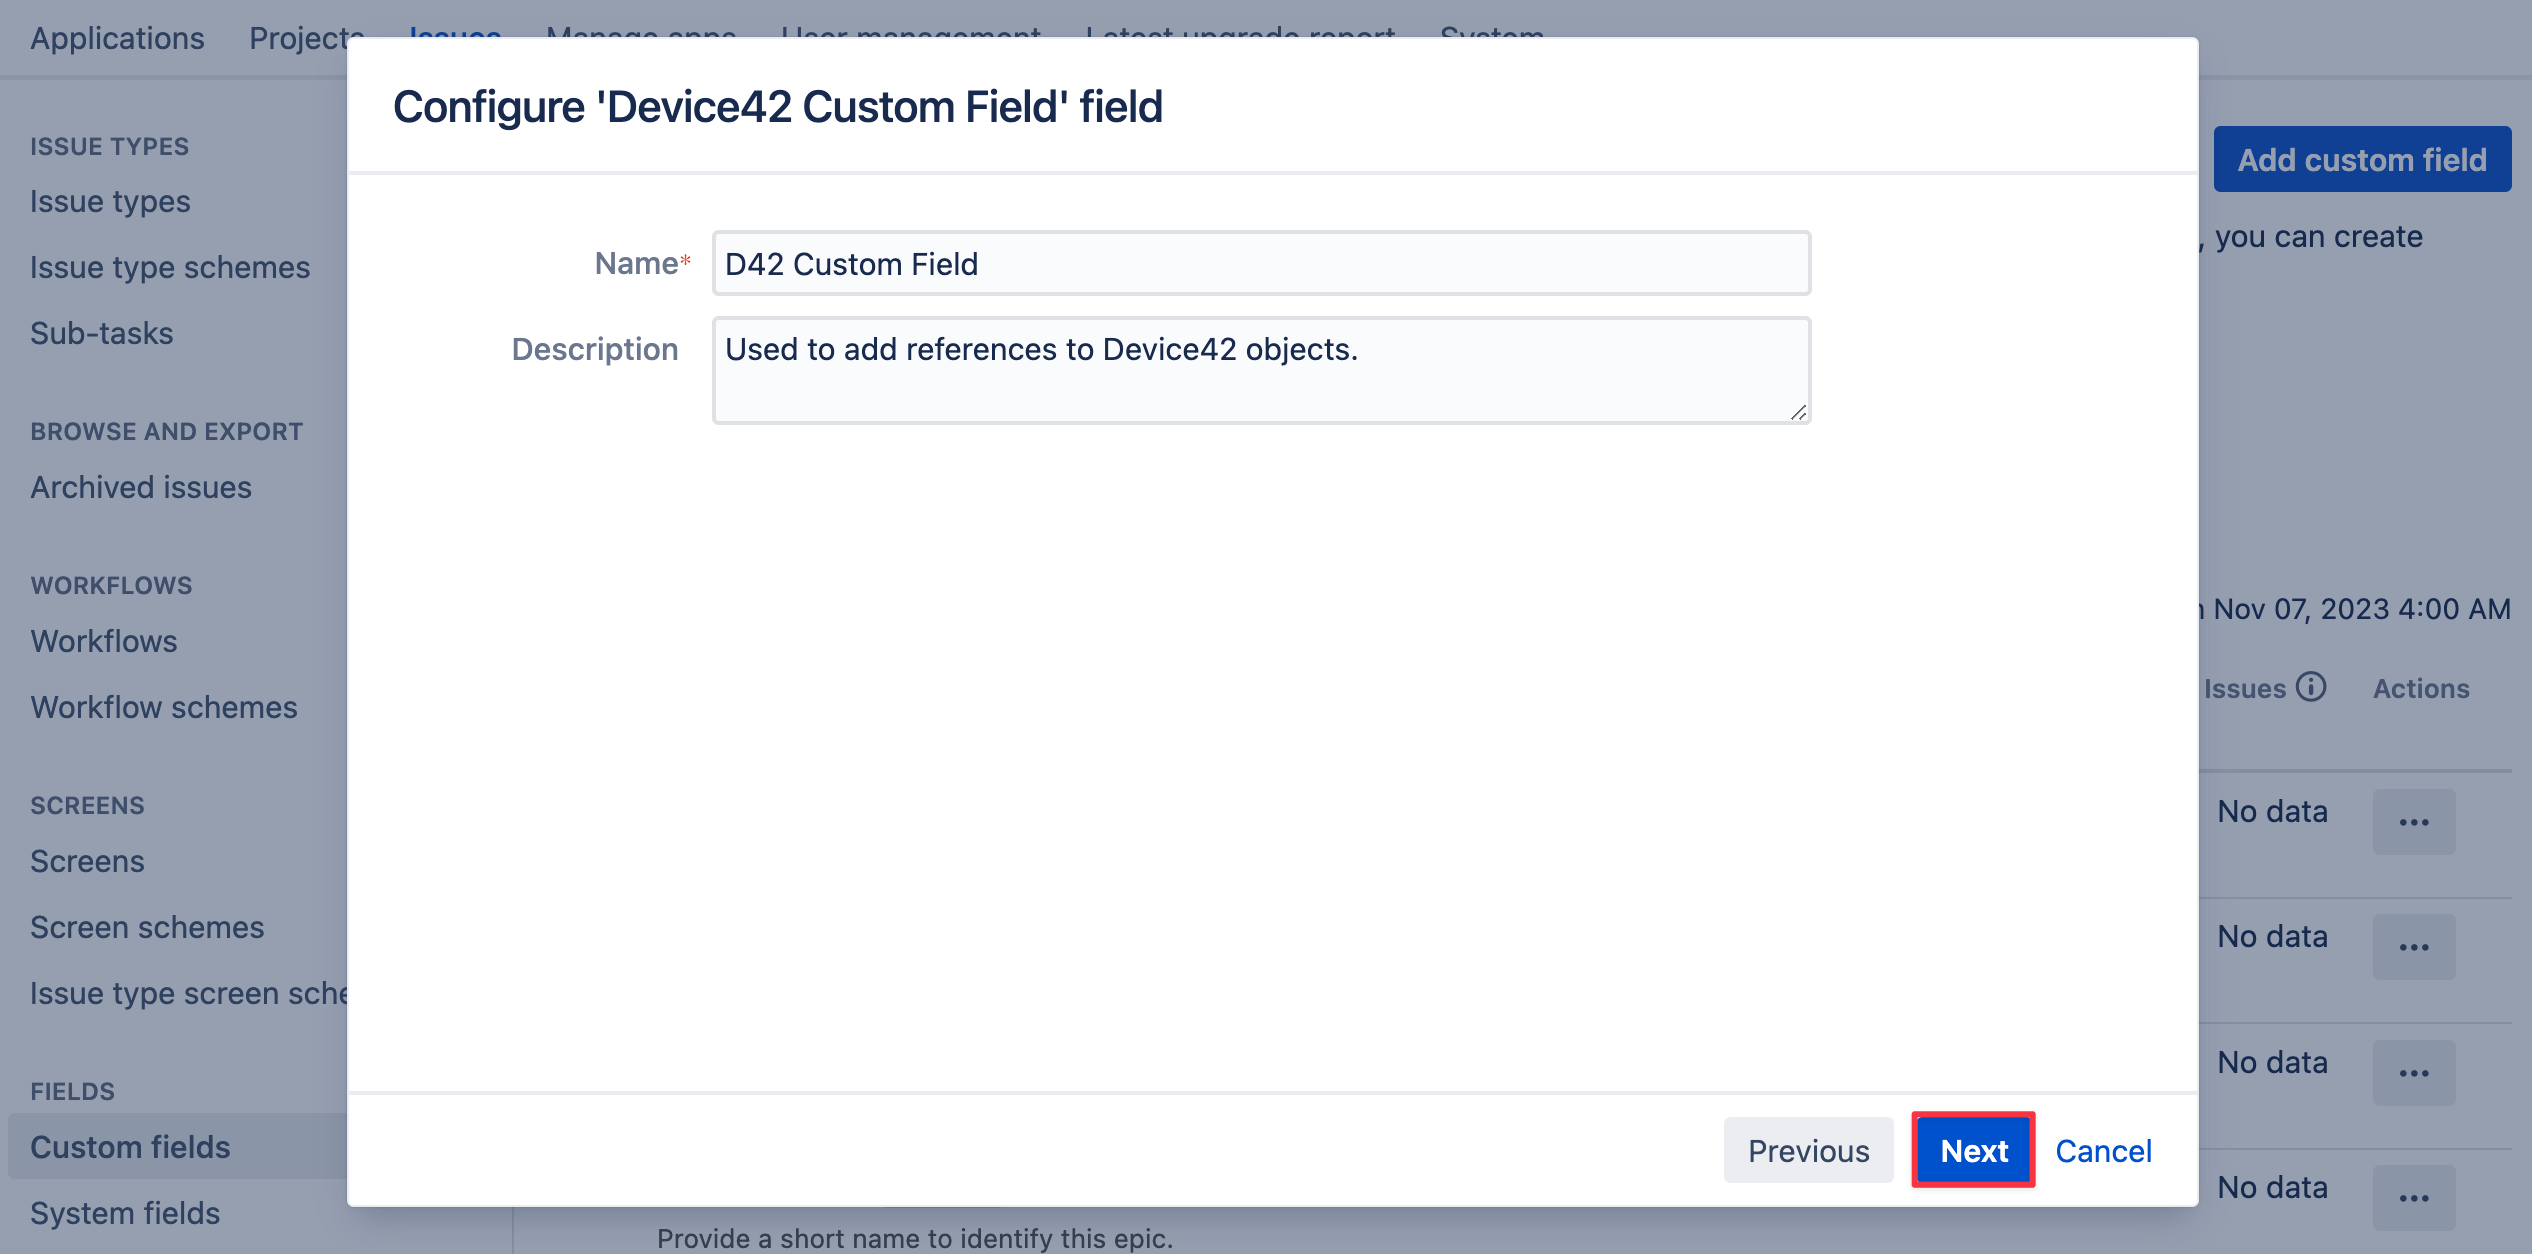
Give the custom field a Name and optional Description, and then click Next.
-
Configure the custom field context by choosing the Jira issue type you want to add the custom field to and whether to add it to all issues or issues in selected projects only.
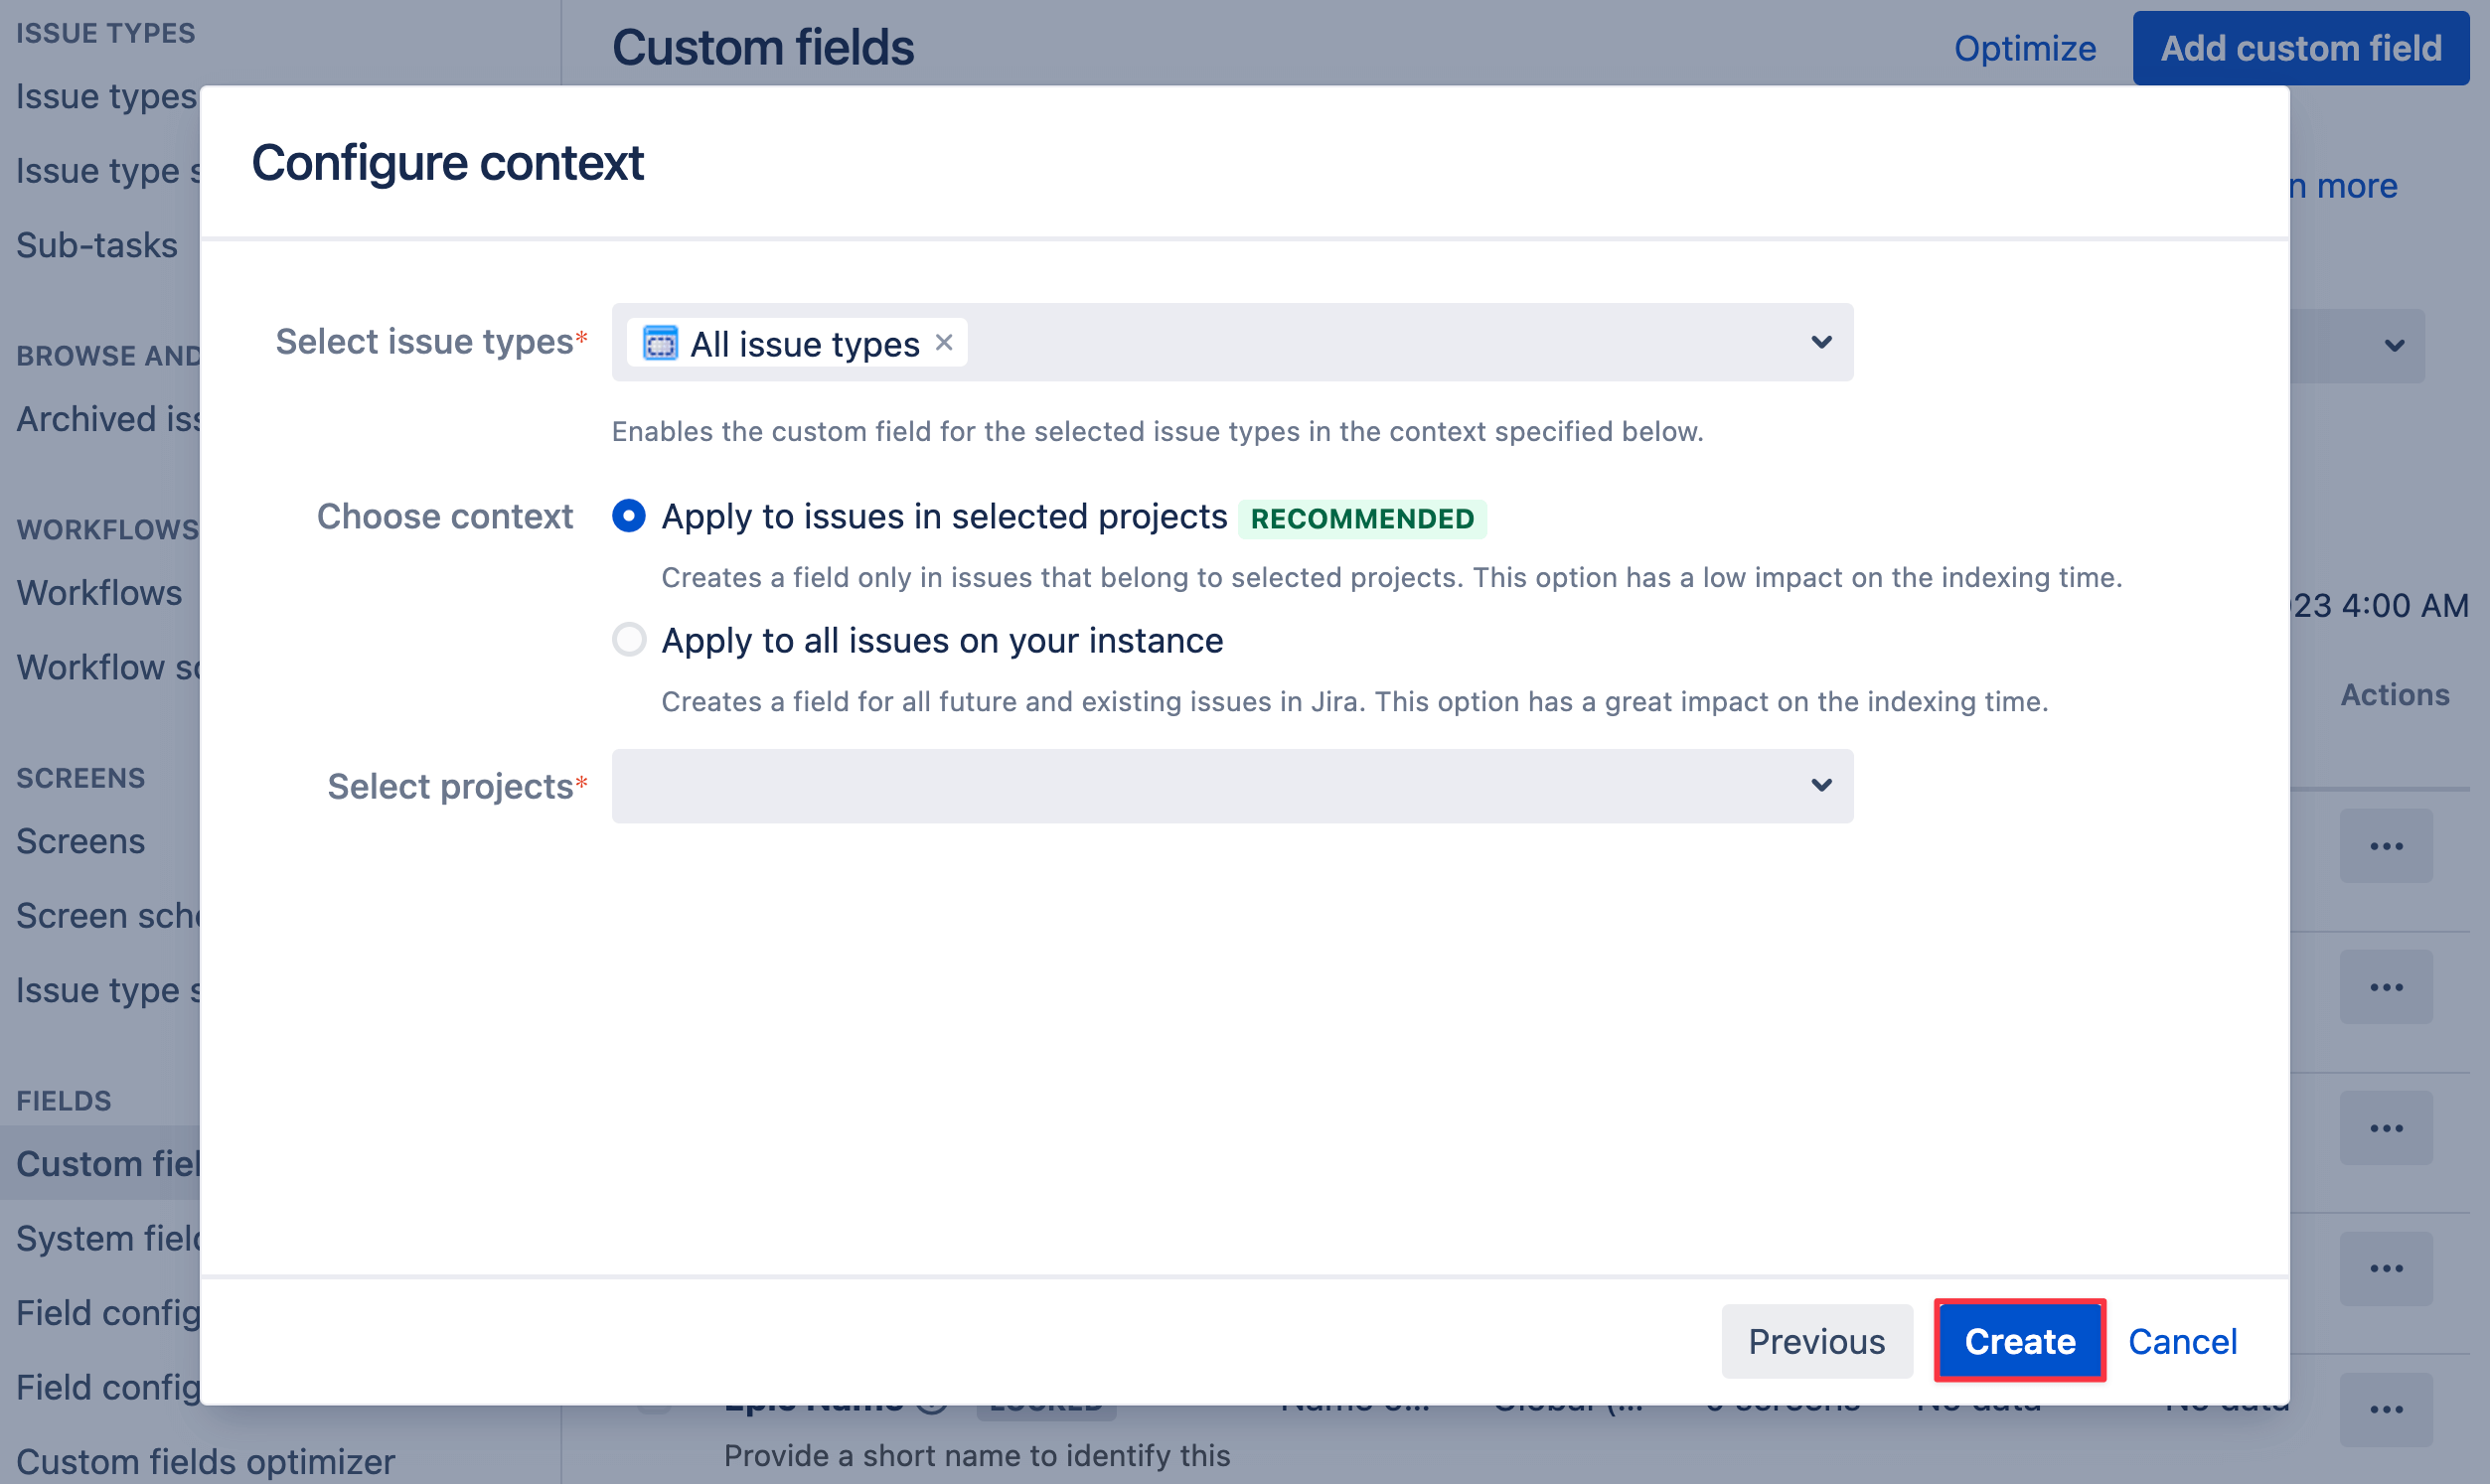
-
Associate the field to screens by checking the boxes. Click Update.

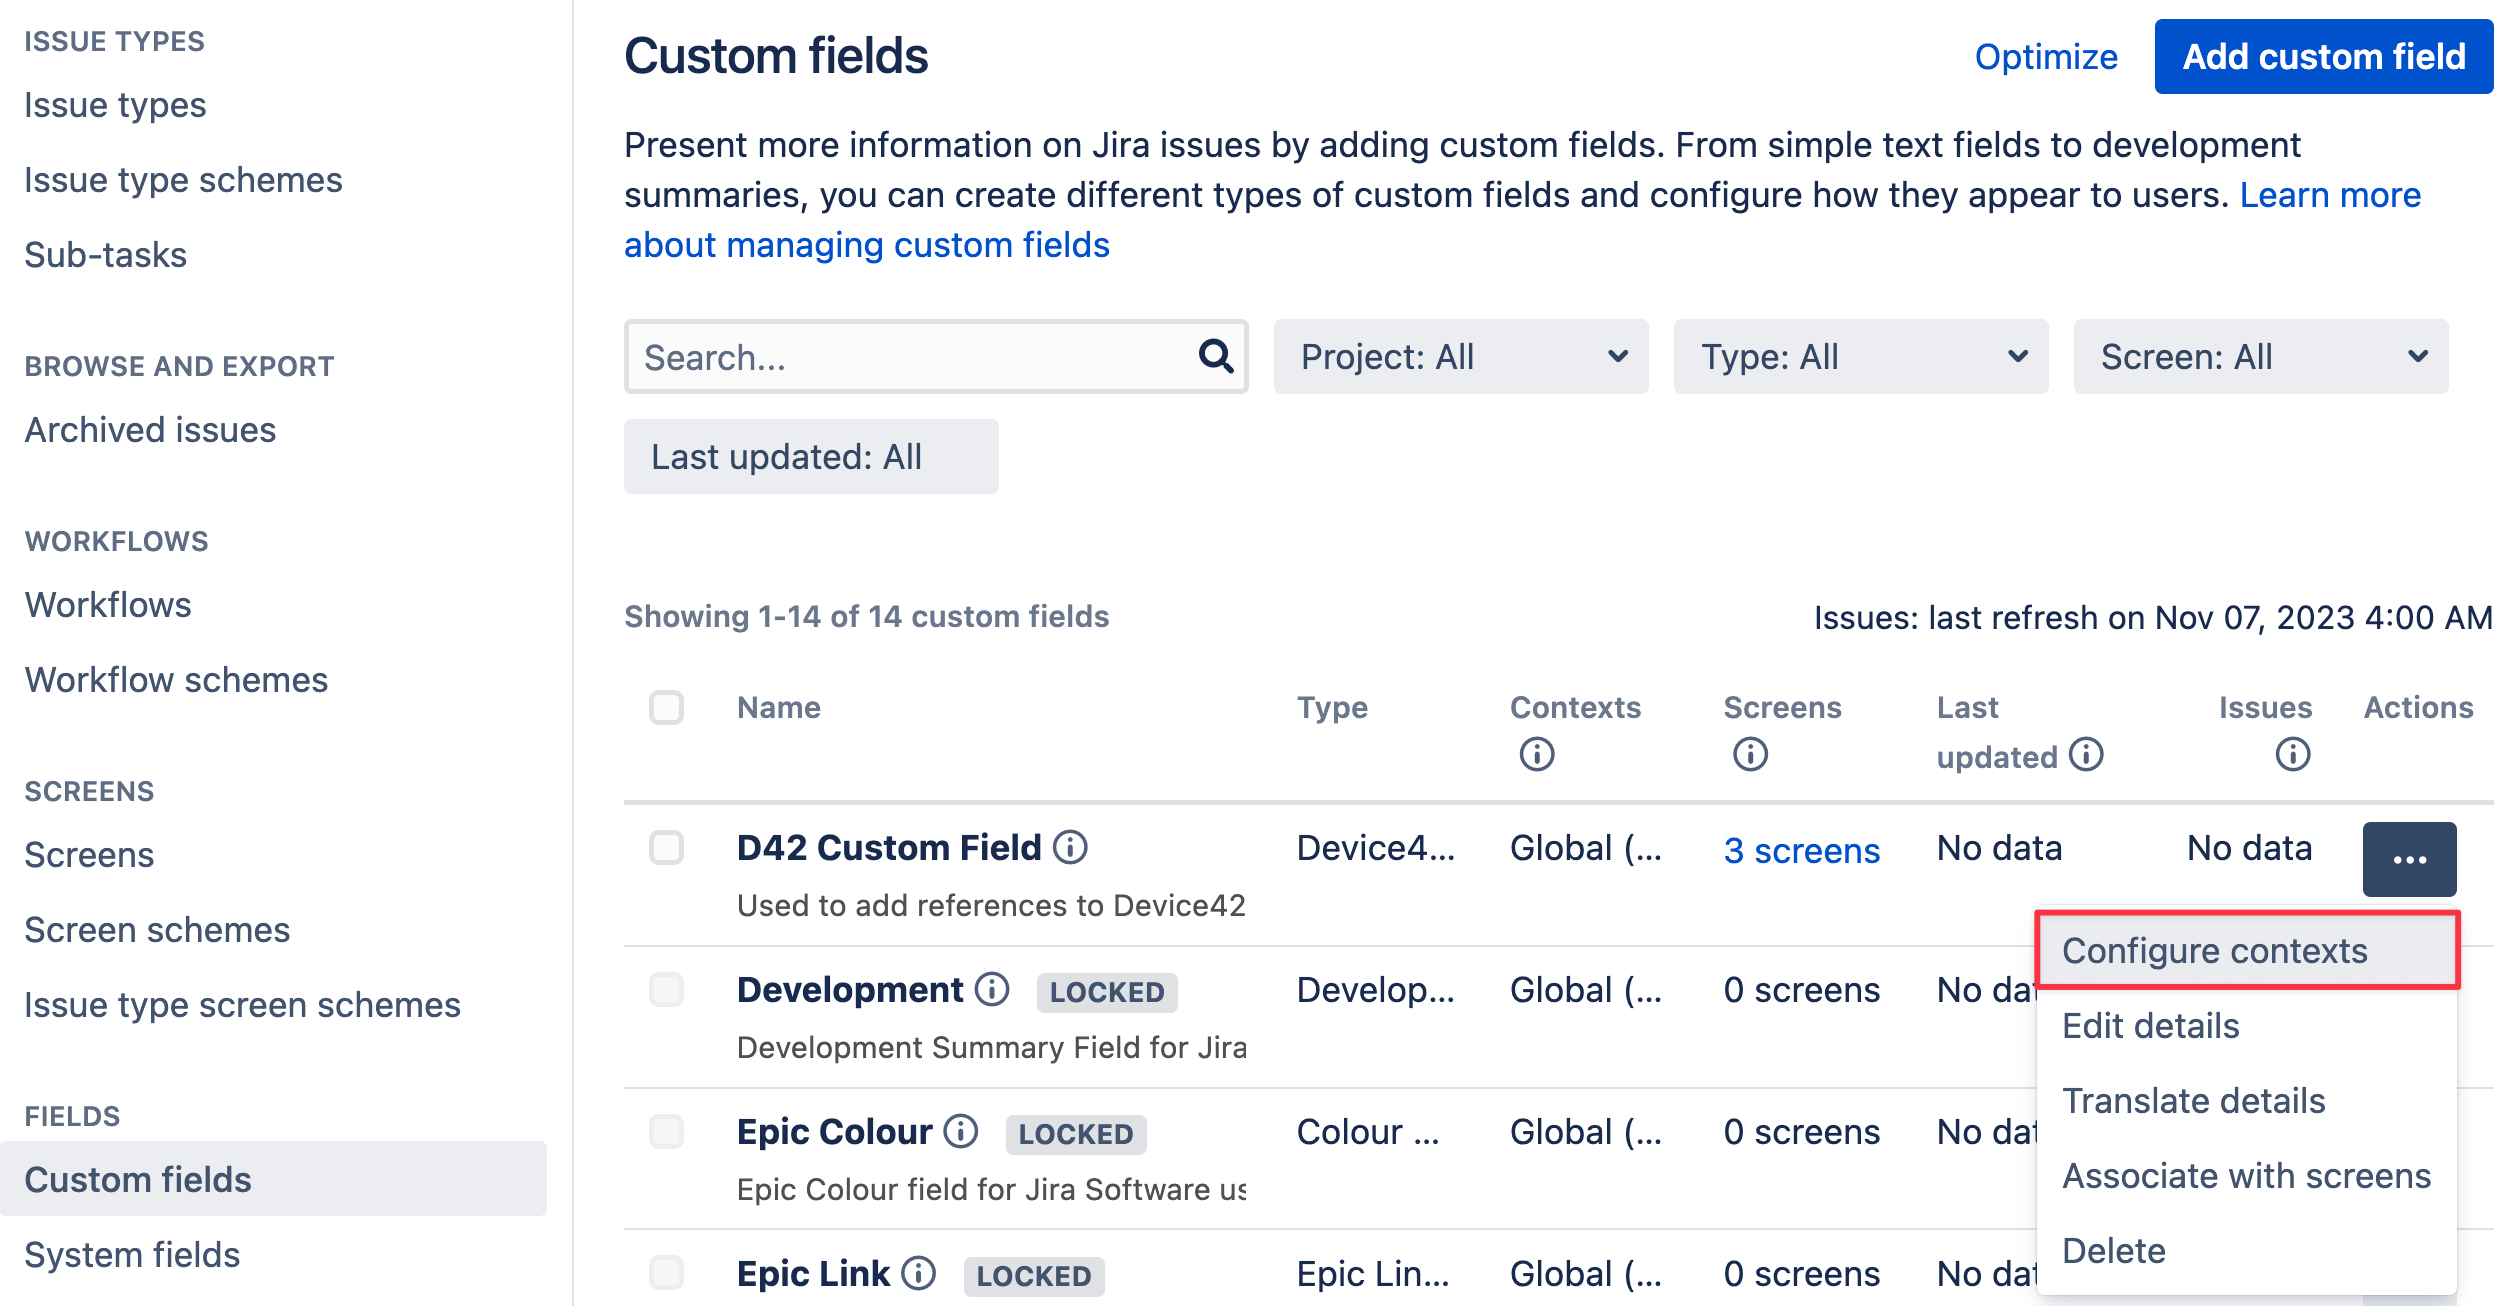
Your custom field is now created. If you want to edit the context or other variables of your custom field, click the ellipsis icon under the Actions column on the Custom fields main page. The app supports creating multiple Device42 custom fields on the same screen.
Custom Field Filters for Configuration Items
The Device42-Jira app lets you define the exact Configuration Items (CIs) that are available for selection under the Device42 Custom Field dropdown menu. The Device42 Custom Field is added to Jira issues to link relevant CIs to individual issues. Note that Jira issues can only be created within a Jira project.
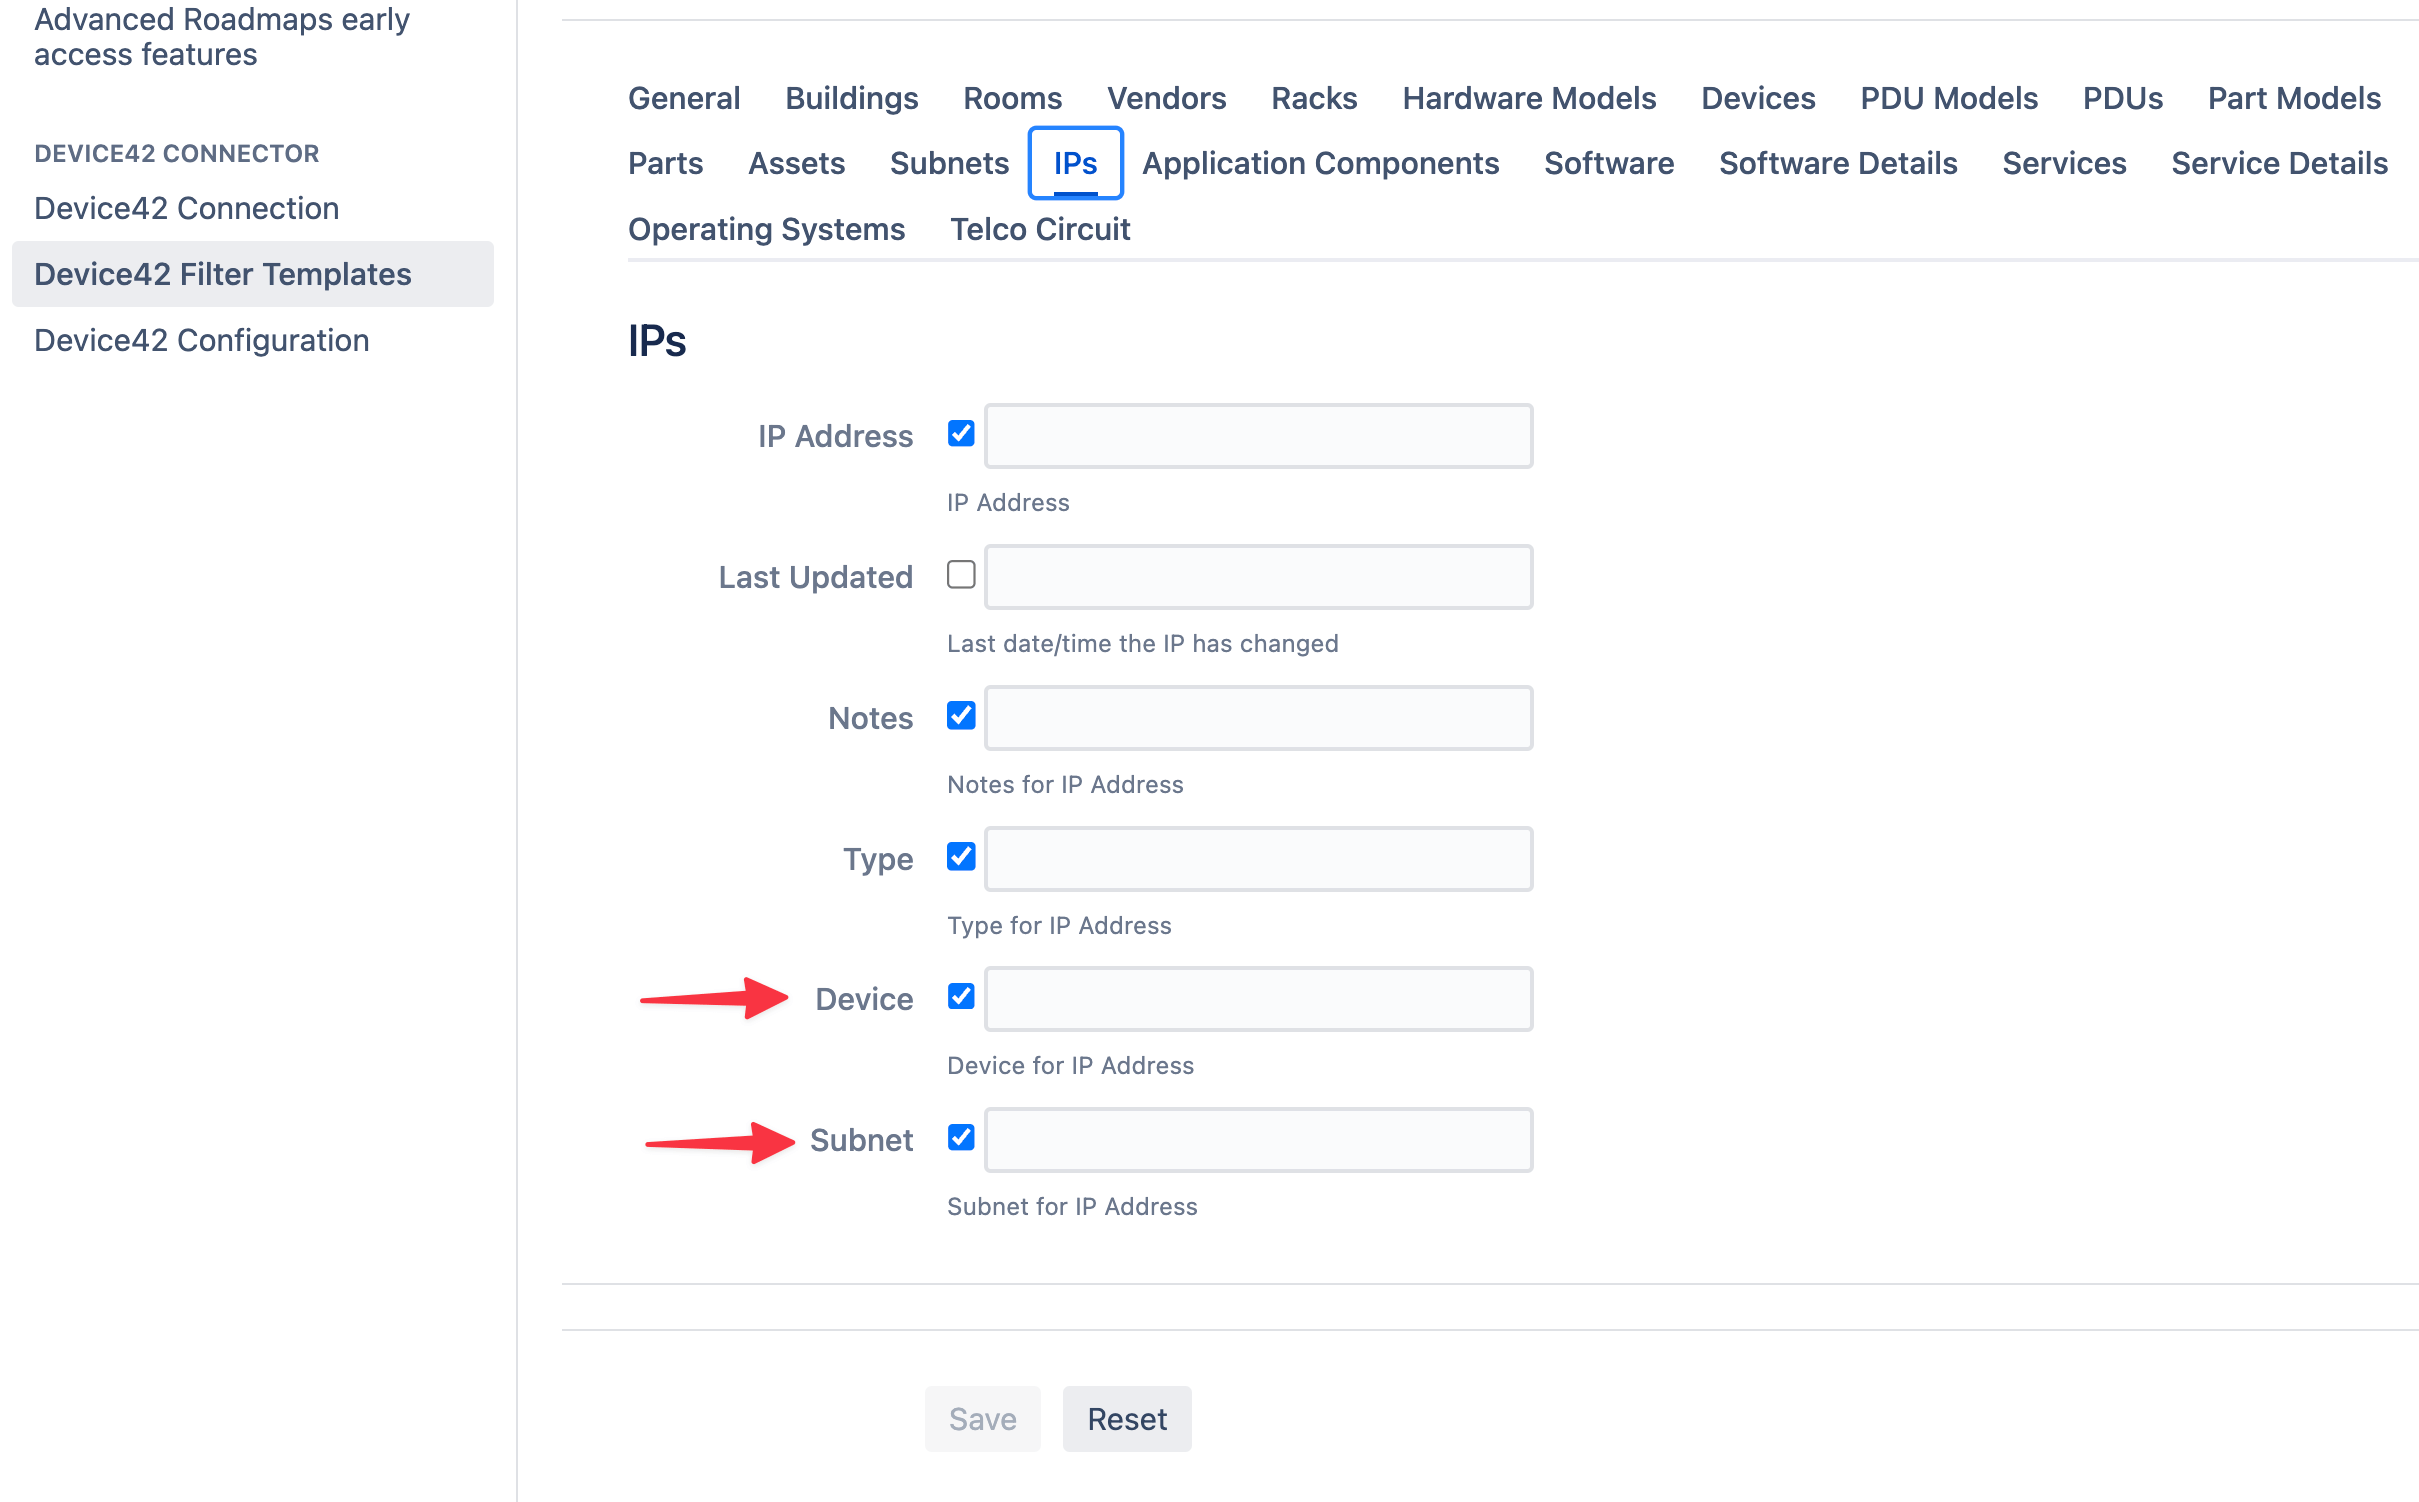
Also, you can apply filters to CIs. Each CI has several parameters. For example, the Device and Subnet parameters are two parameters of the IP configuration item. Add values to these parameters to limit the included records to only those matching the values. You can use Query Language to add multiple values and use conditionals (like AND and OR) to filter CI parameters.
Defining filters and having multiple filters for different CIs can become complex and inconvenient to recreate. This is solved through the use of templates. Users with administrator access can create, edit, and reset (delete) filter templates. Created filter templates are used to quickly apply a set of filters to new projects or add filters after they've been reset.
There's a default filter template applied to all projects. You can make changes to the default filter. Changes made to it will apply to all projects without their own customized filters.
The Default Filter Template: General Settings
This section is about editing the default filter template. The interface for configuring the default filter and project-specific filters look the same.*(confirm?). See the Project Filters section for details on locating the filter options of a project.
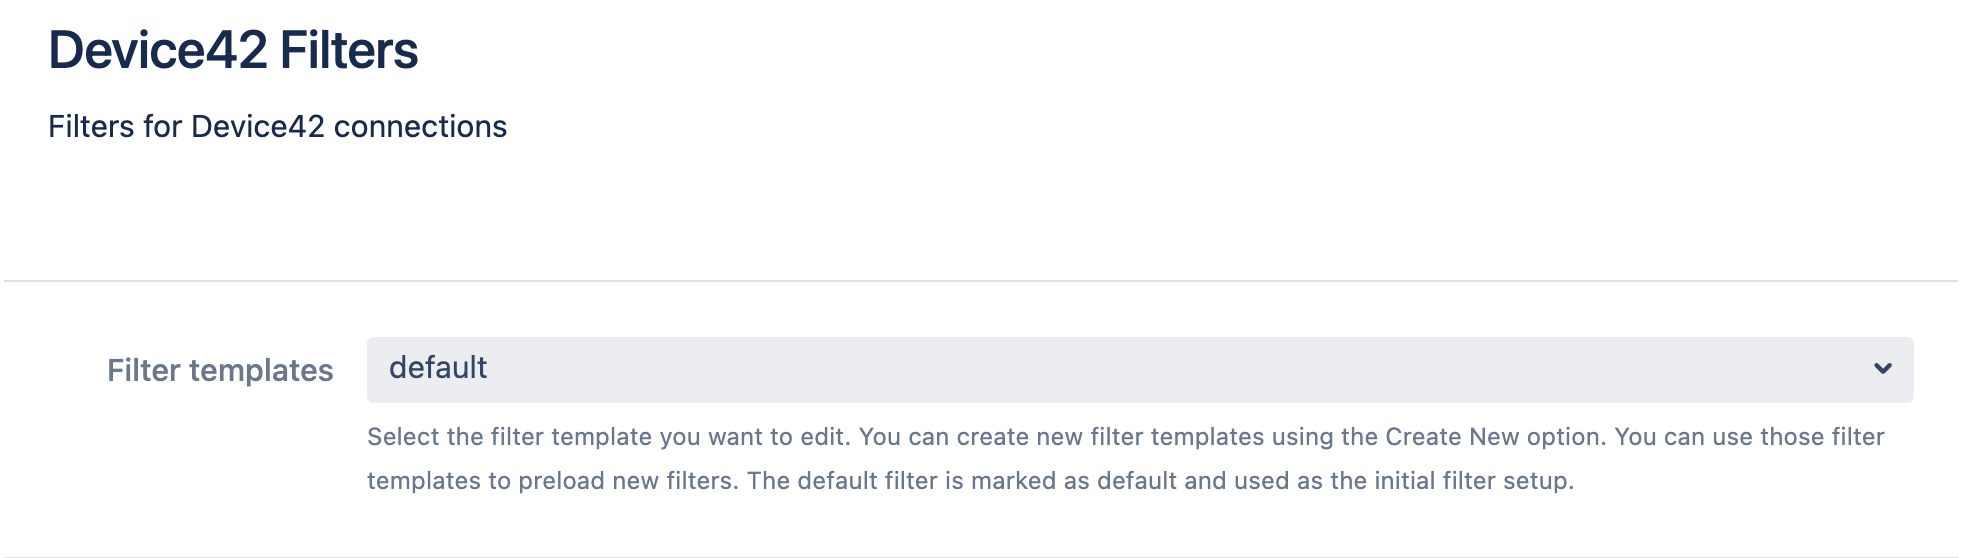
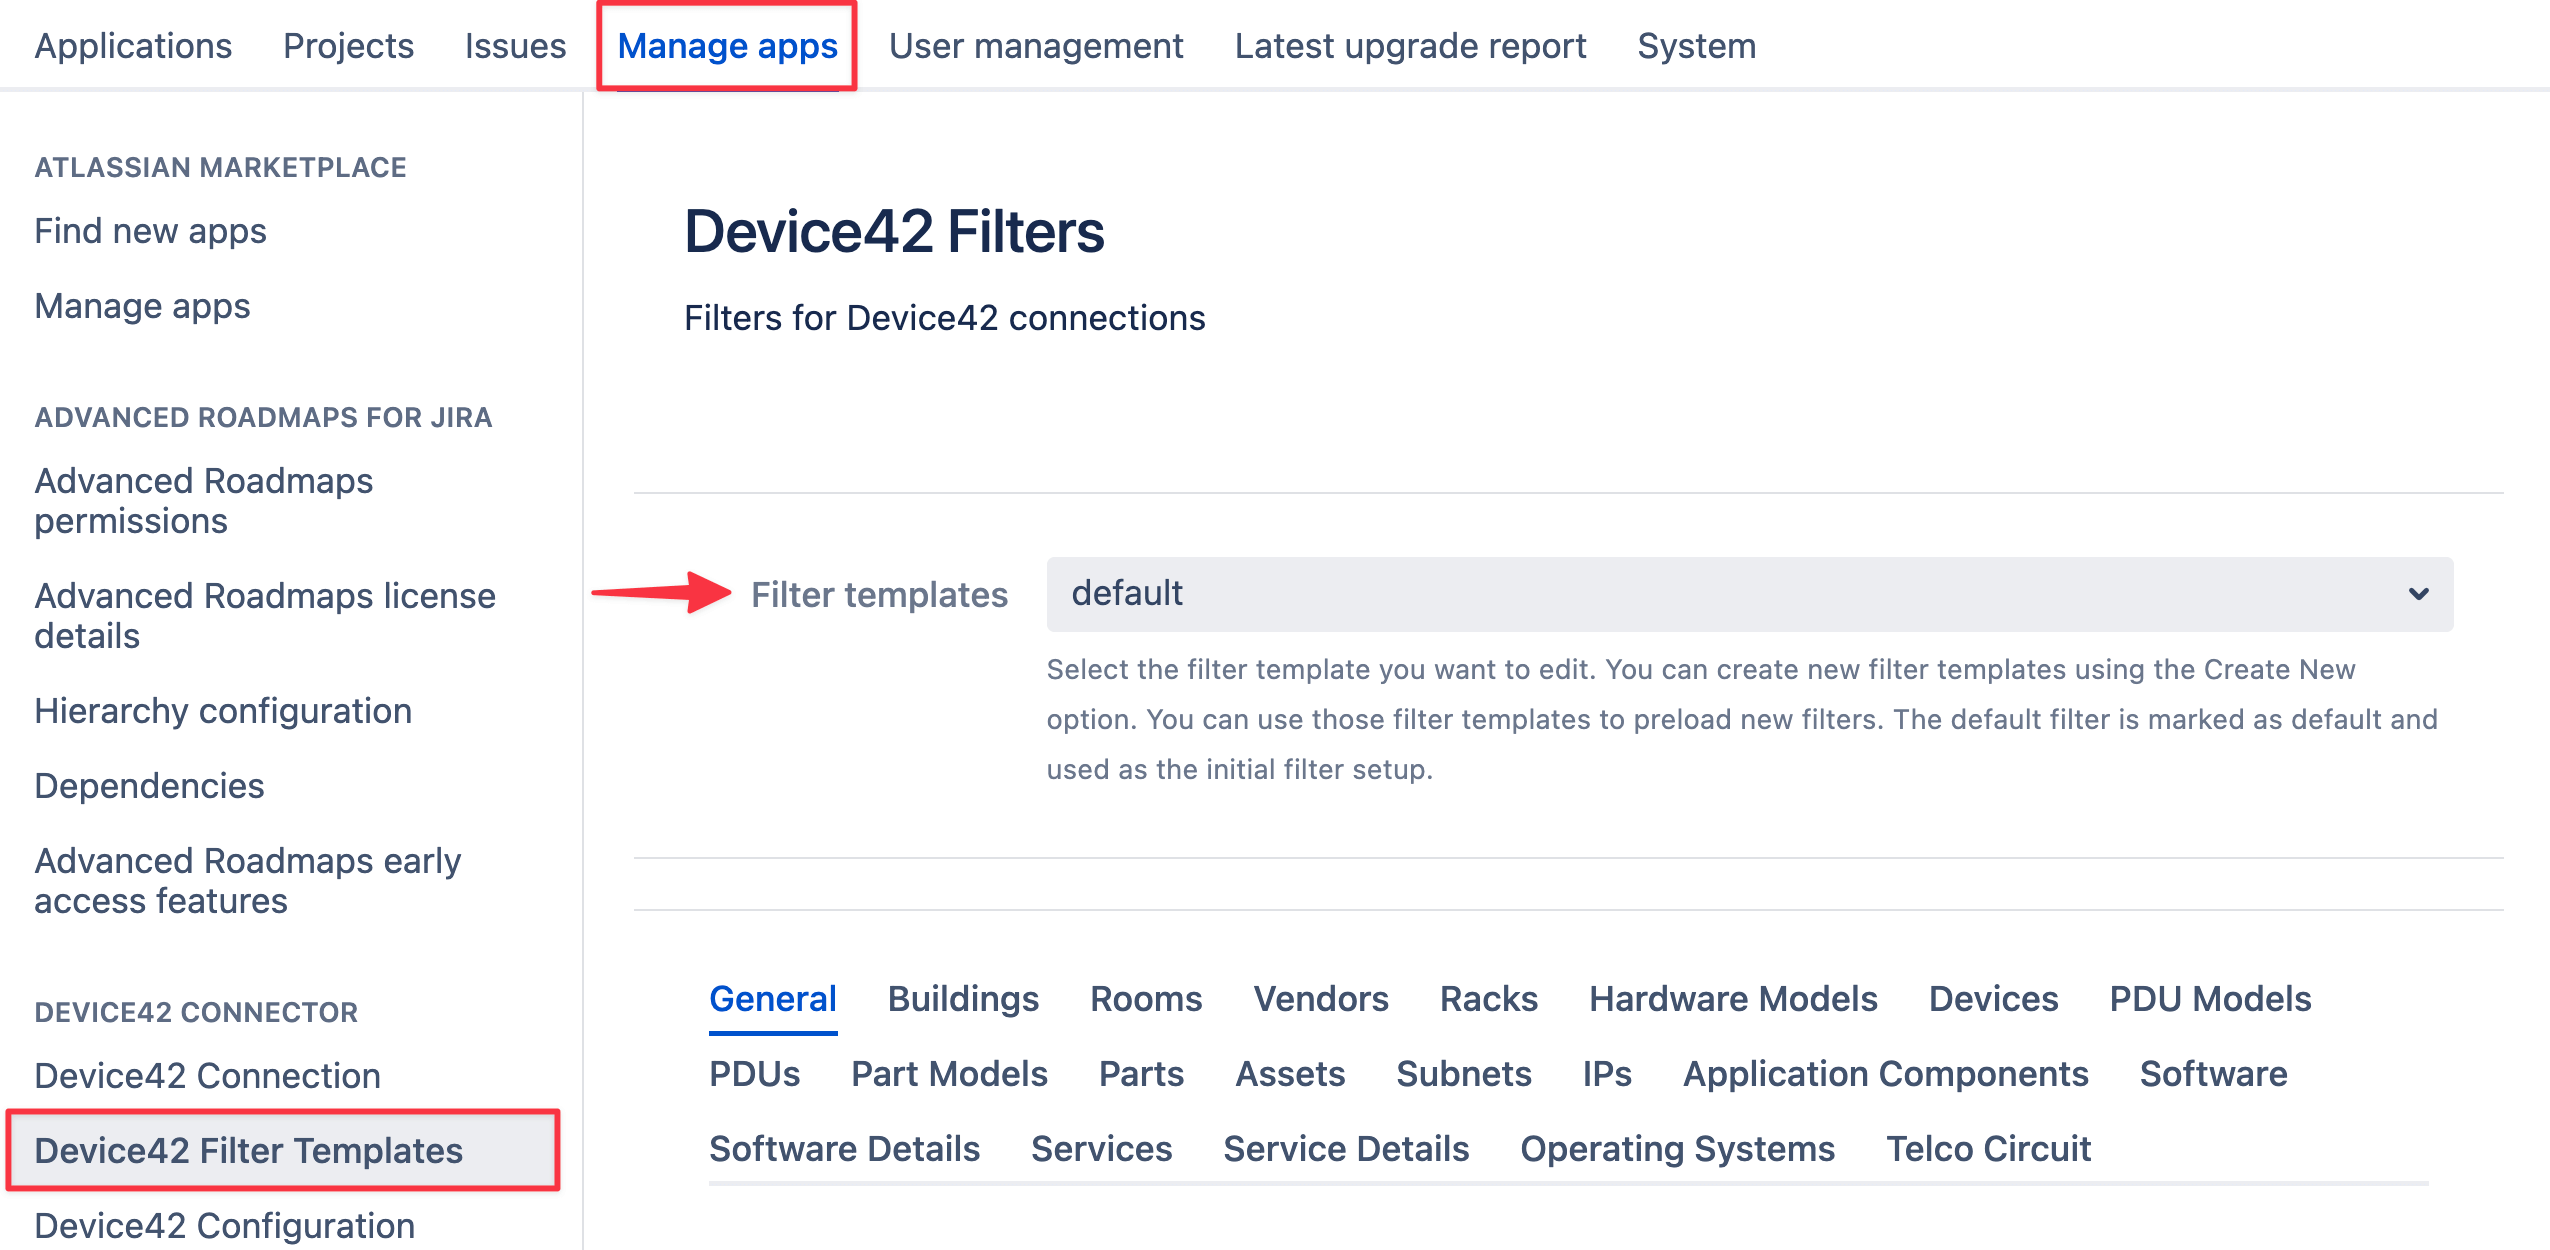
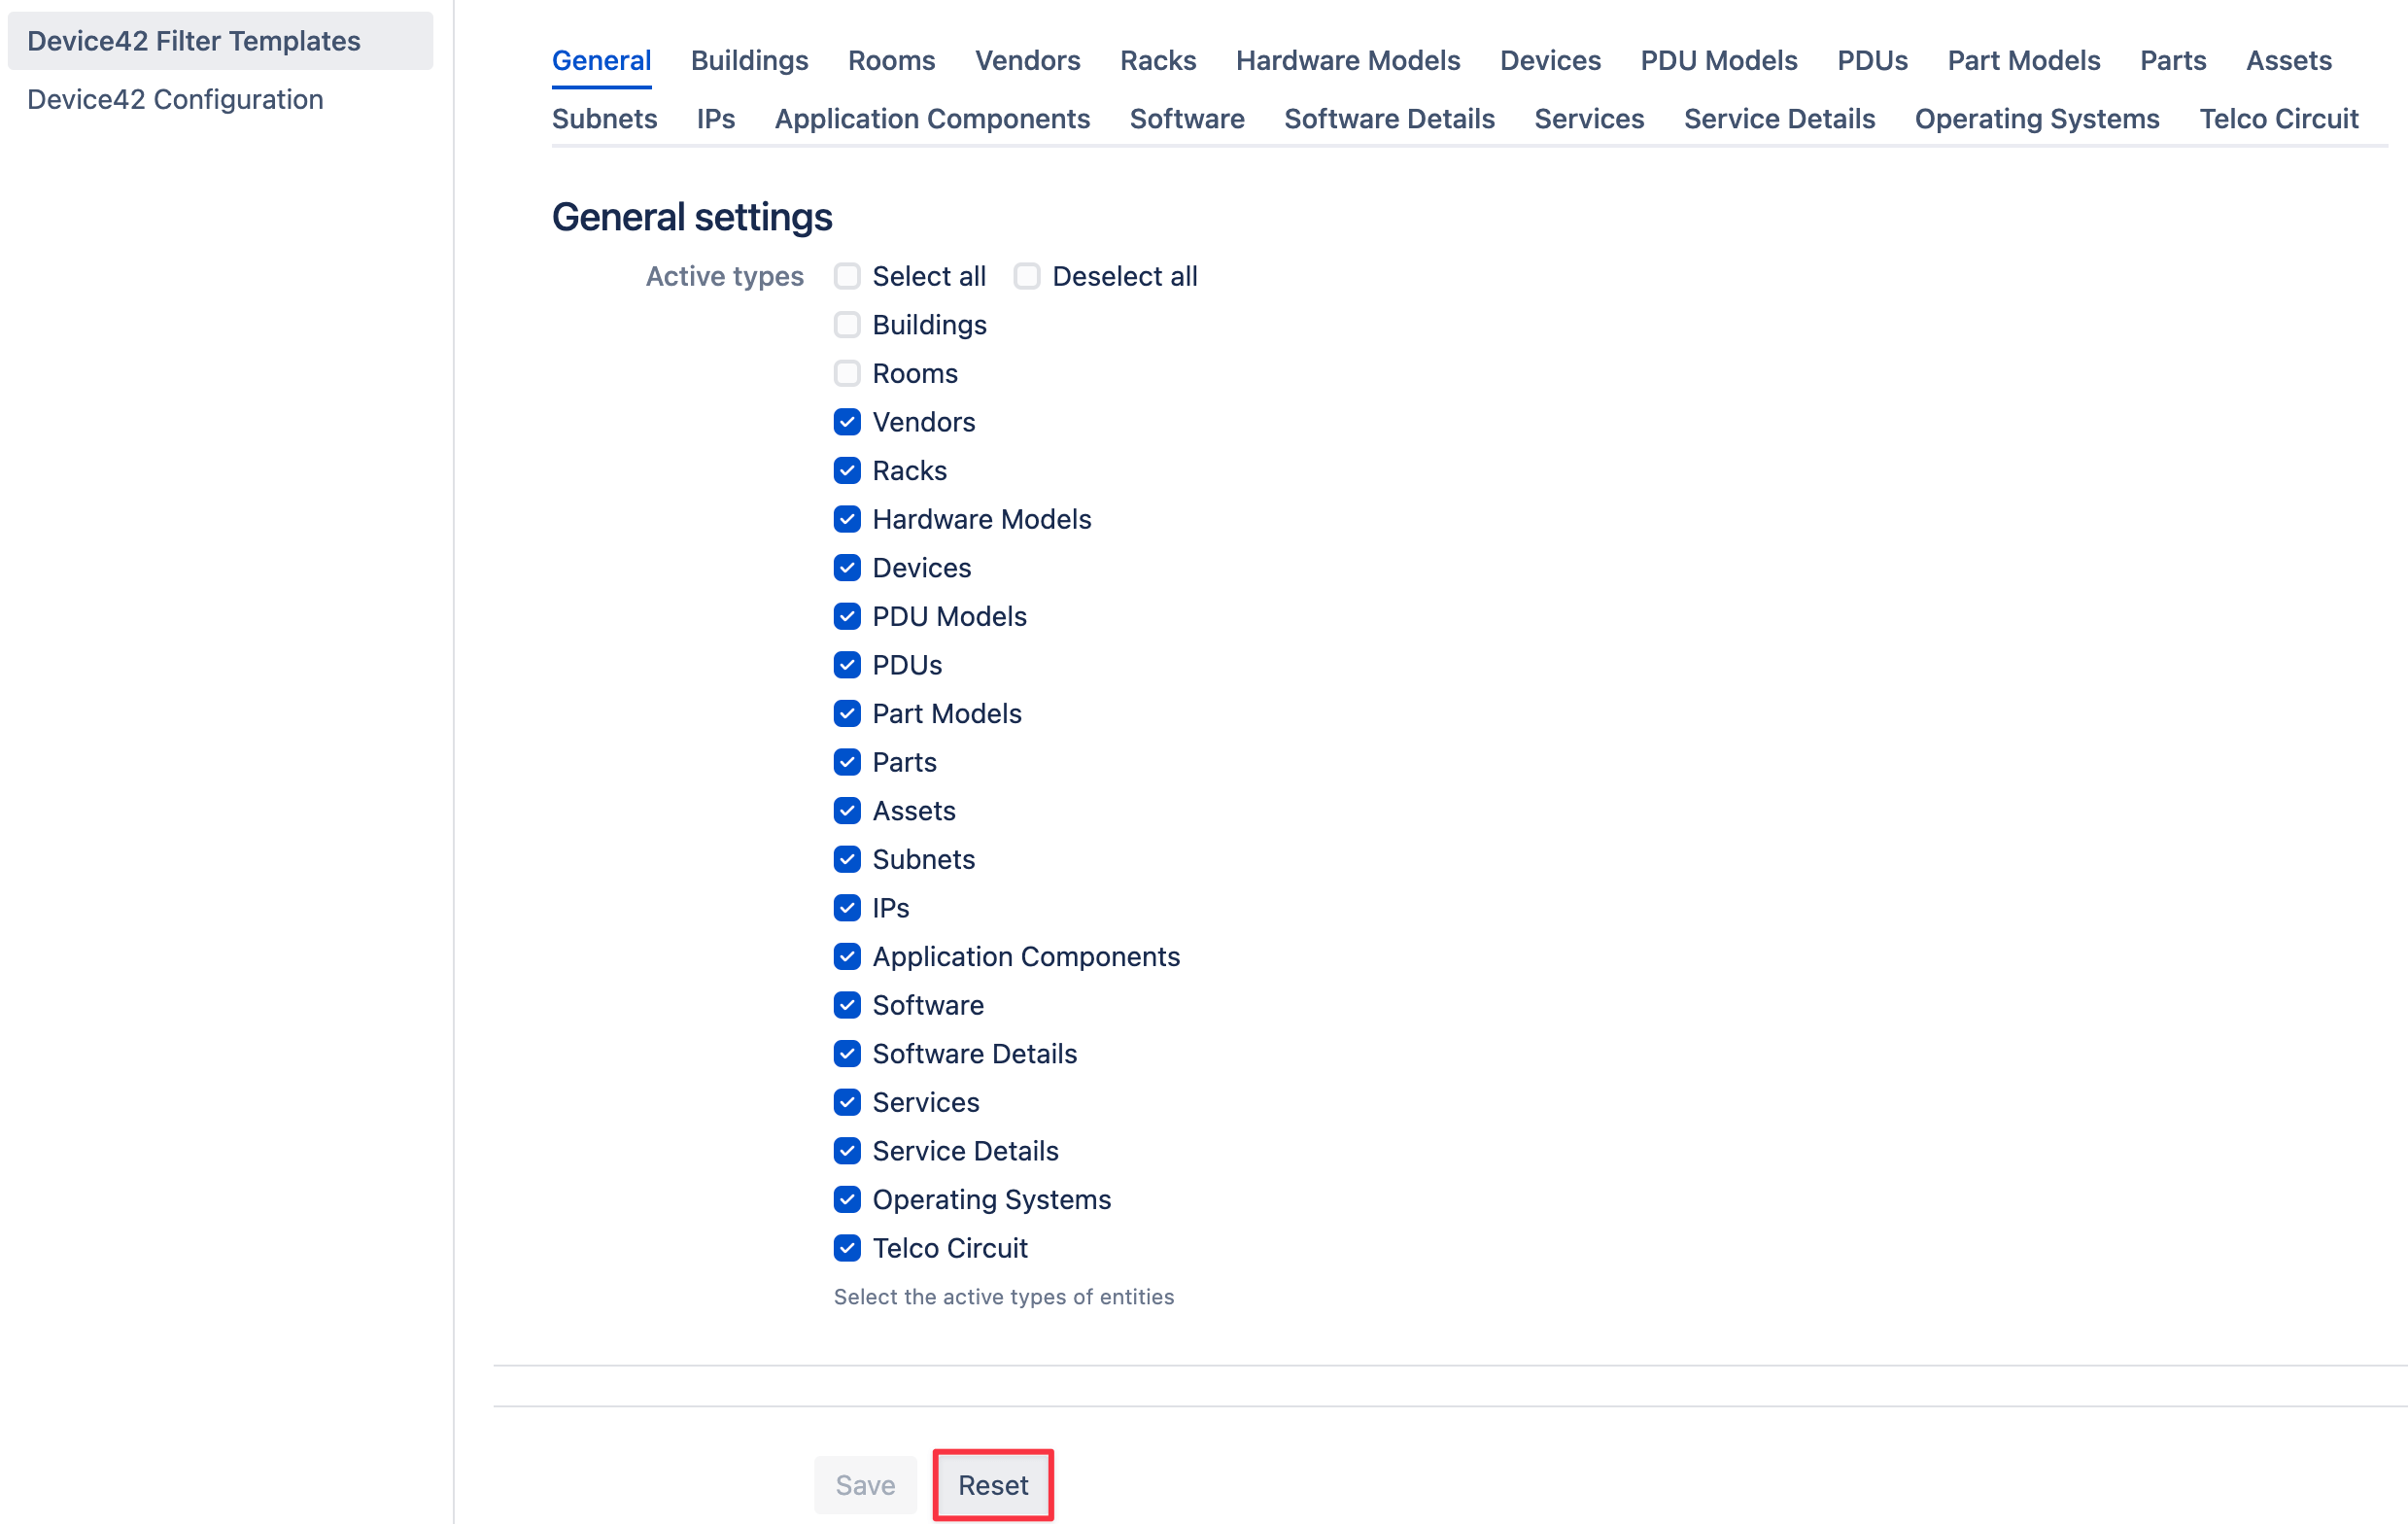
- From the main Administration console, click on the Manage apps tab and then Device42 Filter Templates on the left panel. The Filter templates field will have the default template selected.
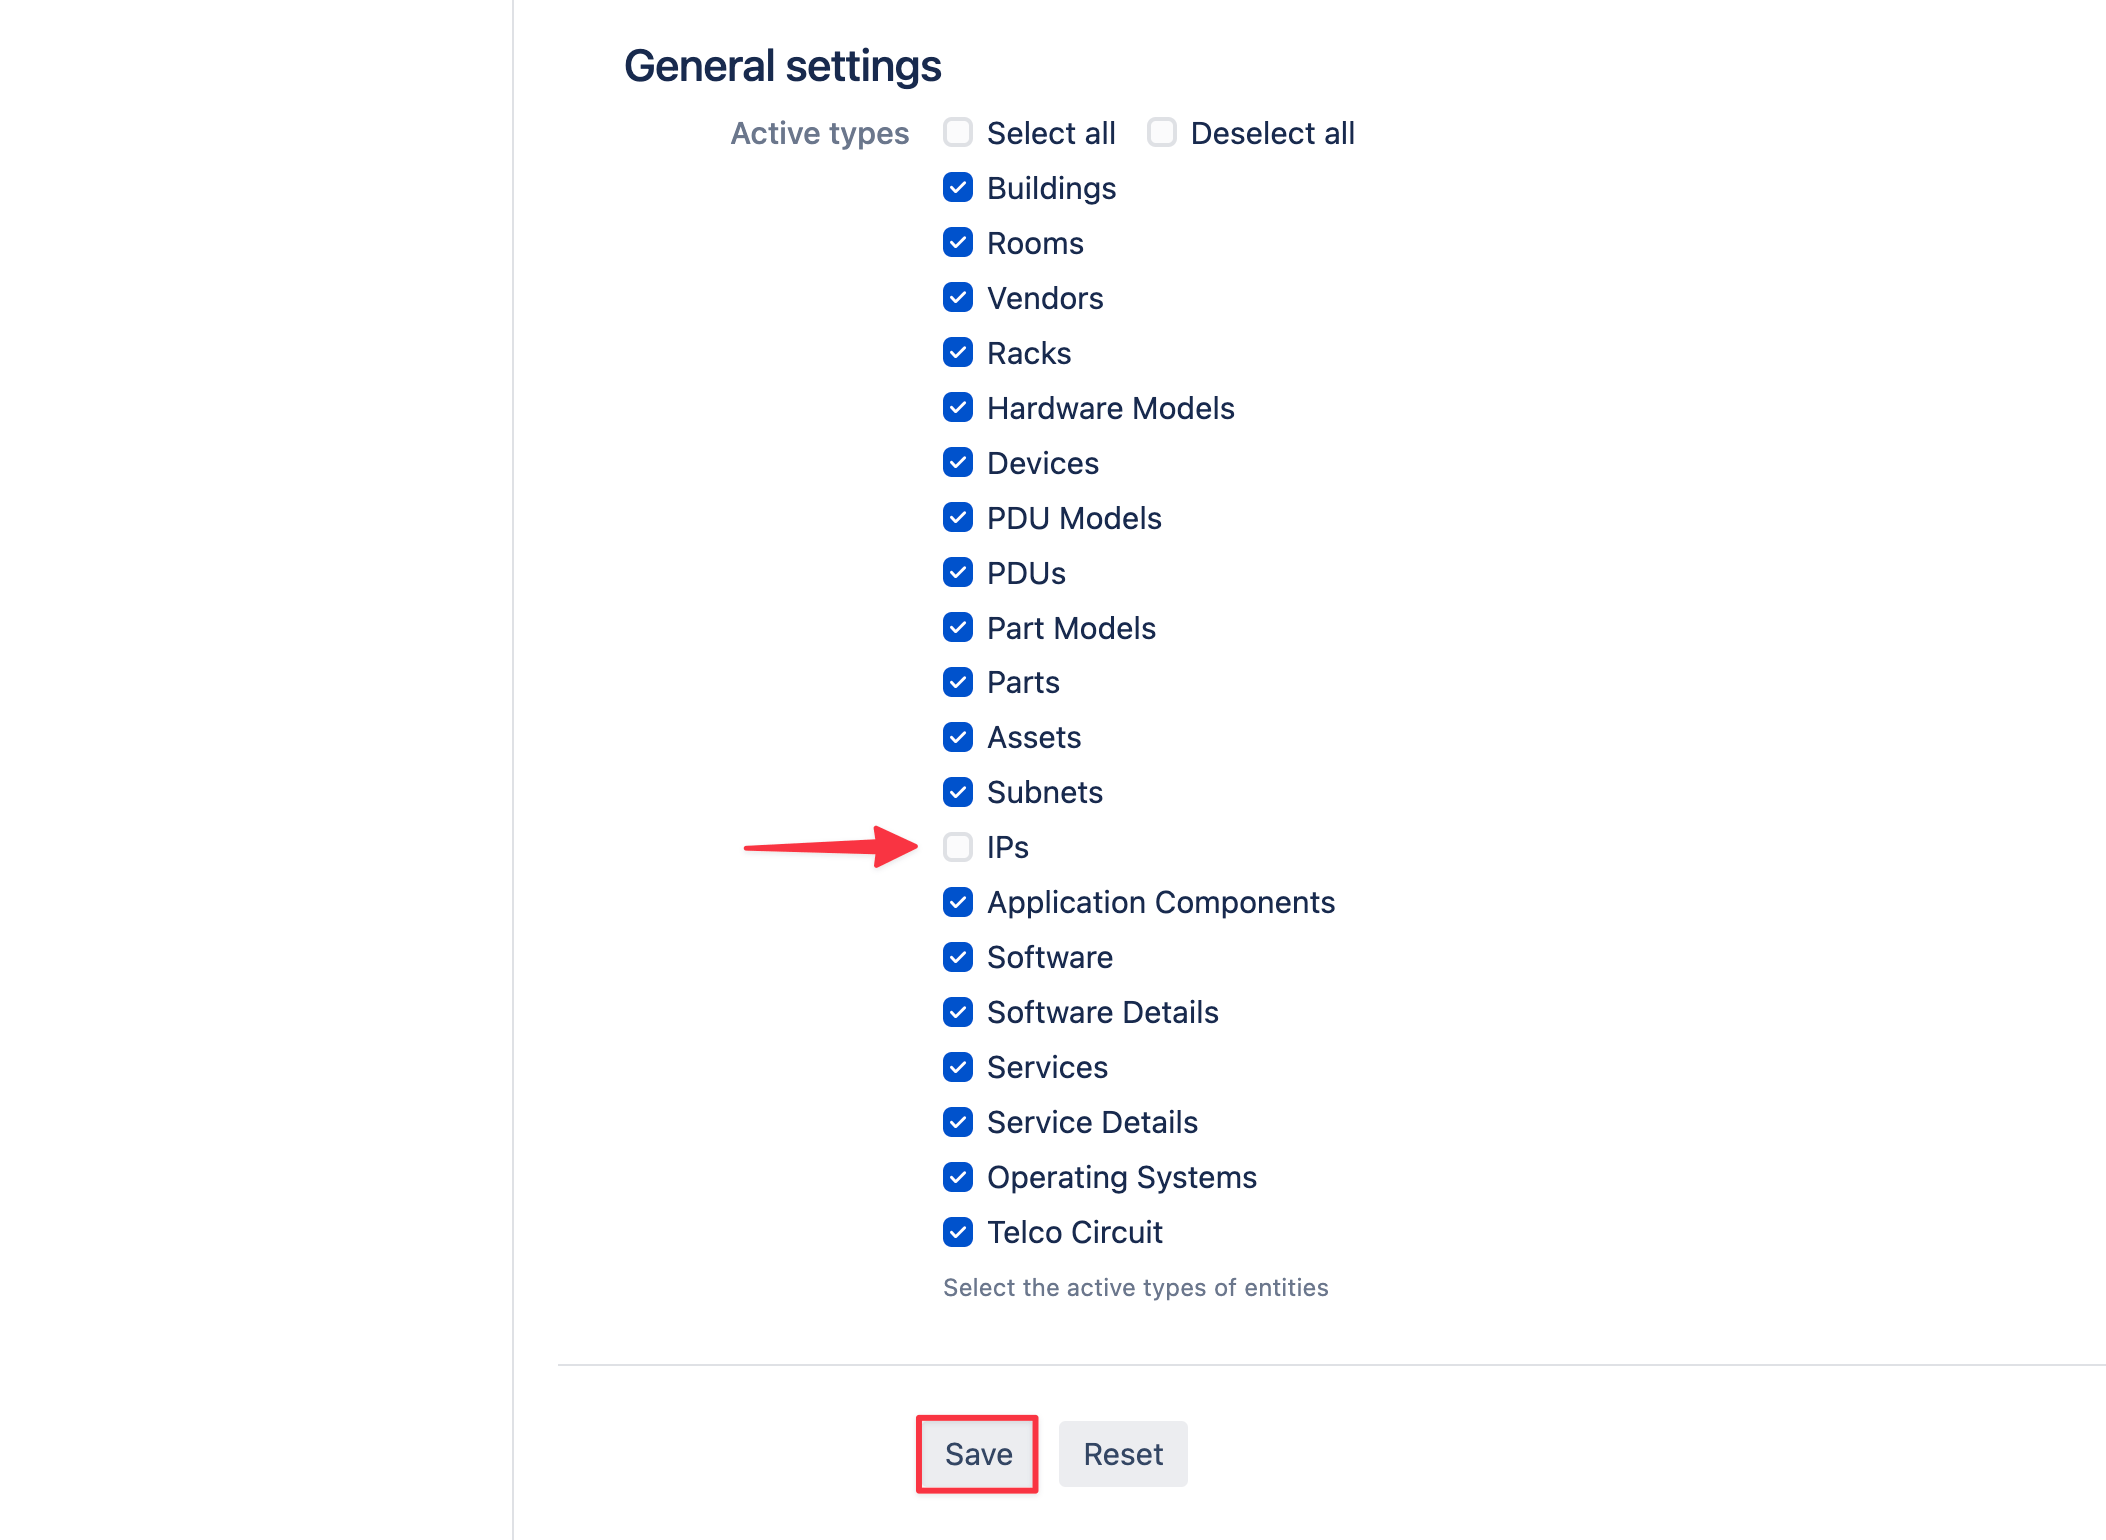
- Under the General settings heading, select the configuration items you want to be available for selection within the Device42 Custom Field. In this example, the IPs is unselected meaning that it won't be listed as an option in the Device42 Custom Field. Note that at least one option should be selected.
- Click on the Save button.
The Default Filter Template: CI Filters
Individual CI types have parameters - with several being unique to the type - that you can add filters to. Please note that changes made to the default filter will be applied all projects that don't have their own custom filter configuration.
-
From the main Administration console, click on the Manage apps tab and then Device42 Filter Templates on the left panel.
-
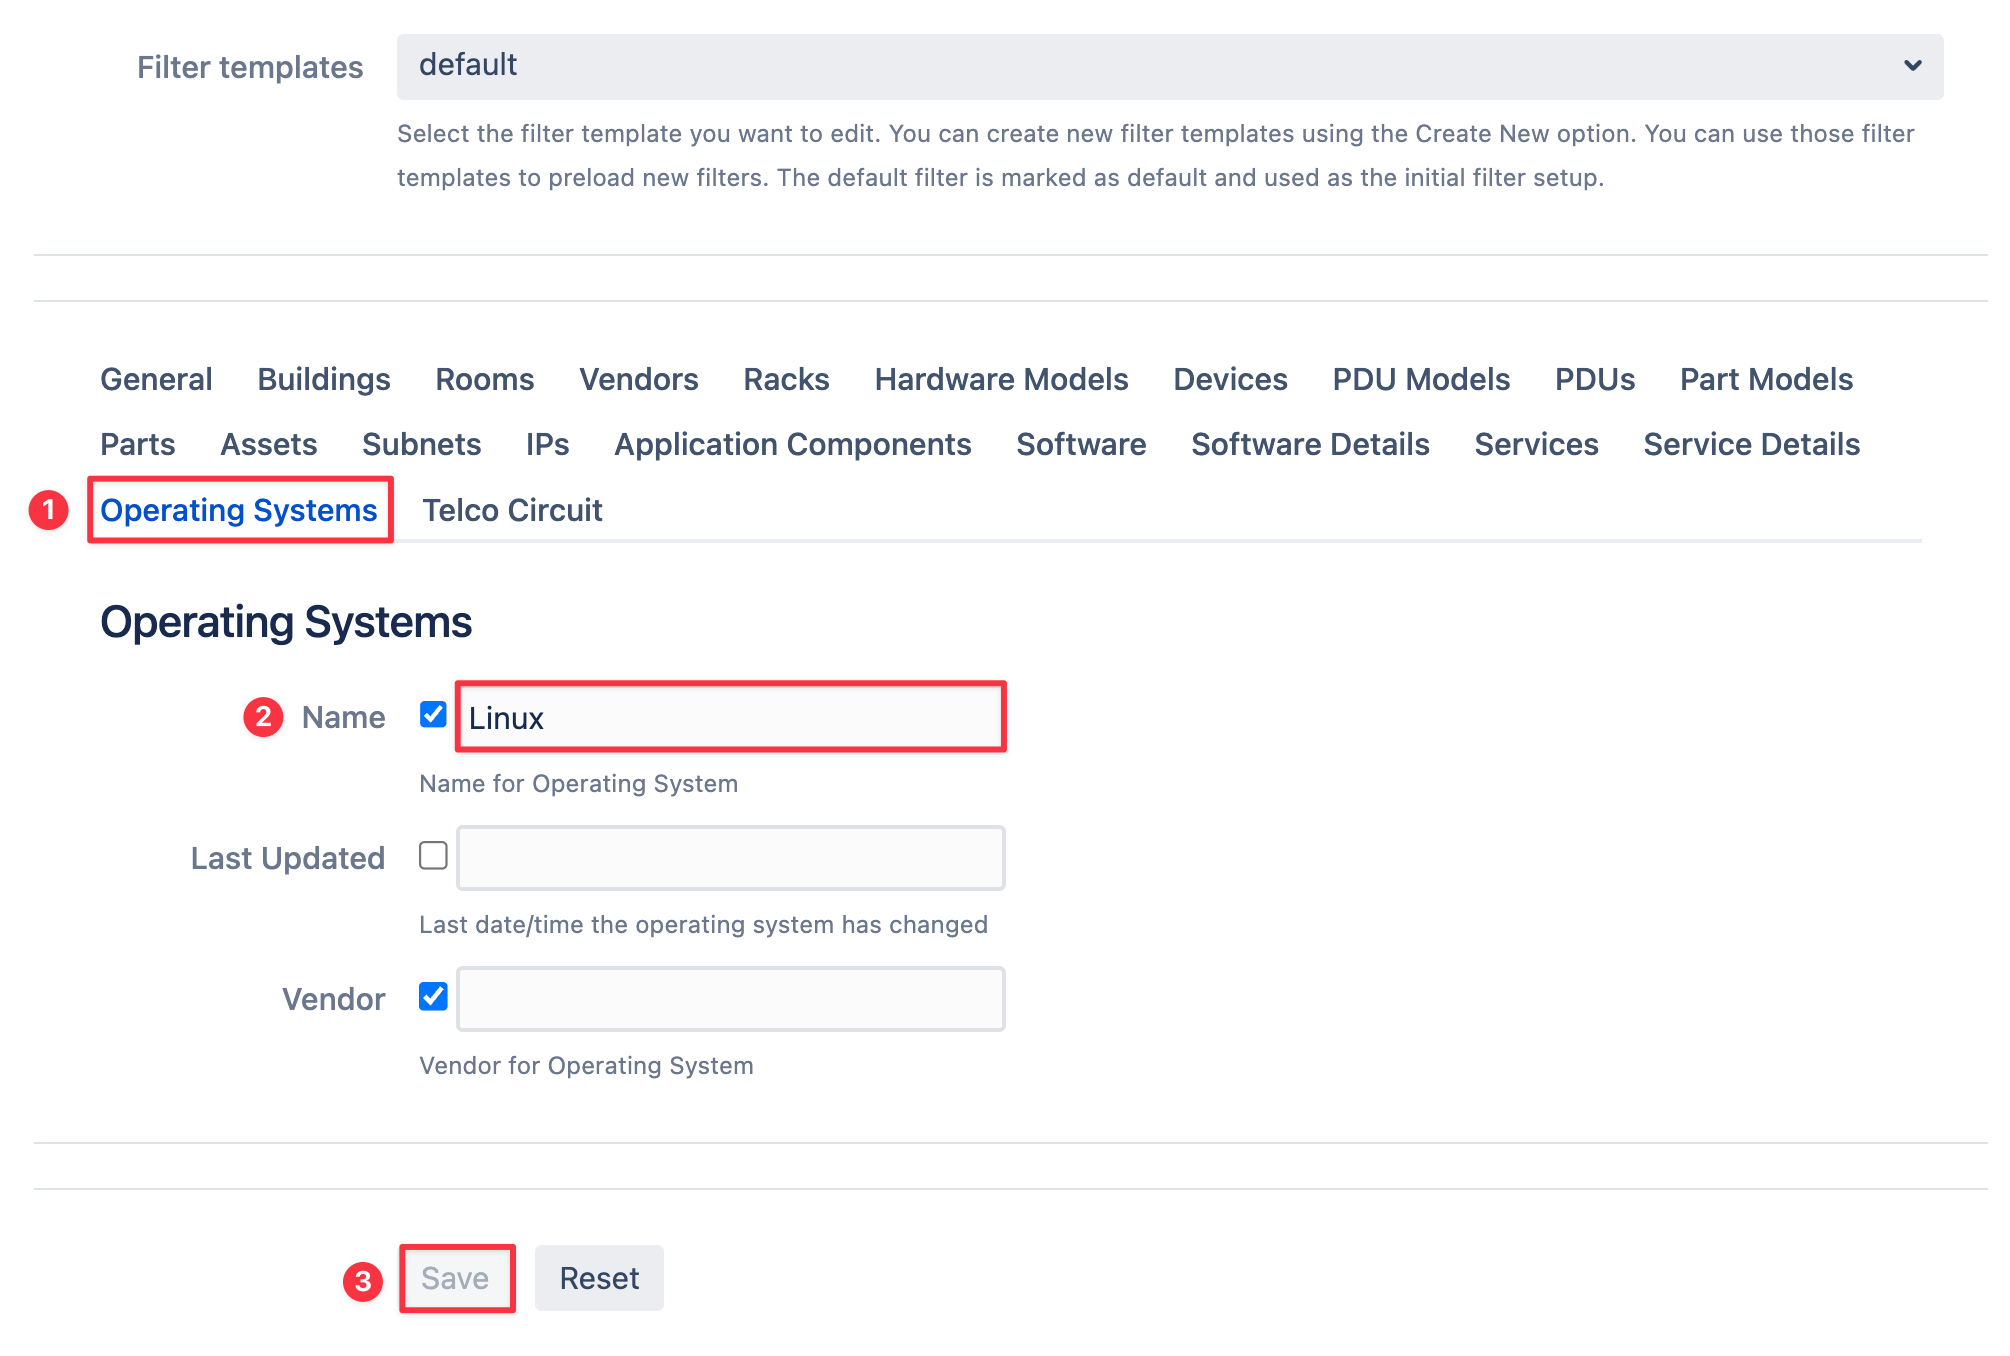
Click on a CI type from them the group of CIs listed. For example, Operating Systems.
-
Enable specific parameters by clicking on the checkbox next to the parameter name.
-
Type in the value that you want your list of CIs to contain. For example, only list operating systems that have Linux in the name.
You can create unique and highly-specific filters include the exact CIs that you want using logical conditionals. Device42 uses general Query Language syntax to define these conditionals. See the Using Query Language to Filter CI Parameters section below.
-
Click on the Save button. When you scroll up you'll see a notification indicating whether the filter has been successfully saved.

-
Click on the Reset button to revert to the default filter template settings.
Use Query Language to Filter CI Parameters
Use the following Query Language rules, ranging from exact value matches to complex logical conditions, to filter configuration items. Note that the filter search is NOT case sensitive.
-
Filter the CI selection based on a single value. Example:
test. Only the CIs with the valuetestwould be displayed. -
Use AND logic to filter CIs that match all the values separated by a comma
,or ampersand&. Example:hello, world. CIs with the valuehello worldwould be displayed, but CIs with only the wordhelloor only the wordworldwill be skipped. -
Use OR logic to include CIs that match at least one of the given values separated by a vertical bar
|. Example:hello | world. The CIs that contain the wordhelloor the wordworldinside the specified parameter would be displayed. The OR is not exclusive, so the CIs with the parameterHello worldwould be displayed, too. -
You can change the sequence of operations using the parenthesis
(). The CIs would be filtered according to order and logic of the operation. Example:(1 | 2), (3, (4 | 5)). CIs will pass this filter if it meets all conditions:- it contains 1 or 2 inside the specified parameter AND
- it contains 3 inside the parameter AND
- it contains 4 OR 5 in the specified parameter.
Create Filter Template
Create filter templates to use as preset settings for the the Device42 Custom Field. Note that default filter templates and project filter templates are the same, apart from the custom field selection option.
-
Log in with Jira administrator access.
-
From the Jira administration console, click on the Manage apps tab and from the panel to left select Device42 Filter Templates.
-
Click on the Filter templates dropdown menu and select Create New.... Enter a name for the new filter template.

-
Add your desired filters. You can make changes to the list of CIs under the General settings option and to CI types.
-
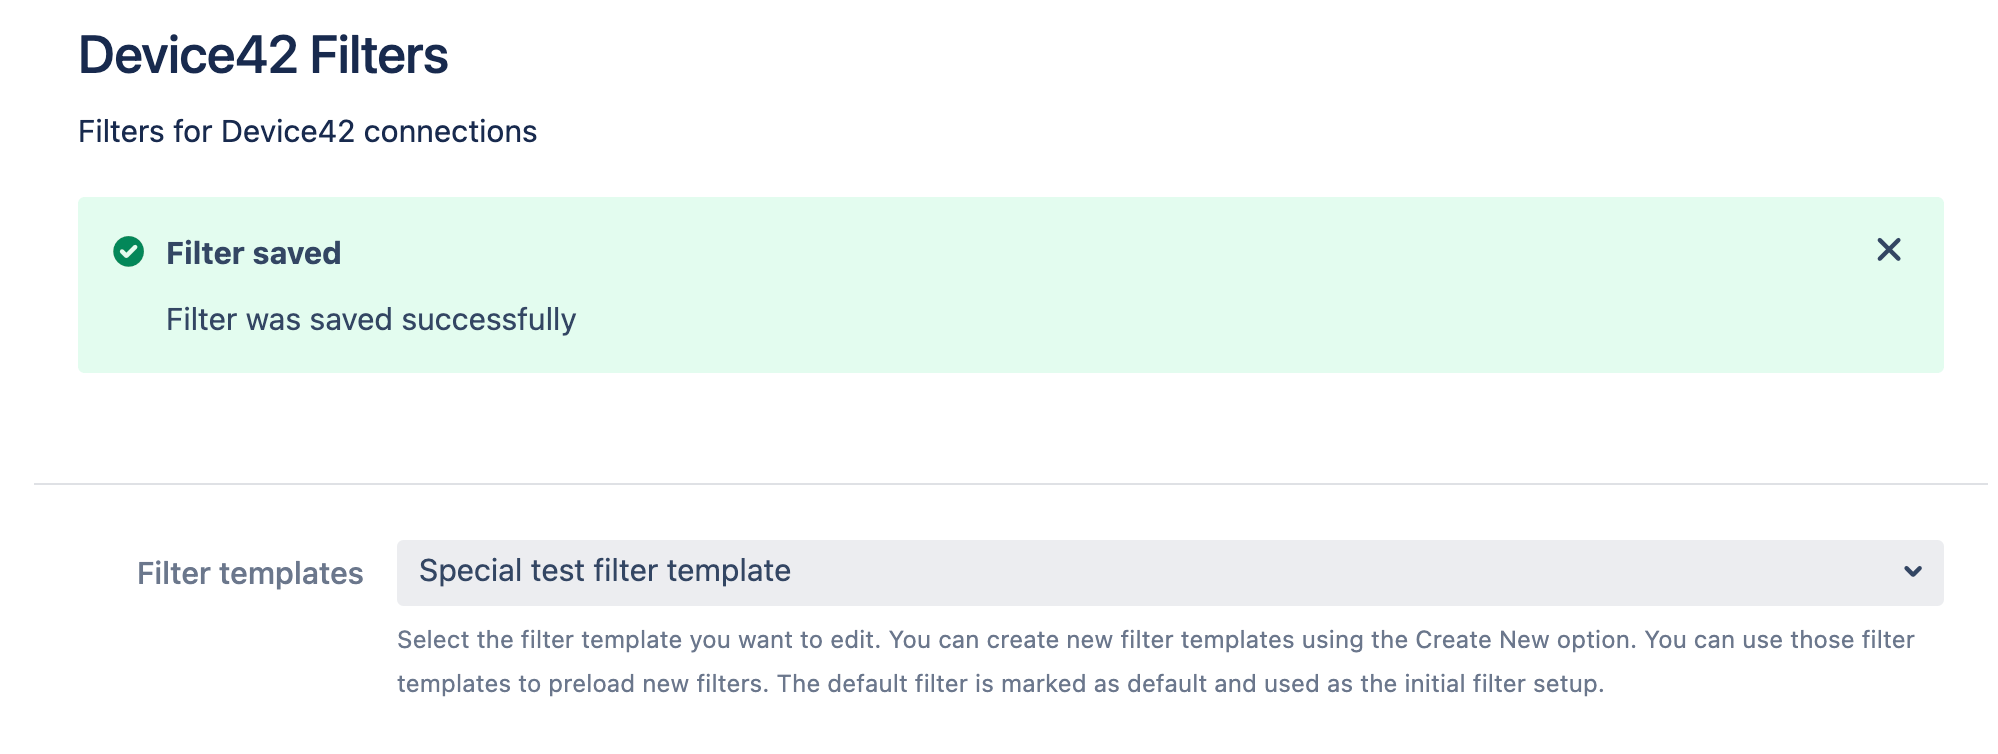
Click Save button to save the changes. The name of your new filter will now be visible in the Filter templates field.
-
You can delete the filter by clicking on the Reset button at the bottom of the interface.
Project Filters
-
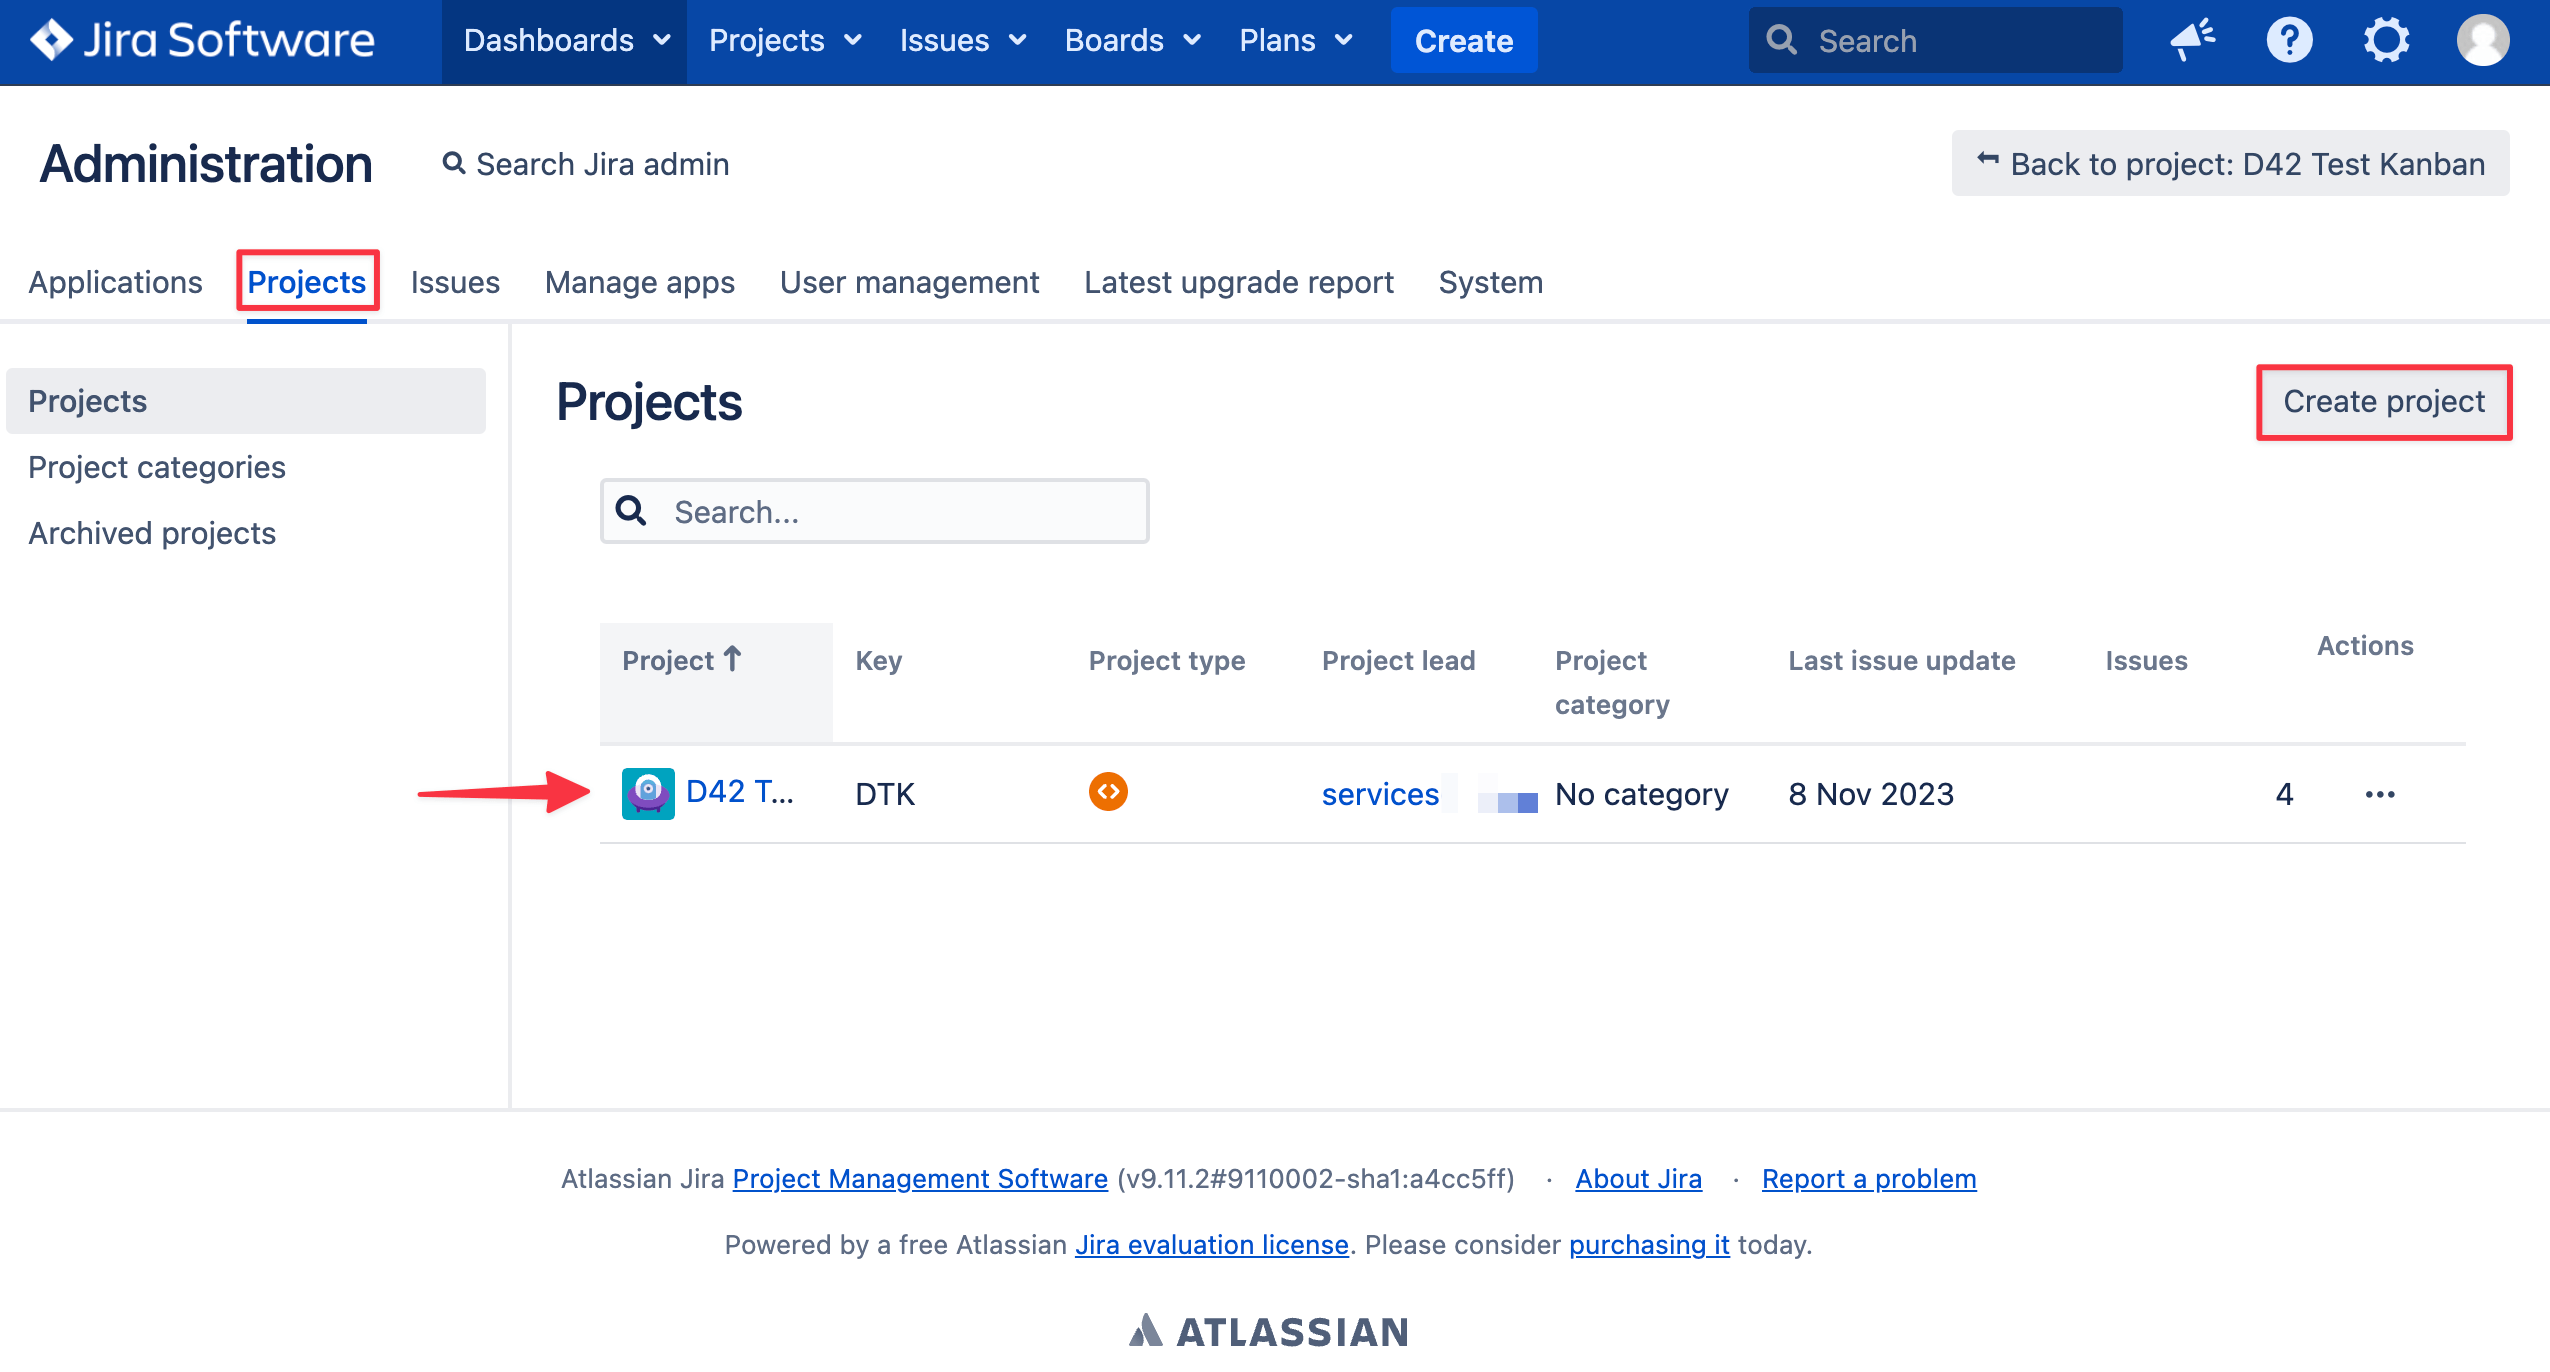
Click on the Projects tab on the administration interface. Select a project or click on the Create project button to start a new one.
-
Scroll down and click on the Device42 Filters option.
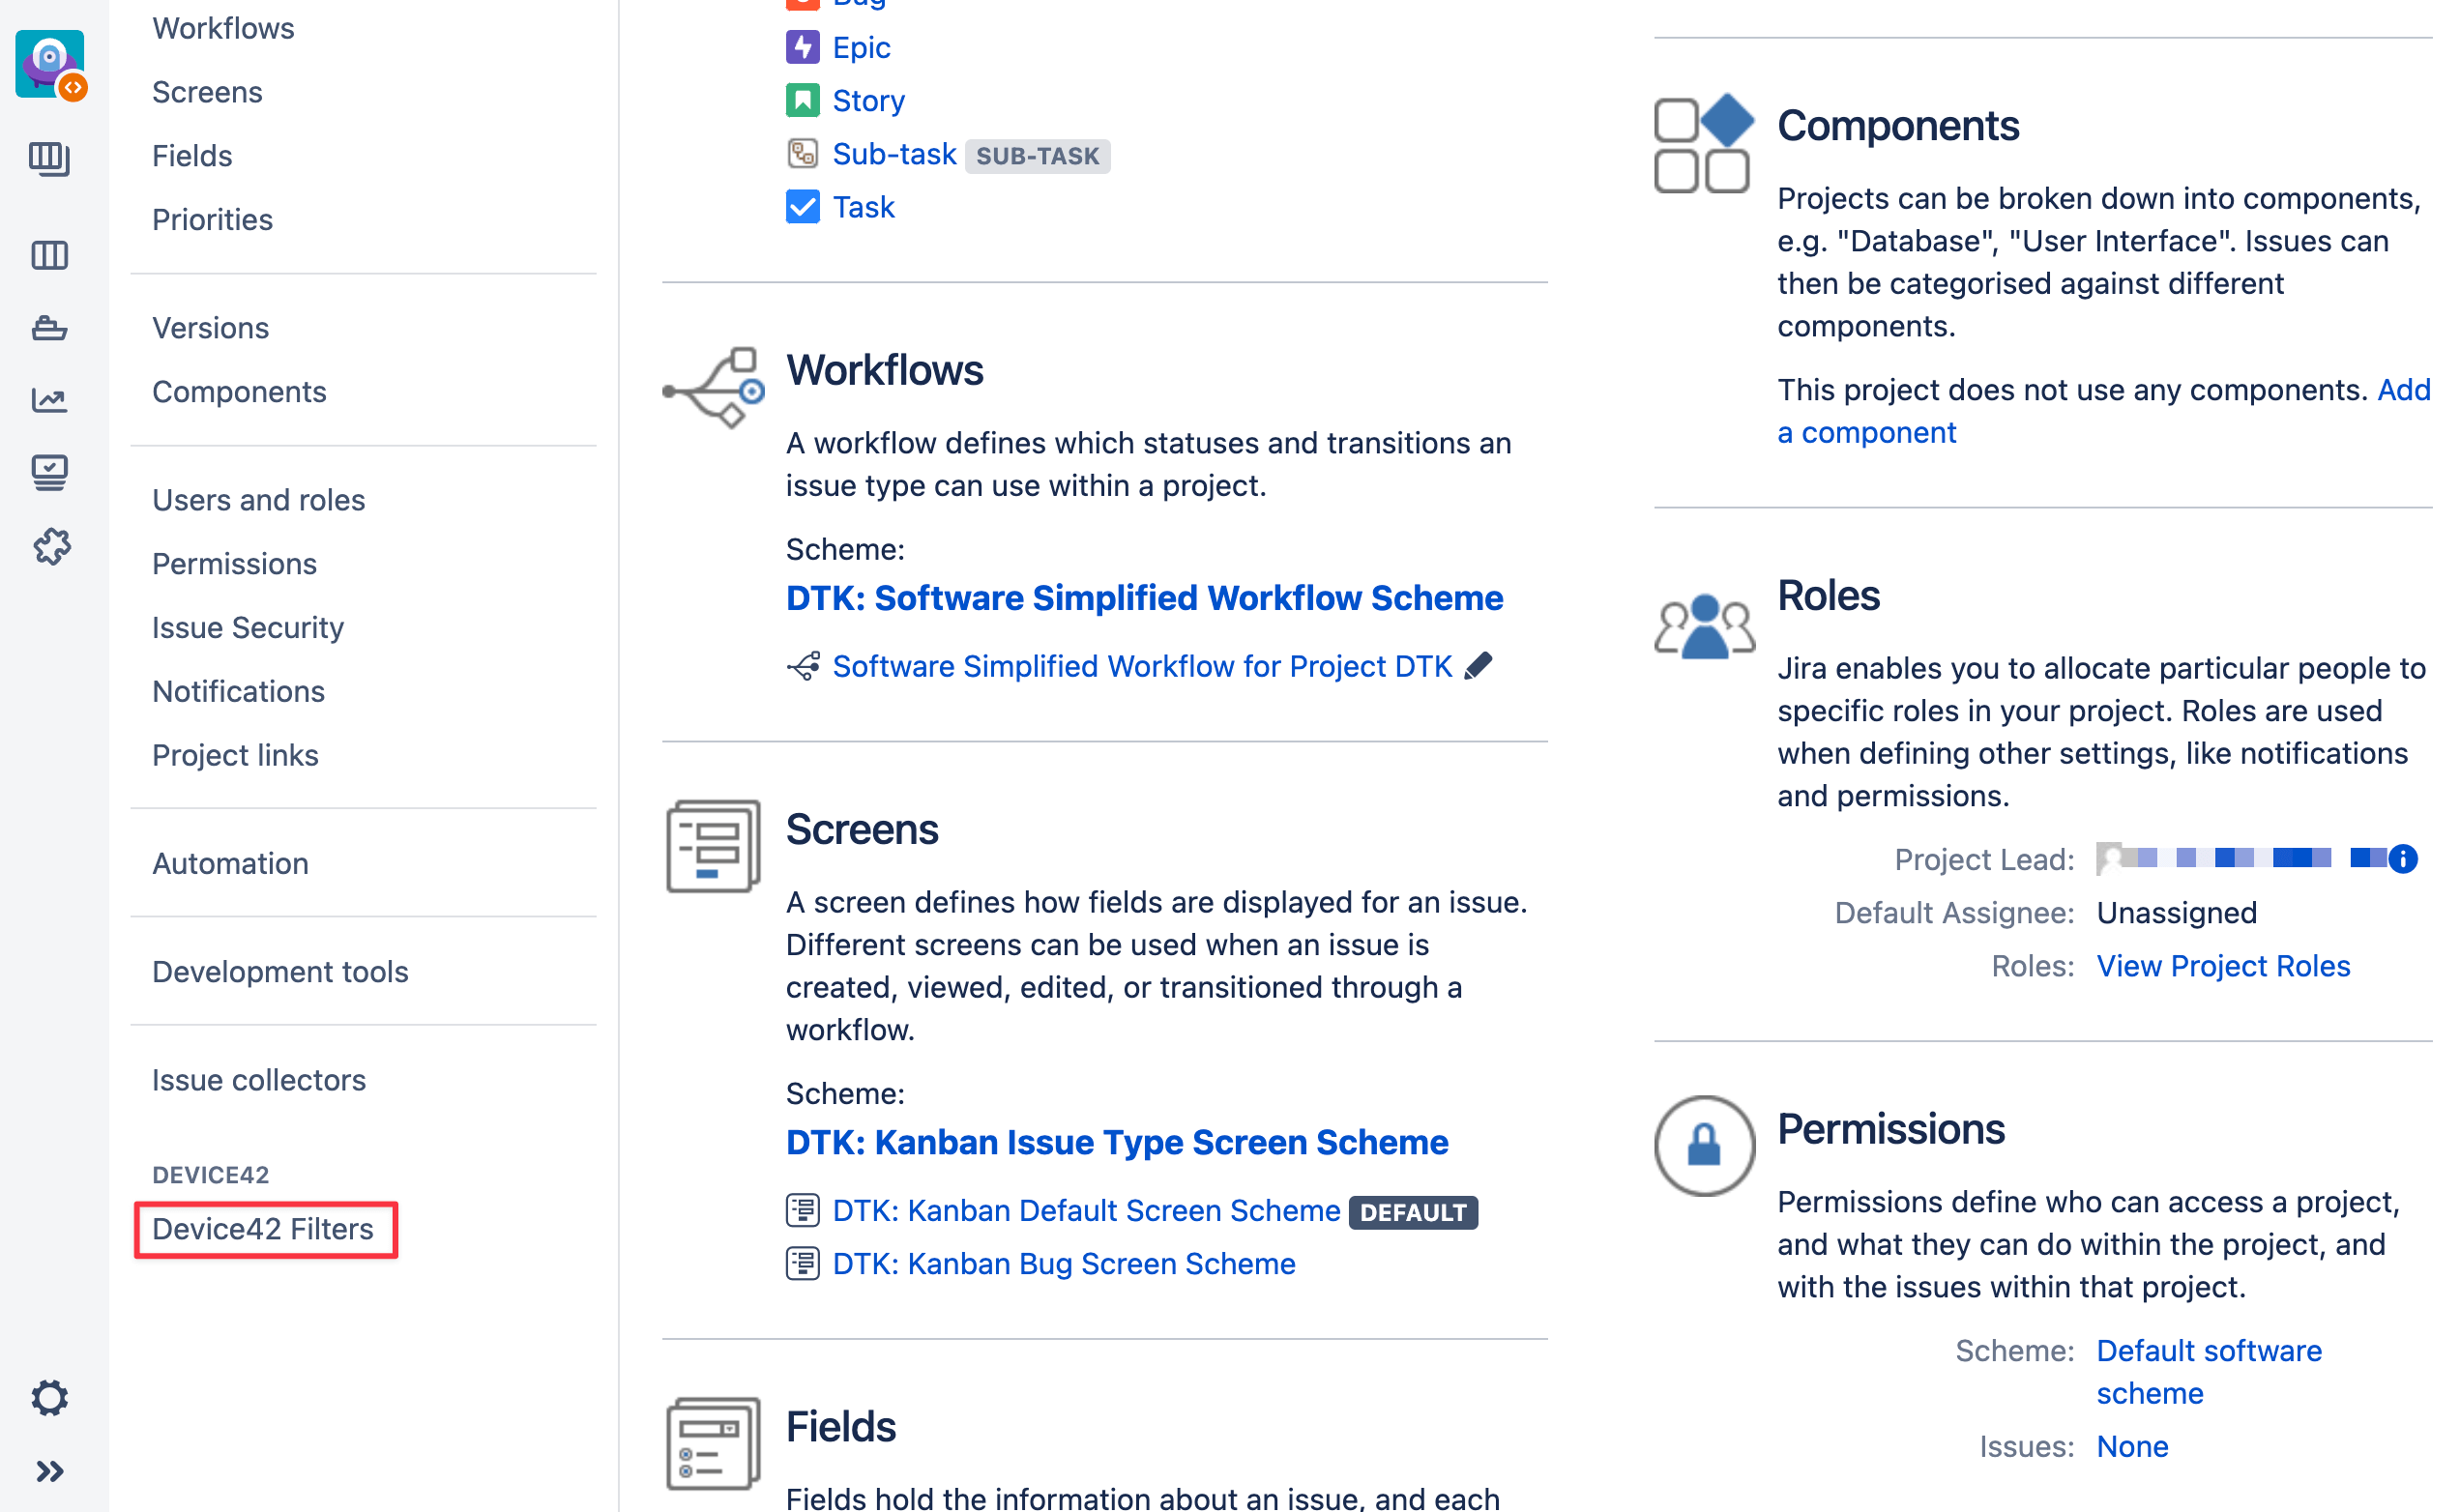
-
Select the custom field that you want apply filters for. For example, the Device42 Custom Field that we added in the Add a Device42 Custom Field section.
-
Select the CI types you want to have as an option under your chosen field as done in the Default Filter: General Settings section. You can also add filters to CI parameters. See the Default Filter: CI Filters section above for more information.
-
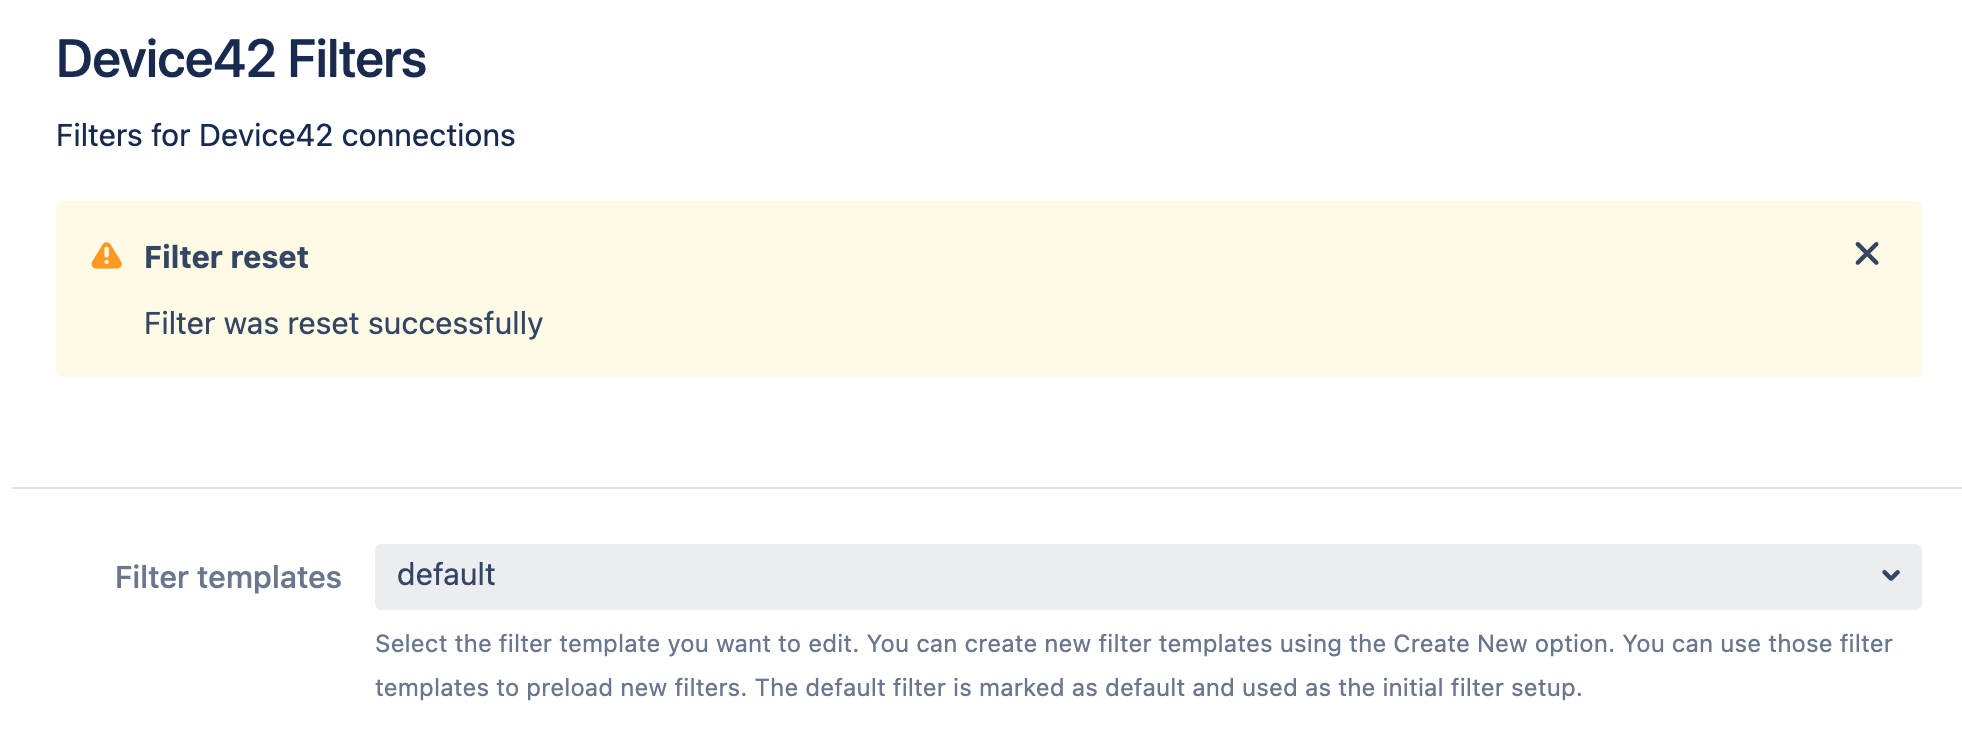
Click on the Save button to store the settings. To undo your changes click on the Reset button. A notification message at the top of the interface will be displayed confirming your changes.
Note: if you haven't selected any CIs under general settings you will see an error message.
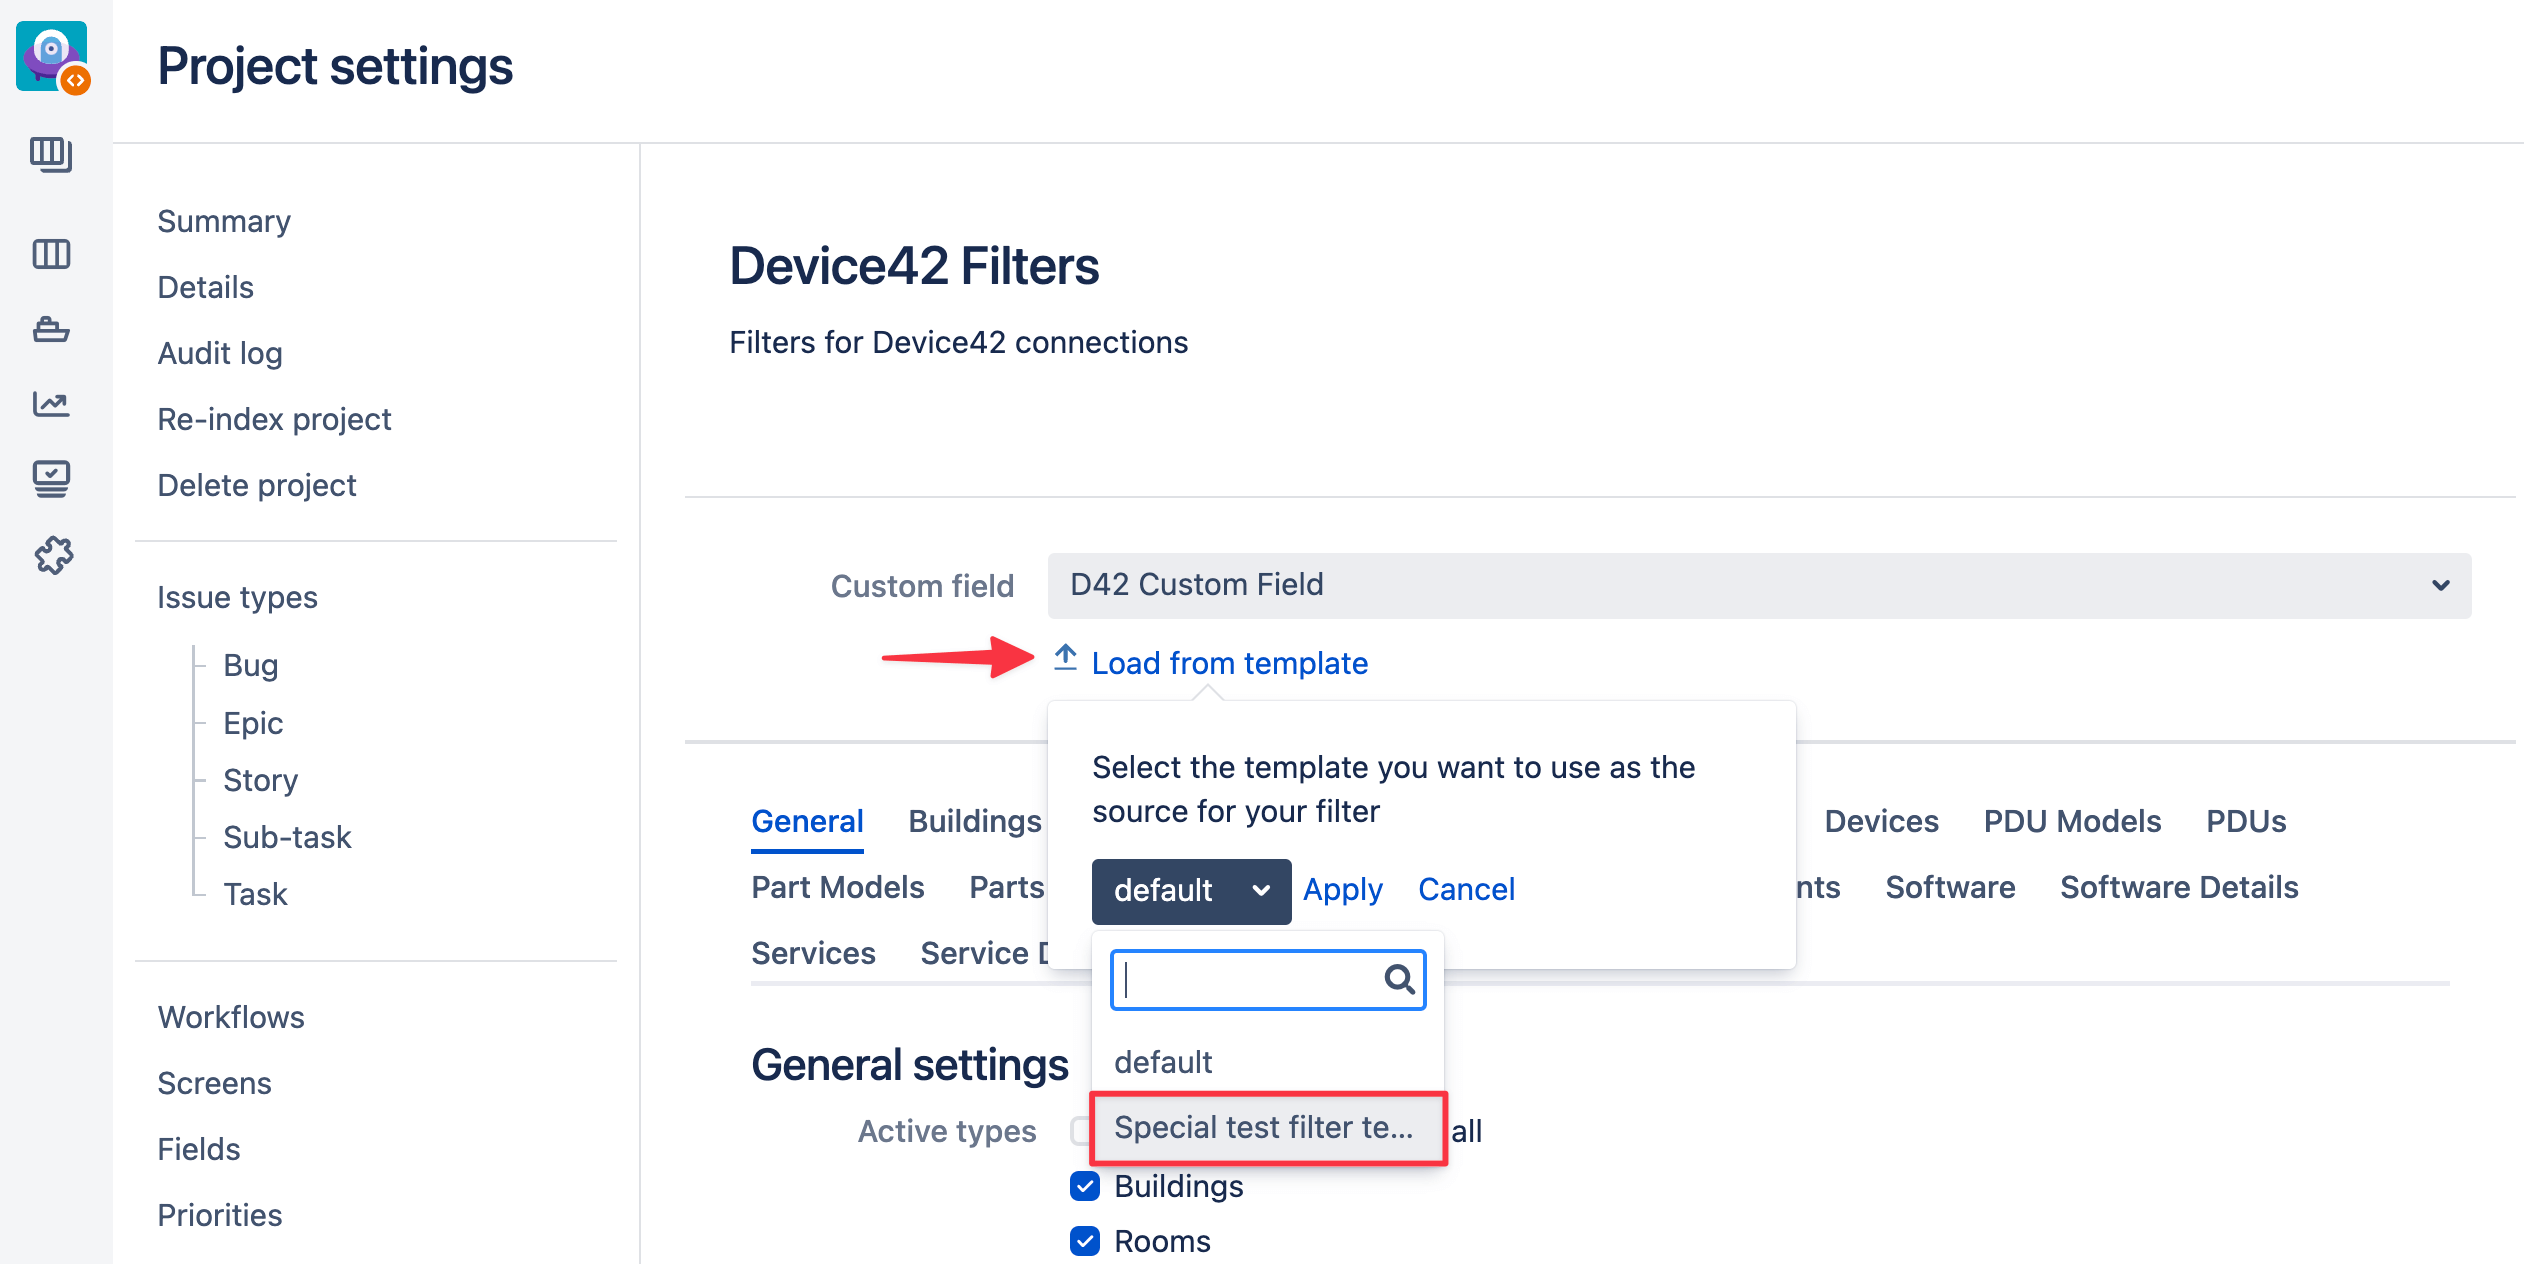
Load a Filter Template
Project administrators can load filter templates to any project. The filter template will be loaded instantly and replace all the existing filters on the screen. After the loading of the template project administrator can edit the filter in the normal way. The filter itself will not be saved until the project administrator clicks the 'Save' button.
-
Navigate to the Project settings page.
-
Click on the Load from template button under the Custom Field dropdown menu.
-
Select the required filter template from the list.
-
Click on the Apply button to load the filter template to your project.
-
Click on the Save button at the bottom of the interface.
Work With Jira Issues
View issue
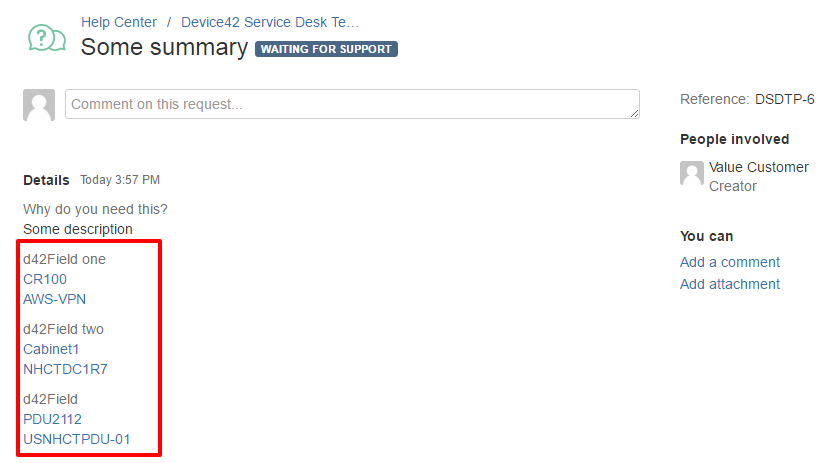
On view screens a Device42 Custom Field looks so:
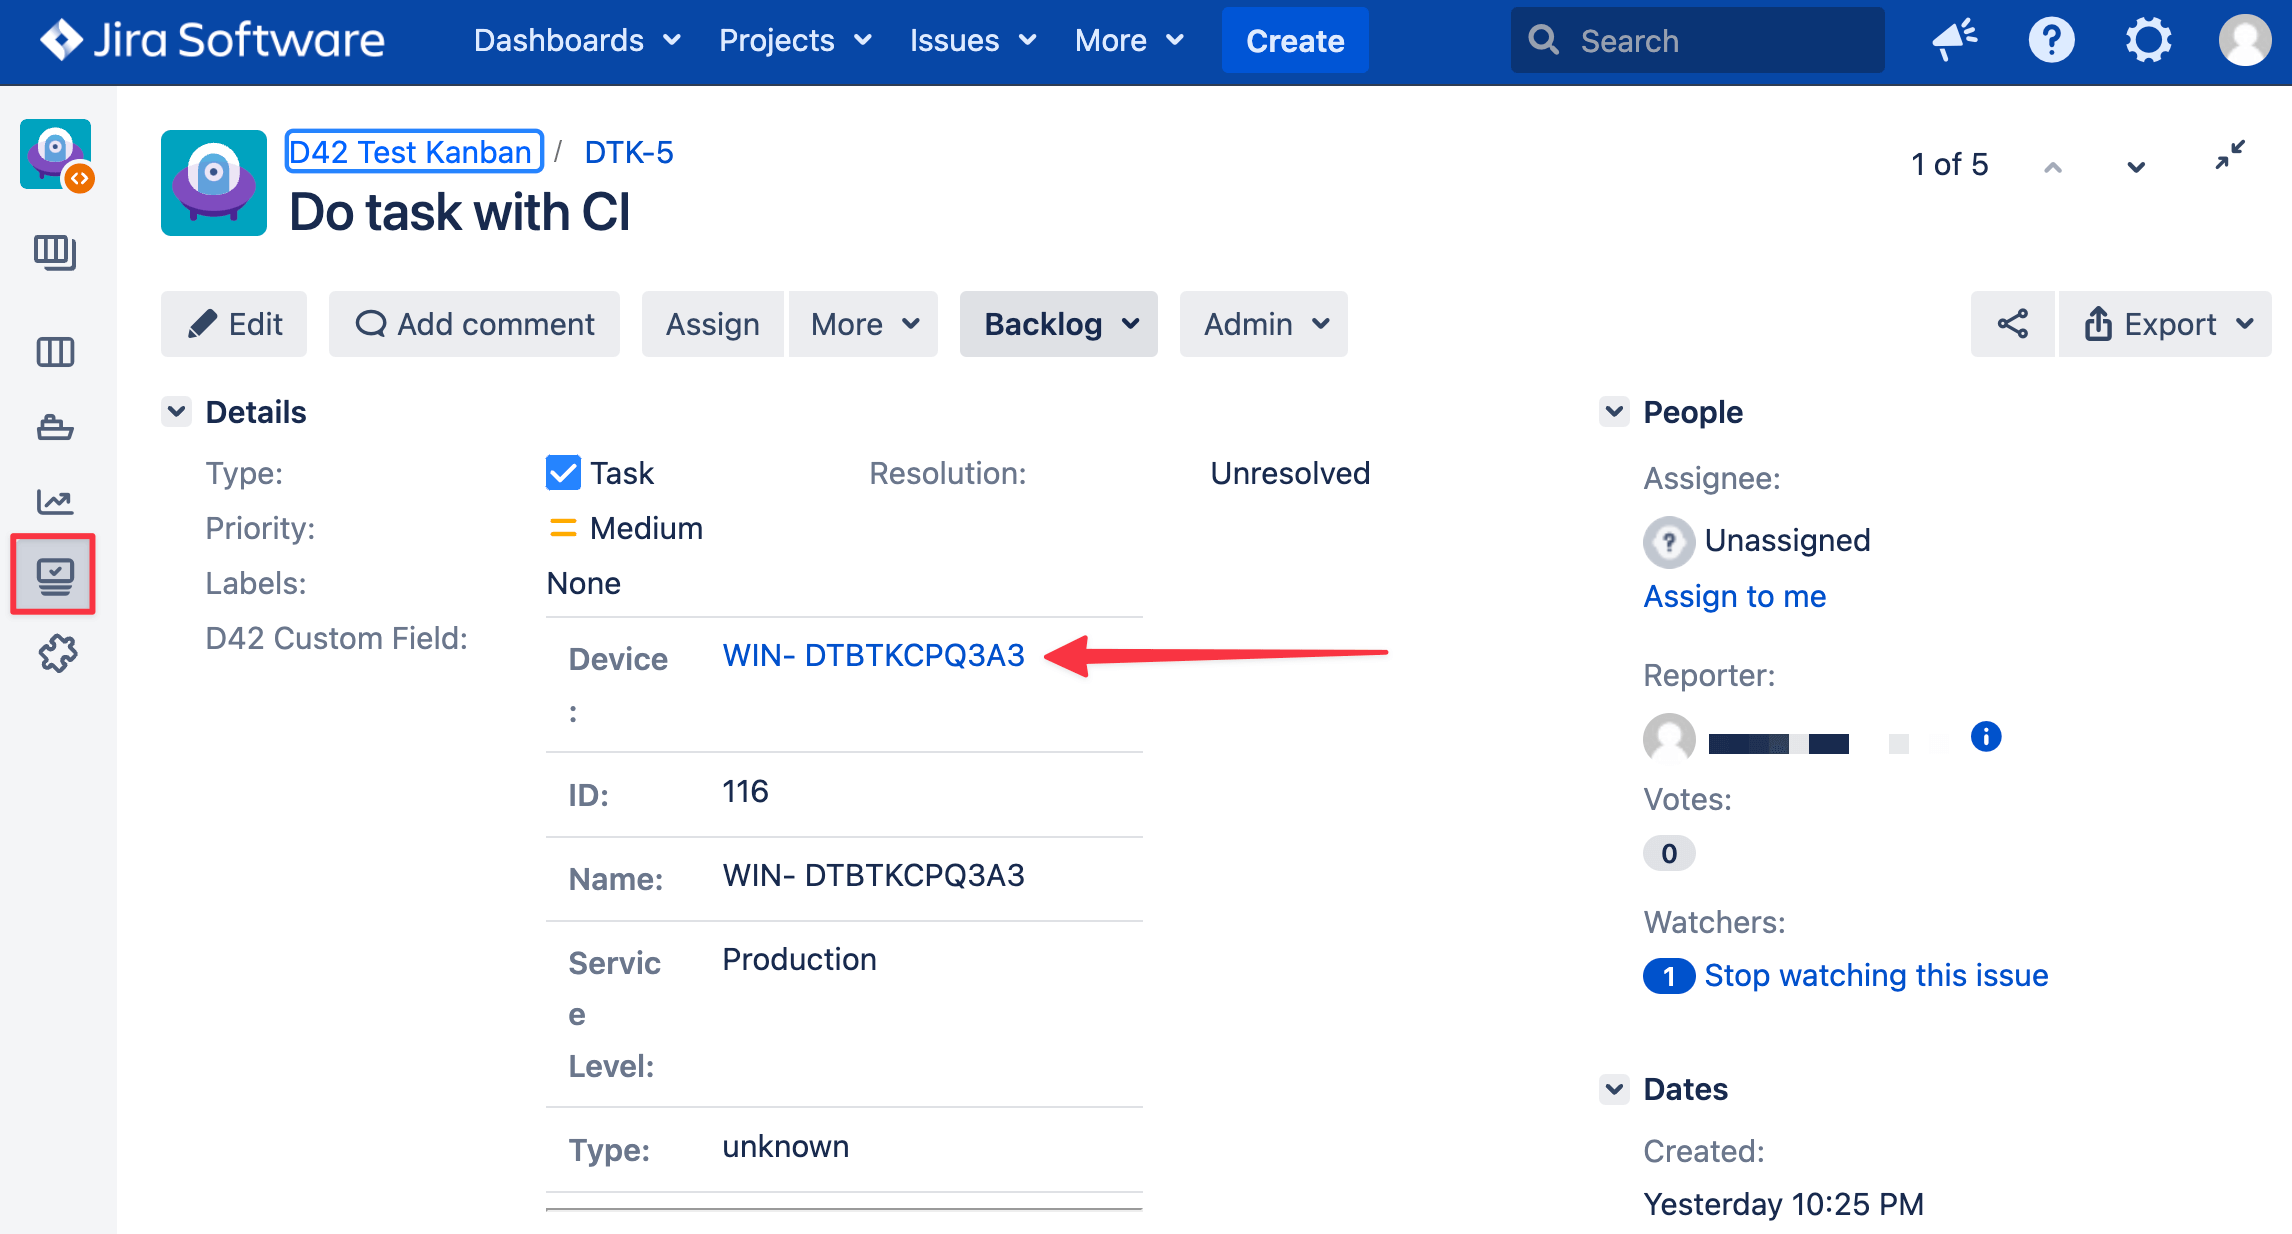
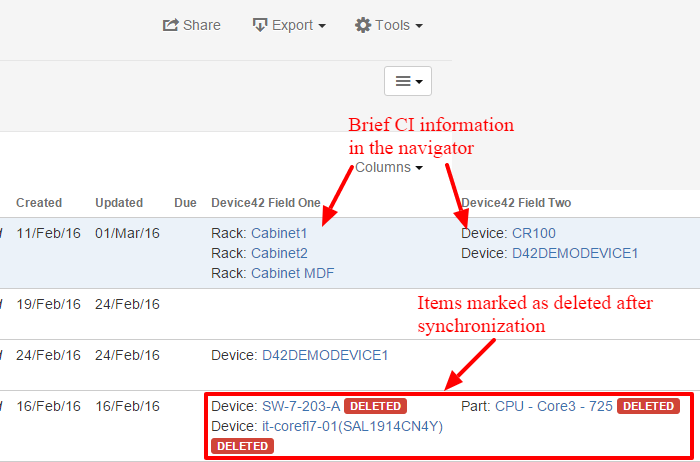
You can see the list of CIs that are linked to the issue through custom field. For each of CI you can find the brief information and a link navigating you to the Device42 application CI representation. If some of the CIs were not found inside the Device42 system they will be marked as the deleted.
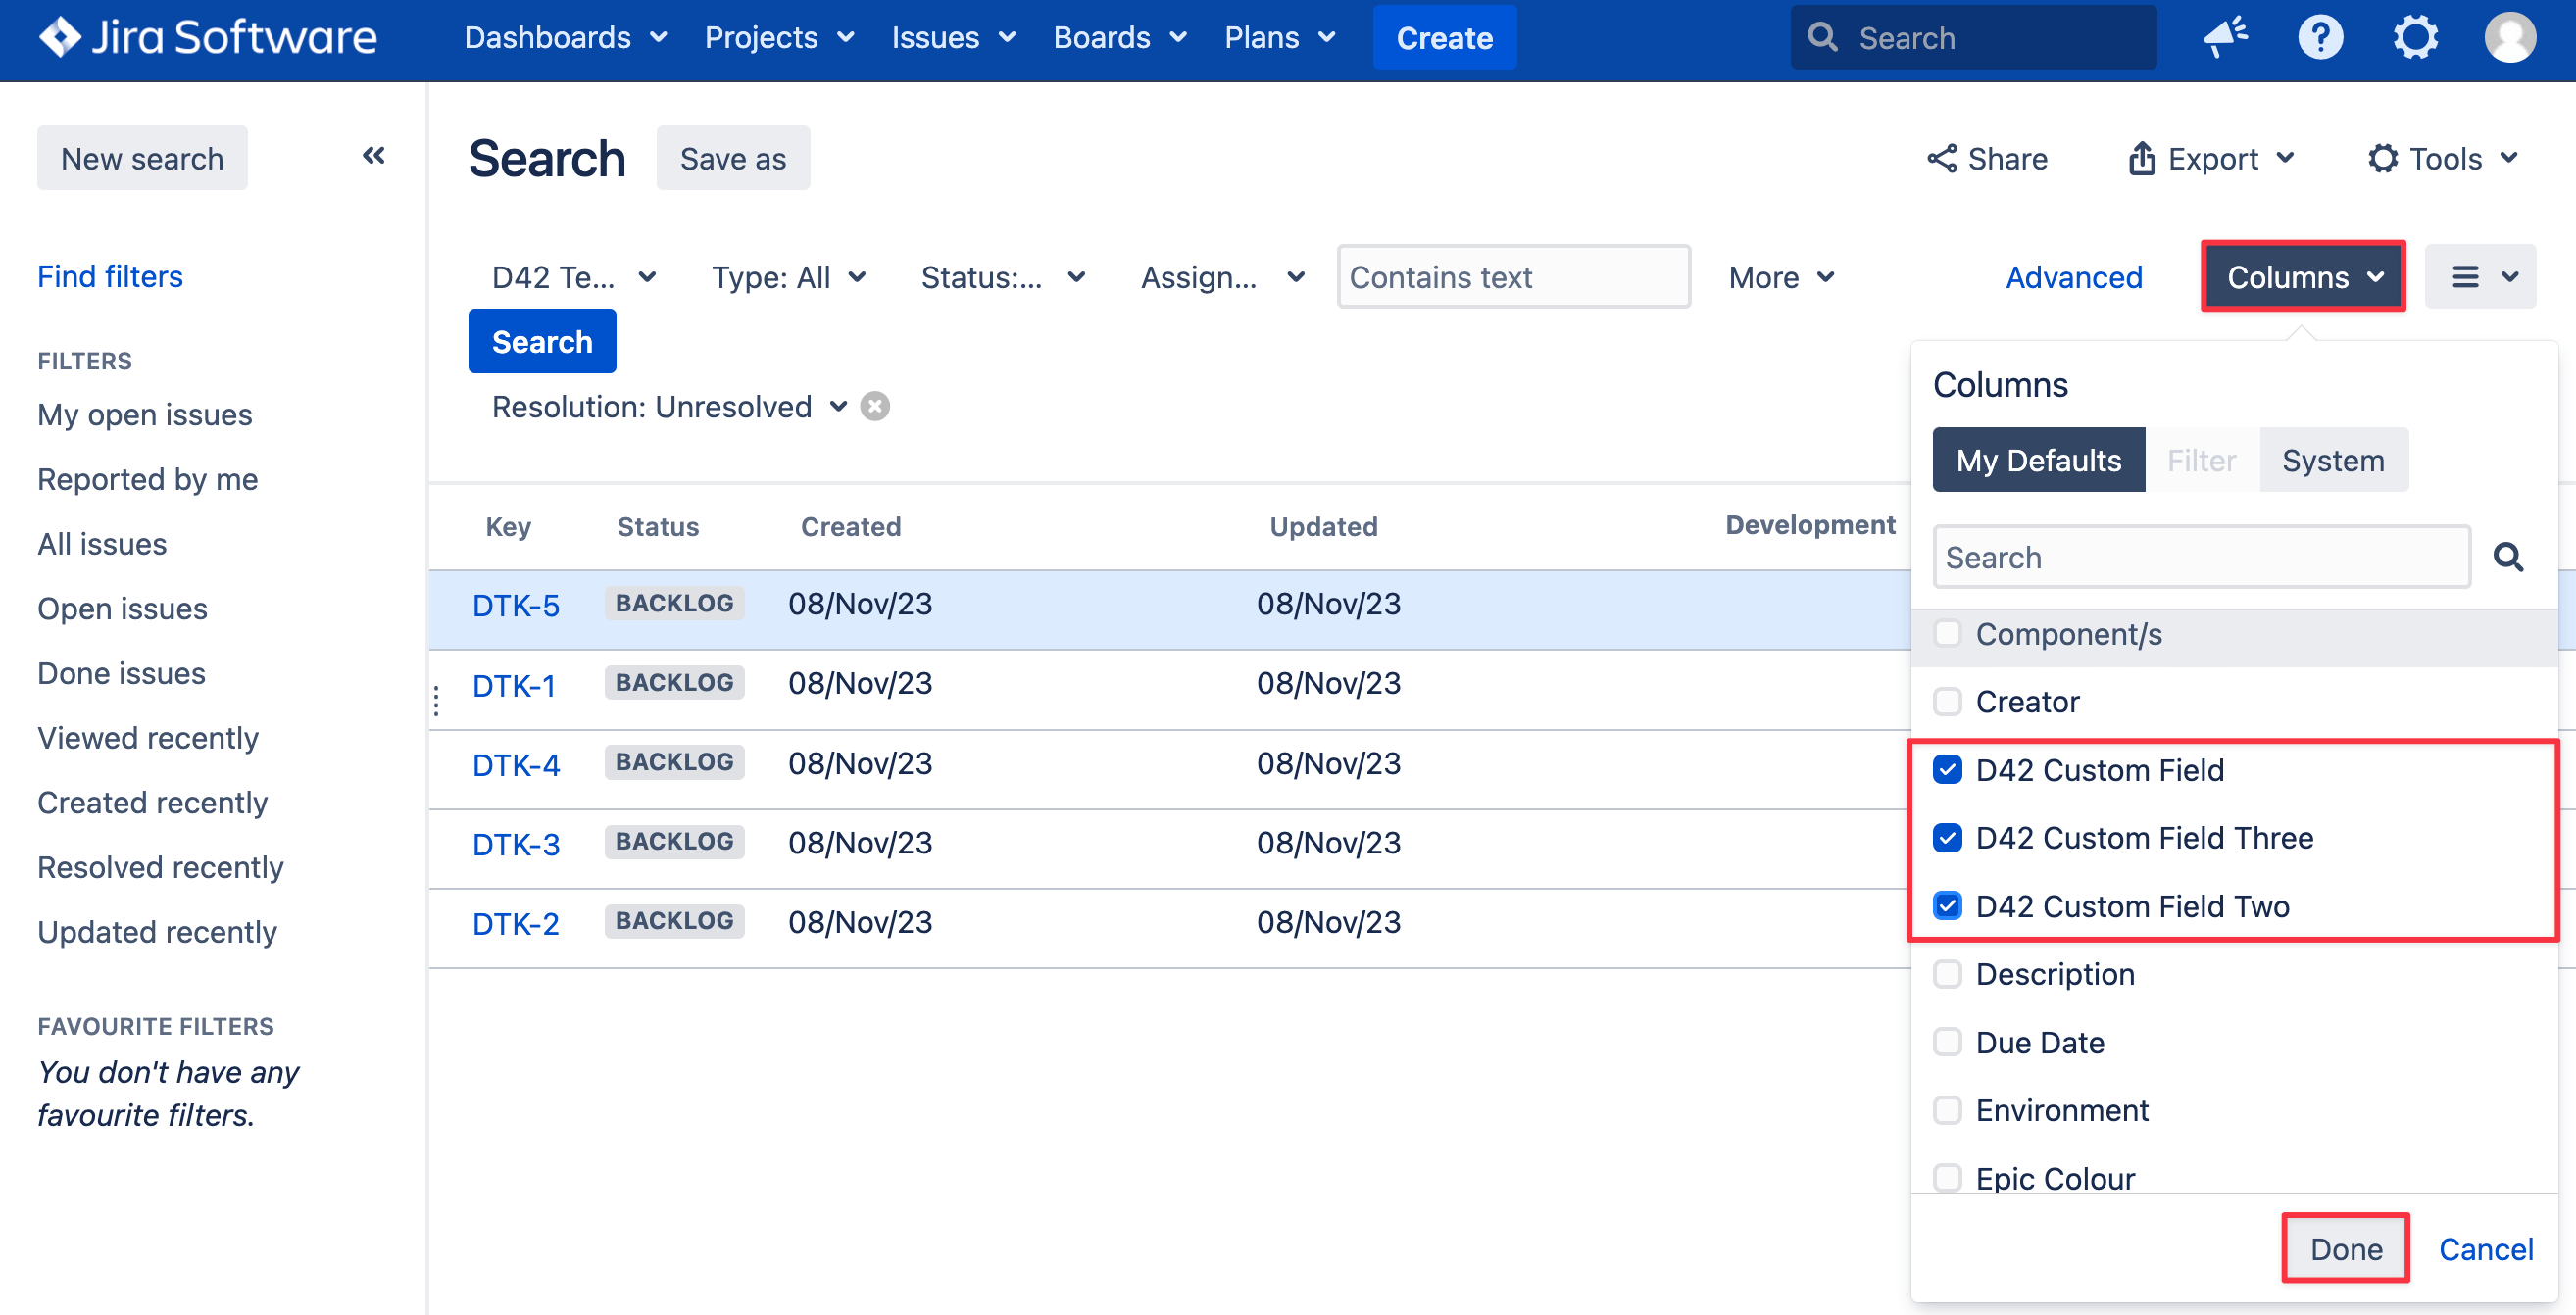
If you add the Device42 custom field to the issue navigator you would be able to see the brief information about CIs linked to the ticket with the ability to follow the link to the Device42 application. If you hover over the link you will see the detailed information on the device.
-
Click on Issues on the navigation bar and select Current search

-
Select the custom fields to add to the issue navigator table.
Create or Edit an Issue
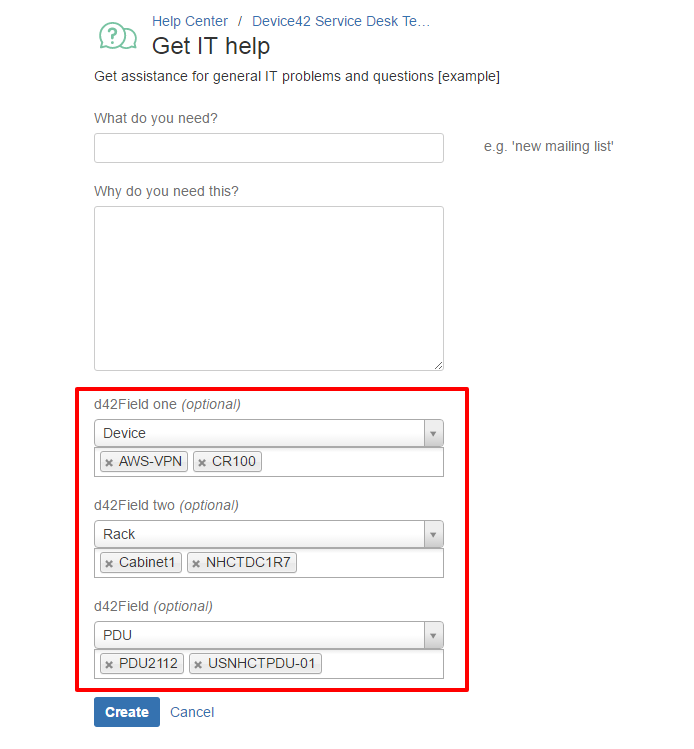
You can link CIs to a Jira issue when you create or edit an issue.
-
From your project dashboard, click on the issues icon on the far left pane to go to the Open issues interface.
-
Click on the + Create issue button at the bottom left corner to create a new issue.
-
To edit an issue, select it from the list and click on the Edit button below name of the open issue.
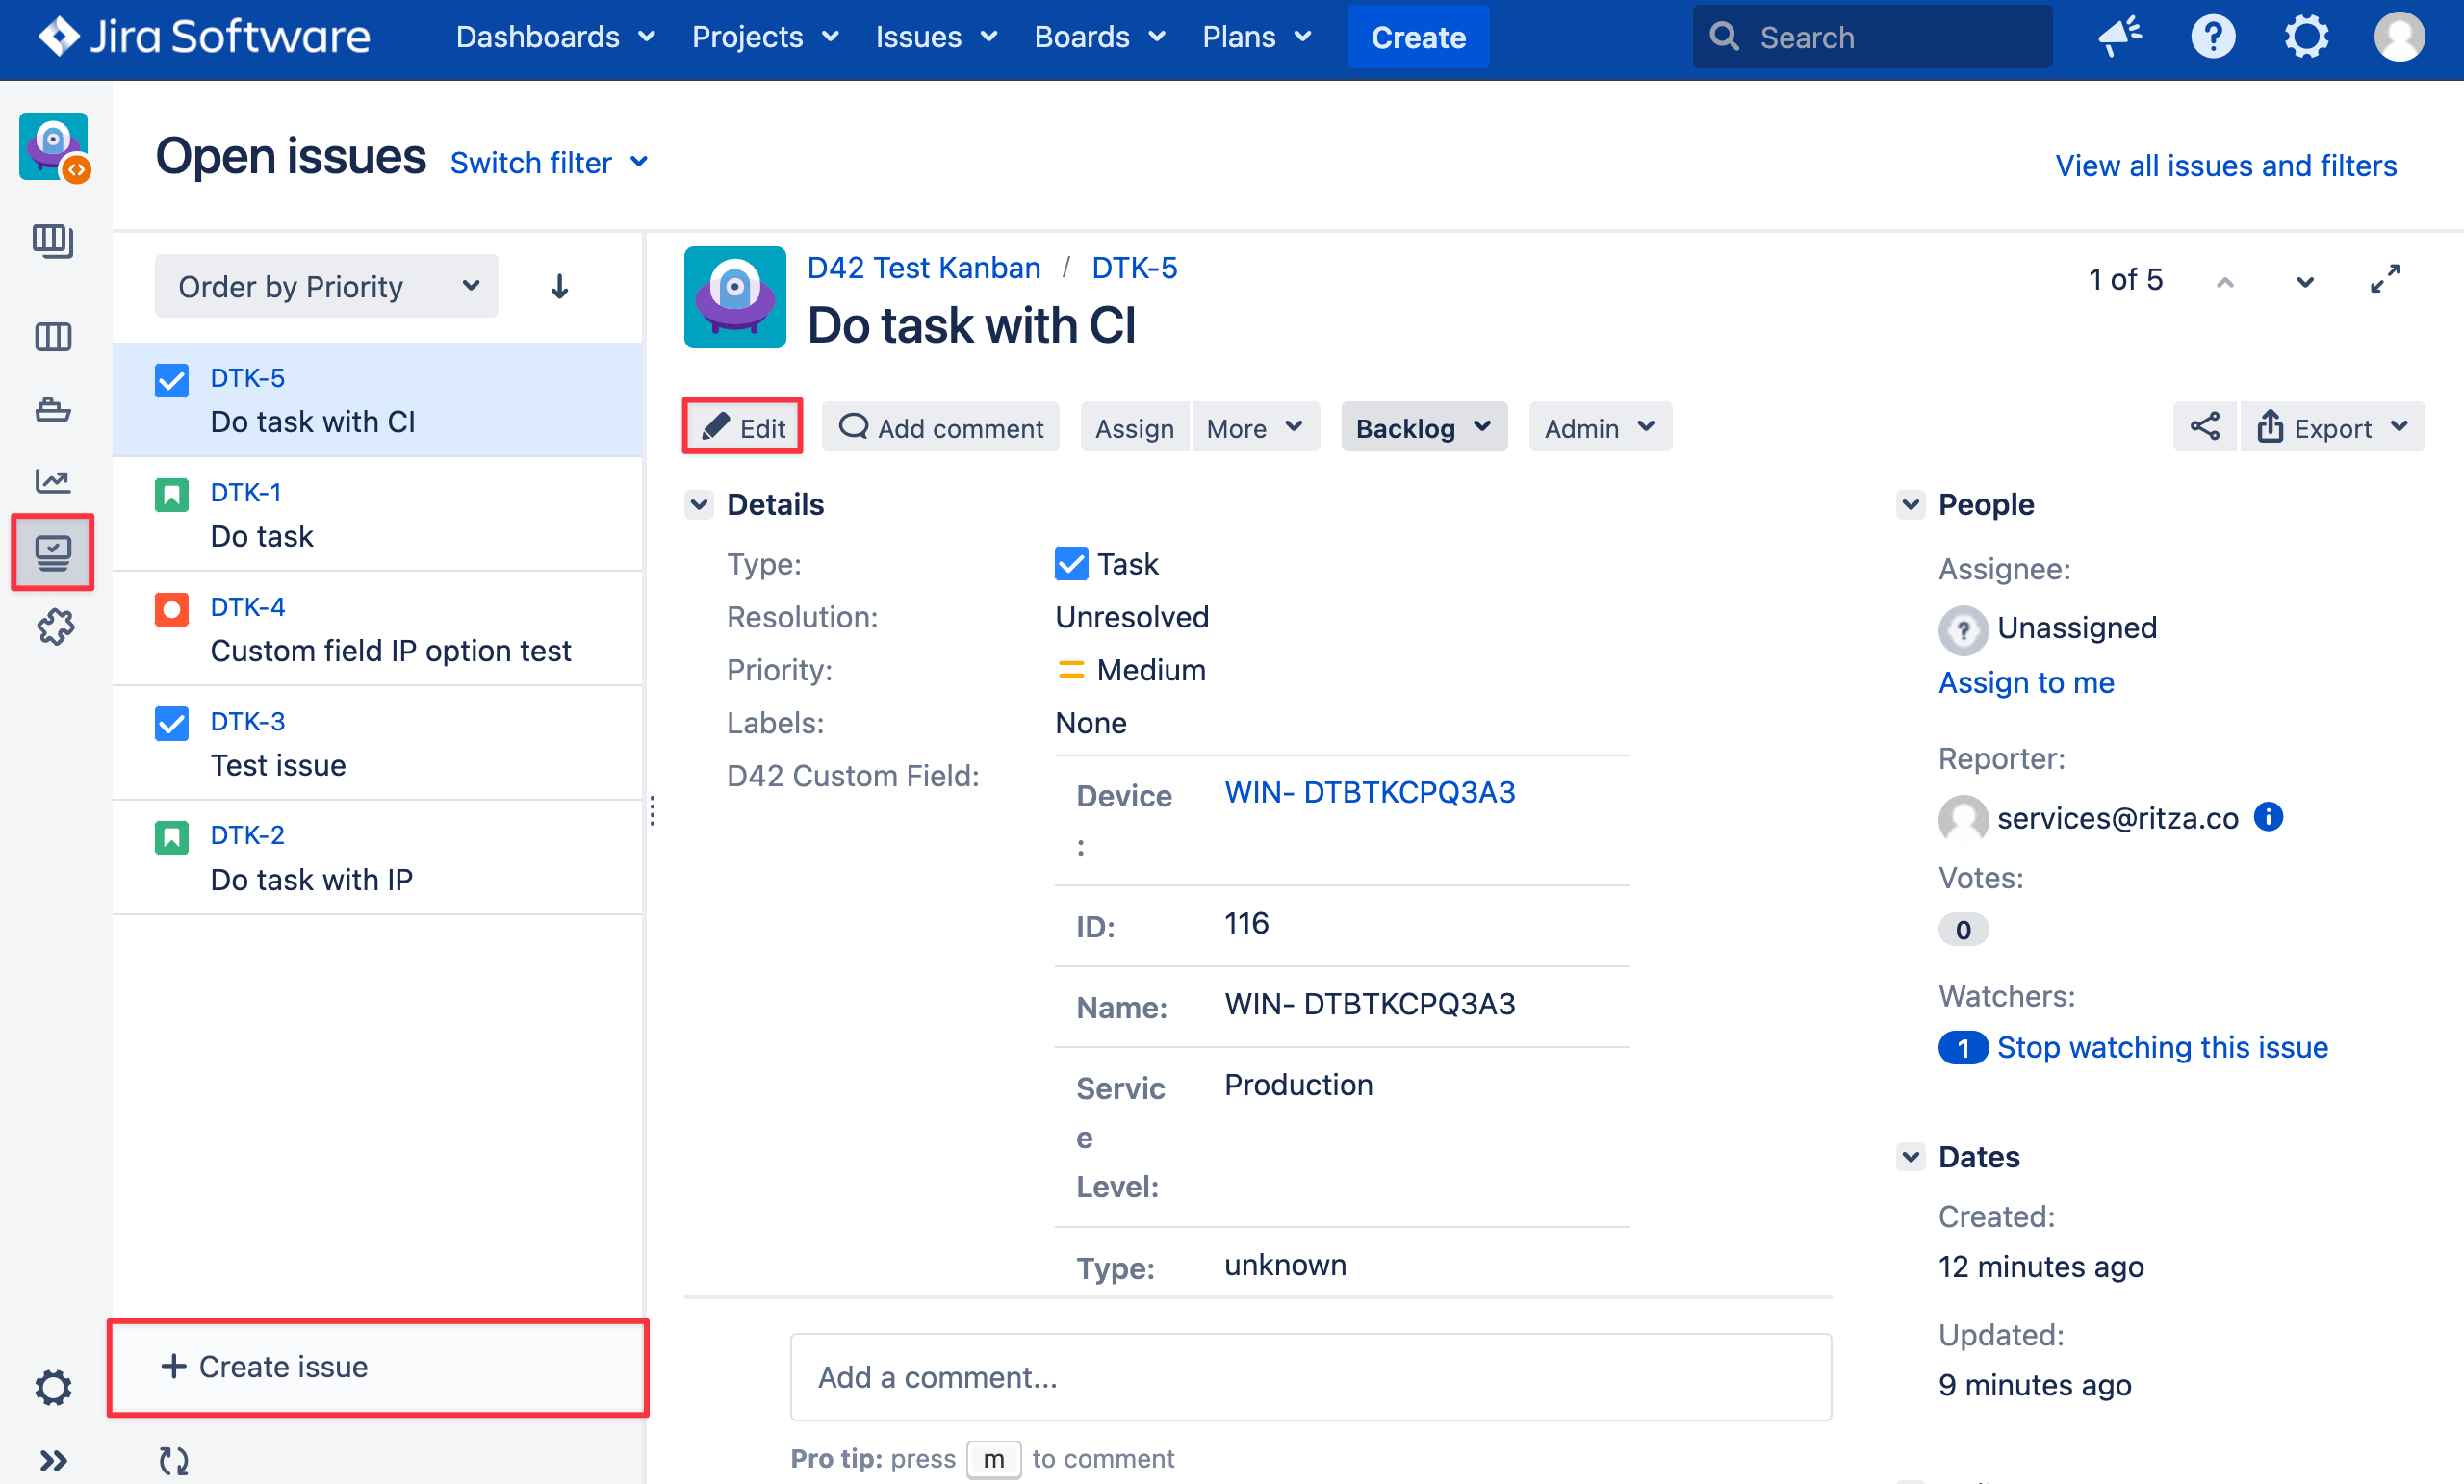
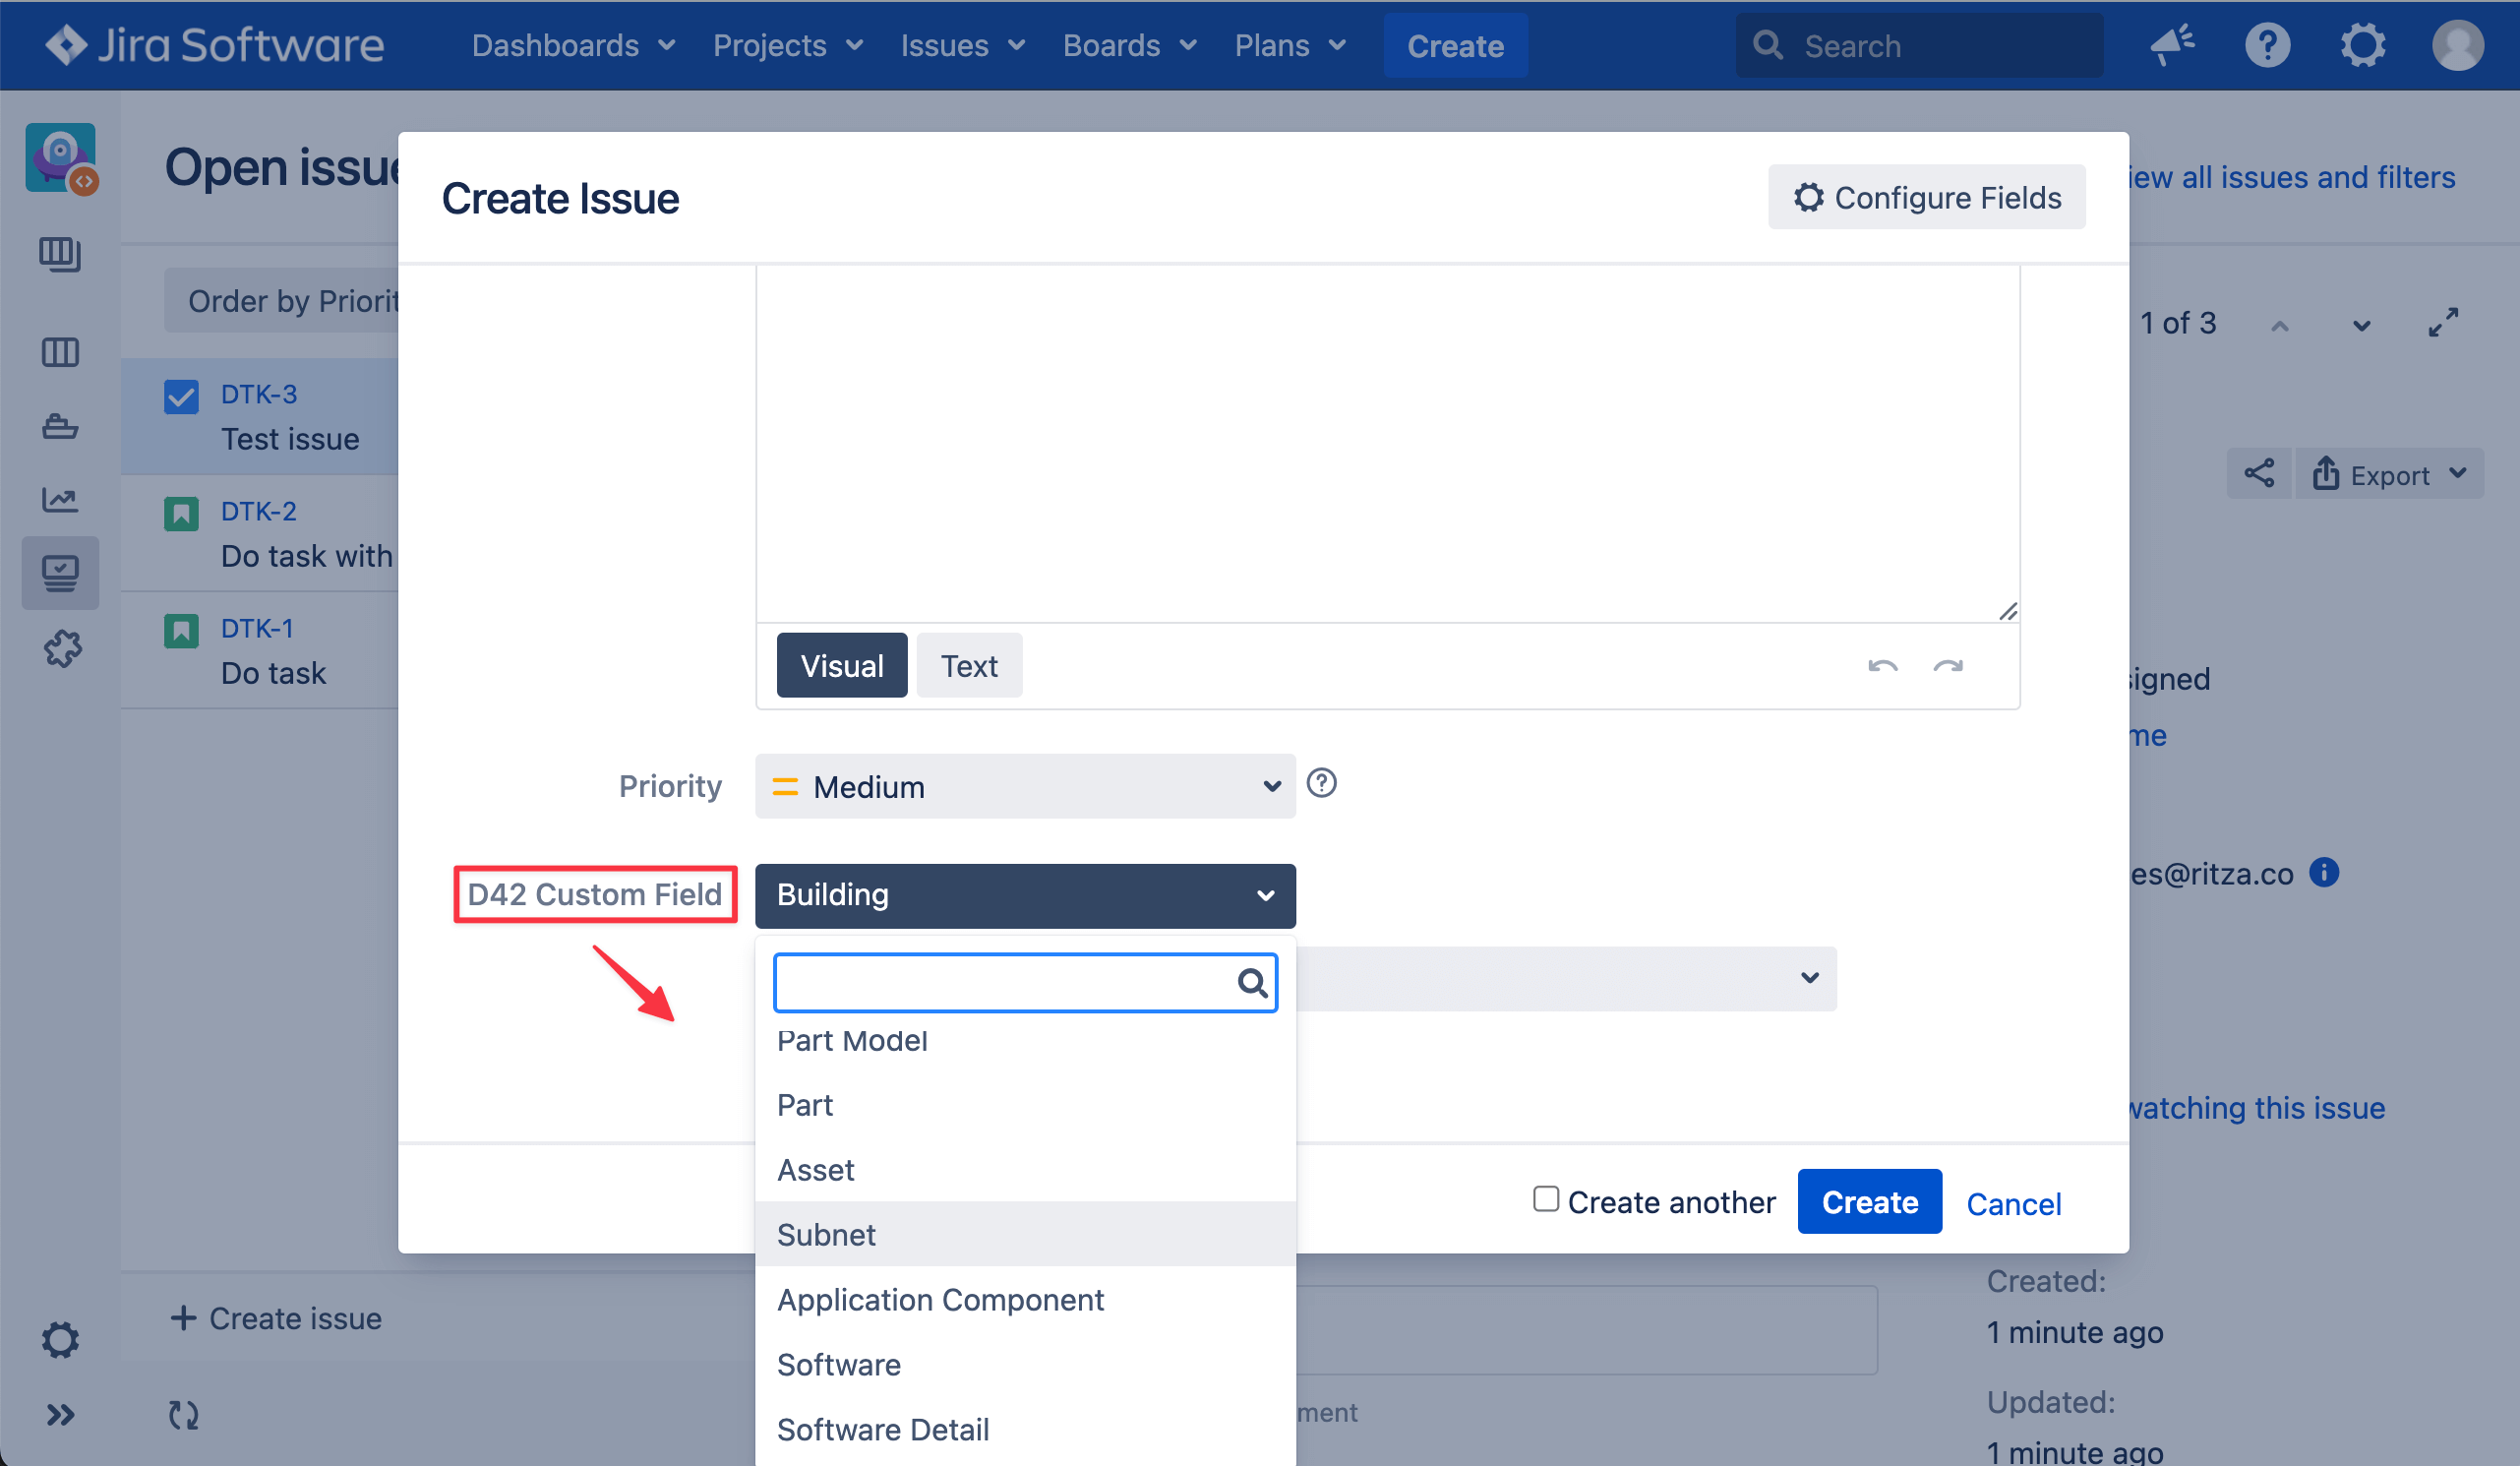
When editing an issue, you'll see the custom field names listed on the left of the modal window. For example, D42 Custom Field and D42 Custom Field Two.
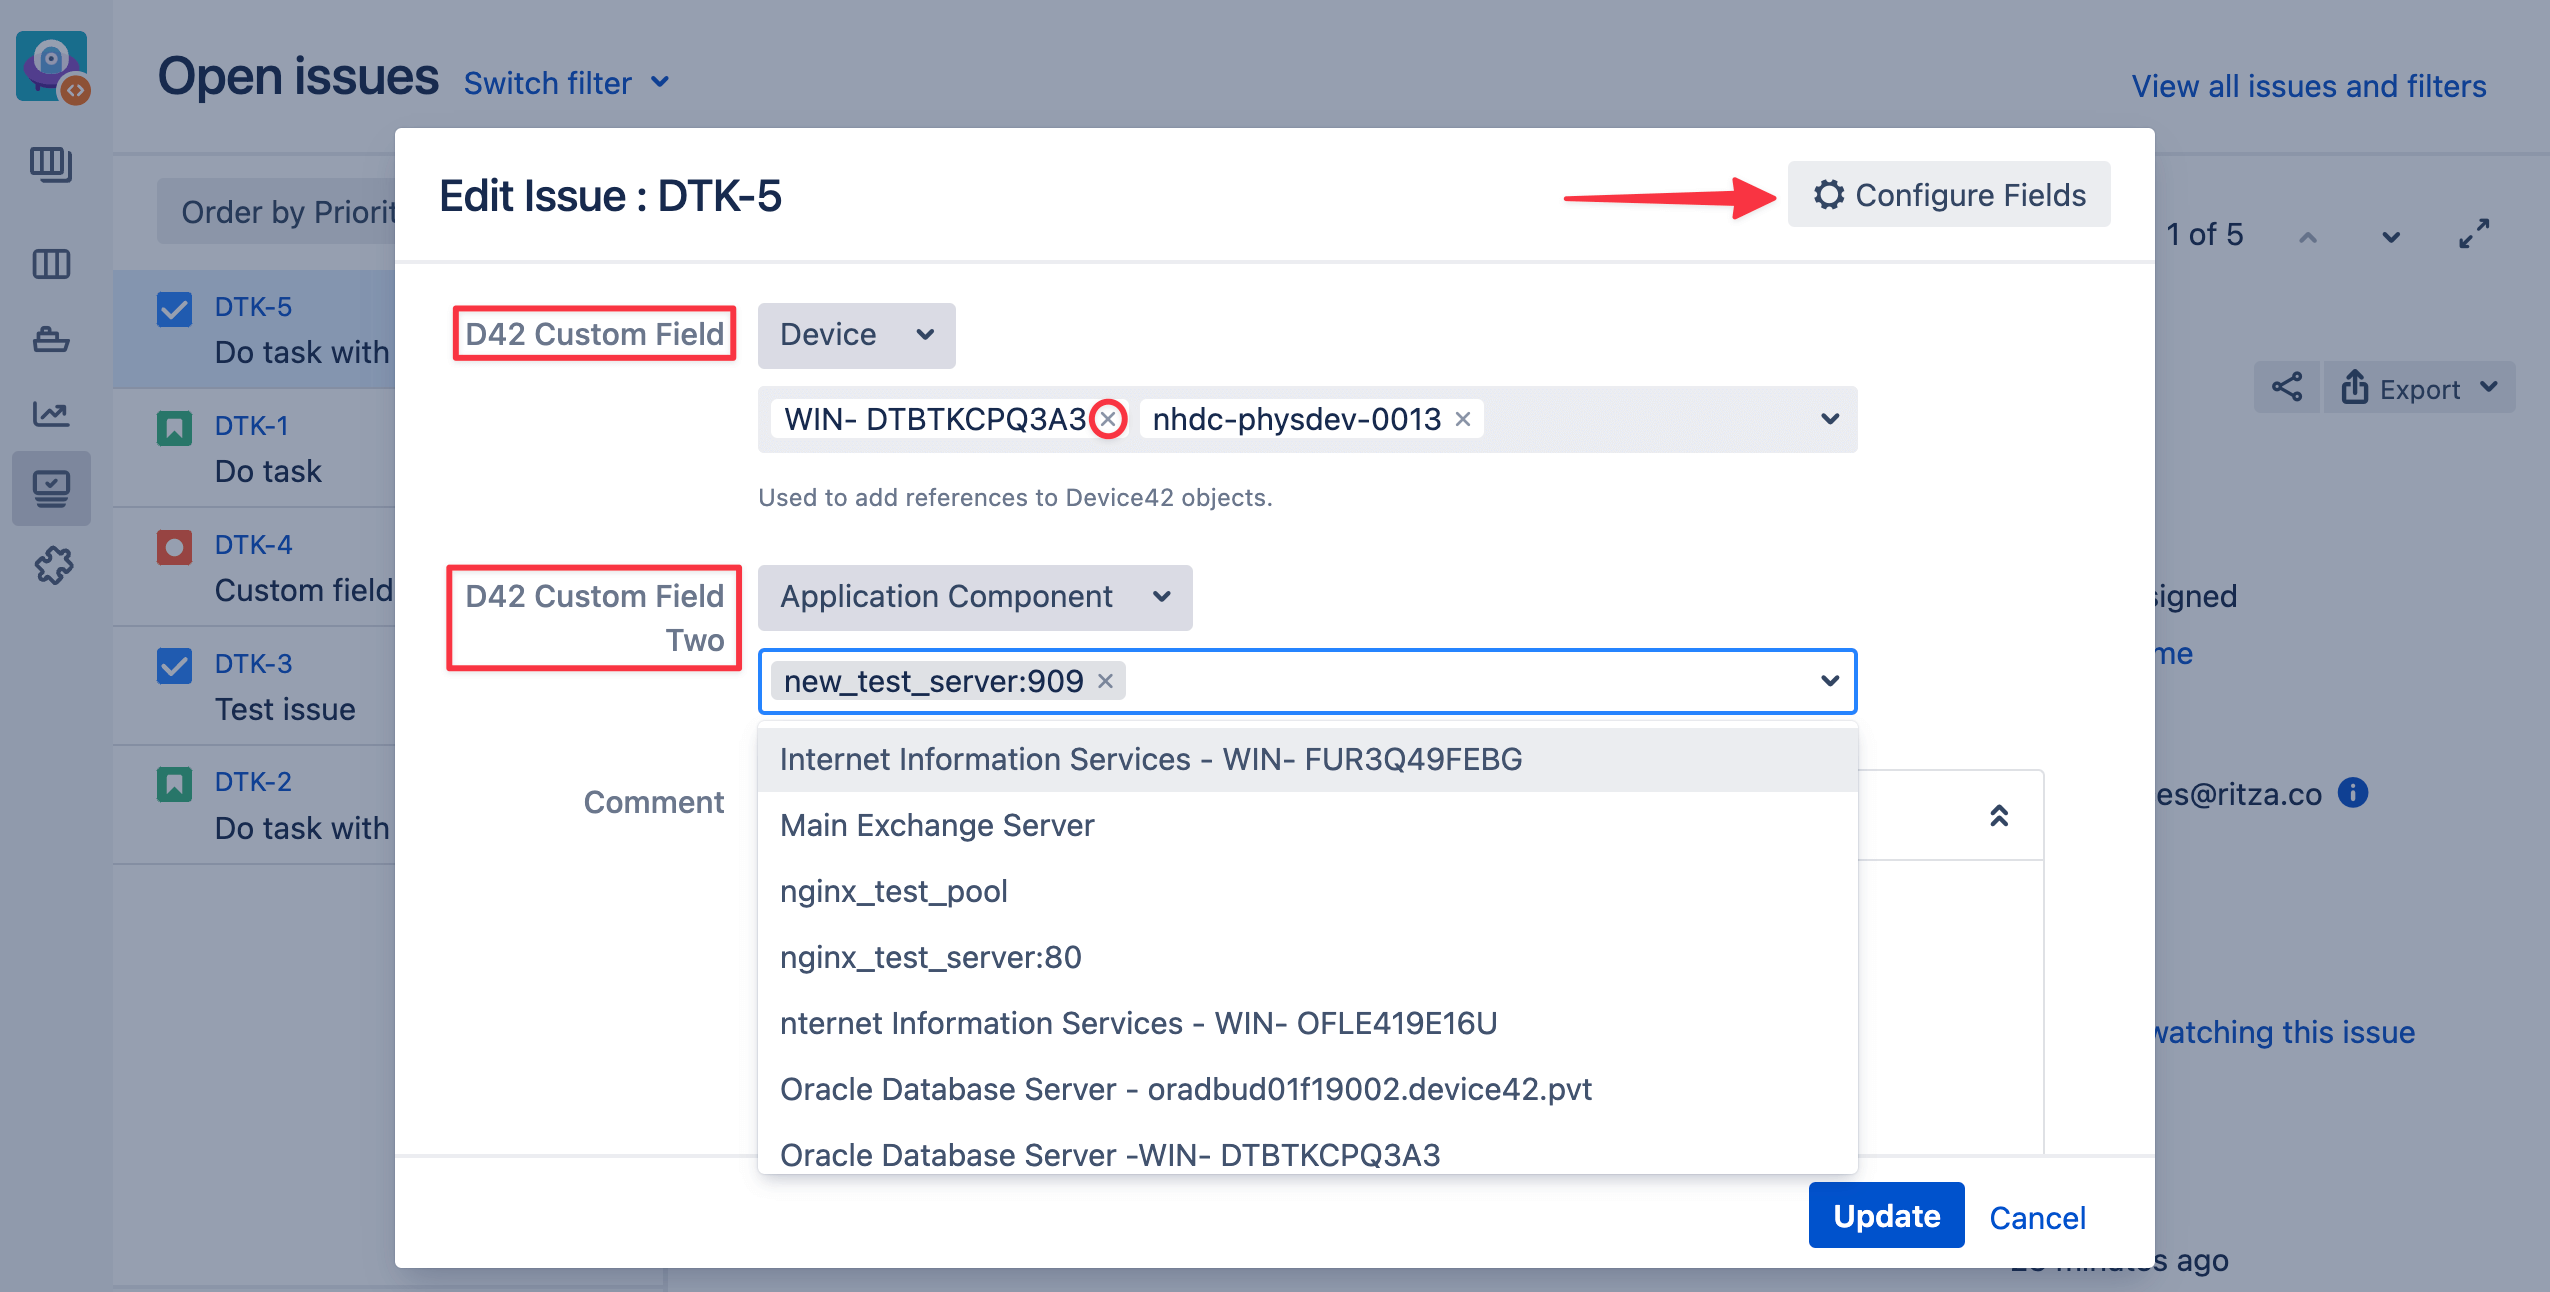
You can search for a specific CI by typing part of its name into the search bar. If you want to delete the CI, click on the small cross icon next its name.
Note: The list of available CIs and CI types depends on the filters that were applied to the project and custom fields. You will not be able to assign the CIs that have been filtered out. If the filter was created after the issue was edited the data will be shown inside the view mode. However, if you edit the issue the available CIs and CI types will conform to the new filter.See the Custom Field Filters for CIs section for more information.
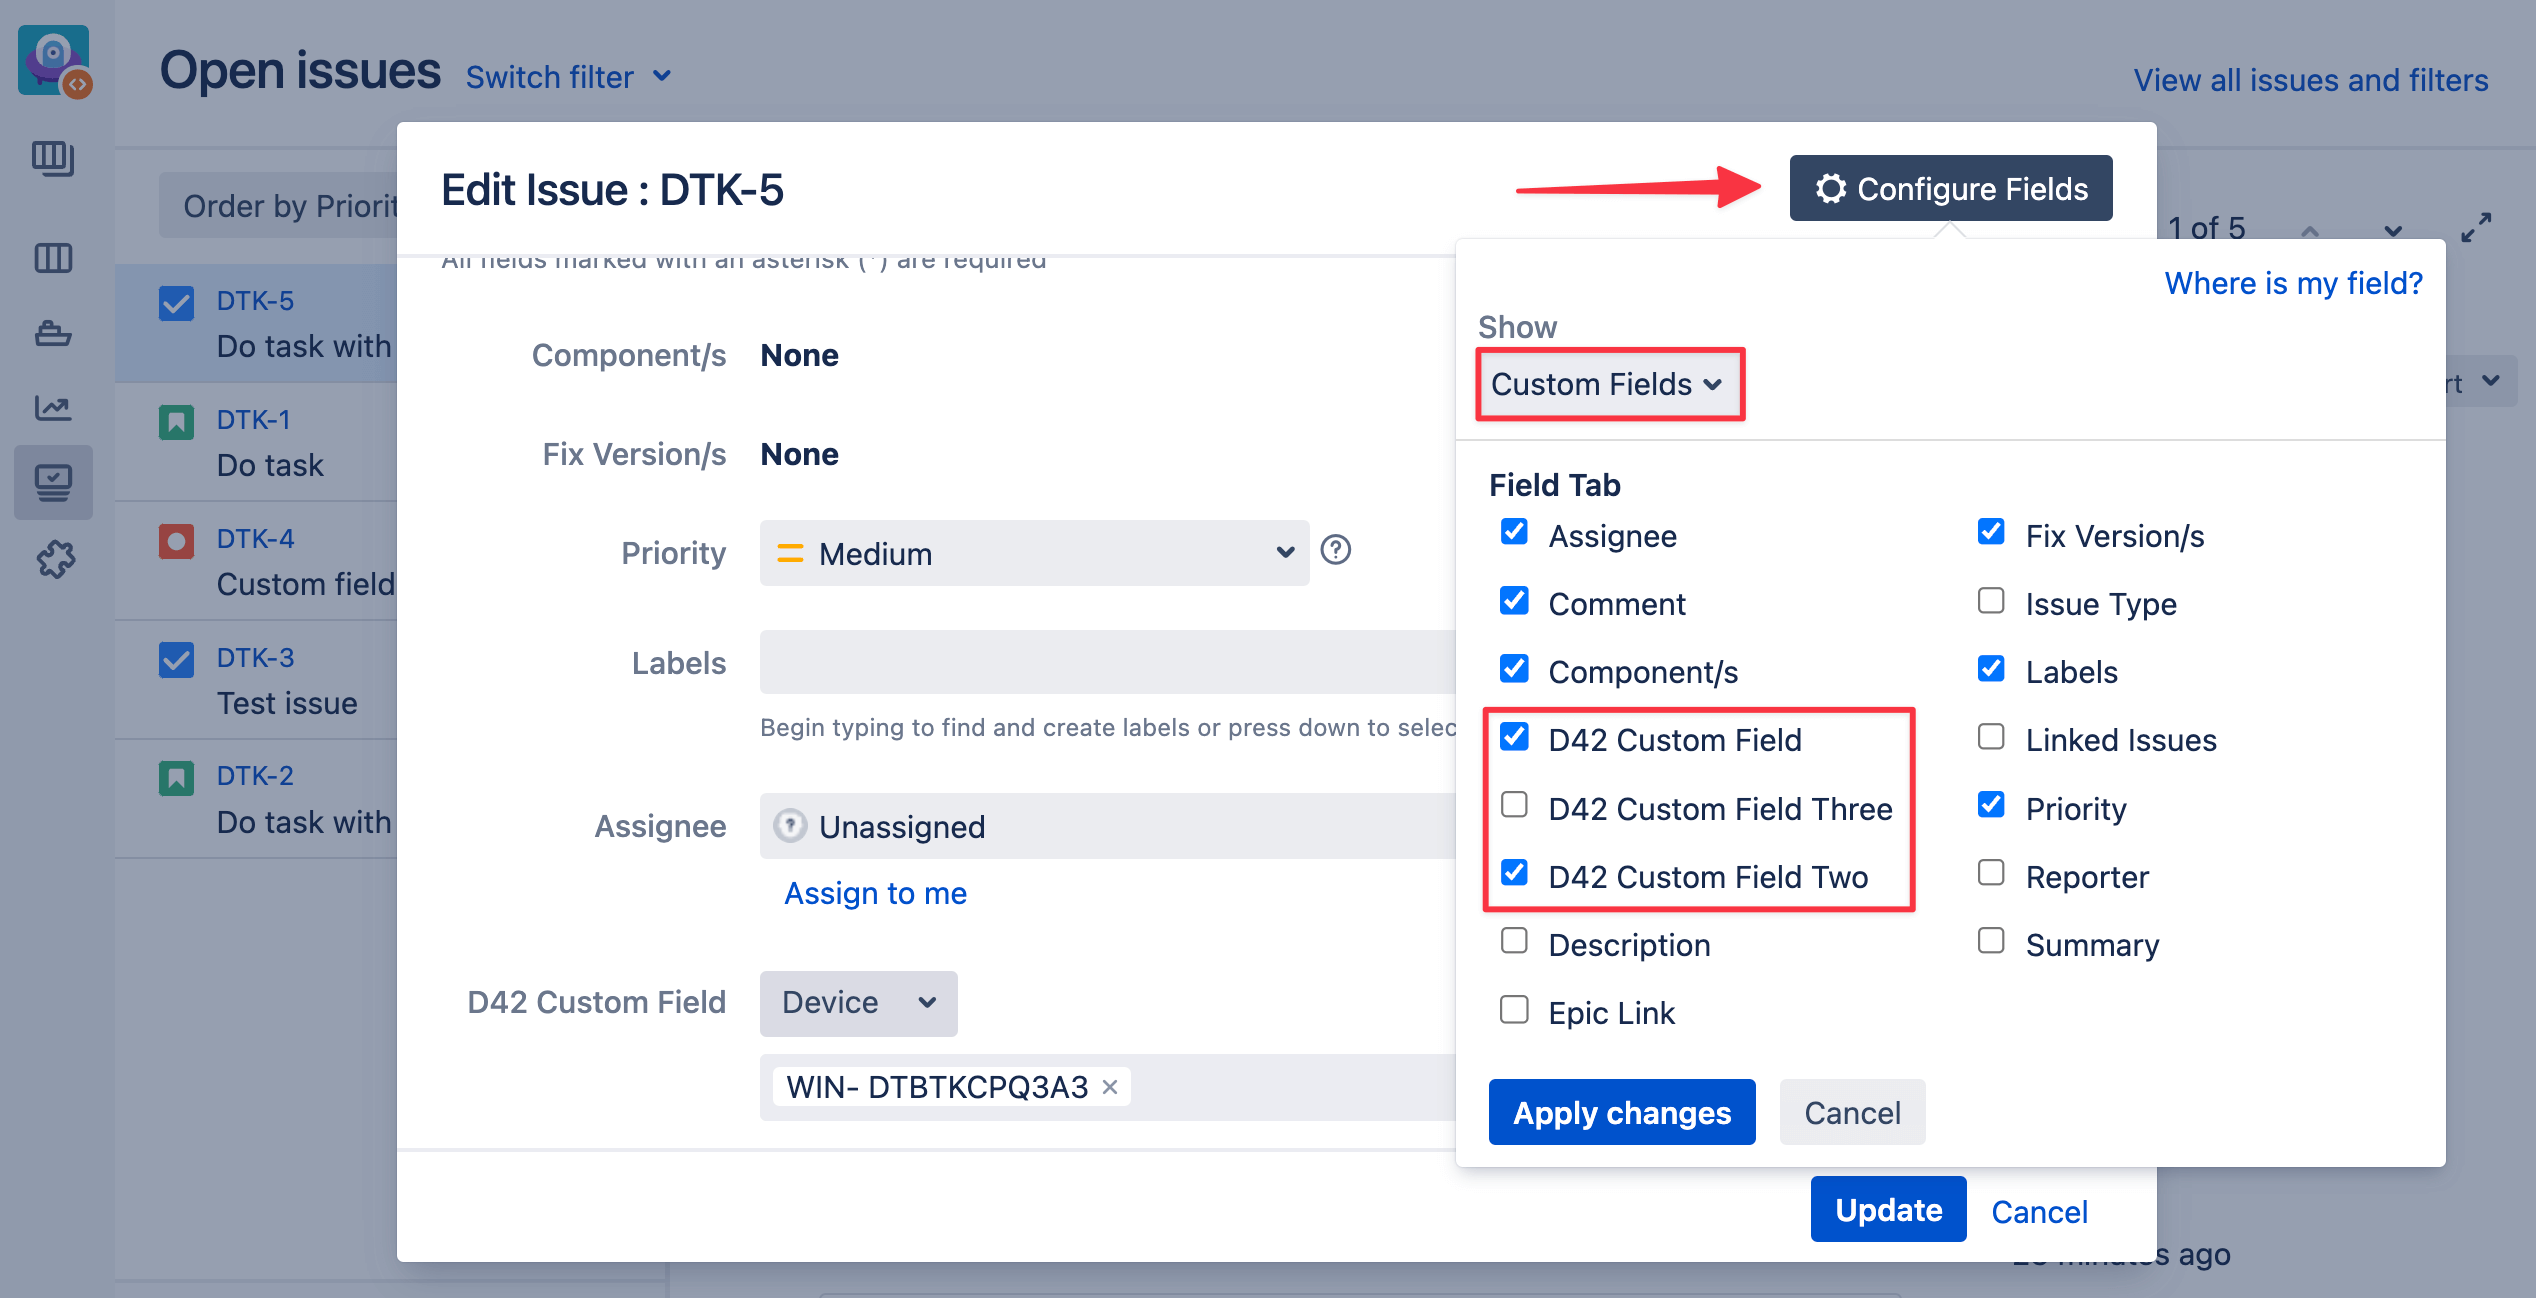
If you don't see your custom field, you can add it by clicking on the Configure Fields button on the top right corner. Select Custom Fields form the dropdown menu under Show and select the checkboxes of the custom fields you'd like. Click on the Apply changes button to save.
For the large scope of CIs plugin uses ajax to request the data for the CI selection list, so the CIs are loaded by portions. It is possible to search the custom field by the term. The search scope is the display name of the CI. In the future, we plan to extend this functionality and use the smart search of data.
Search Issues by Device42 Custom Fields
Device42 custom fields allow full-text search on the CI IDs and parameters. Almost all parameters are available for search, however, users cannot specify exact parameters to search. For example, if you search for the word 'Device' you will find the issues with a custom field containing devices and custom fields with other CI types that contain the word 'device' in their name.
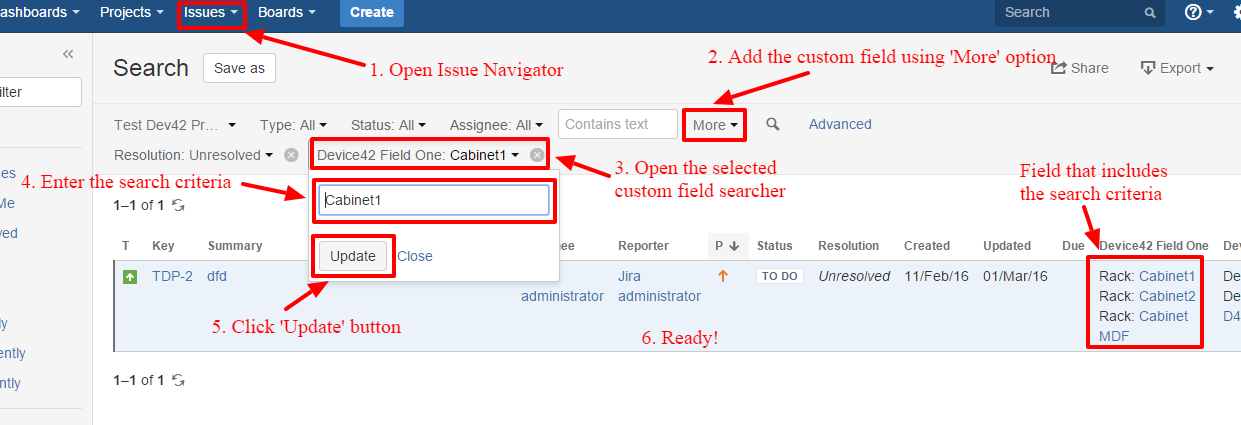
Simple search
- Open the issue navigator. Select 'Simple' search mode
- Click the 'More' selection list. Search for the custom field by name
- Open the added custom field search filter
- Add the search criteria in the text box under the filter
- Click the 'Update' button. You will see the issues filtered by the custom field inside the issue navigator
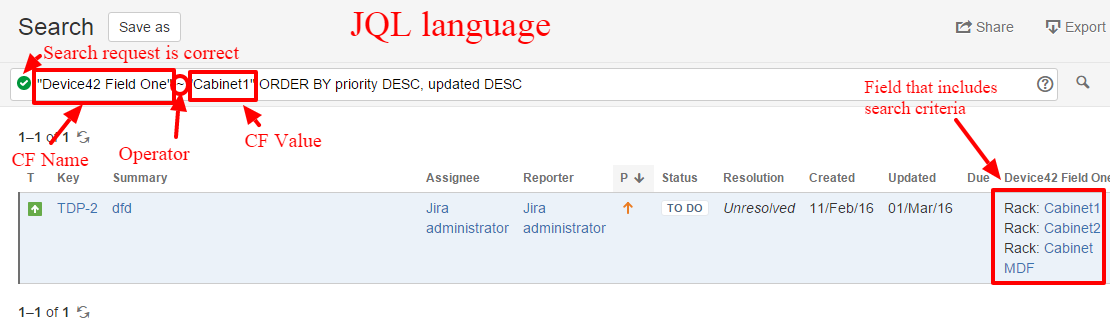
Advanced search
-
Open the issue navigator. Select 'Advanced' search mode
-
Type the search request using JQL query language. Supported operators for the field: '
', '!', 'IS EMPTY', 'IS NOT EMPTY'.Example: D42 ~ "NH*"
-
Press 'Enter' … You will see the issues filtered by the custom field inside the issue navigator.
Jira Workflow Automation
The Jira - Device42 connector plugin allows for the automation of business processes related to Device42 Entities. Current release allows to acquire the IP address in the selected Subnet automatically and configure the permission to show/follow the transition based on the content of the Device42 custom fields.
Post Function
The Device42 post function now have only option to acquire the IP address based on the selected network. The action is performed during the transition in the workflow, for example, when you move the ticket from one status to the other or create the ticket. The post function will gather information about the selected subnet from the Device42 custom field (the field can be selected inside the post function setup), will acquire the IP address from the Device42 instance. The notifications, error messages and IP address information will arrive inside the comments to the ticket.
Add post function to the workflow
To give your project the ability to request the next free IP address from Device42 automatically, do the following:
- Edit the workflow that is used to manage the ticket life cycle for the specified issue type in the target project.
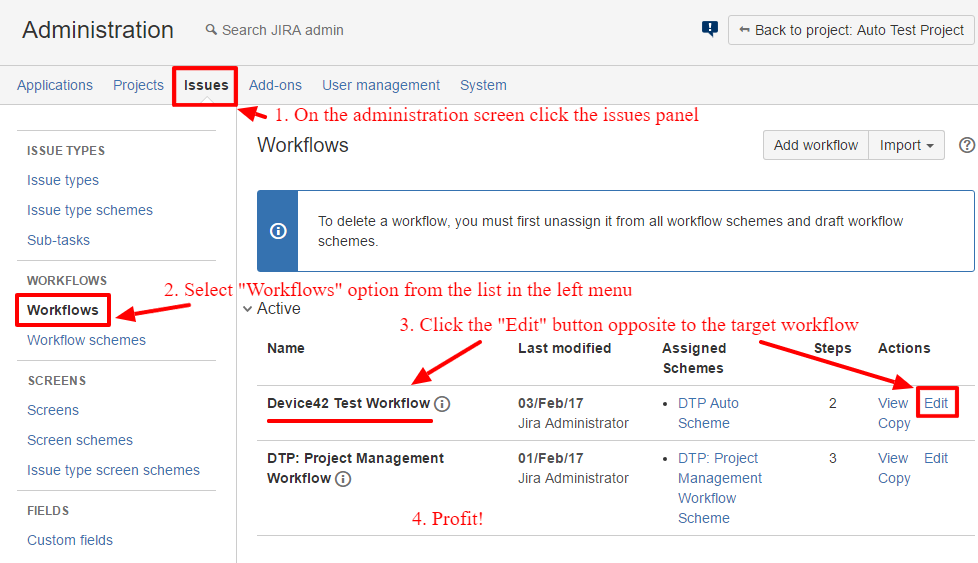
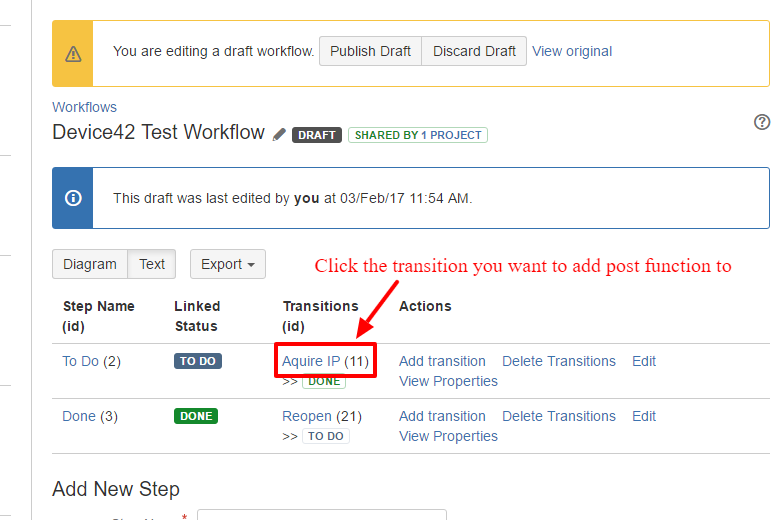
- Inside the opened workflow for the edit mode click the transition you want to automate. If you don't have the needed transition or your workflow is not configured the way you like, please follow the guides https://confluence.atlassian.com/adminjiraserver/working-with-workflows-938847362.html and https://confluence.atlassian.com/adminjiraserver/advanced-workflow-configuration-938847443.html
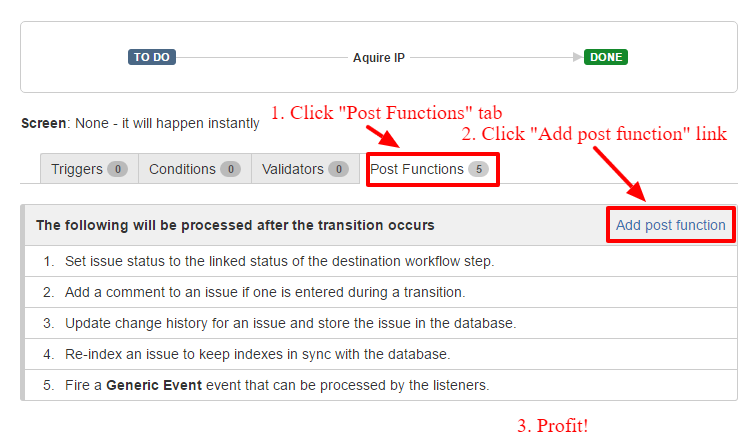
- Inside the transition click the "Post Functions" tab and click "Add post function" link. That will open the list of post functions that can be added to the workflow.
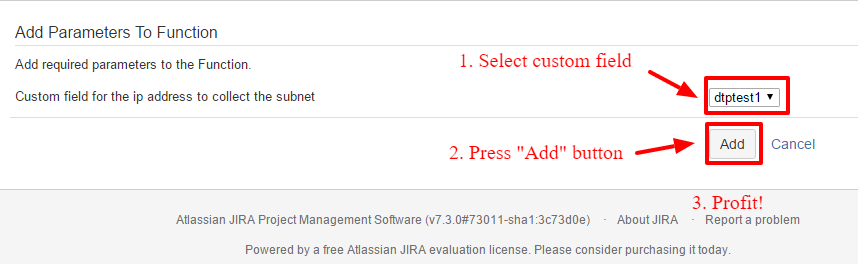
- Select the Device42 automation post function and click the "Add" button
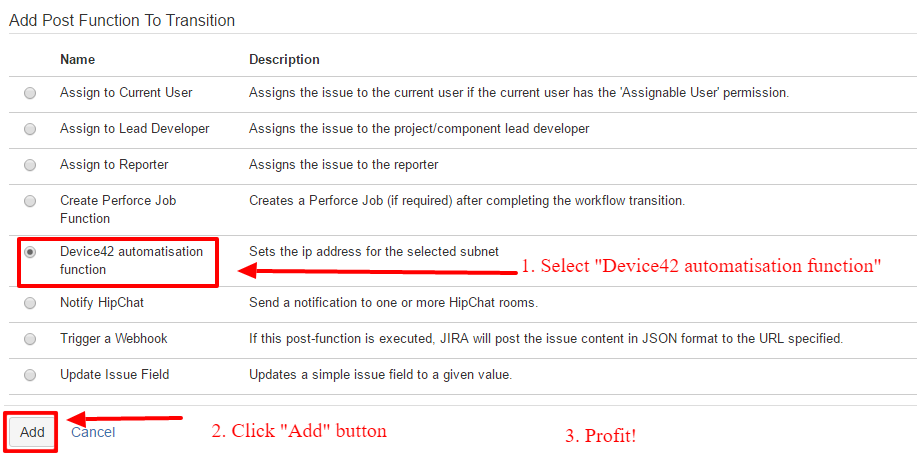
- Inside the edition mode for Device42 post function you can select the Device42 custom field that will have the information about the subnet, where the IP address should be acquired (source custom field, required).
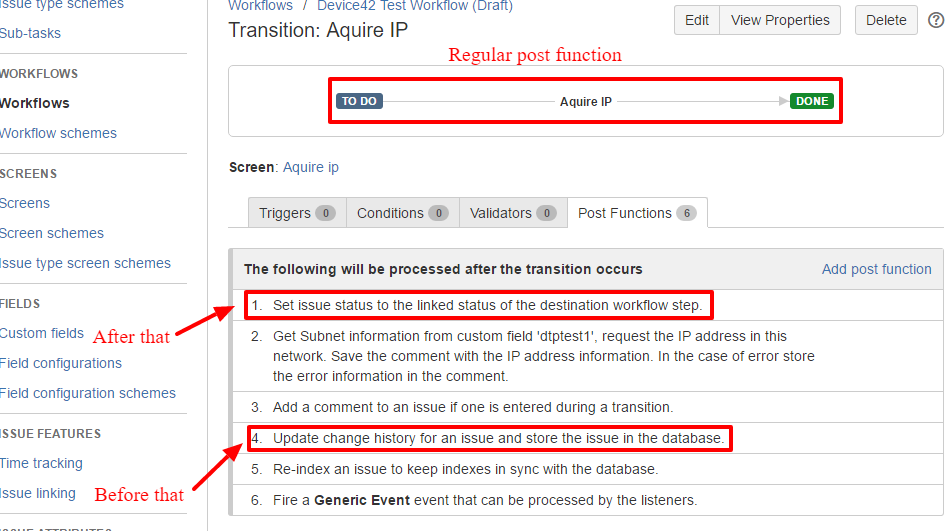
- It is required that the post function is processed in a specific position when configuring the transition. For regular transitions between two statuses, the POST function should be placed between "set issue status" default post function and "Update change history" default post function. By default, the Device42 post function arrives on the second place and nothing should be done.
- When creating transitions, the behaviour is similar except there is another set of POST functions available. You can use a POST function in a workflow the same way you would any regular transition.

Post function usage
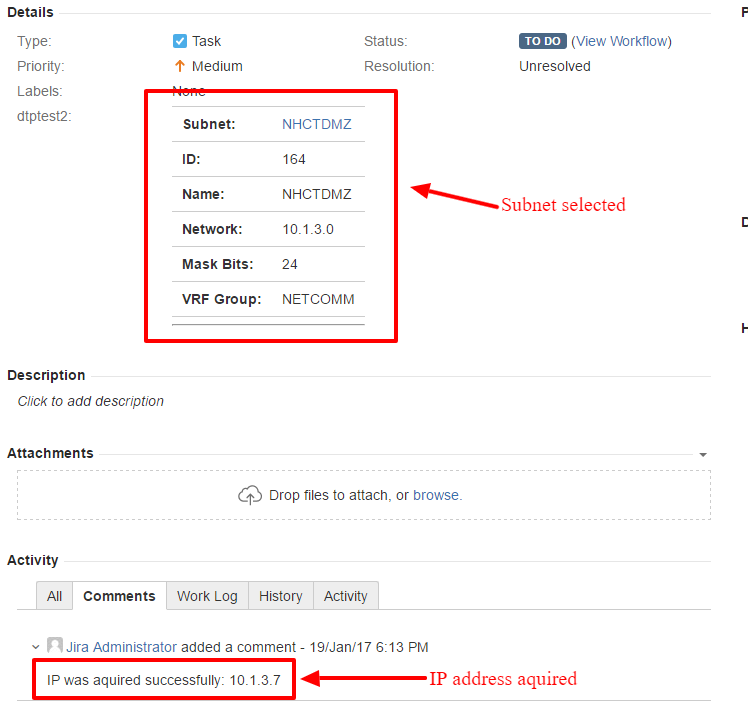
You can just follow the transition, fill the Device42 custom field if needed (inside the transition screen, if it was set up) and get the results of the IP address to acquire inside the comments and custom fields (if they are set up)
Condition / Validator functions
Device42’s Jira plugin has the possibility to validate the Device42 data inside the custom fields during the transition or check the custom field detains to indicate if the transition should be shown at all. Device42 custom fields could be checked on the amount of the CI stored, types of the CIs and values can be validated by the filter on the specific parameter criteria.
Condition specific setup
For the detailed information on condition setup please refer to the https://confluence.atlassian.com/adminjiraserver/advanced-workflow-configuration-938847443.html#conditions section
- Edit the workflow as described in sections 1 and 2 for the post functions
- Select the "Conditions" configuration tab and click the "Add Condition" button to add the new condition
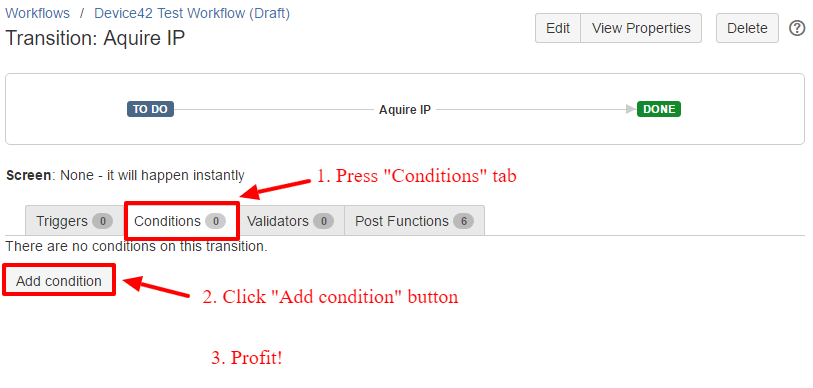
- Select the Device42 condition inside the radio button list and click "Add" button
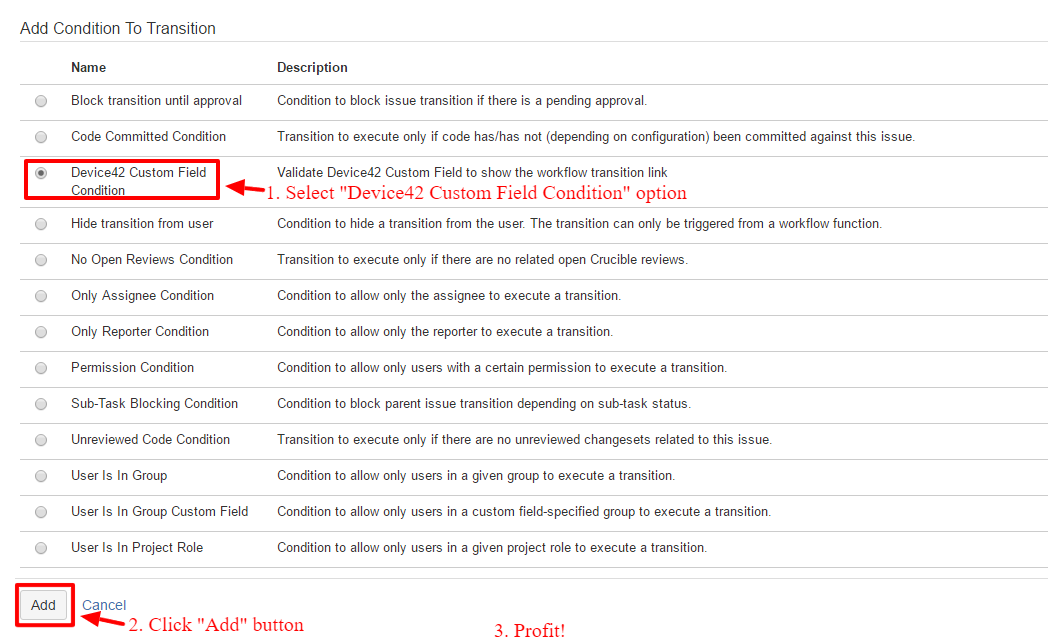
- Follow the generic setup section to configure the condition
Validator specific setup
For the detailed information on validator setup please refer to the https://confluence.atlassian.com/adminjiraserver/advanced-workflow-configuration-938847443.html#validators
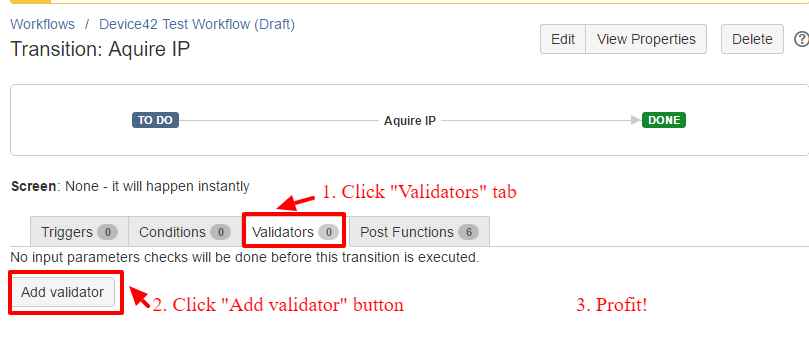
- Edit the workflow as described in sections 1 and 2 for the post functions
- Select the "Validators" configuration tab and click the "Add Validator" button to add the new validator
- Select the Device42 validator inside the radio button list and click "Add" button
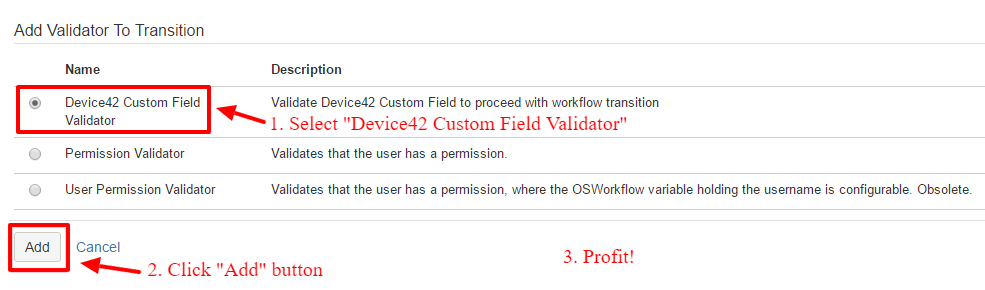
- Follow the generic setup section to configure the validator

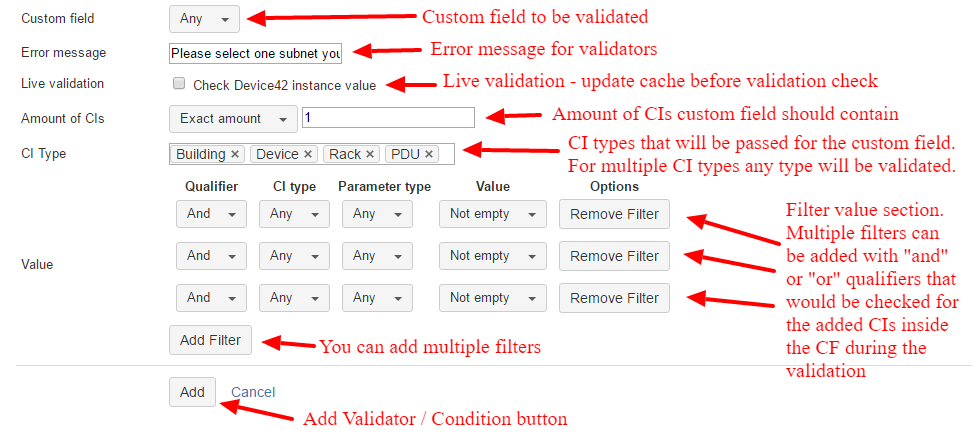
Condition / Validator Generic Setting
The Device42 Custom Field validator and condition have essentially the same setup parameters and usage possibilities. The main/only difference is that the condition function will show or hide the transition link depending on the state of custom fields set up inside the condition configuration, while the validation function will check the states of the custom fields during the transition itself. Unlike the condition, the validator will show a user-specified error message (related to the specific custom field) during the transition, and as mentioned, this is configurable. The error message, when displayed, is also duplicated on the top of the transition screen.
The configuration screens for validation and condition are similar as well. You may freely add sets of validators (with "and" logic) and sets of conditions (with "or" or "and" logic depending on the condition setup).
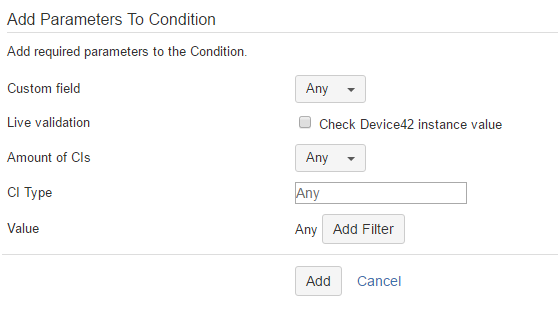
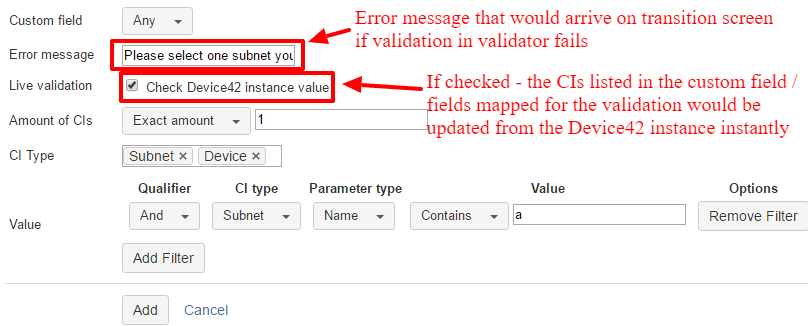
Inside the validation configuration, an administrator can set up the validation for Configuration Items count, CI types, and can also add a filtering check against the configuration item’s parameters. You can also set up live validation that will update the selected configuration items cache with the latest data [a real-time call will be made to Device42 to live-validate the data, ignoring the cached data stored in the Jira DB]. For validation, an administrator can configure both the error message and can choose which custom field should be validated.
Advanced Validation Scenarios
It is possible to set up advanced scenarios where beyond validating the custom field itself, an administrator can select aggregation options such as “Any” (so if any Device42 custom field that exists in the system is validated, the transition will be validated), “All” (so all Device42 custom field existing in system should be validated to pass the transition), “None” (none of the Device42 custom fields should be validated; if any field is validated the validation fails). For the validator, it is possible to add a custom error message that will be displayed when a user fails the workflow validation. The error message should contain clear instructions on how to fulfil the custom field’s validation criteria and should notify the user that a mistake was made. If an administrator leaves the message field empty, the default message will be generated. The administrator also has the ability to configure the live check for the CI details to be validated.
If this option is selected, for the CIs that supports the update by the CI id the data for the CIs stored in the custom field will be instantly retrieved from the Device42 instance and validated against, disregarding the cached value in the Jira DB. All the validation options follow "AND" logic between the sections. That means that the custom field should follow the amount criteria, type criteria, and filter value criteria to pass the validation.
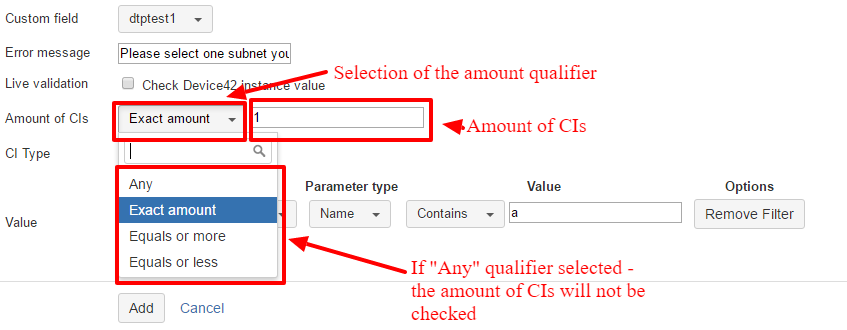
Quantity Validation:
Exact Value, less than or Equals, Greater than or equals
The ‘amount’ validation option allows an administrator to limit the amount of CIs selected inside the custom field.
- The default option is "Any", which switches off this validation criteria.
- Exact value means that to meet the validation criteria, the custom field in the ticket should contain the exact amount of CIs specified. The amount of configuration items can be set up inside the validation configuration in the field right to the amount selection.
- Equals or less means to pass the validation, the custom field in the ticket should not contain any more CIs than the number specified in the configuration. Zero CI is *not* allowed by this validation. Please note, if any other validation set up zero items, validation will not succeed.
- Equals or more means that to pass validation, the custom field in the ticket should not contain less configuration items than the amount specified in configuration.
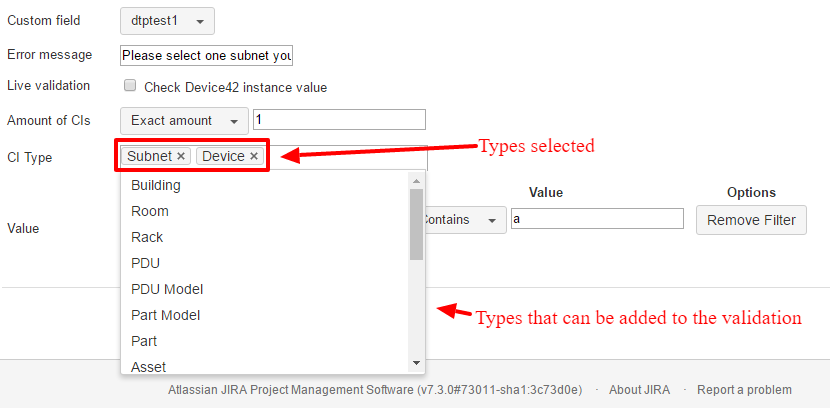
The type validation option allows the administrator to limit the types of CIs that can be selected inside the specified custom field. It is possible to add multiple CI types. When multiple types are added, if Configuration Items with any of selected type is added to the custom field, the validation will succeed. If no types are added, this section will be ignored.
The value validation option is the most flexible one for the validation configuration. You can add one or more sets of validation options to pass or fail validation according to the values contained inside the Configuration Item parameters selected inside the custom field. You can freely add, remove or modify the rows inside this section. Each row can contain sets of configuration controls that allow the addition of validation criteria. If no rows are added, this section will be ignored during the validation. If there are multiple Configuration Items inside the custom field the validation will be passed if at least one configuration item inside the custom field passes the validation.

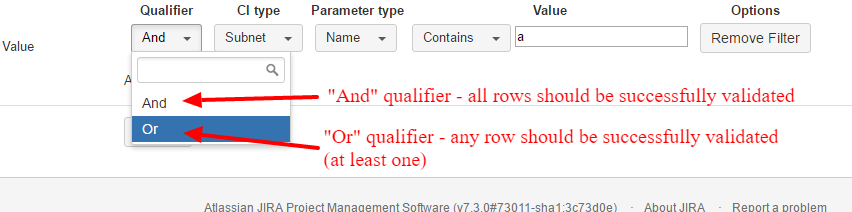
Each value validation row can be added to one of the subsets: "Or" or "And" subset. Those subsets would be checked separately. For "And" subset the validation will be passed when all "And" rows are successfully validated for the checked custom field. For "Or" subset the validation will be passed when any of row will be successfully validated for the checked custom field.
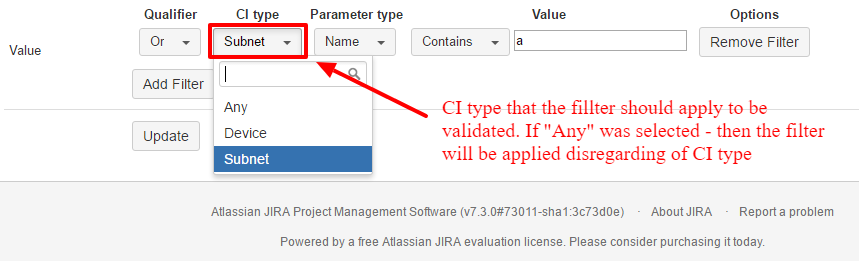
An administrator can specify the CI type the filter will be applied to. If the CI type in the custom field is not correct, the value of the filter validation row will be ignored (only the Configuration items of CI type specified in the filter will be checked. Any other will be ignored). If different CI types are added to the ‘And’ qualifier, only the rows containing appropriate CI types will be applied and checked through validation. If you select any qualifier, the row will be validated for any value in the custom field, disregarding the type, but you will not be able to select the parameter type.
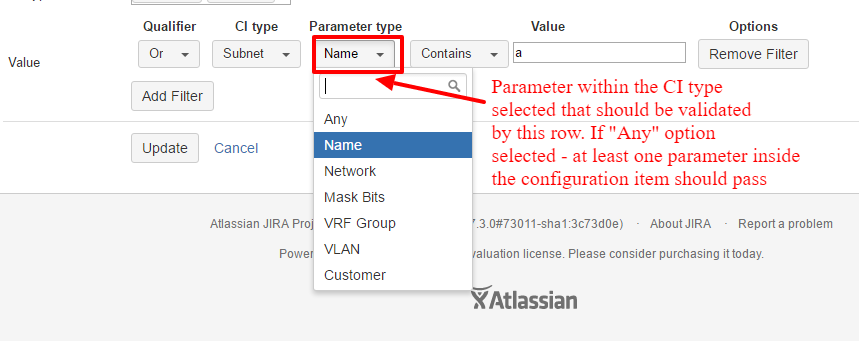
If you selected the CI type for the validation it is possible to specify the parameter to be validated. If the ‘Any’ option is selected, the validation will be checked for all the parameters inside the configuration item. If there is a parameter that passes validation, the validation will be passed for this criterion.
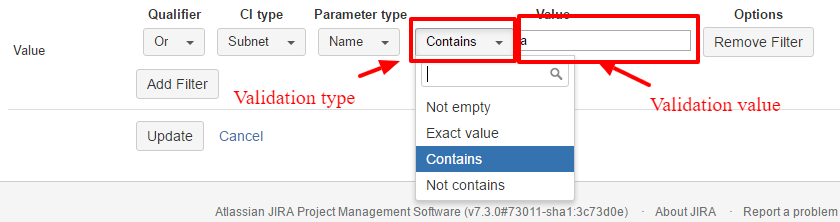
Validation Types
There are 4 validation types that can be used for the validation of specific parameter:
- ‘Not Empty’* the parameter value should exist inside the Configuration Item. Addition value is not used.
- ’Exact Value’ the parameter value should exactly equal the value specified inside the row in the configuration.
- ’Contains the parameter’ value should contain the value specified inside the row in the configuration. The value supports the filter operators and sequences (so you can use the same language you use for the project filters, i.e. "(1|2),3" means that the configuration item parameter should contain "3" inside the text of parameter and additionally should contain "1" or "2" inside the text. For any parameter, all parameters will be checked and validation will pass if any parameter accepting the criteria found.
- ’Not Contains the parameter’ should not contain the value specified inside the row in the configuration. The possibilities for the value are the same as described in contains section.
For the exact value, contains, and not contains validation options, you can select the value. The not empty will hide the option to enter the value:
When the "Add" button is pressed, a validator/condition will be added. The description will contain a short description explaining how the validation will be evaluated. You may edit the validator/condition while your workflow is in ‘edit mode’. To apply the validator/condition to the existing workflow and to real tickets, you must publish it. The example above proposes the validation criteria (inside validator) for the post function that acquires the IP address (with the addition of the filter criteria that the subnet name should contain the letter 'a').

Condition / validator usage
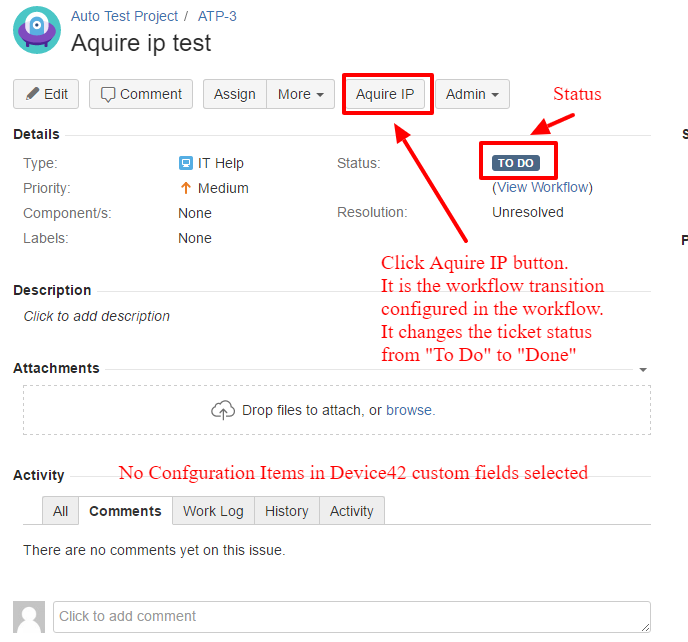
When the workflow is published, the validator/condition will start to work. As an example, the following workflow has to do and Done statuses, and during the transition, it will acquire an available IP address; this workflow will ask for the subnet to be specified during the transition, as well. The custom field dtptest1 is used on the view screen, and the transition contains the settings to prompt with the "Acquire IP" screen. The acquire IP screen contains only the dtptest1 custom field.
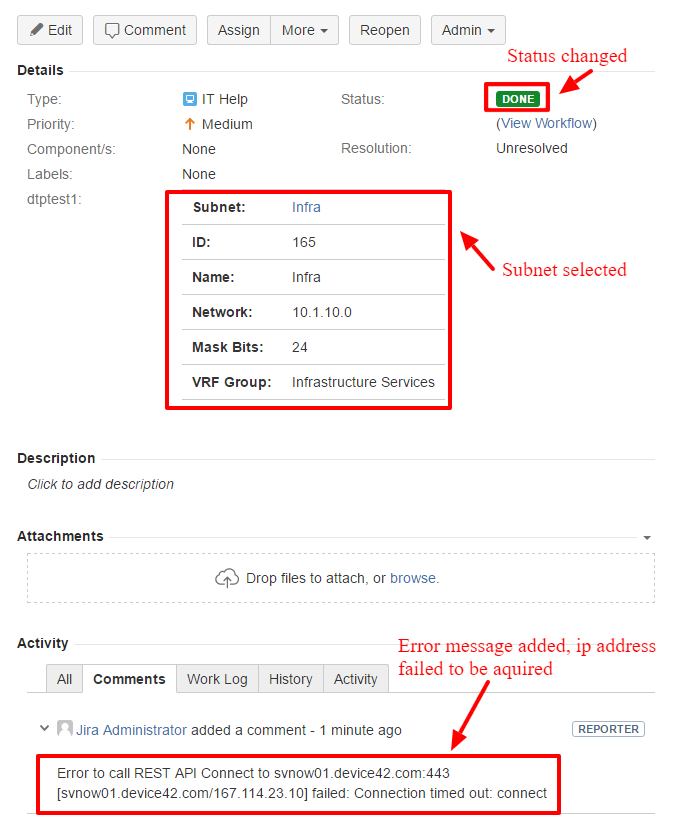
When a user enters the wrong data into the custom field the validator will fail the transition and indicate the error on the bottom to the custom field with duplication on the top.

When a user enters the proper data the transition will pass, and either the new IP address will be acquired via the post function or the error information will be inserted into the comment/text custom field linked to the post function.
Jira Applications support
Jira Software support
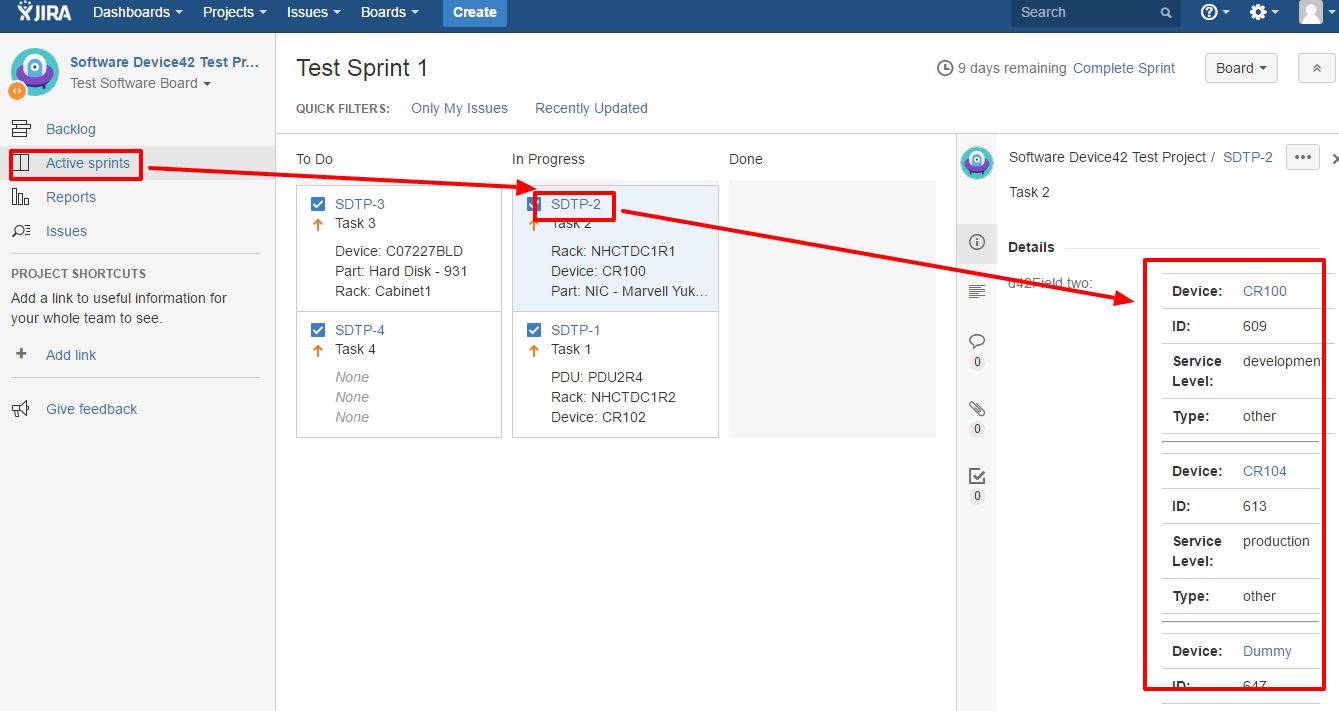
You can use Device42 Custom Fields on Jira Software boards.
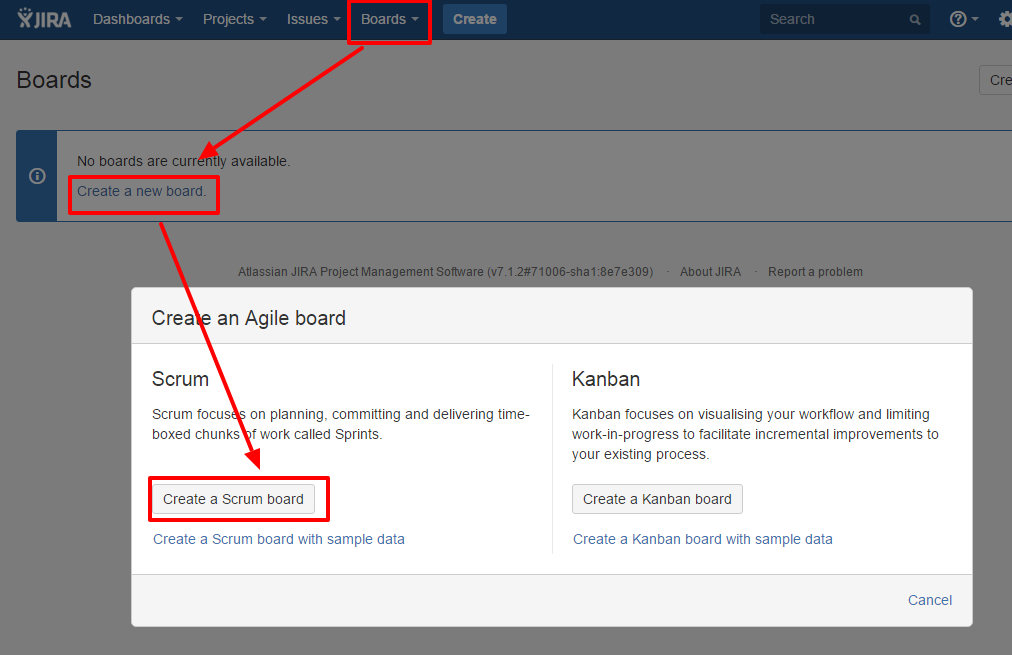
- If you do not have a Jira Software board you can create the new one
- You can configure the created or the existing board to add the Device42 Custom Fields to the Jira Software screens
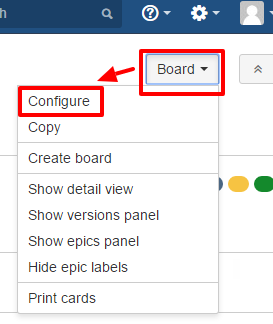
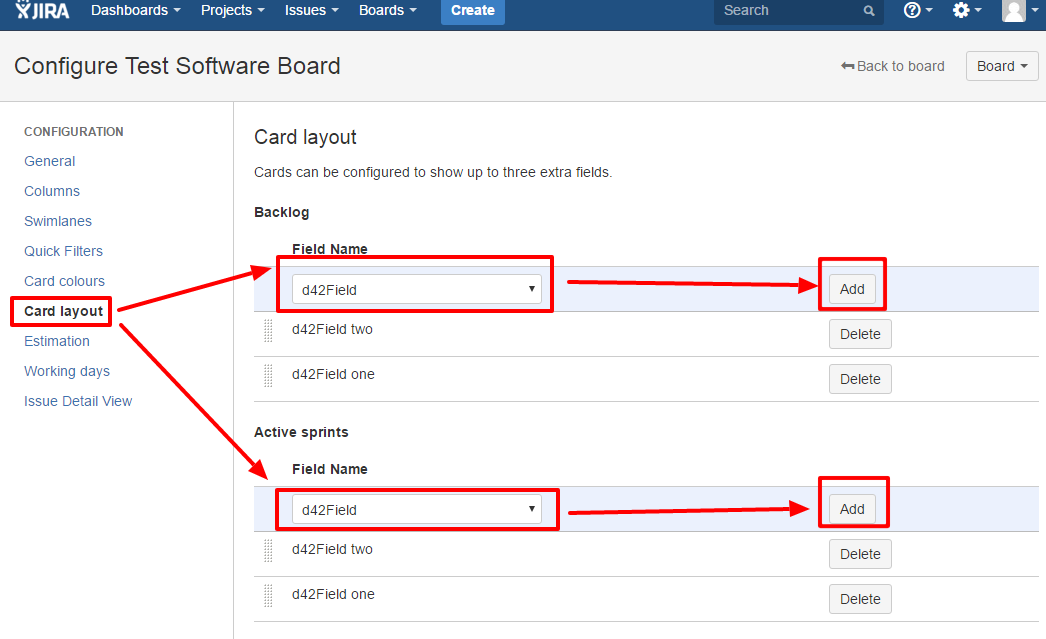
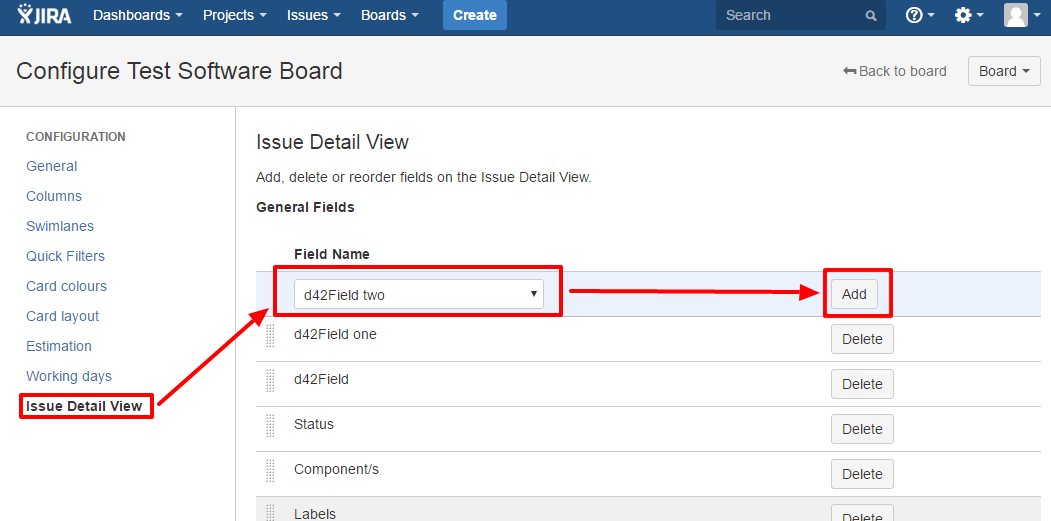
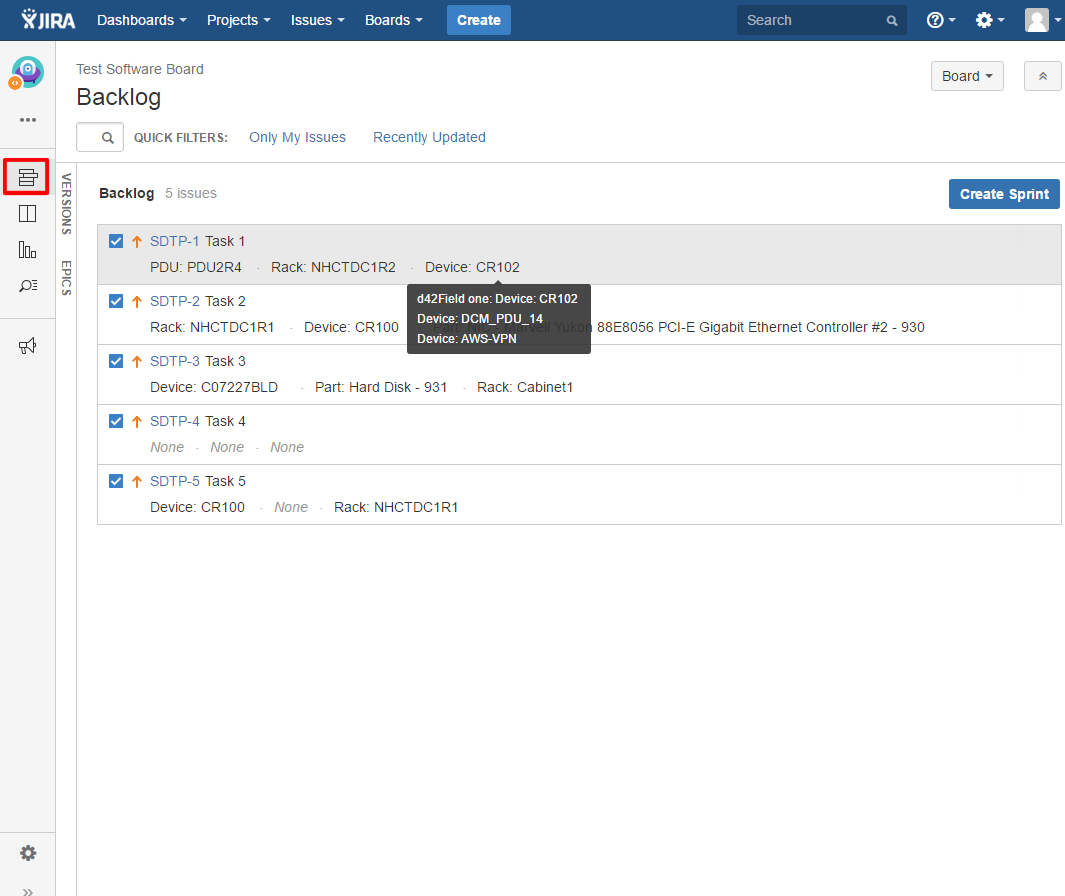
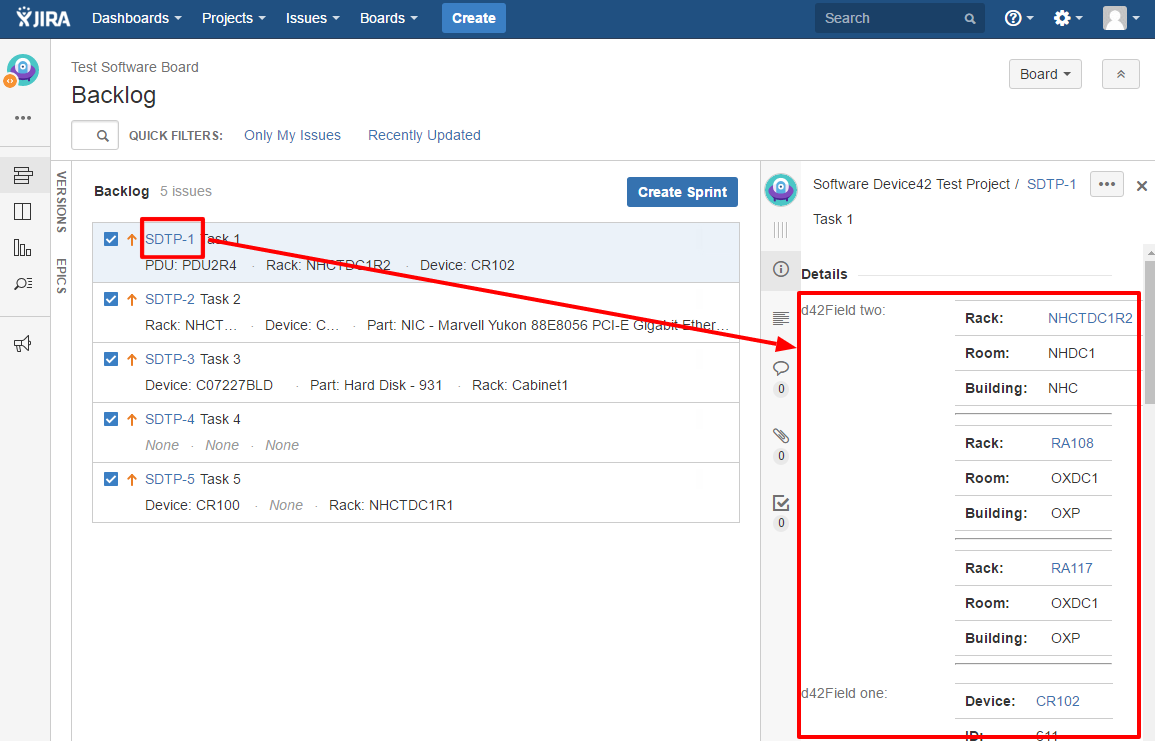
- Inside the Board Configuration screen you can add Device42 Custom Fields to the Backlog card view, Sprint card view (see Card Layout) or to the Issue Details View (see Issue Detail View)
- As the result you will be able to see the Device42 fields inside the Jira Software board
Jira Customer Portal support
You can use Device42 Custom Fields inside Jira Service Management customer portal.
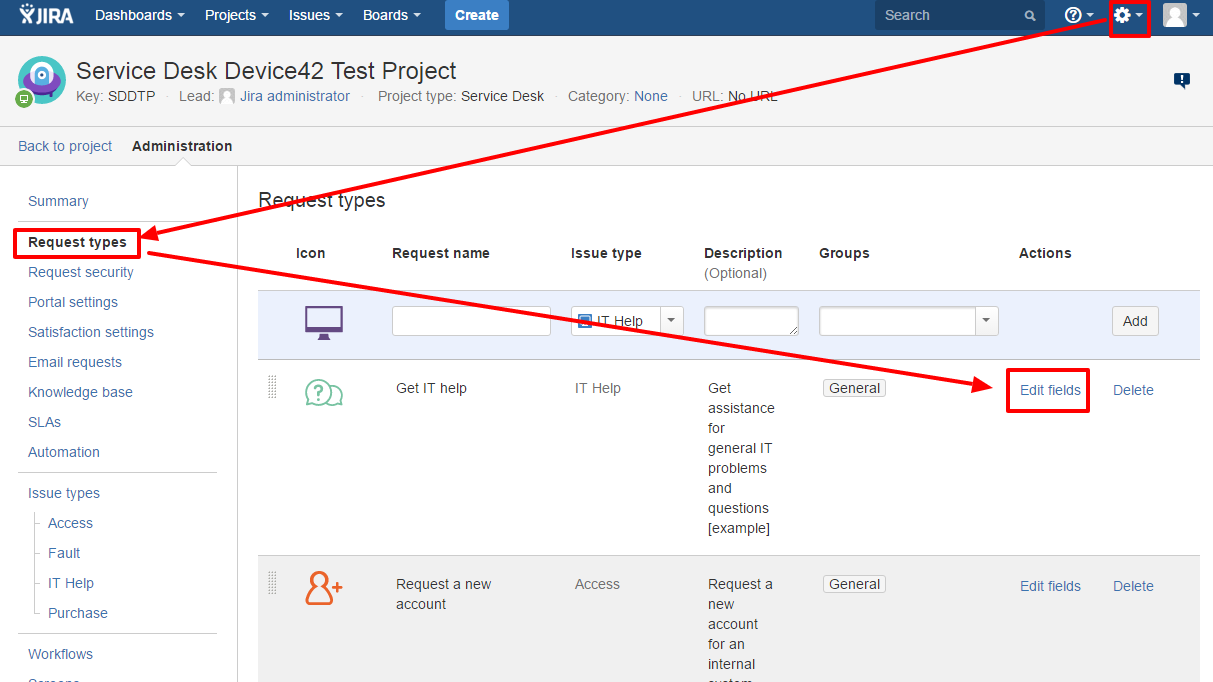
- For the Service Management Portal you want to add Custom Fields to open Service Management Project administration. Open Request Types section. Open Edit Fields link for the needed ticket.
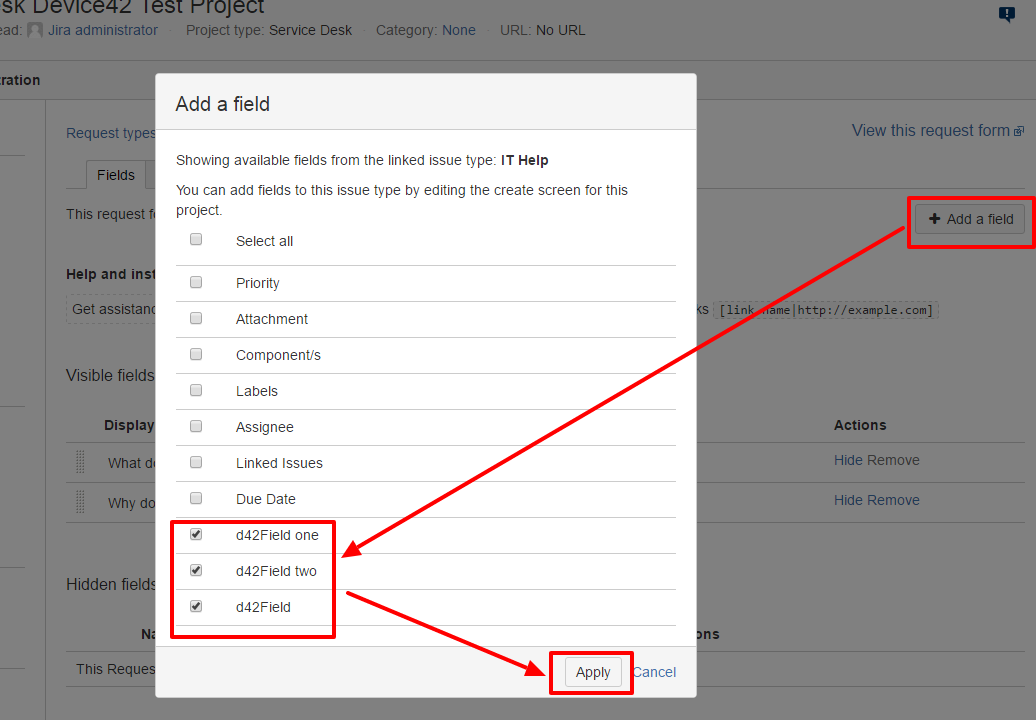
- Press "Add Field" button. Select the needed Device42 Custom Fields and press Apply button.
- Your customers will be able to use the Device42 Custom Fields when they are creating the tickets inside the customer portal