Jira Service Management Integration
Jira Service Management Cloud (or JSM Cloud) is a comprehensive service desk solution designed to optimize and elevate IT service management processes in enterprises. It offers a wide range of powerful features and tools aimed at expediting incident resolution, managing changes, and handling service requests, resulting in enhanced customer satisfaction and operational efficiency.
Please note that the JSM Assets app is the currently supported Device42-Jira integration app. It is available on the Atlassian Marketplace.
Support for the 'external' JSM Assets integration app ended on December 30, 2024, as Atlassian has implemented asset capabilities that are 'internal' (native) to its premium Jira platform.
Device42 for Jira Service Management
This section is about the Device42 for JSM app. Refer to the Device42 for JSM Assets section for information about the Device42 for JSM Assets app.
JSM Cloud seamlessly integrates with Device42 using the Device42 for Jira Service Management app available from the Atlassian Marketplace. The Device42 JSM app efficiently transmits data and augments JSM Cloud capabilities.
If you handle infrastructure assets, operate on a large scale, or have plans for future scalability, integrating Device42 with JSM enables you to manage your team's tasks efficiently and directly associate Jira tickets with the relevant assets controlled through Device42. The Device42-JSM combination brings the benefits of an enterprise configuration management database (CMDB) to Jira Service Management.
Now we'll show you how easy it is to set up the Device42-JSM integration.
Integrate Device42 and Jira Service Management
With just a few minutes of setup, your Device42-Jira integration will allow you to link assets between the two systems.
Prerequisites:
- Administrator privileges to a running Device42 virtual appliance. Update your software or download a free trial.
- Administrator privileges to a JSM Cloud account.
- A network setup that allows the browser to access
jsm.device42.io. Ensure outbound communication is not blocked by WAF or other network and security controls.
Setting Up Device42
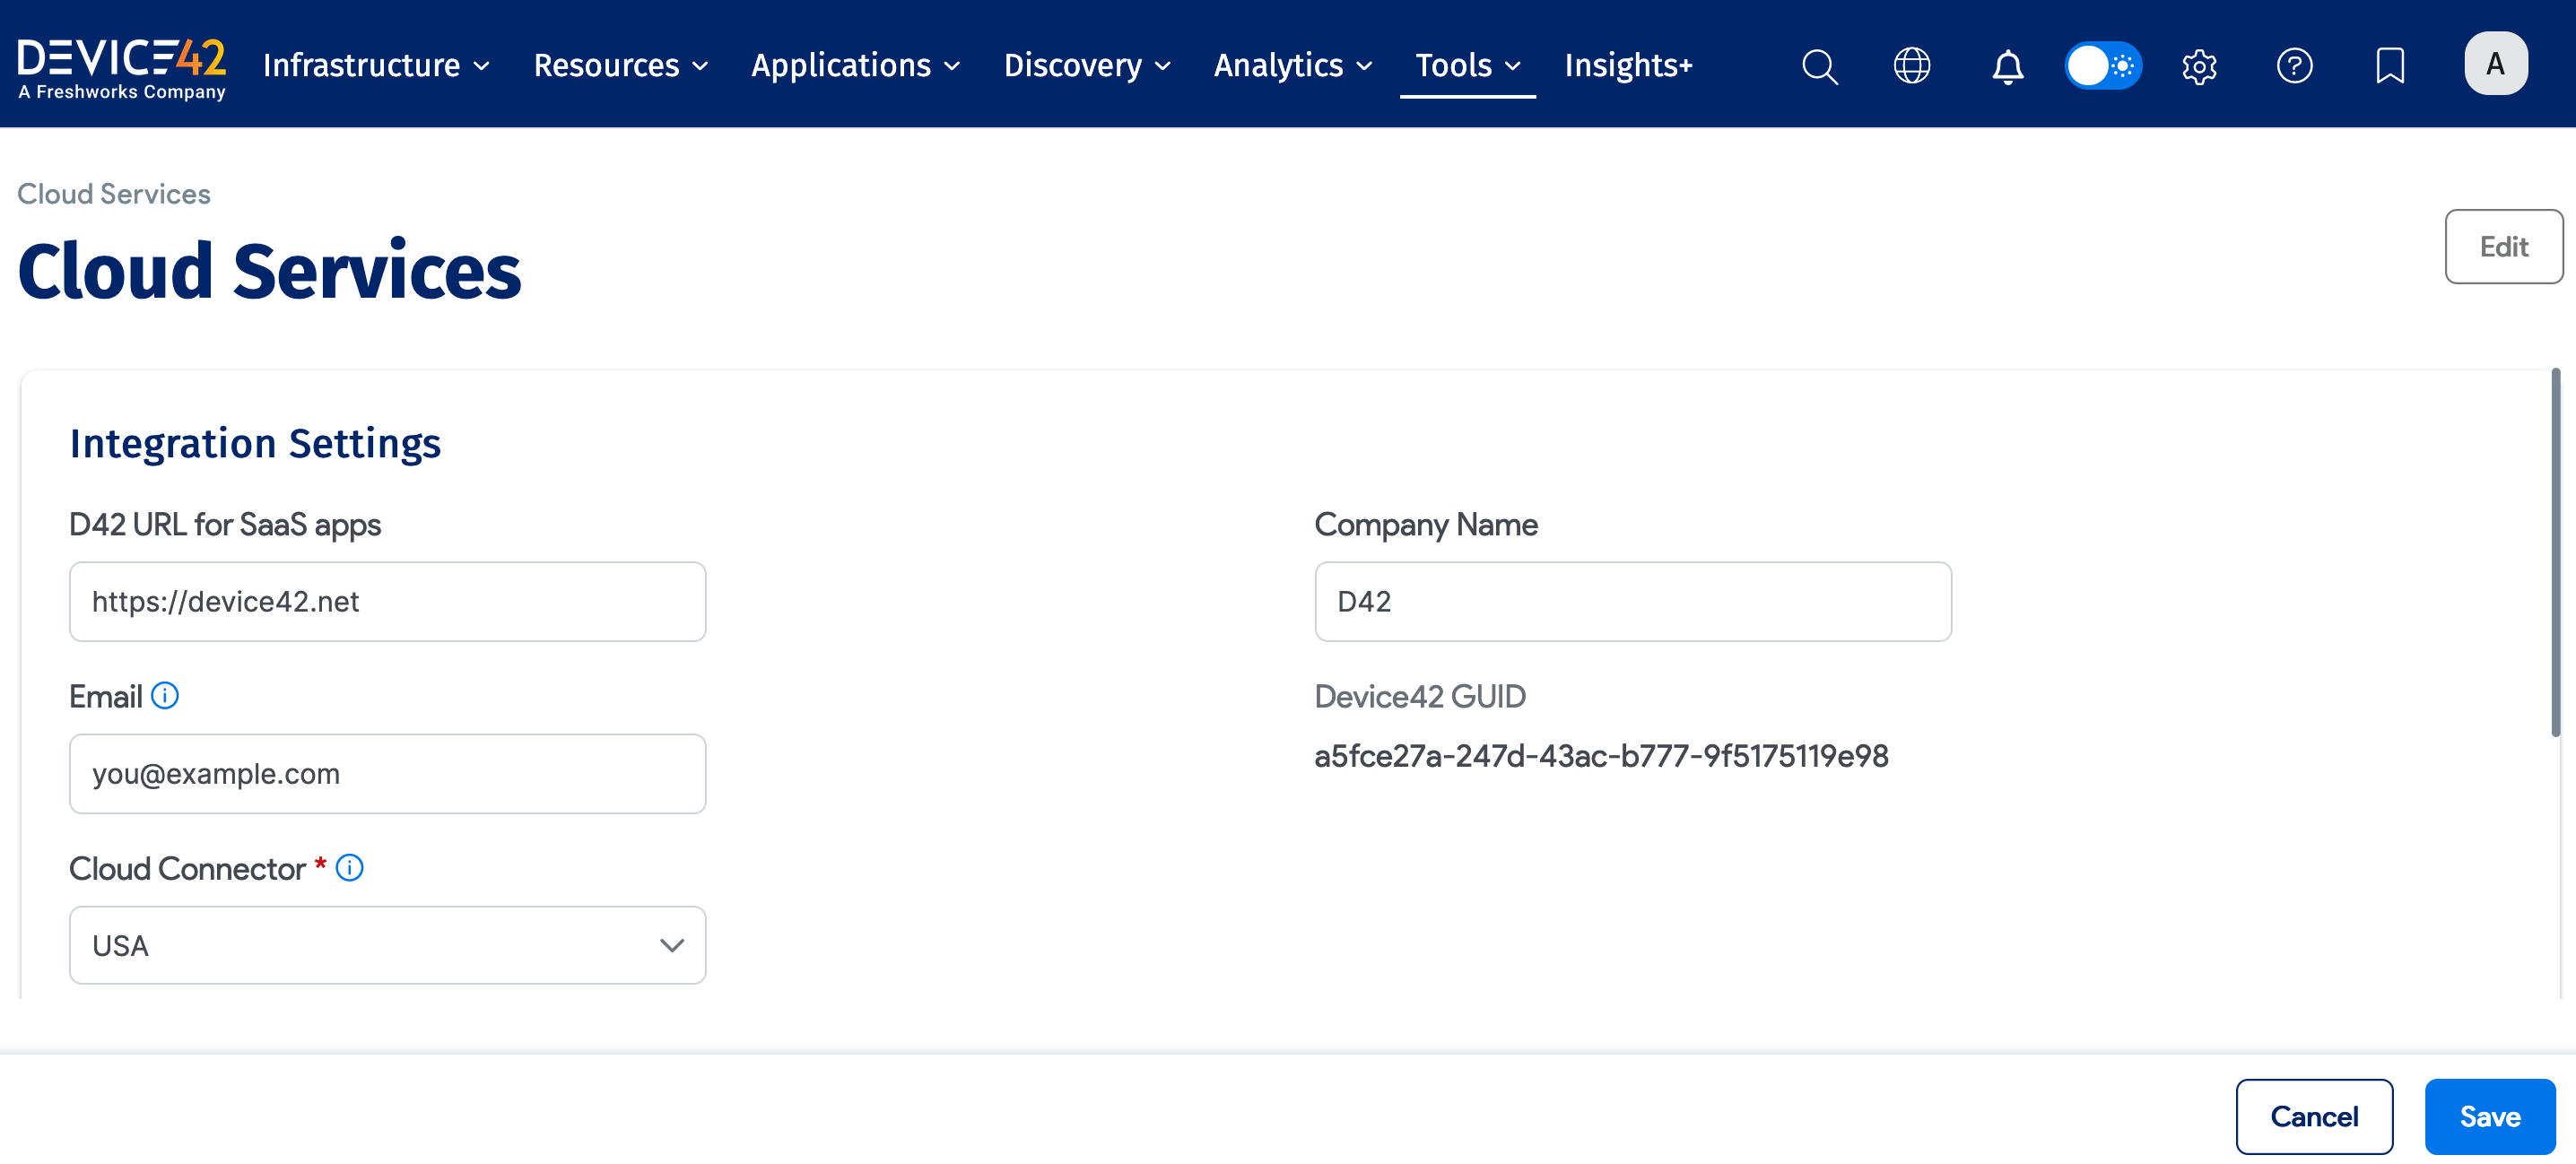
We'll start by preparing Device42 for cloud service integrations. Navigate to Tools > Integrations > Cloud Services, and complete the following fields:
- D42 URL for SaaS apps: This is the hostname your Device42 instance is accessible on.
- Company Name: Your company name.
- Email: Your email address.
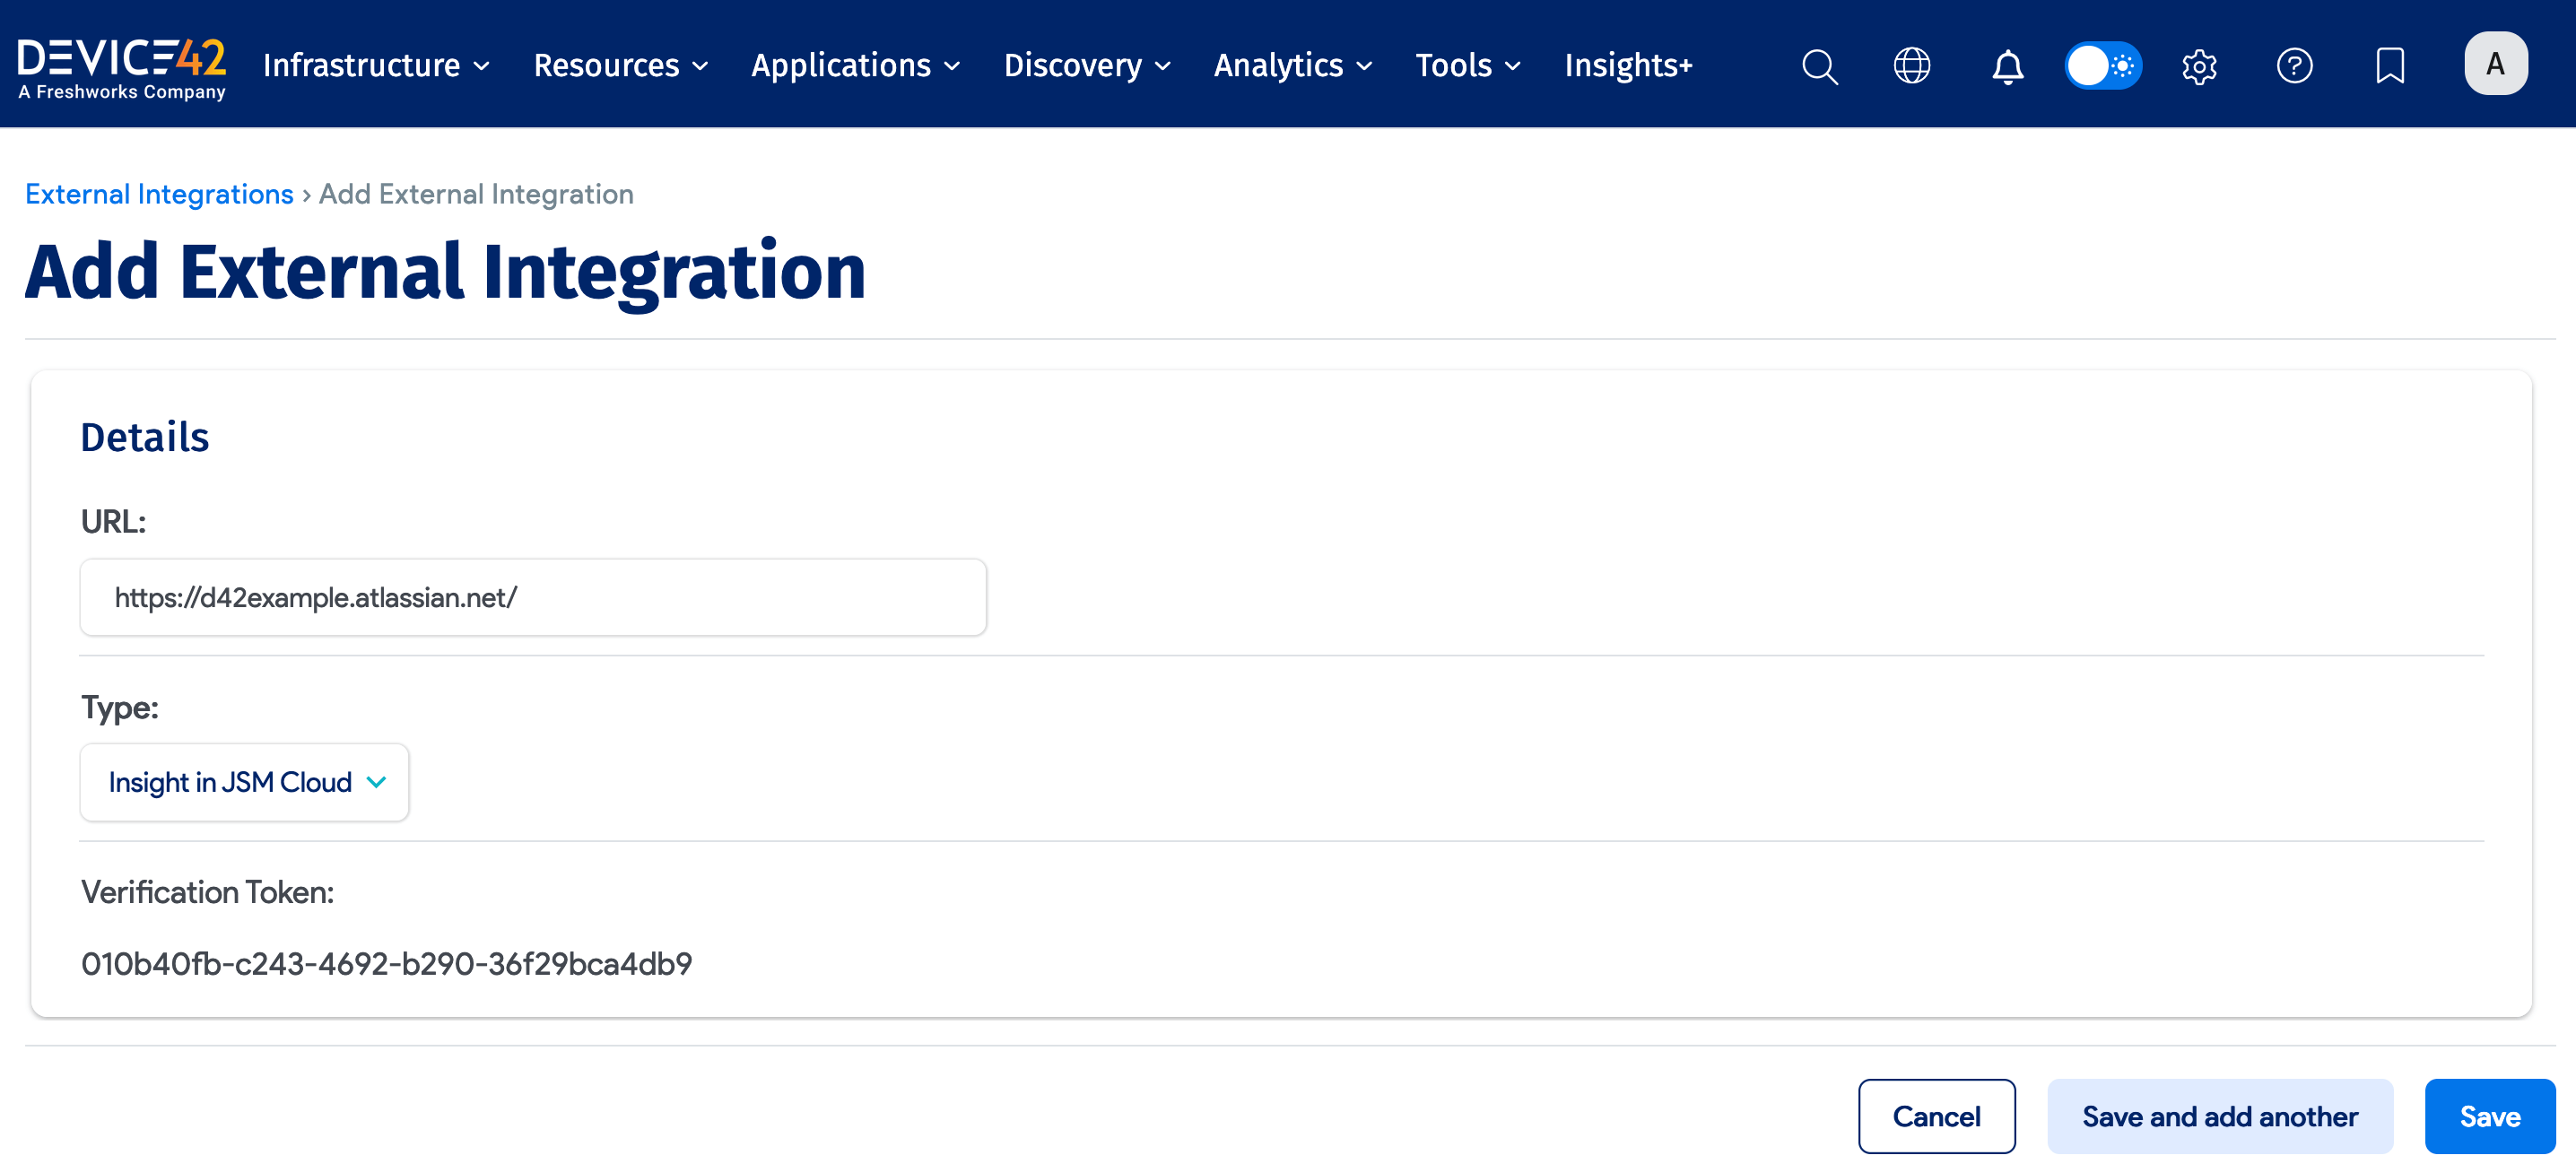
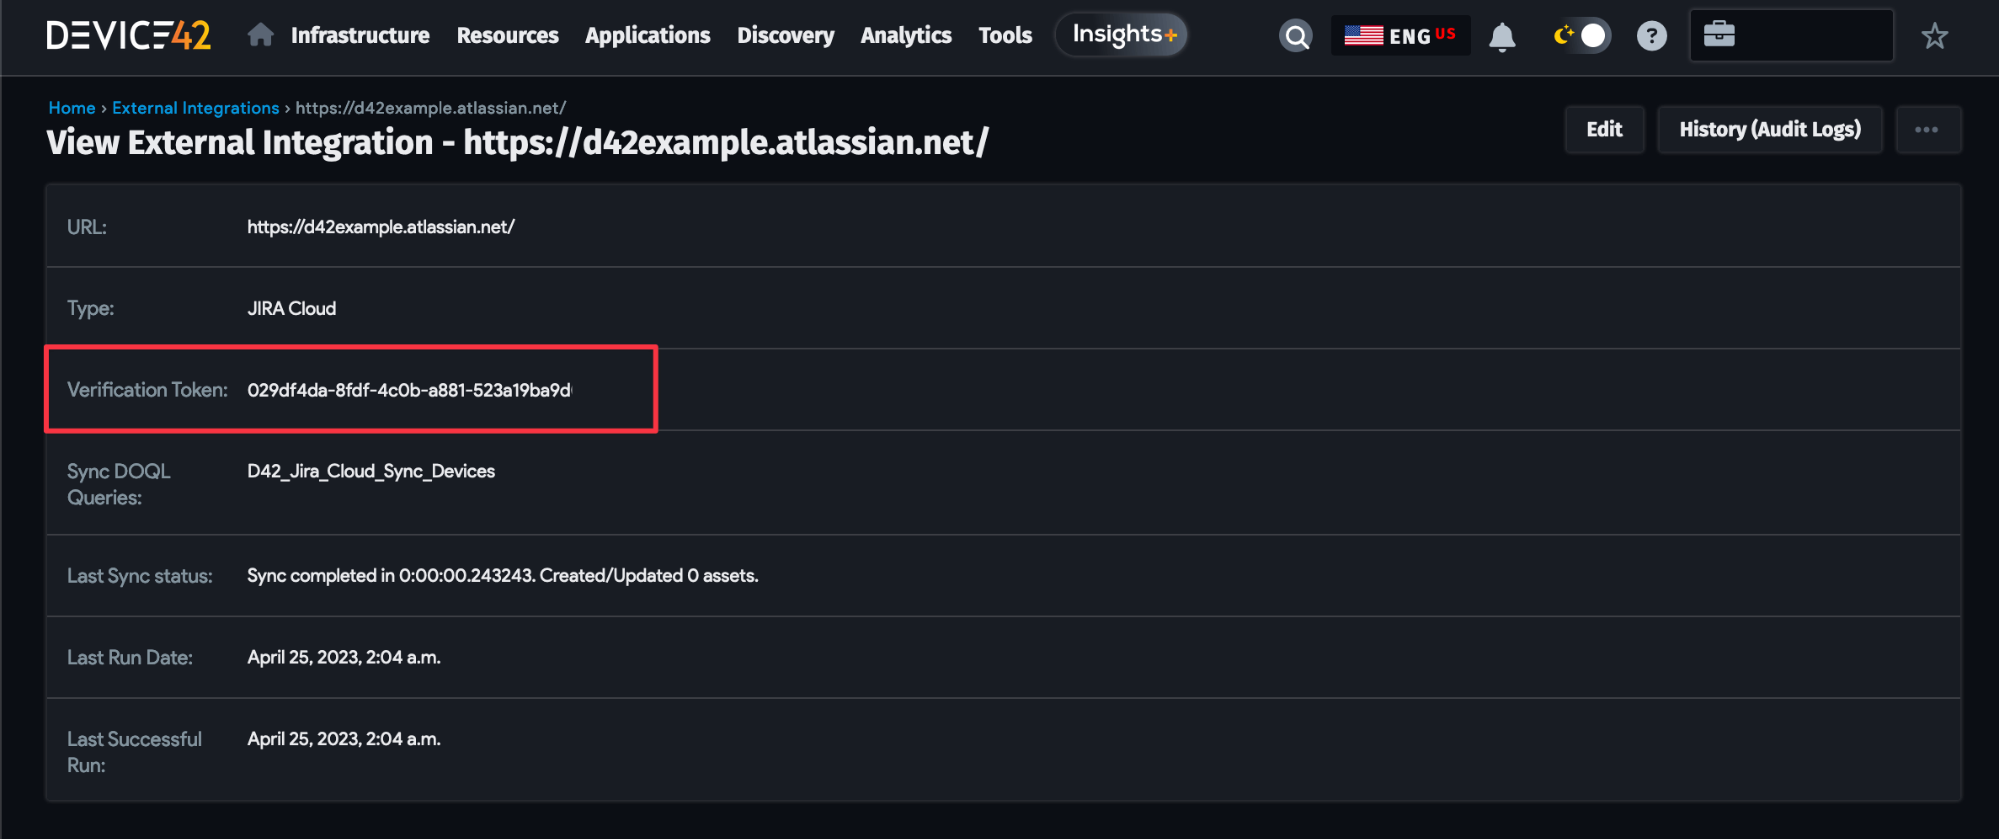
Next, we'll set up a Jira integration. Navigate to Tools > Integrations > External Integrations and add a new external integration. Set the URL as the hostname for your Jira Cloud instance, like this:
Installing the Device42 JSM App
The next step is to configure Jira.
Note that the instructions below assume you are using a JSM Cloud team-managed project.
First, on the Atlassian Marketplace, install the Device42 for Jira Service Management app.
When the app is installed to your Jira account, configure it from Apps > Manage Your Apps > Device42 Jira Service Management > Configure.
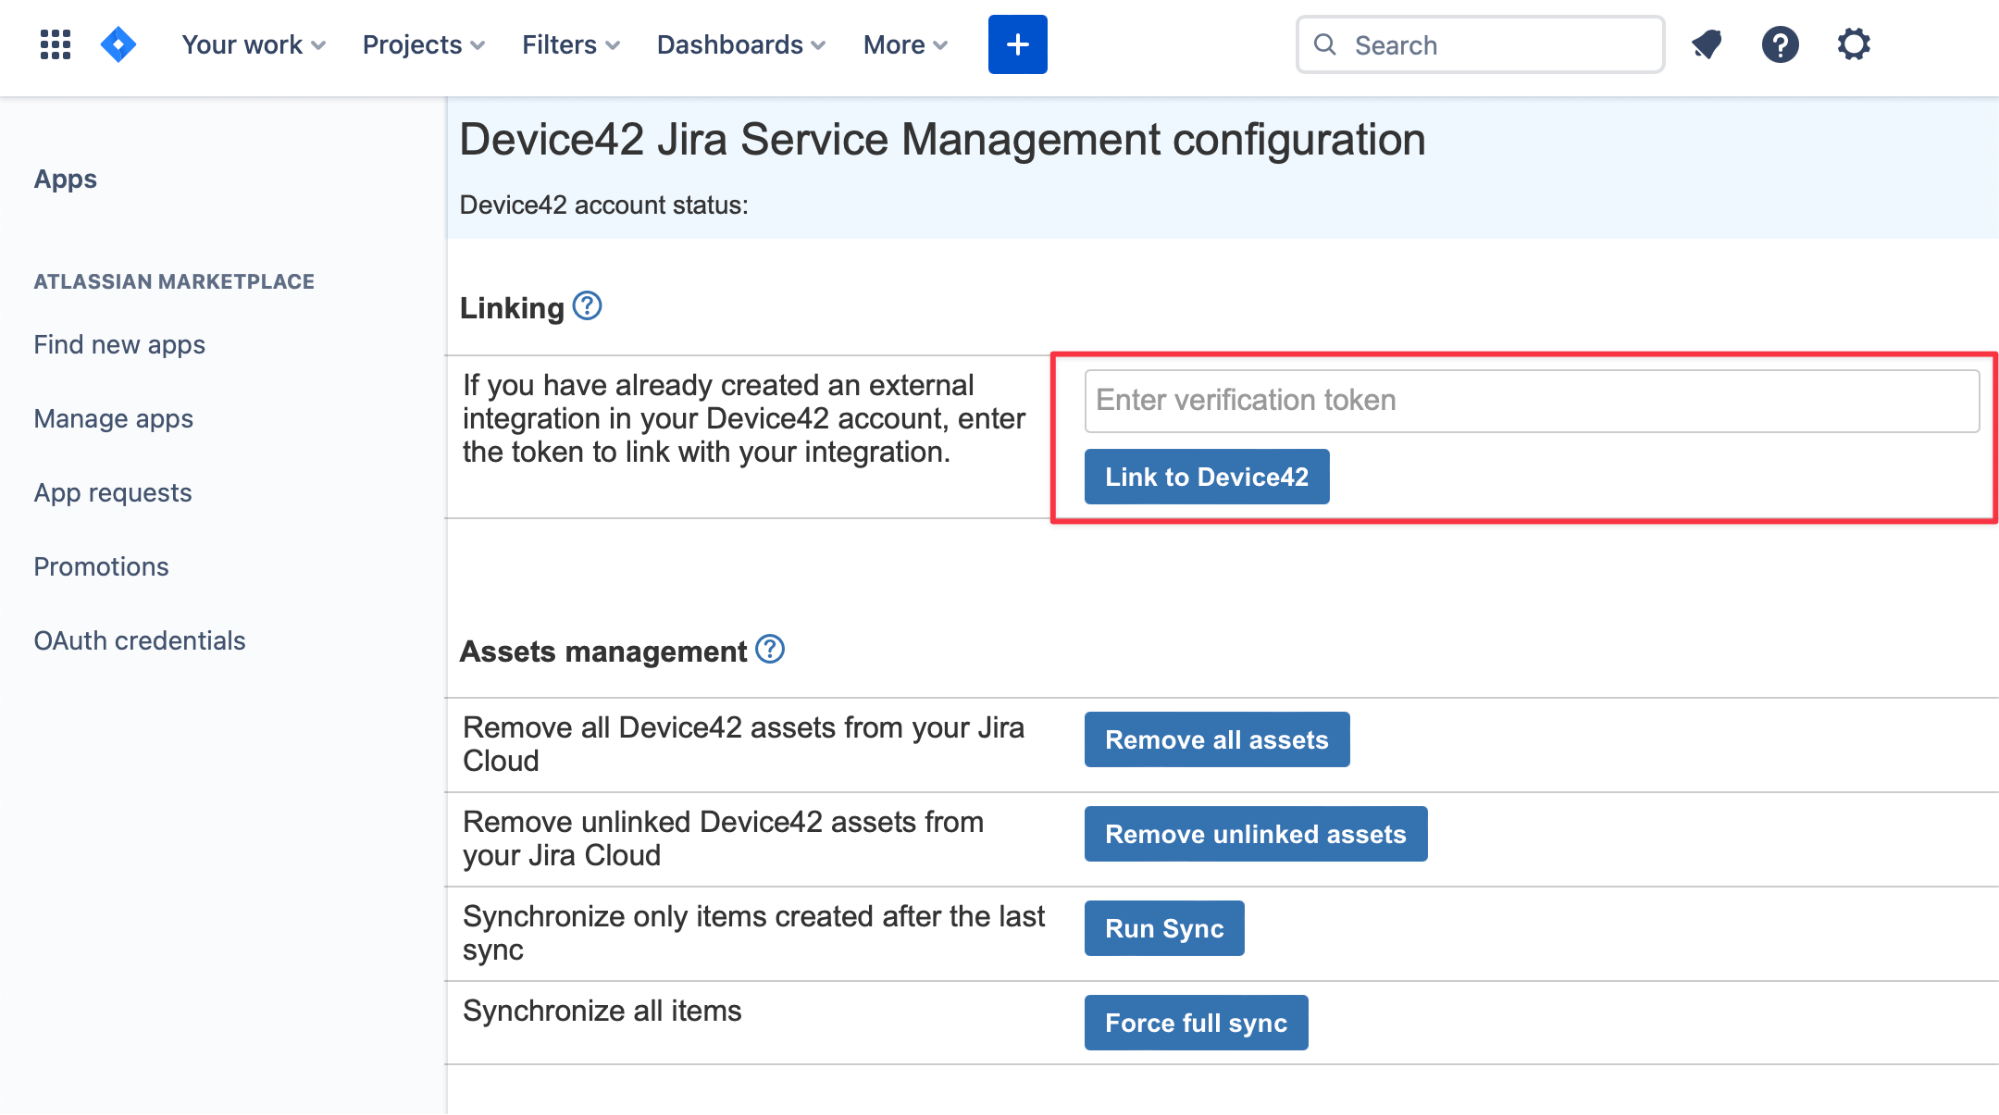
You’ll need your verification token from Device42. To find it, return to Device42 and select Tools > Integrations > External Integrations.
Once you’ve entered your verification token in the Jira configuration and saved the settings, the Device42 account status should show as "Linked":

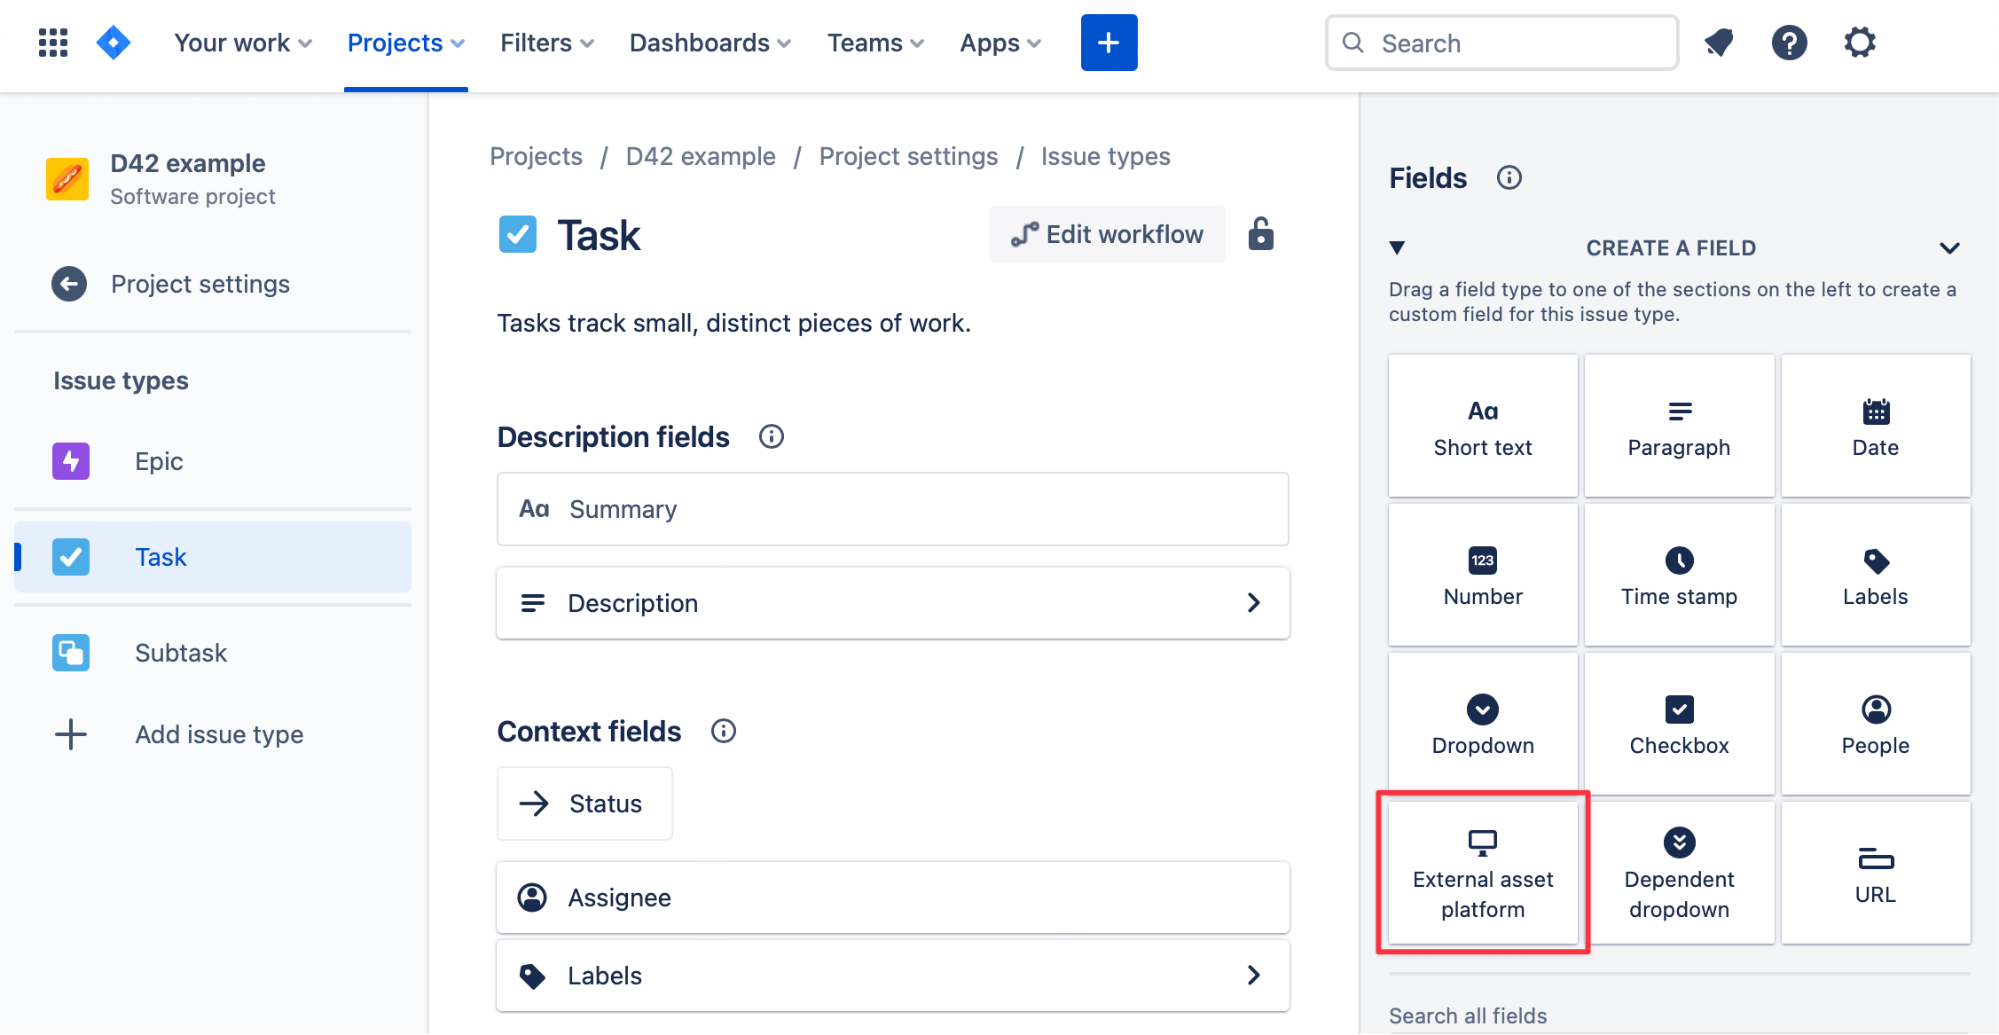
Configuring Jira Issue Type Fields
Now we need to configure the Jira fields to use the data in Device42.
In Jira, go to Projects > Project Settings > Issue Type and add the "External asset platform" field type to the issue types your use case requires.
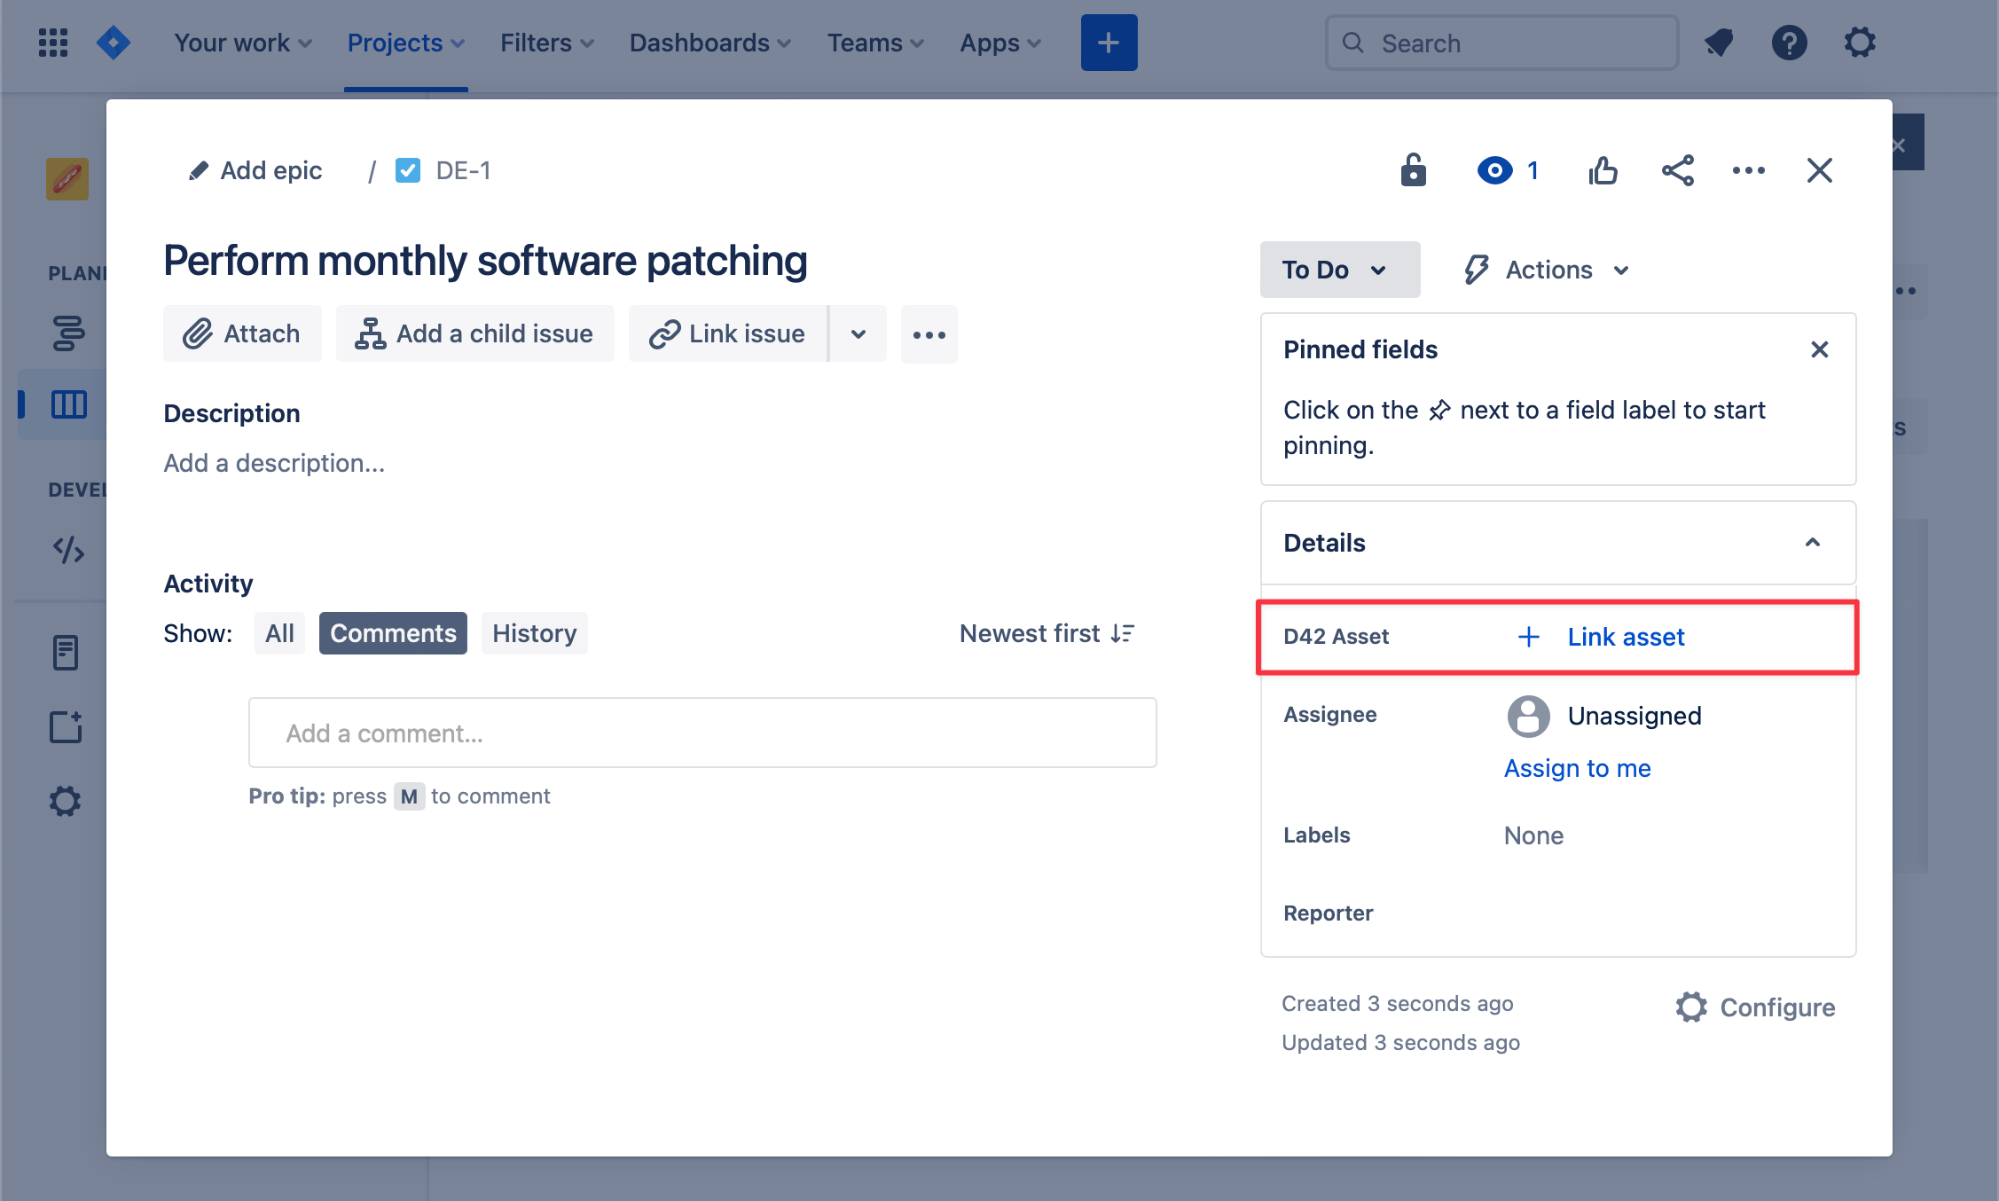
Linking Device42 Records from Jira
Now we can link Jira records to Device42 records.
From any issue type that is configured with the "External asset platform" field, select the + Link Asset function:
Once a record is linked, it will be present on the Jira record. Selecting it will display its associated information present in Device42:
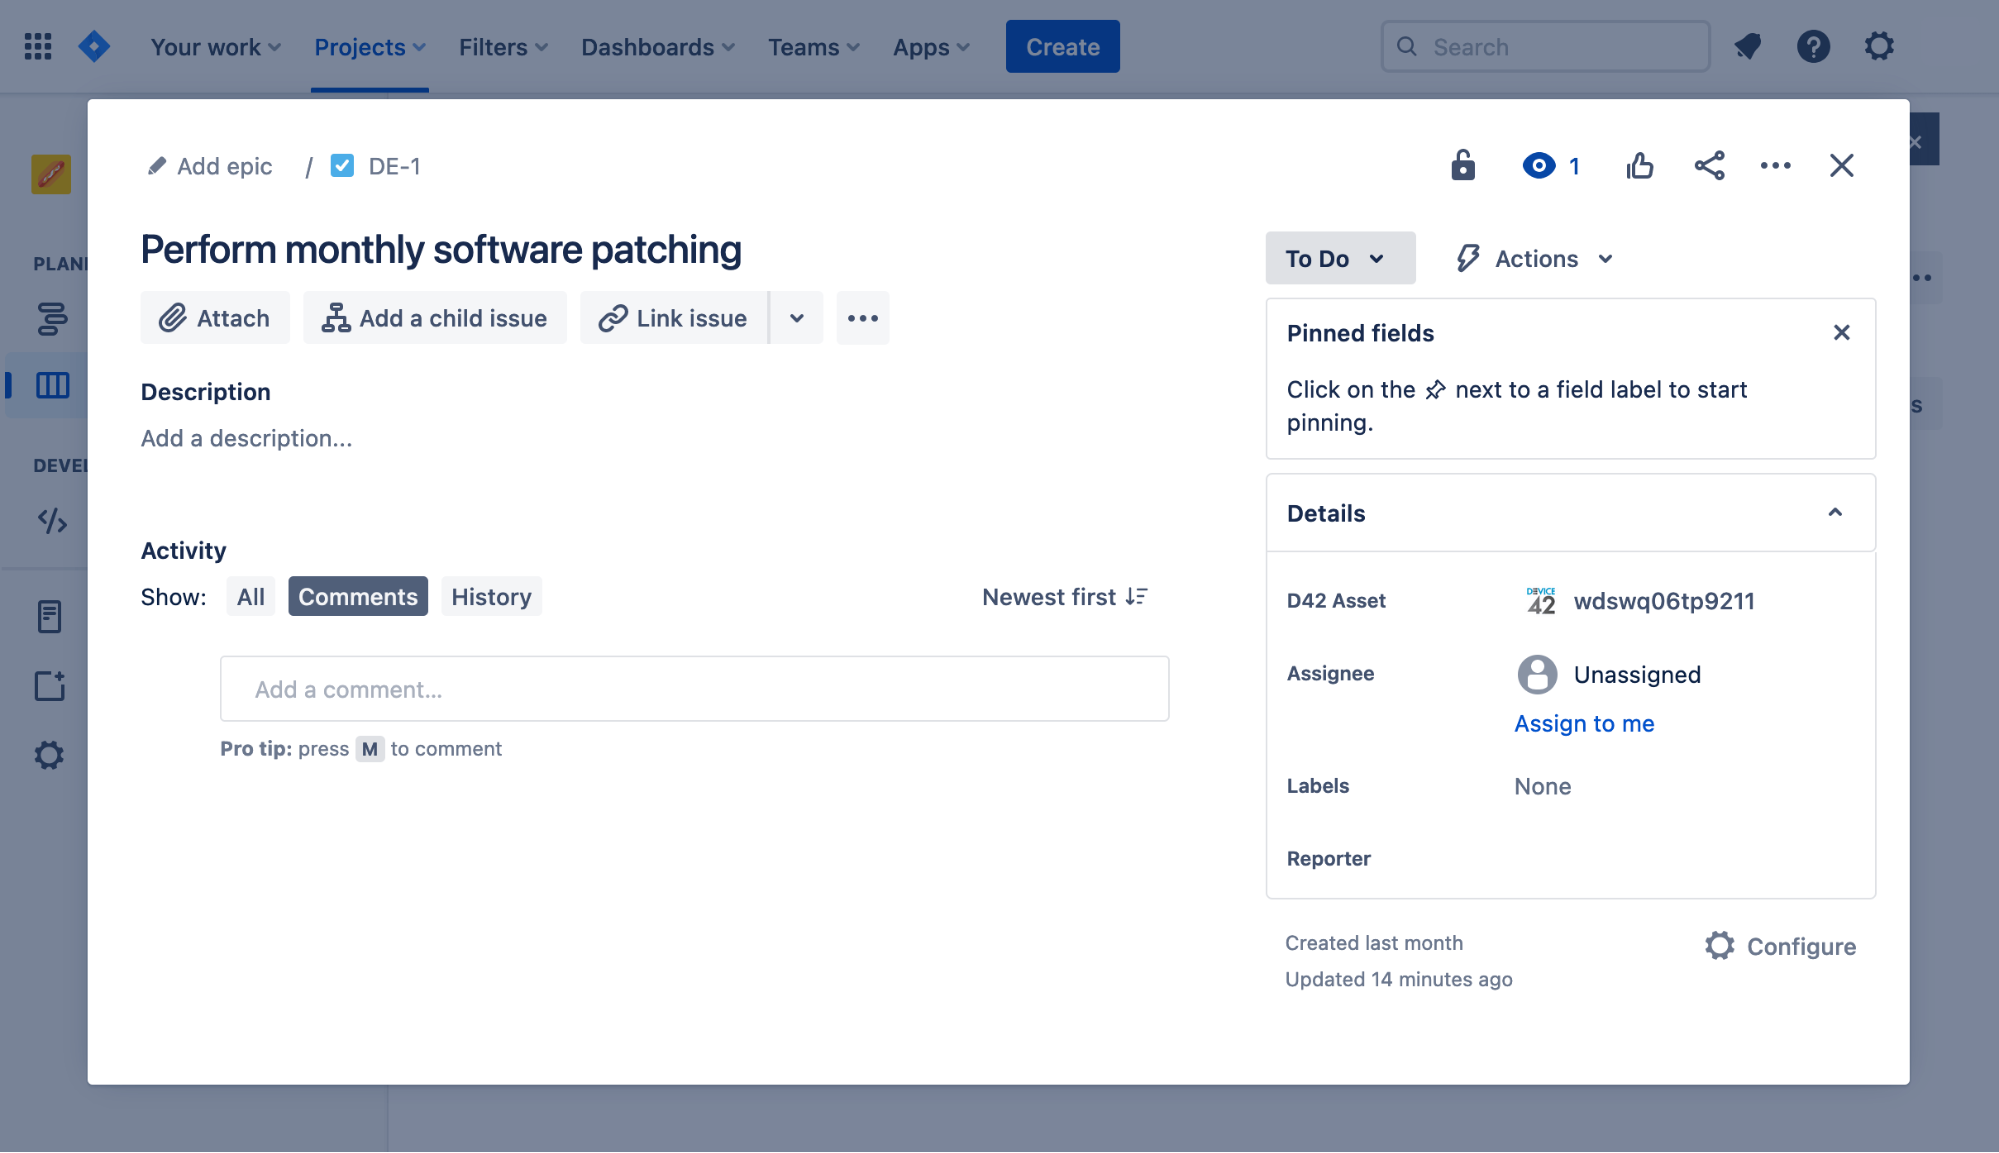
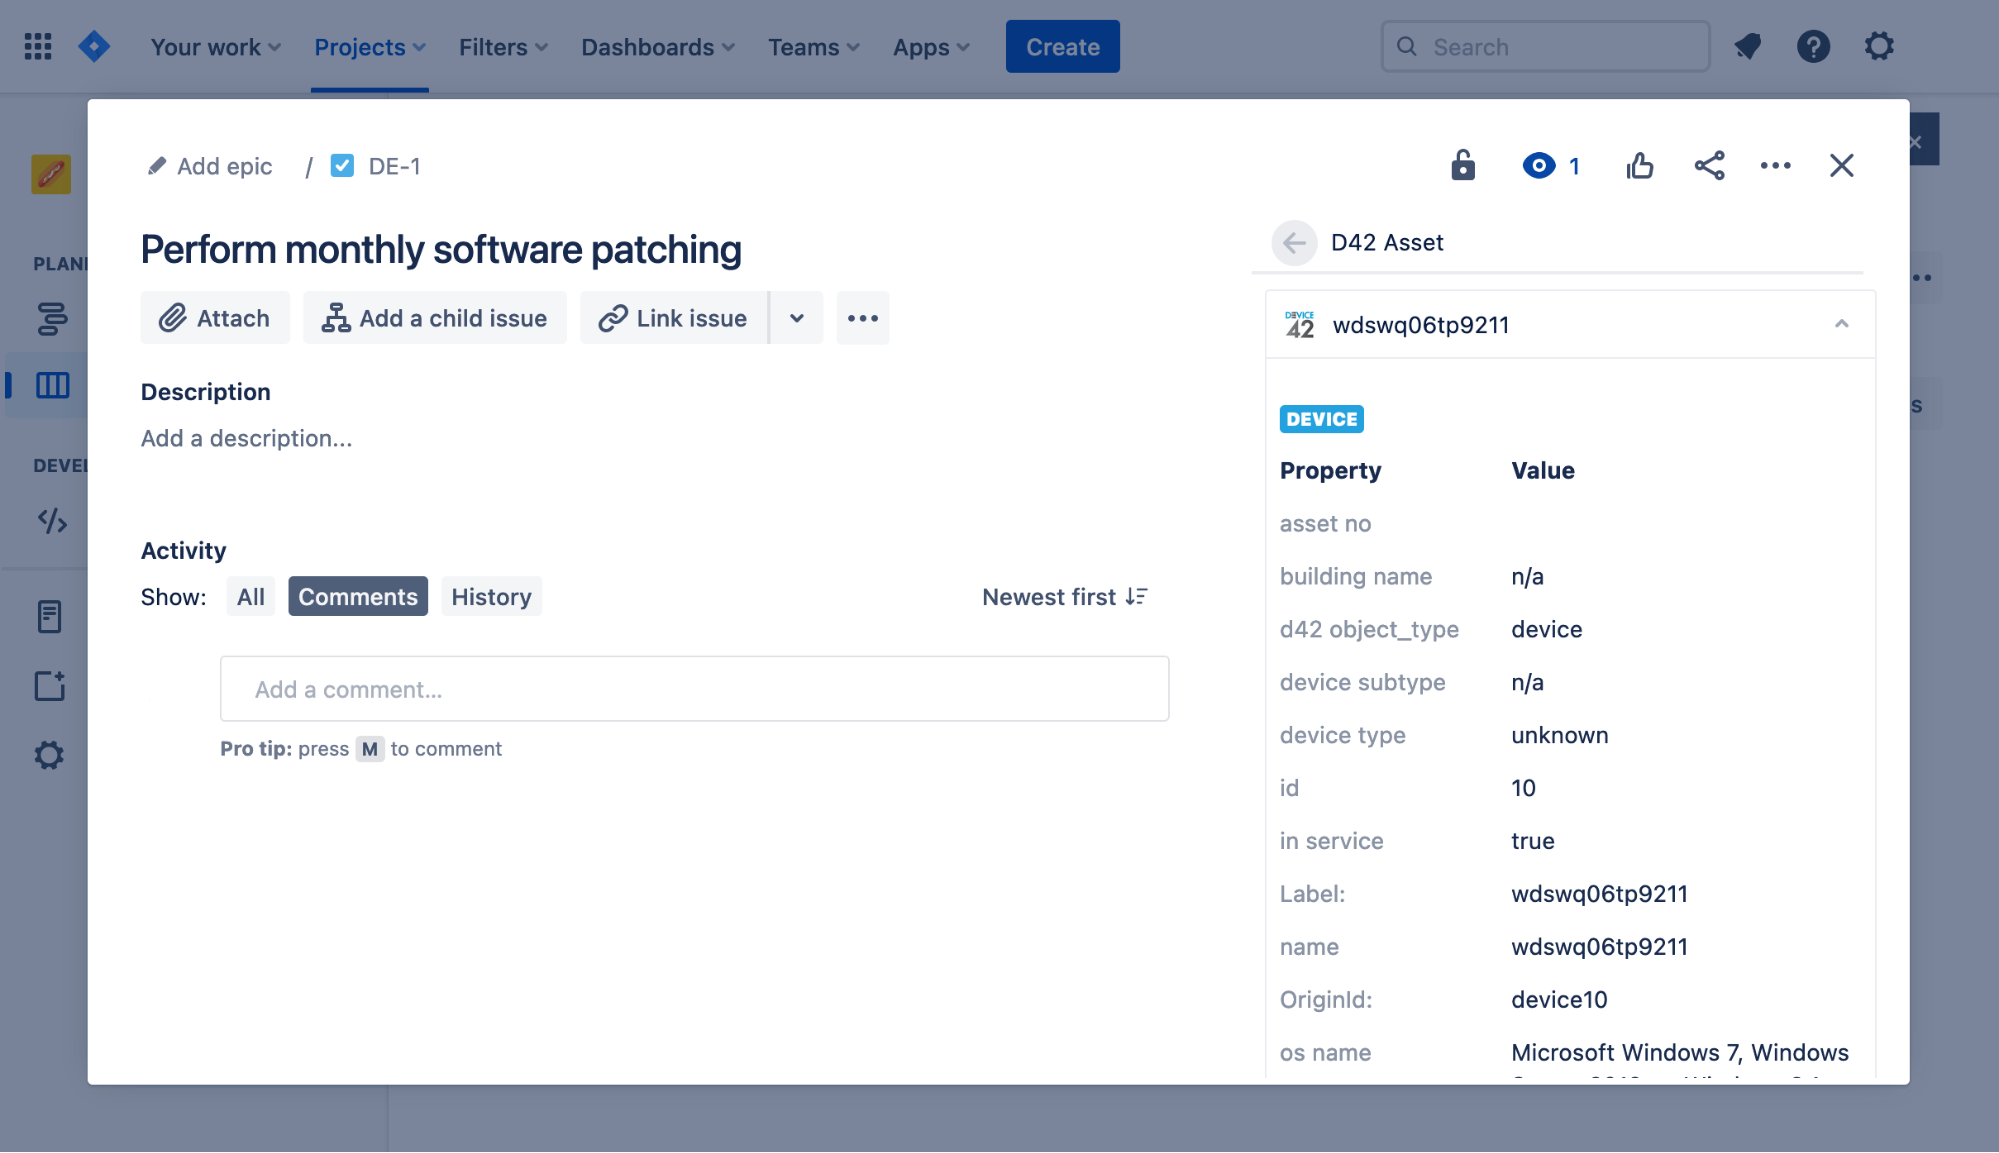
Click View in Device42 to view the full details of the record in Device42.

Customizing Syncing Device42 Record Types with Jira
It's important to note that, by default, only a subset of Device42 information is synchronized with Jira. This is controlled by a DOQL query and is customizable. You can change the DOQL queries in your Jira integration settings in Device42 at Tools > Integrations > External Integrations:
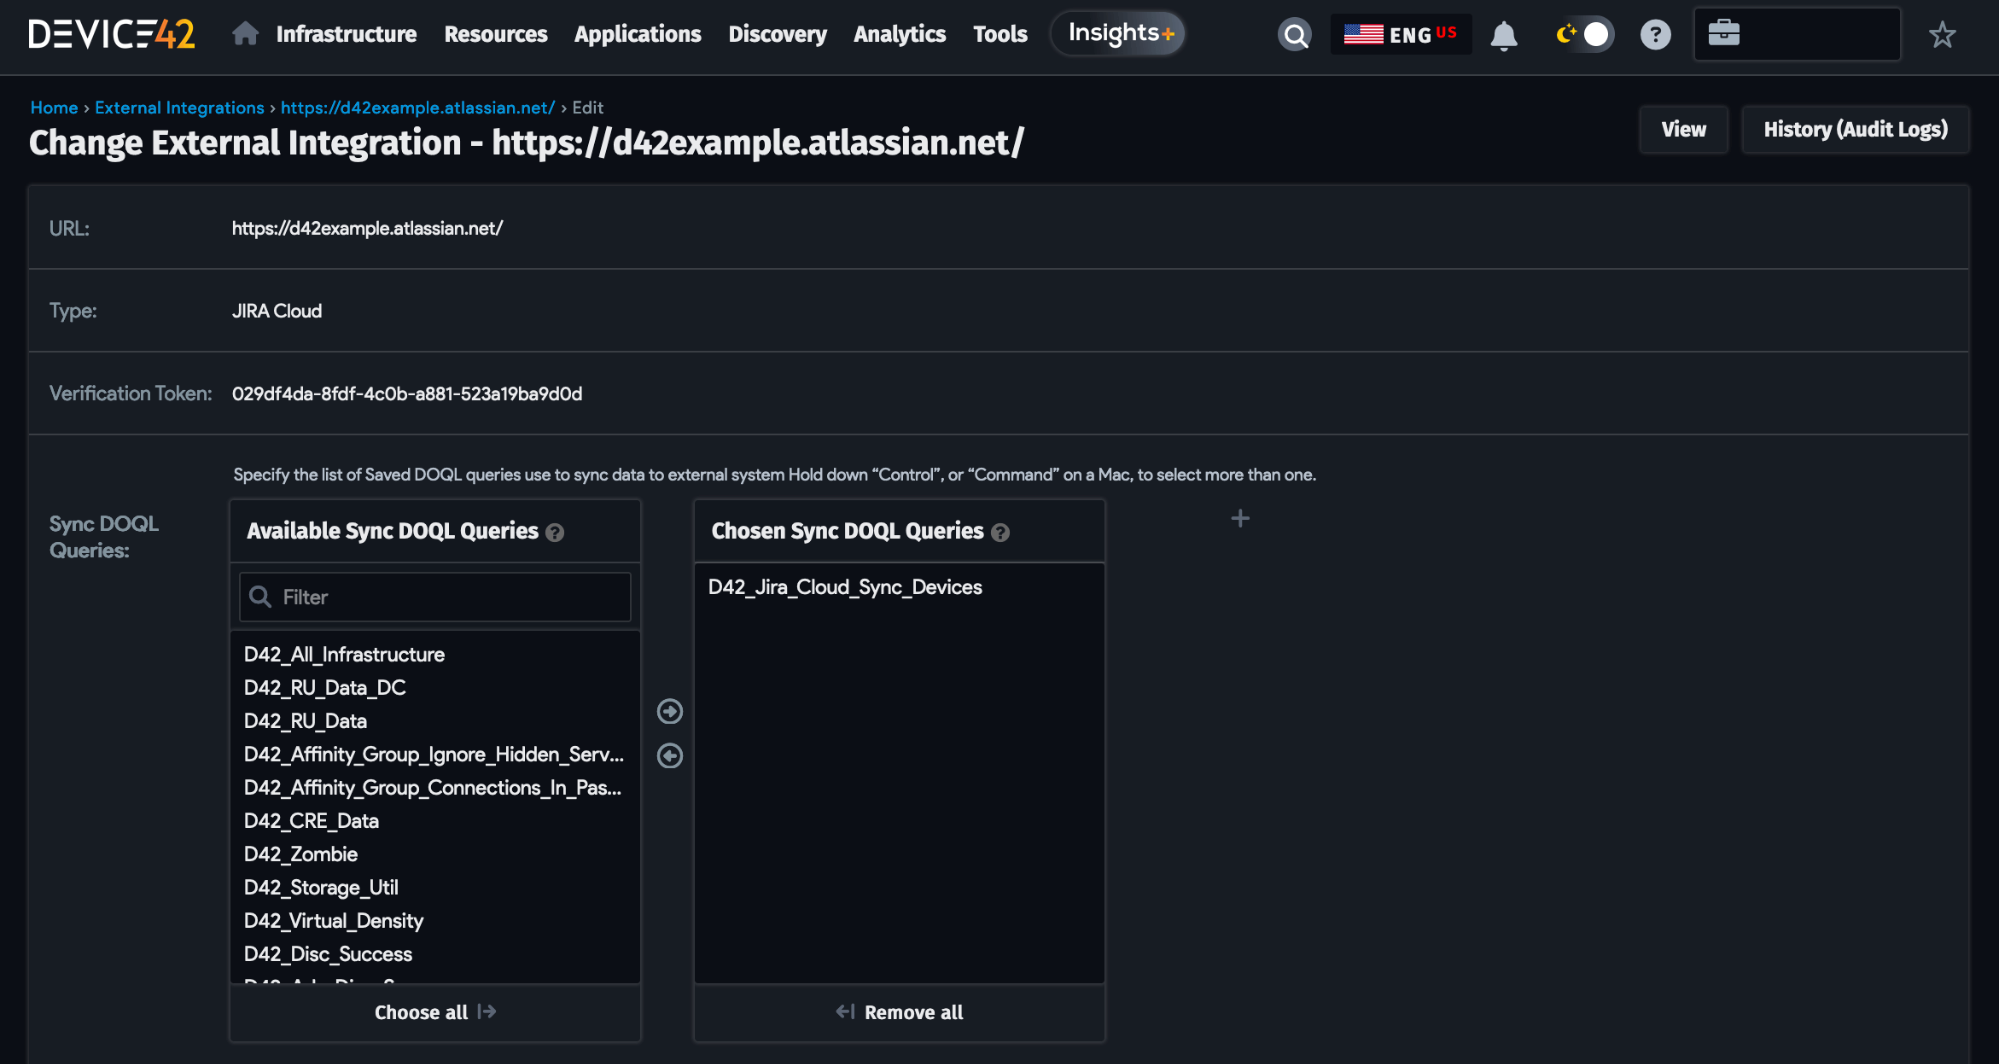
The D42_Jira_Cloud_Sync_Devices query is the default. Additional predefined queries can be selected or you can write a custom query to have more control over what is synchronized with Jira.
More Information
See the Jira Cloud Integration page for more information.
Jira Service Management Integration
In addition to integrating with regular Jira issues, Device42 can also be integrated with Jira Service Management directly through the Device42 for Jira Service Management Assets integration. See the following section or watch our Device42 JSM Assets integration video for more details.
Resources
Device42 for Jira Service Management app on Atlassian Marketplace
Troubleshoot email notifications in Jira Service Management
Configure Device42 for JSM Assets: The Settings Tab
Get started with the Device42 for Jira Service Management Assets app by connecting your Device42 virtual appliance to it following these steps:
Navigate to the Settings tab and complete the two required fields.
- Device42 Cloud Connector Enter URL of the Device42 connector here, for example,
connect.device42.io. - Device42 Verification Token To get the verification token from your Device42 instance, follow these steps:
- In Device42, navigate to Tools -> Integrations -> External integrations -> Add External integration.
- Copy the token.
- Return to the app and paste the token into the verification token field.
See Jira Service Management Assets Integration for more detailed guidance on creating an external integration on Device42.
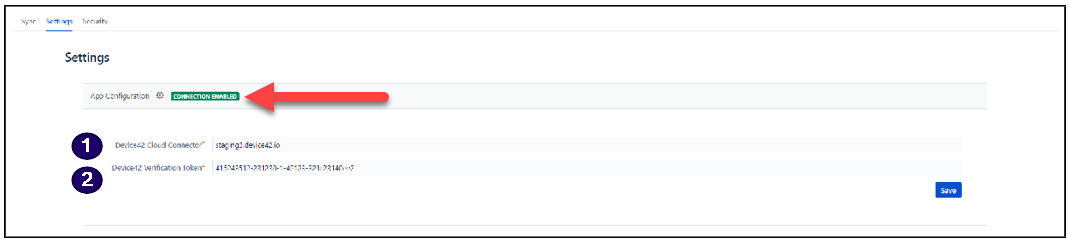
Click the Save button and the app will attempt to connect to Device42.
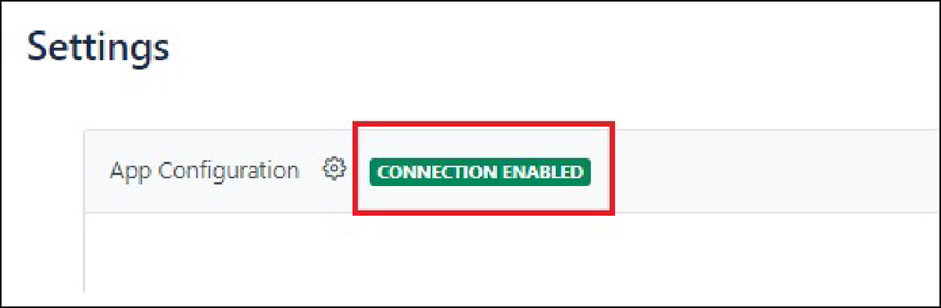
Following the app attempting to connect to Device42, the connection will display one of six states in the Settings tab:
- Connection enabled.
- Connection not enabled.
- Credentials do not exist.
- Error in verifying Device42 account.
- Request URL not found.
- An error occurred on Device42.
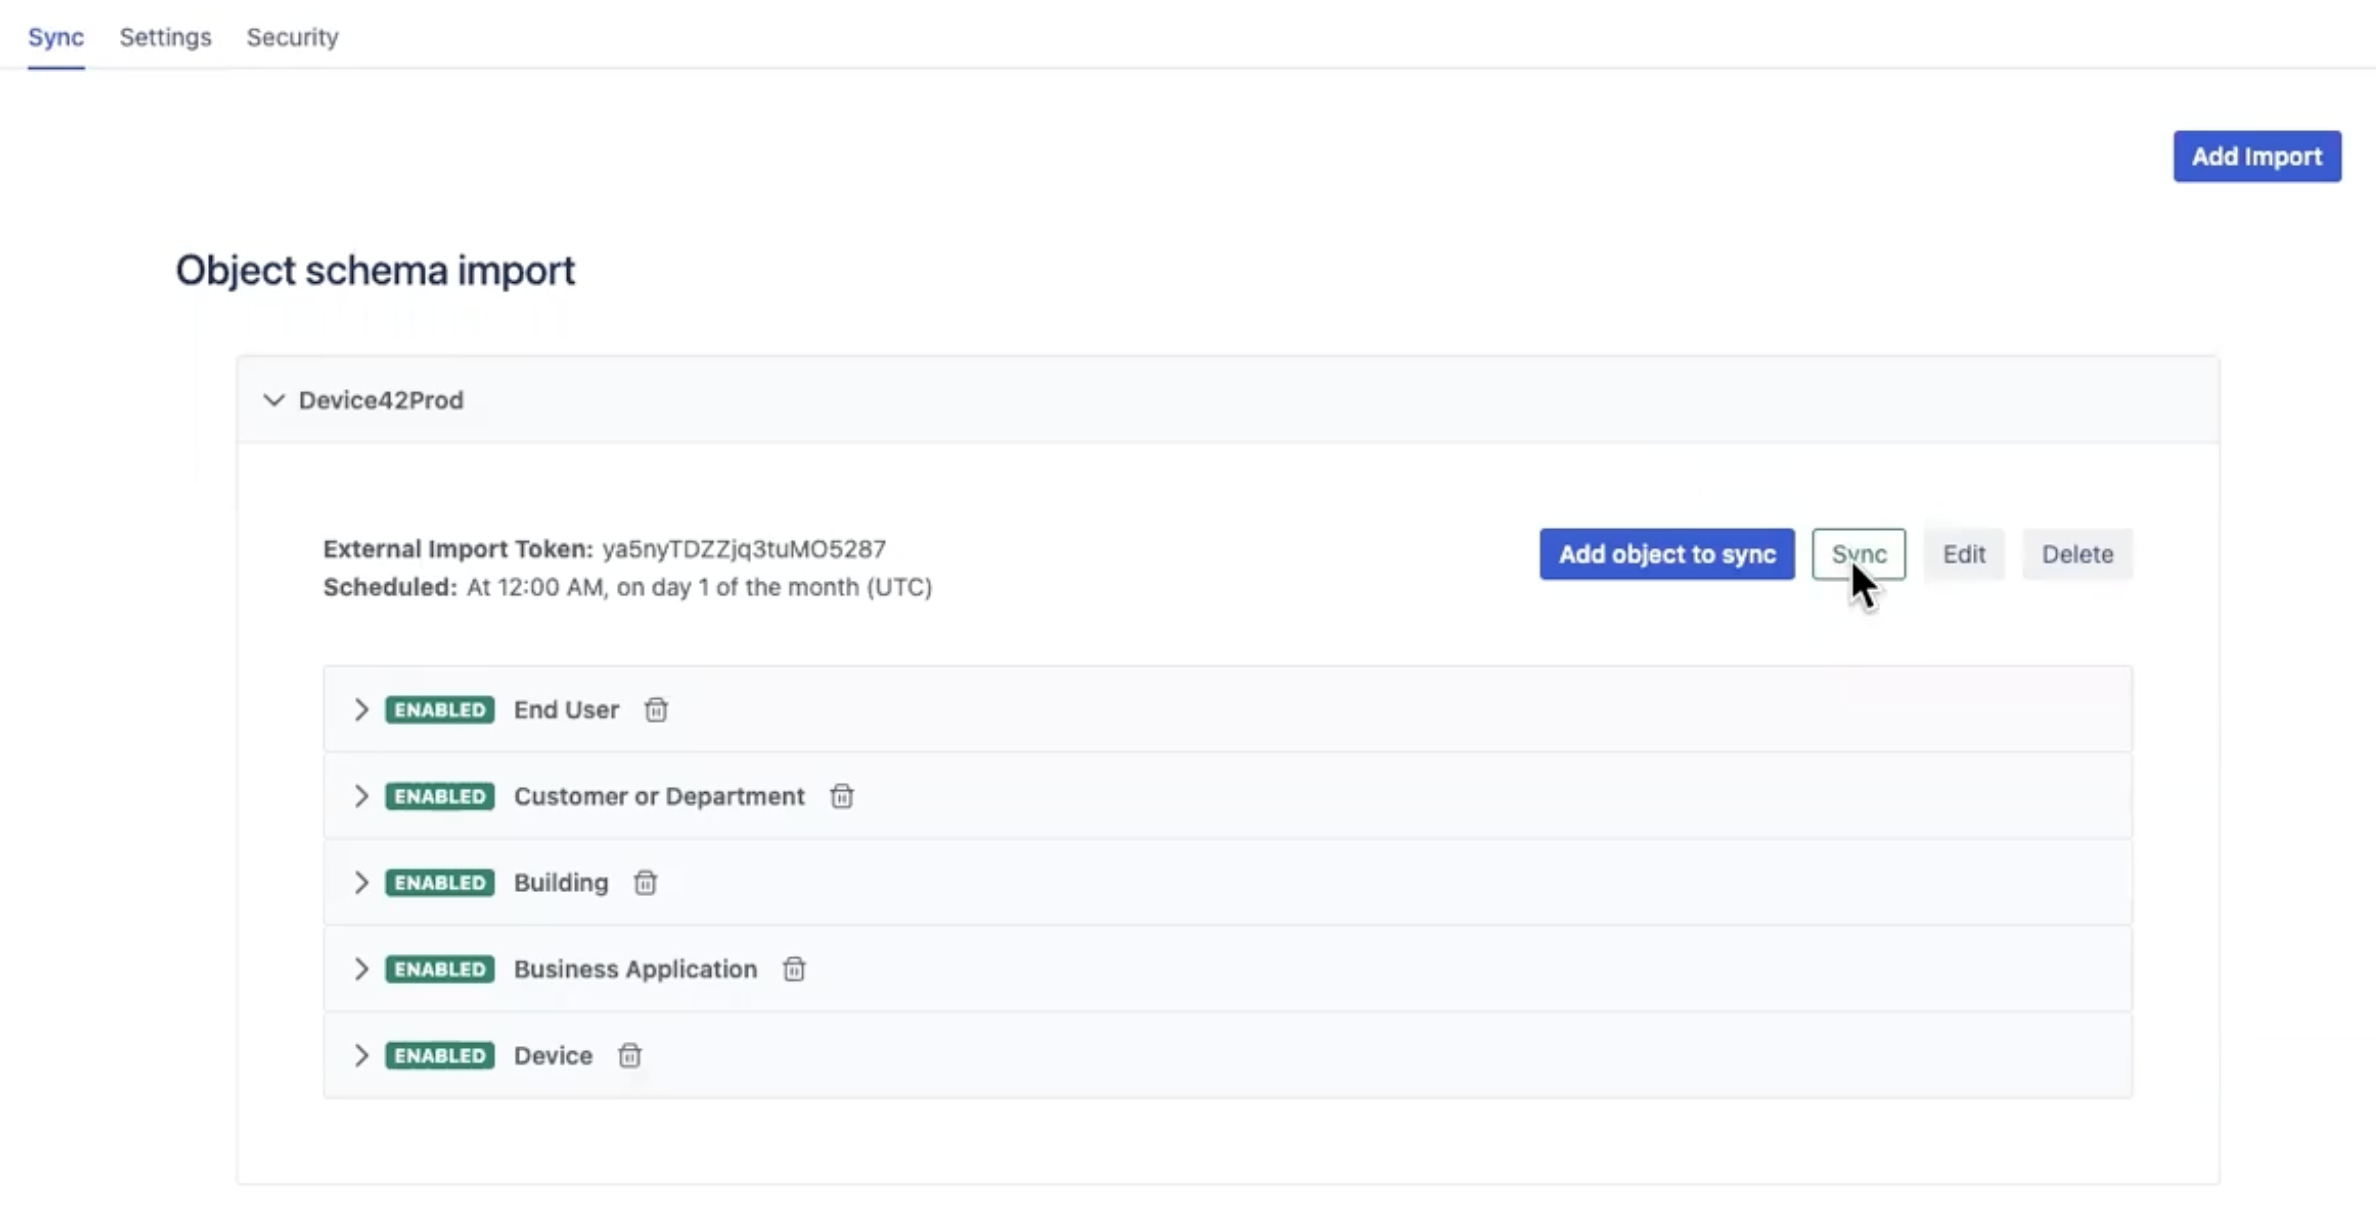
Working With Device42 Data on the JSM Cloud: The Sync Tab
In the Device42 Jira app, add and edit Device42 data in the Sync tab.
The Device42 Jira app synchronizes data from your main Device42 instance using an object schema. You will need a Jira external import token to import an object schema to the app.
Once you have created an object schema and synced Device42 data in the app, you can edit the object schema to add or remove objects for import and customize asset fields.
Let's begin by creating an object schema and generating the external token.
Create an Object Schema and Generate an External Import Token in Jira
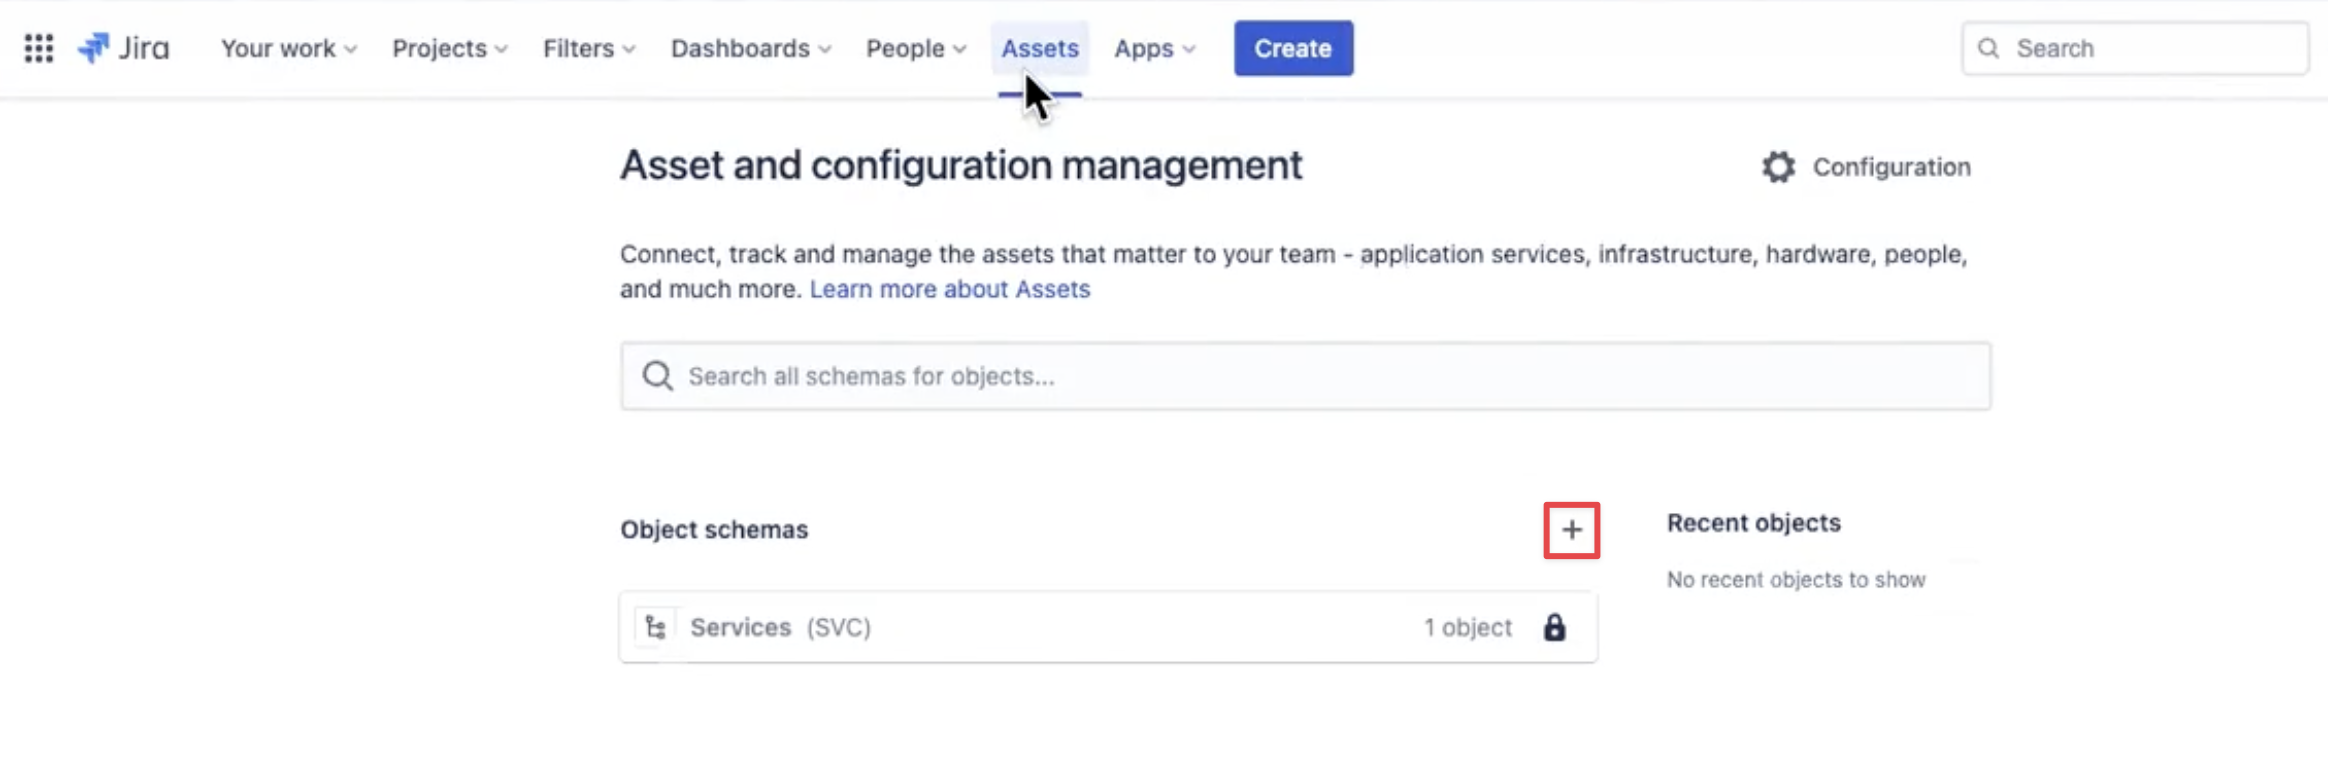
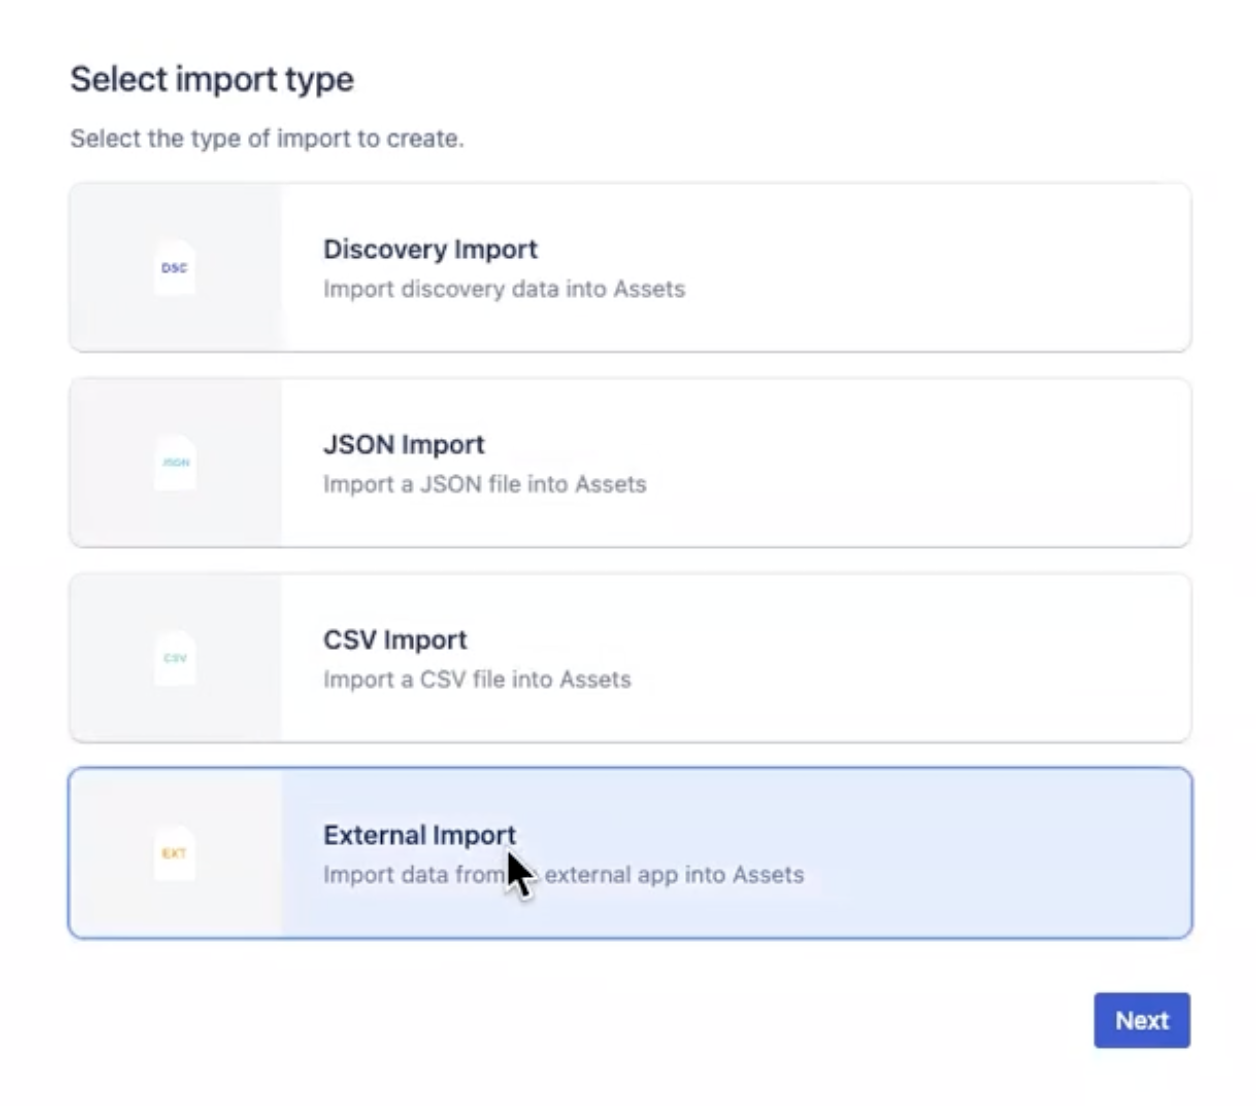
In Jira, navigate to the Assets tab (formerly Insight) and follow these steps:
- Click on the + button to open the "Create object schema" modal window.
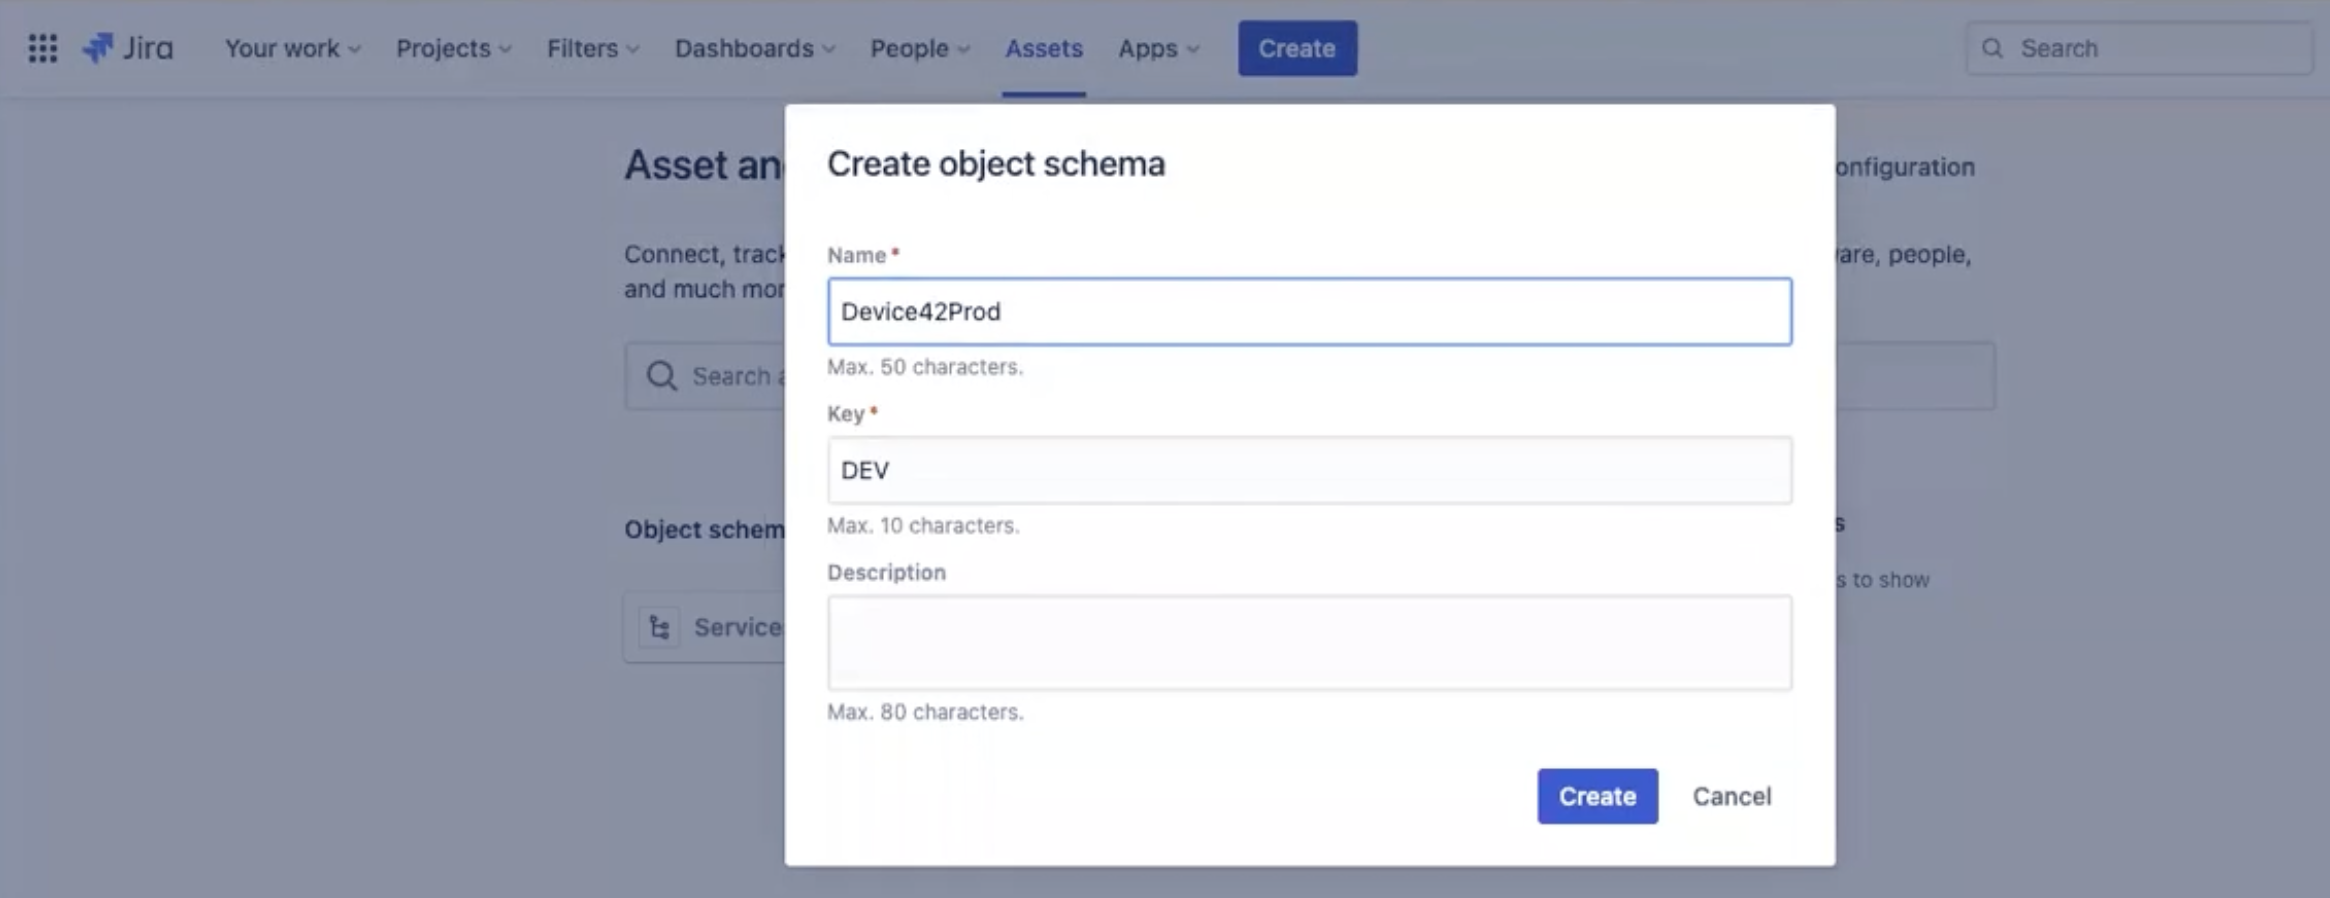
- Give the schema a name and click Create.
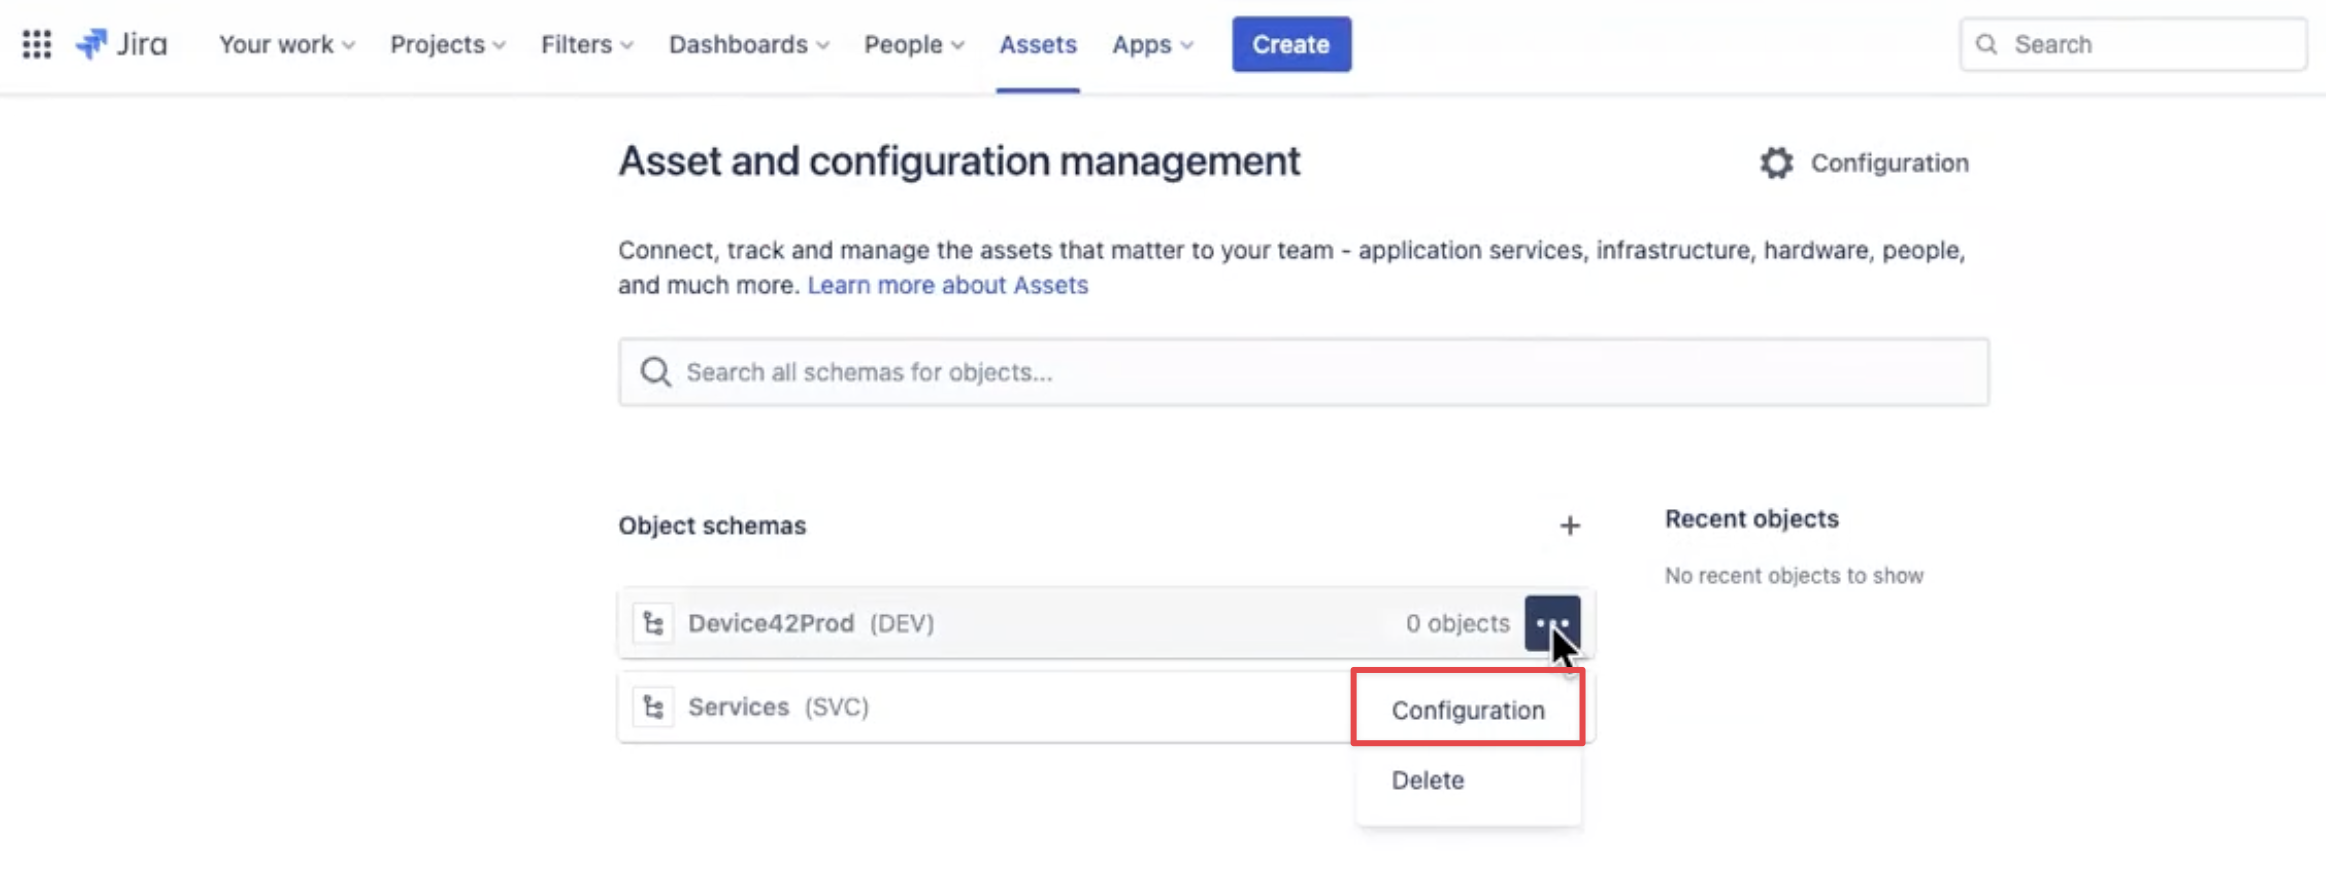
- Click the three dots (ellipsis) next to the schema you created and select Configuration.
-
Click on the Import tab.
-
Click on the Import tab and the Create Import button and choose the External Import option.
- Click the ellipsis menu symbol ... and select Generate new token.
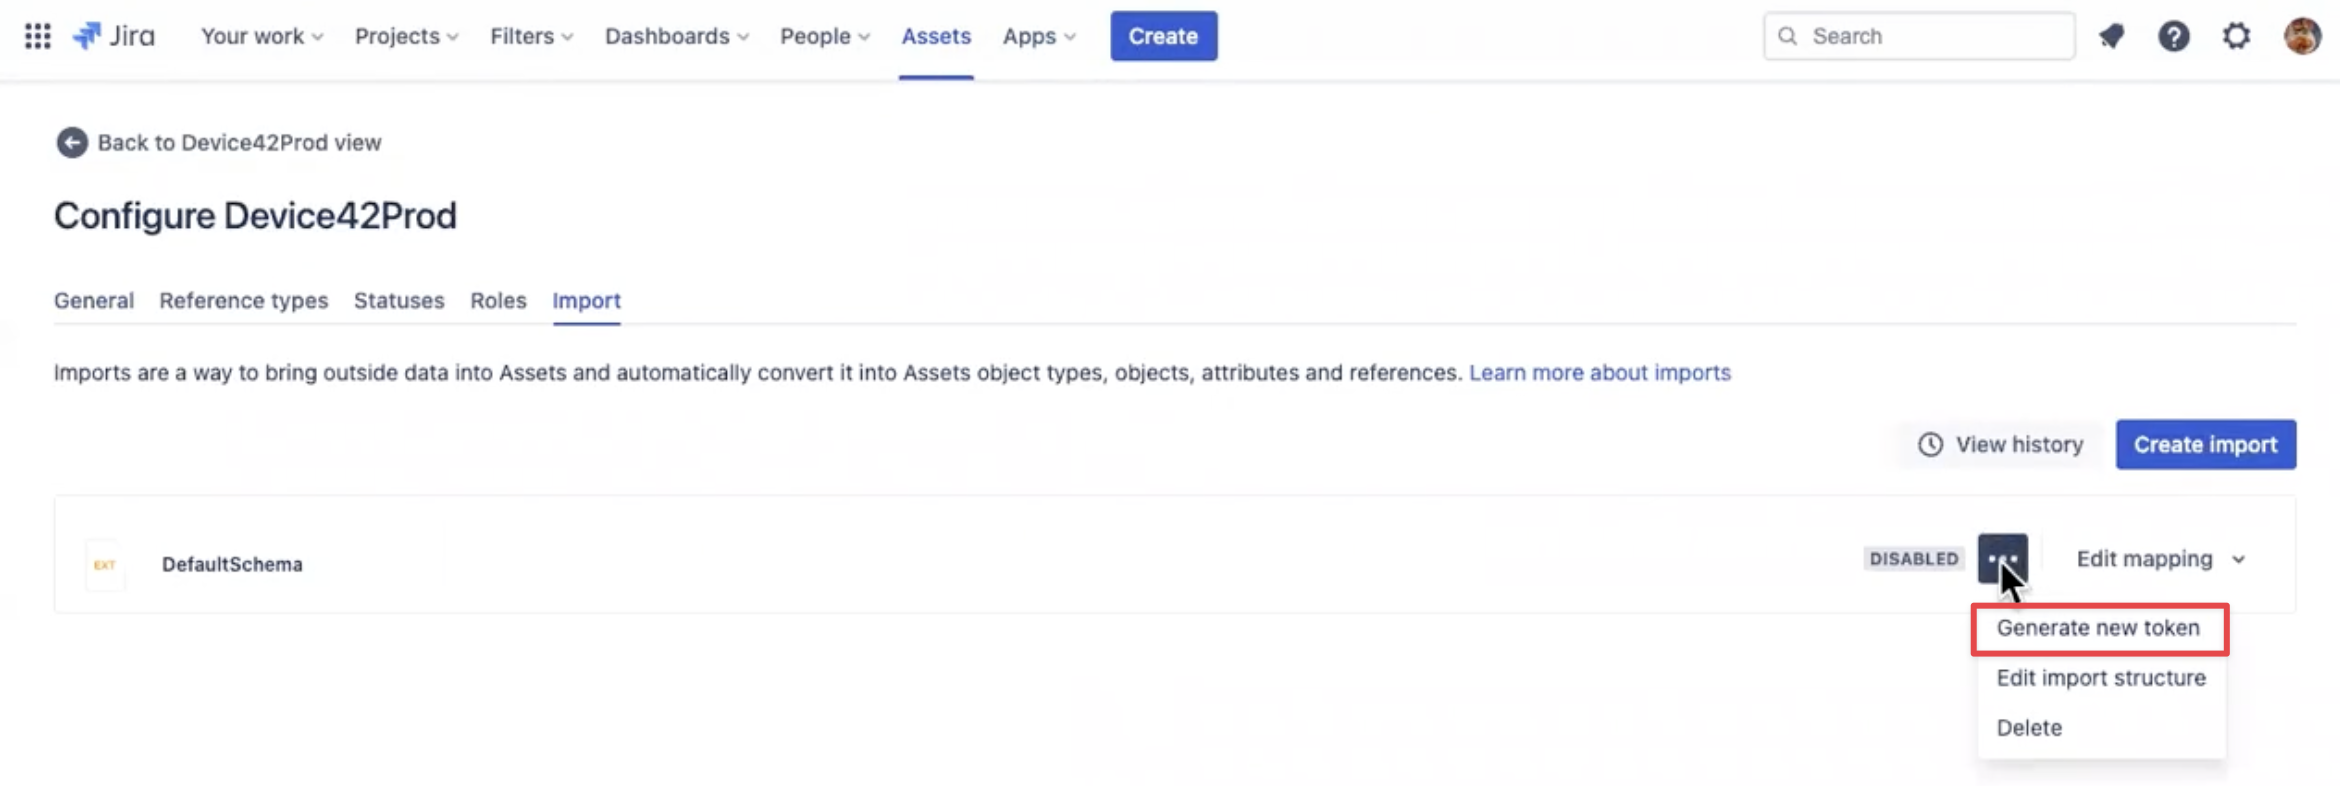
The token you generate will only appear once, so save it to a password manager.

Add a New Object Schema Import
Now you can use the external import token from Jira to add and configure the object schema in the app.
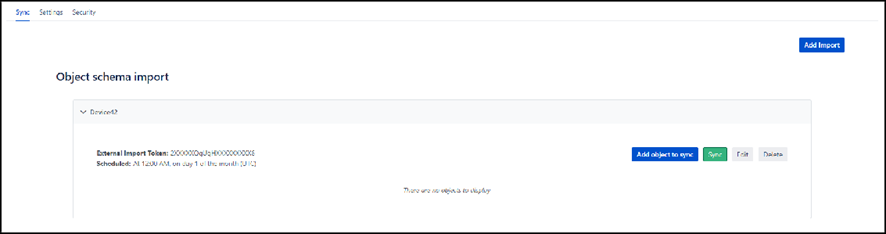
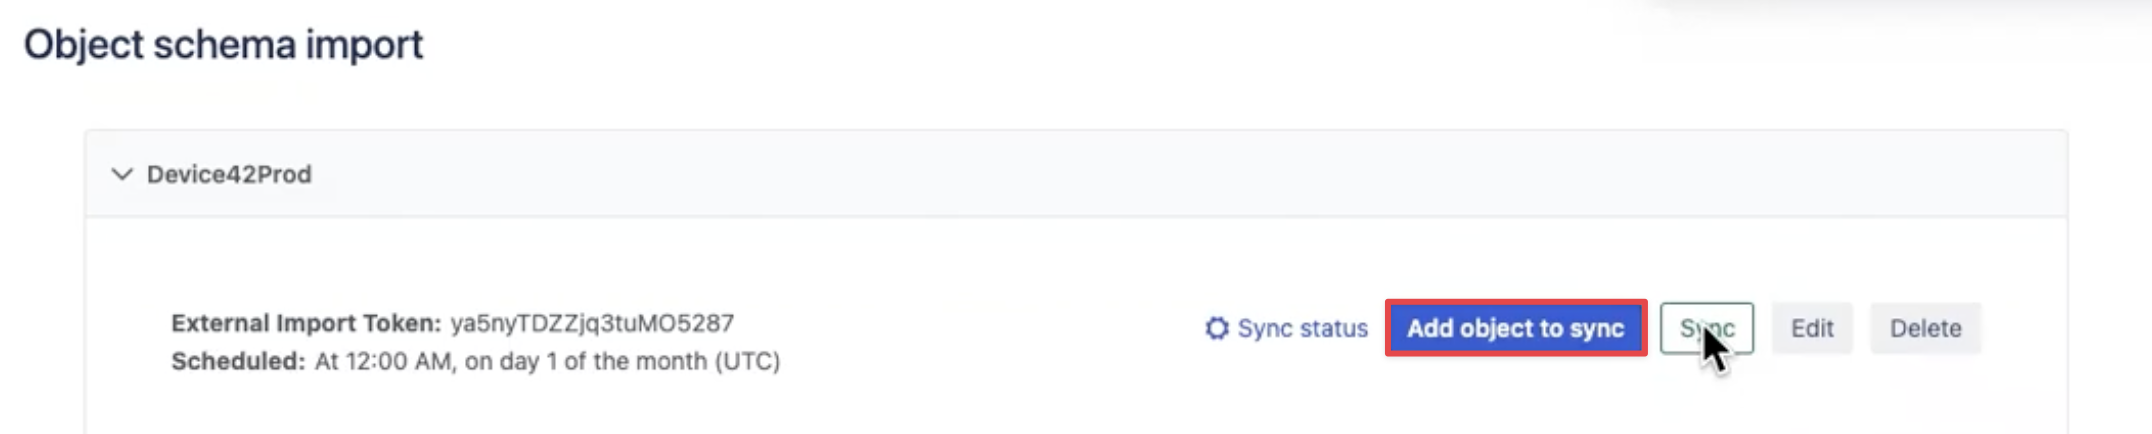
Navigate to the Sync tab. Initially, only an Add Import button is displayed in this view.
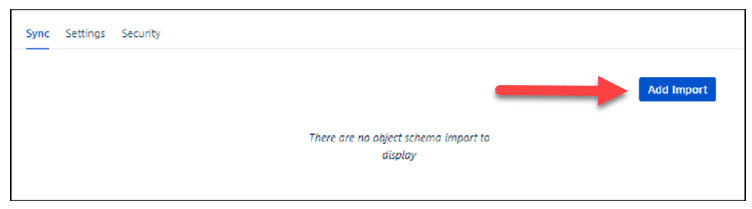
- Click on the Add Import button to open the New Object Schema Import form.
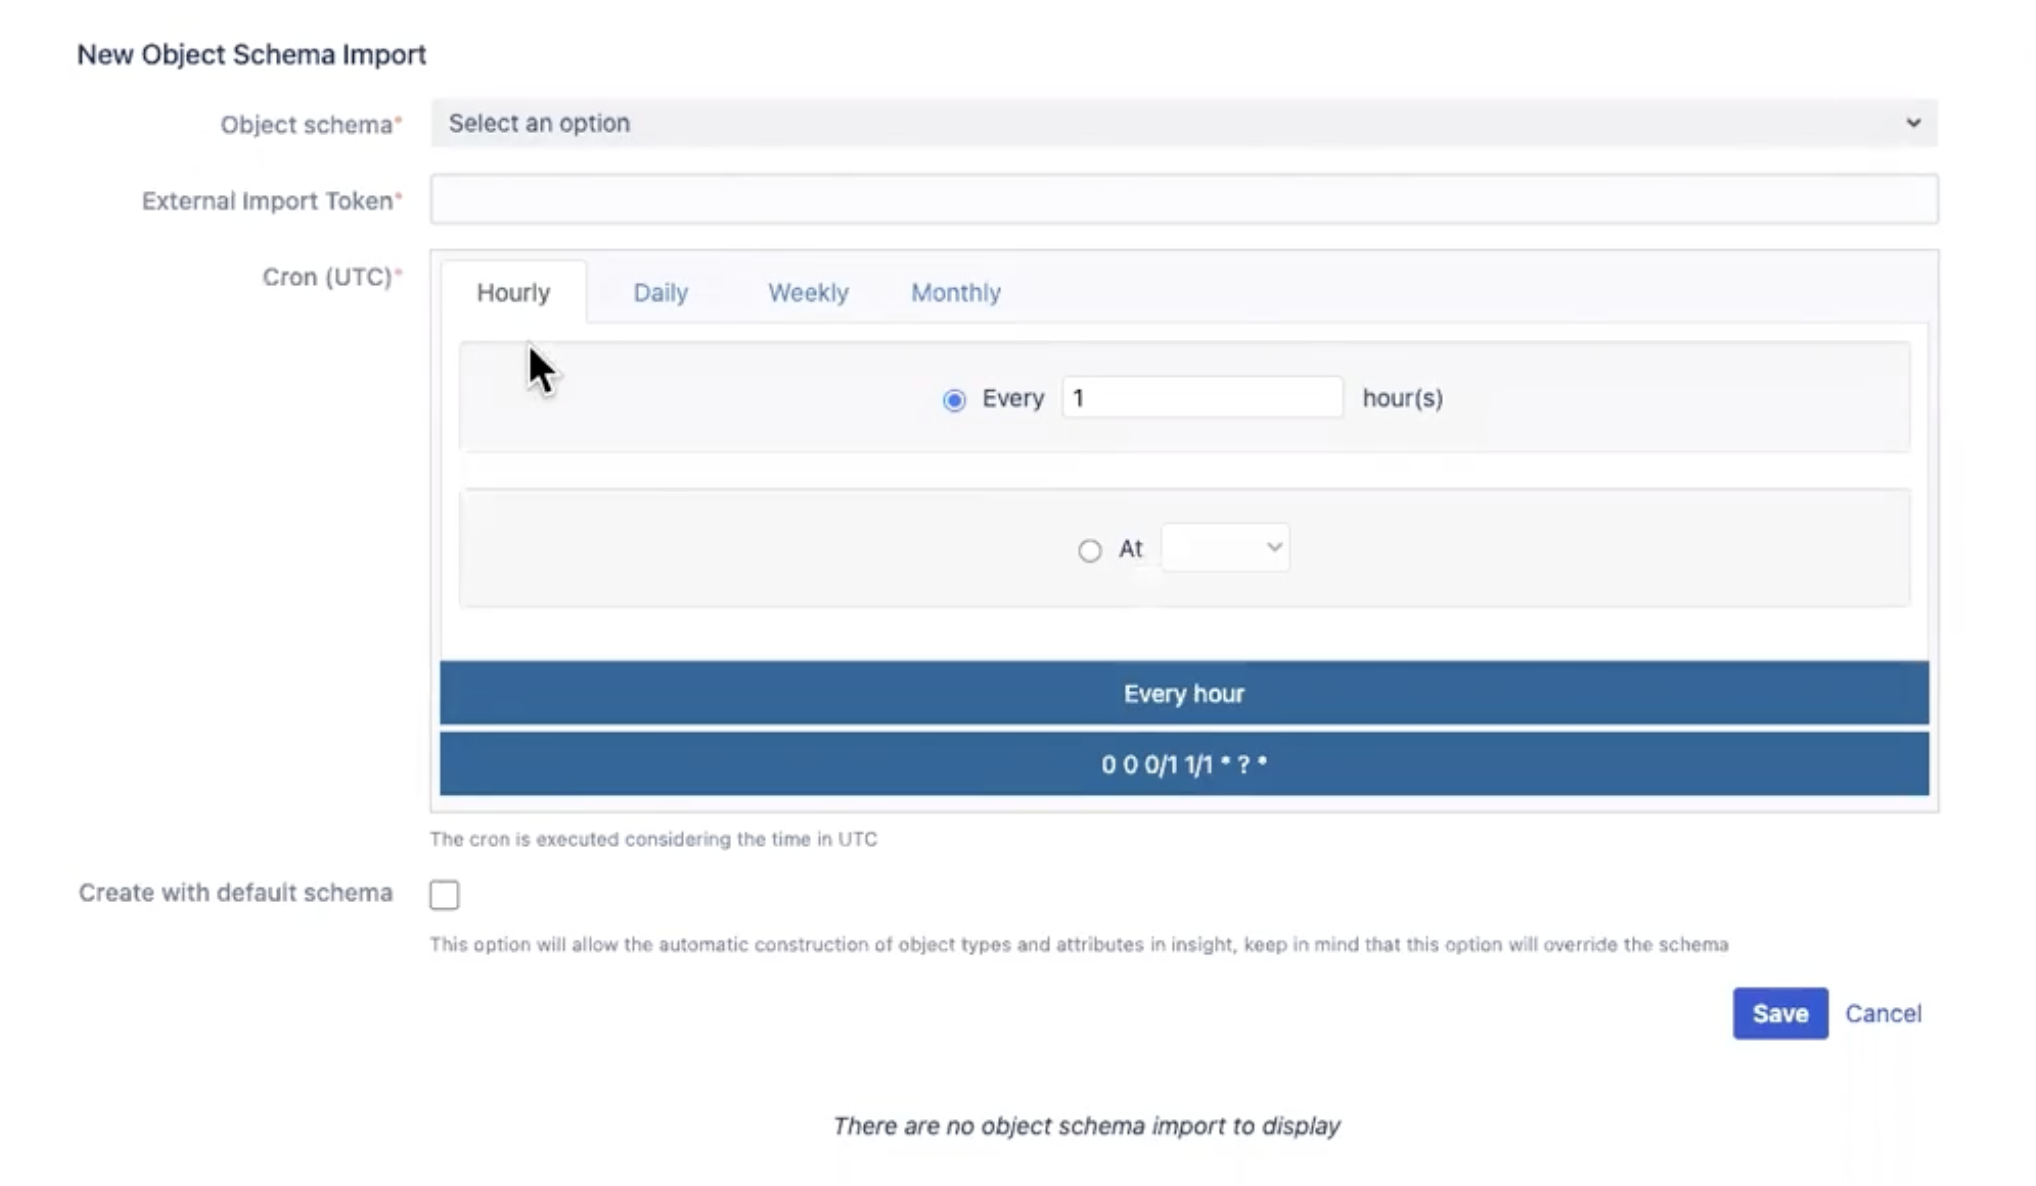
- Complete in the required fields:
- Object schema (Required) This field is prepopulated with the object schema available in Jira Assets. Select the object schema you created.
- External Import Token (Required) Copy the external import token generated in the previous section into this field.
- Cron (UTC) (Required) In this field, you configure a cron job to sync Device42 and Jira according to a schedule in Coordinated Universal Time (UTC). Select Hourly, Daily, Weekly, or Monthly from the tabs. If you opt to sync monthly, you can specify the day and hour the cron job should run.
- Create with default schema (Optional) Check this field if the app should create default object types and attributes in Jira Assets as needed when syncing. The default asset types created are End User, Customer or Department, Building, Business Application, and Device. You can customize the available fields of enabled asset types.
This is an example of an import created with the default schema option selected.
This is an example of an import without the default schema option selected.
- Click Save.
The finished register shows the object schema import list. All schema import registers are grouped by the schedule.
You can easily edit and delete object schema in the app as necessary.
Fetch Device42 Data
When you have created an object schema import, click the Sync button to fetch your Device42 data. After this initial sync, data will be added to your object schema according to the cron job sync schedule you specified.
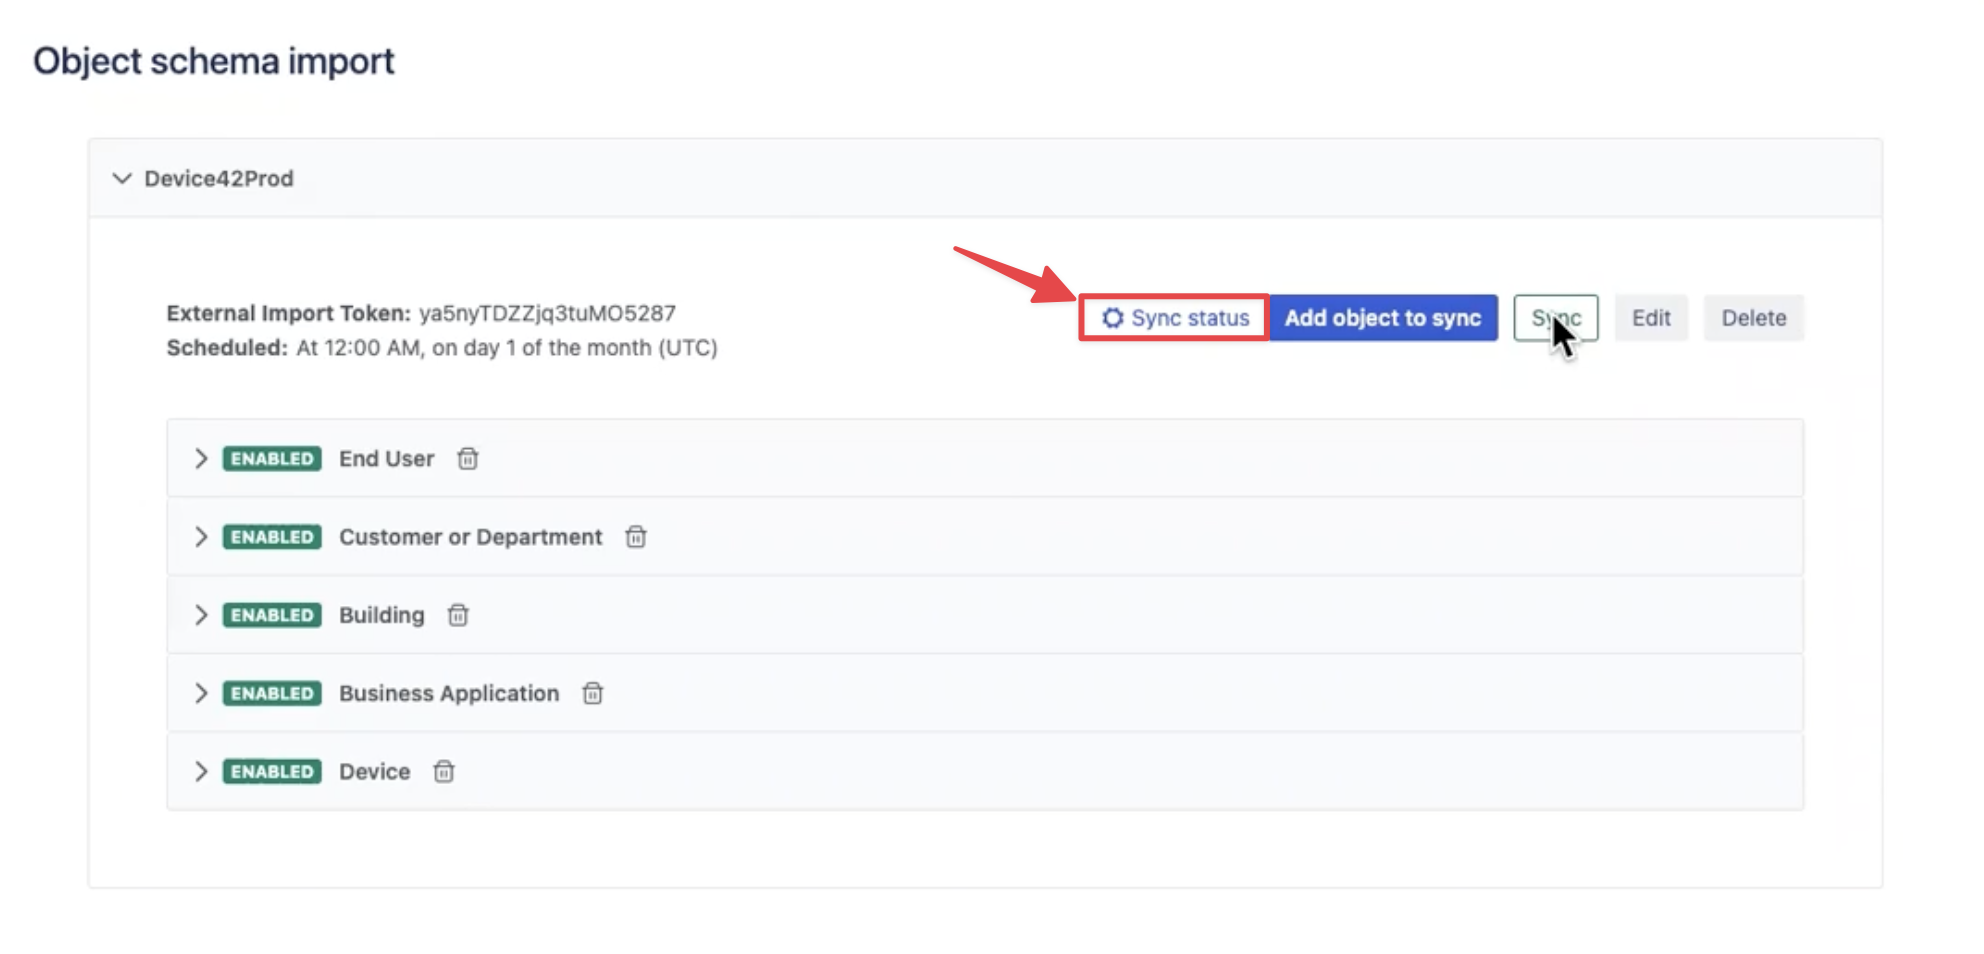
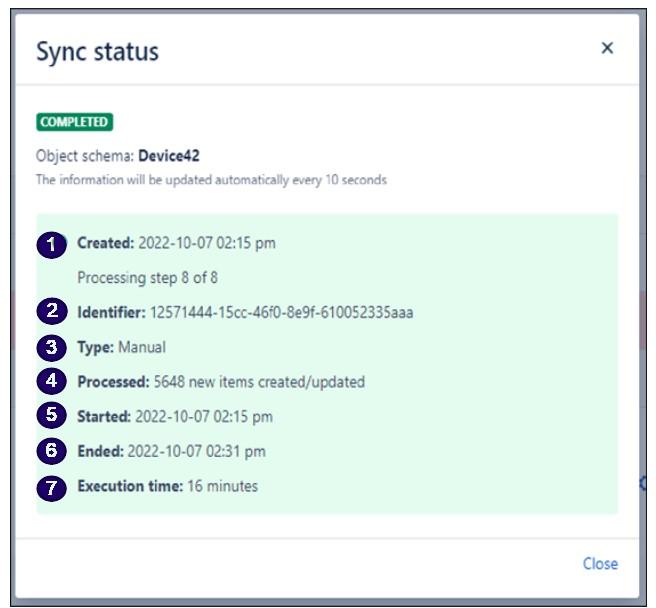
View the Synchronization Status
In the Object Schema Import window, click the Sync status link to view your Device42 data sync status.
A Sync status window will open containing information about the object schema's current synchronization state along with additional details.
There are four possible synchronization states:
- Launched Synchronization has started but no information is available yet.
- In Progress Information from Device42 is being processed and registered or updated in Assets.
- Done Synchronization is complete and no problems were encountered.
- Failed Synchronization could not be completed due to one or more errors. If the Sync status window shows your sync failed, it will provide a link for you to download the log errors.
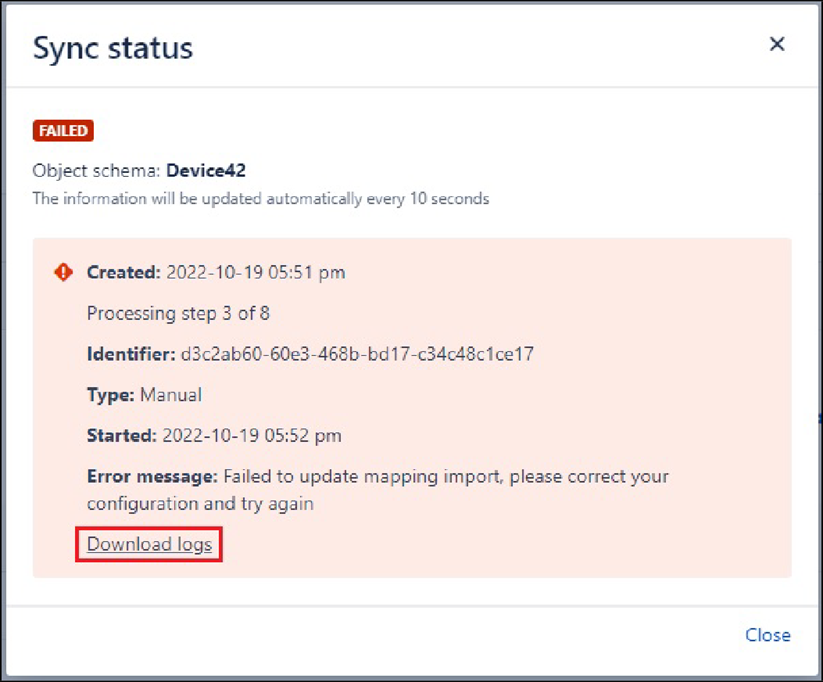
The Sync status window also contains the following additional details:
- Created The date and time that the sync was created.
- Identifier The synchronization identifier.
- Type The type of execution.
- Manual indicates the cron job was executed by pressing the Sync button.
- Automatic tells you the cron job was automatically executed according to the schedule.
- Processed The count of items synced to Assets.
- Started The date and time that the sync started.
- Ended The date and time that the sync ended.
- Execution time The time taken to complete the synchronization.
Edit an Object Schema Import
Click the Edit button to edit an object schema import.
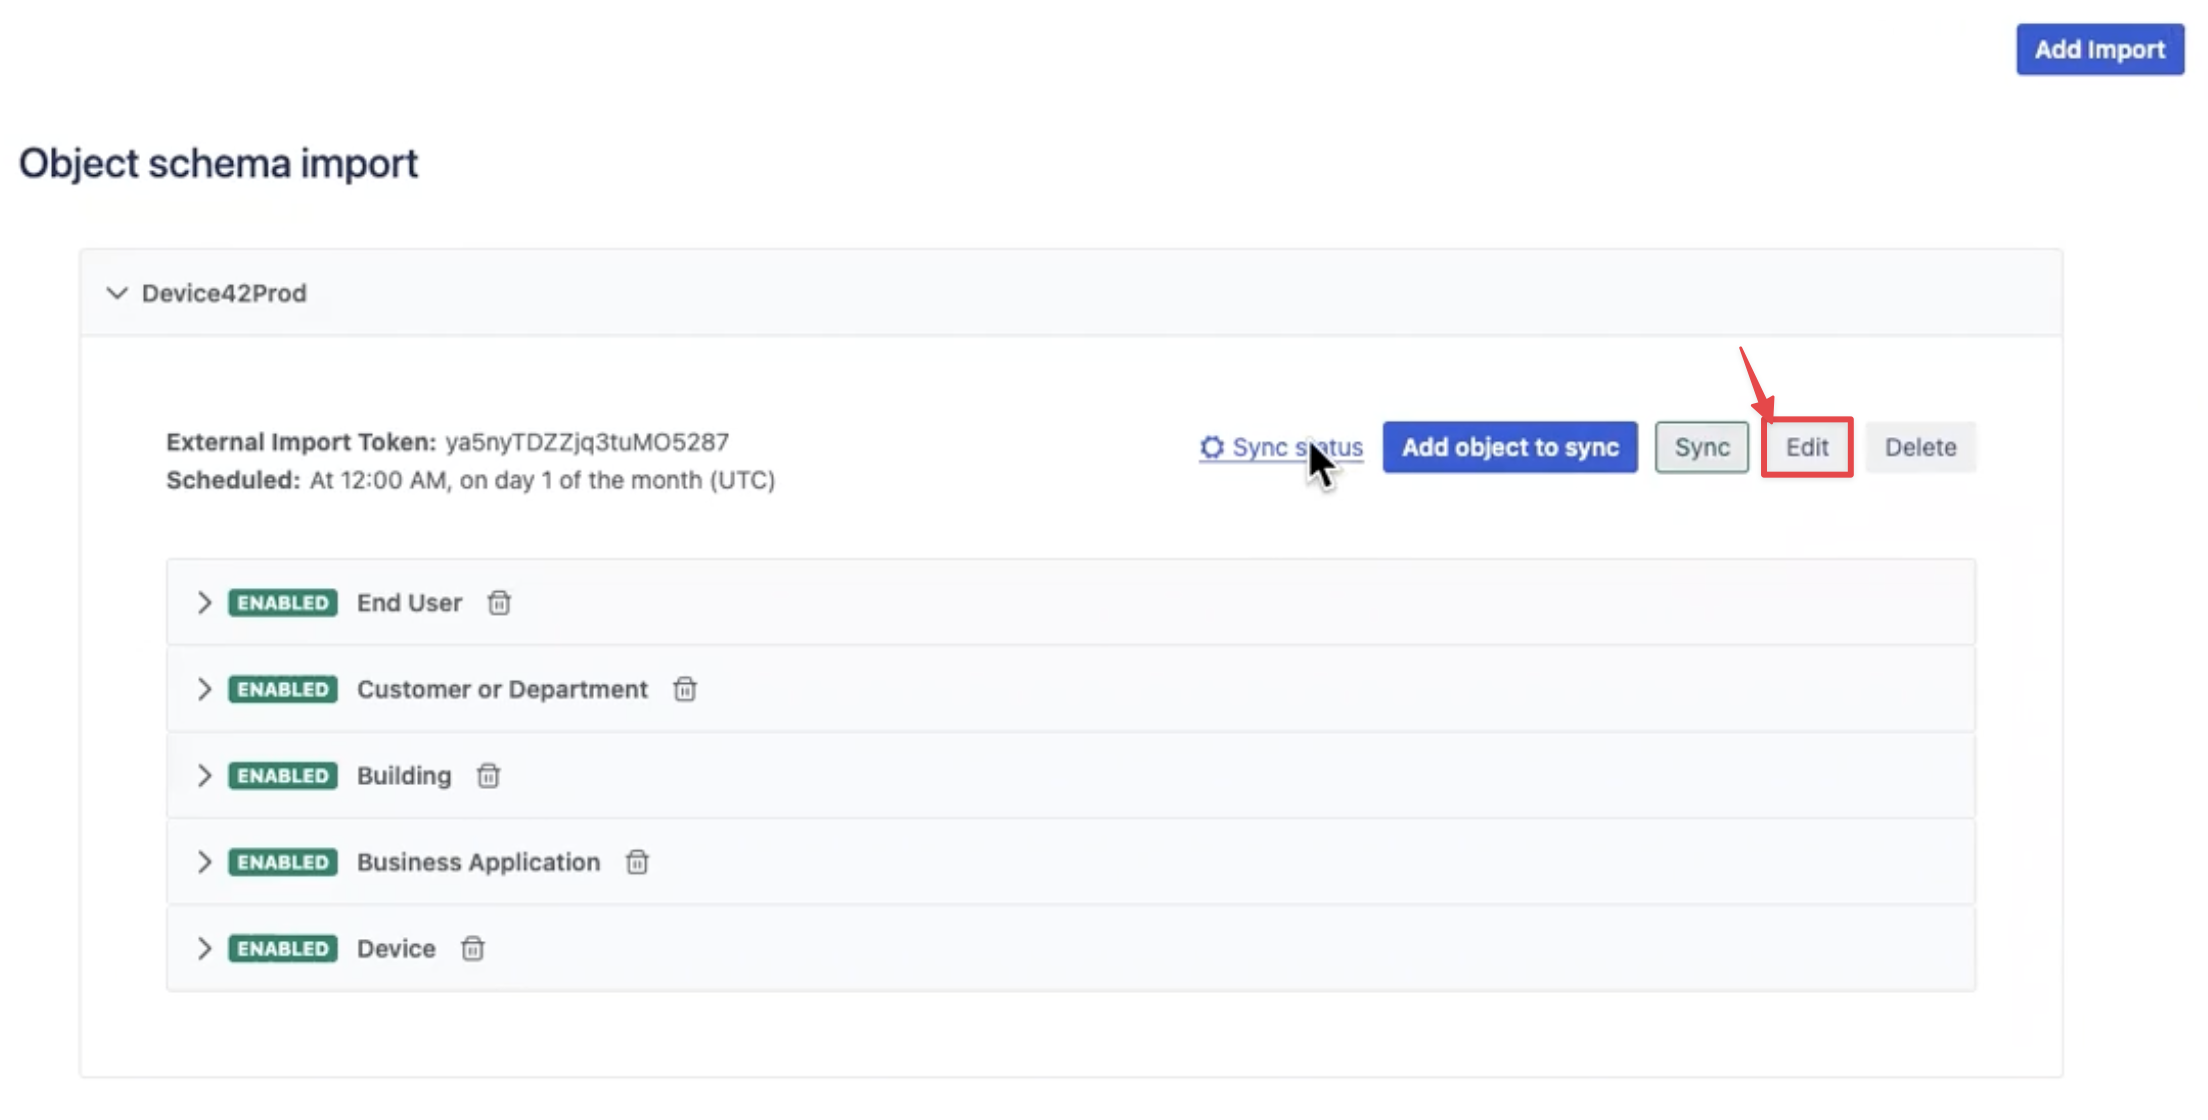
In the Object schema import form that opens, you can edit the following information:
- External Import Token The external import token generated when you created the object schema in Assets.
- Cron (UTC) The deployment frequency (in UTC) of the synchronization cron job.
Click the Save button to save your changes.
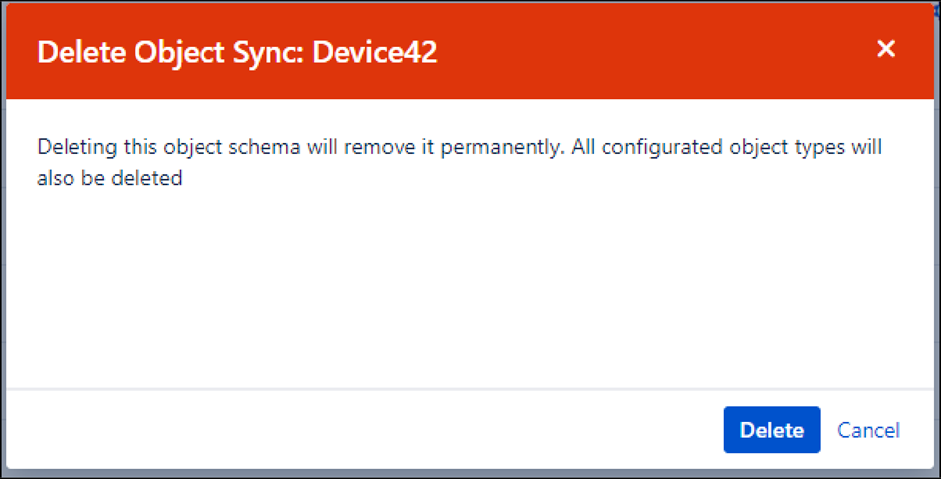
Delete An Object Schema Import
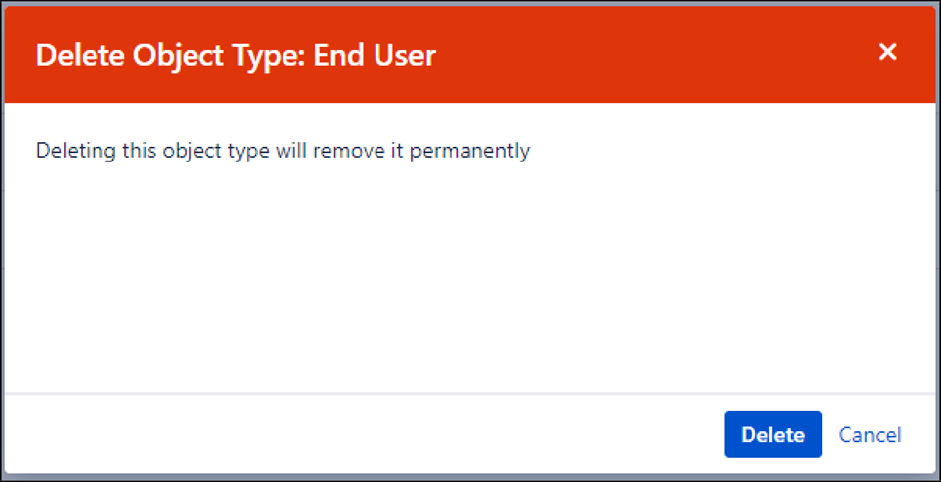
To delete an object schema import, click the Delete button under the Sync tab.
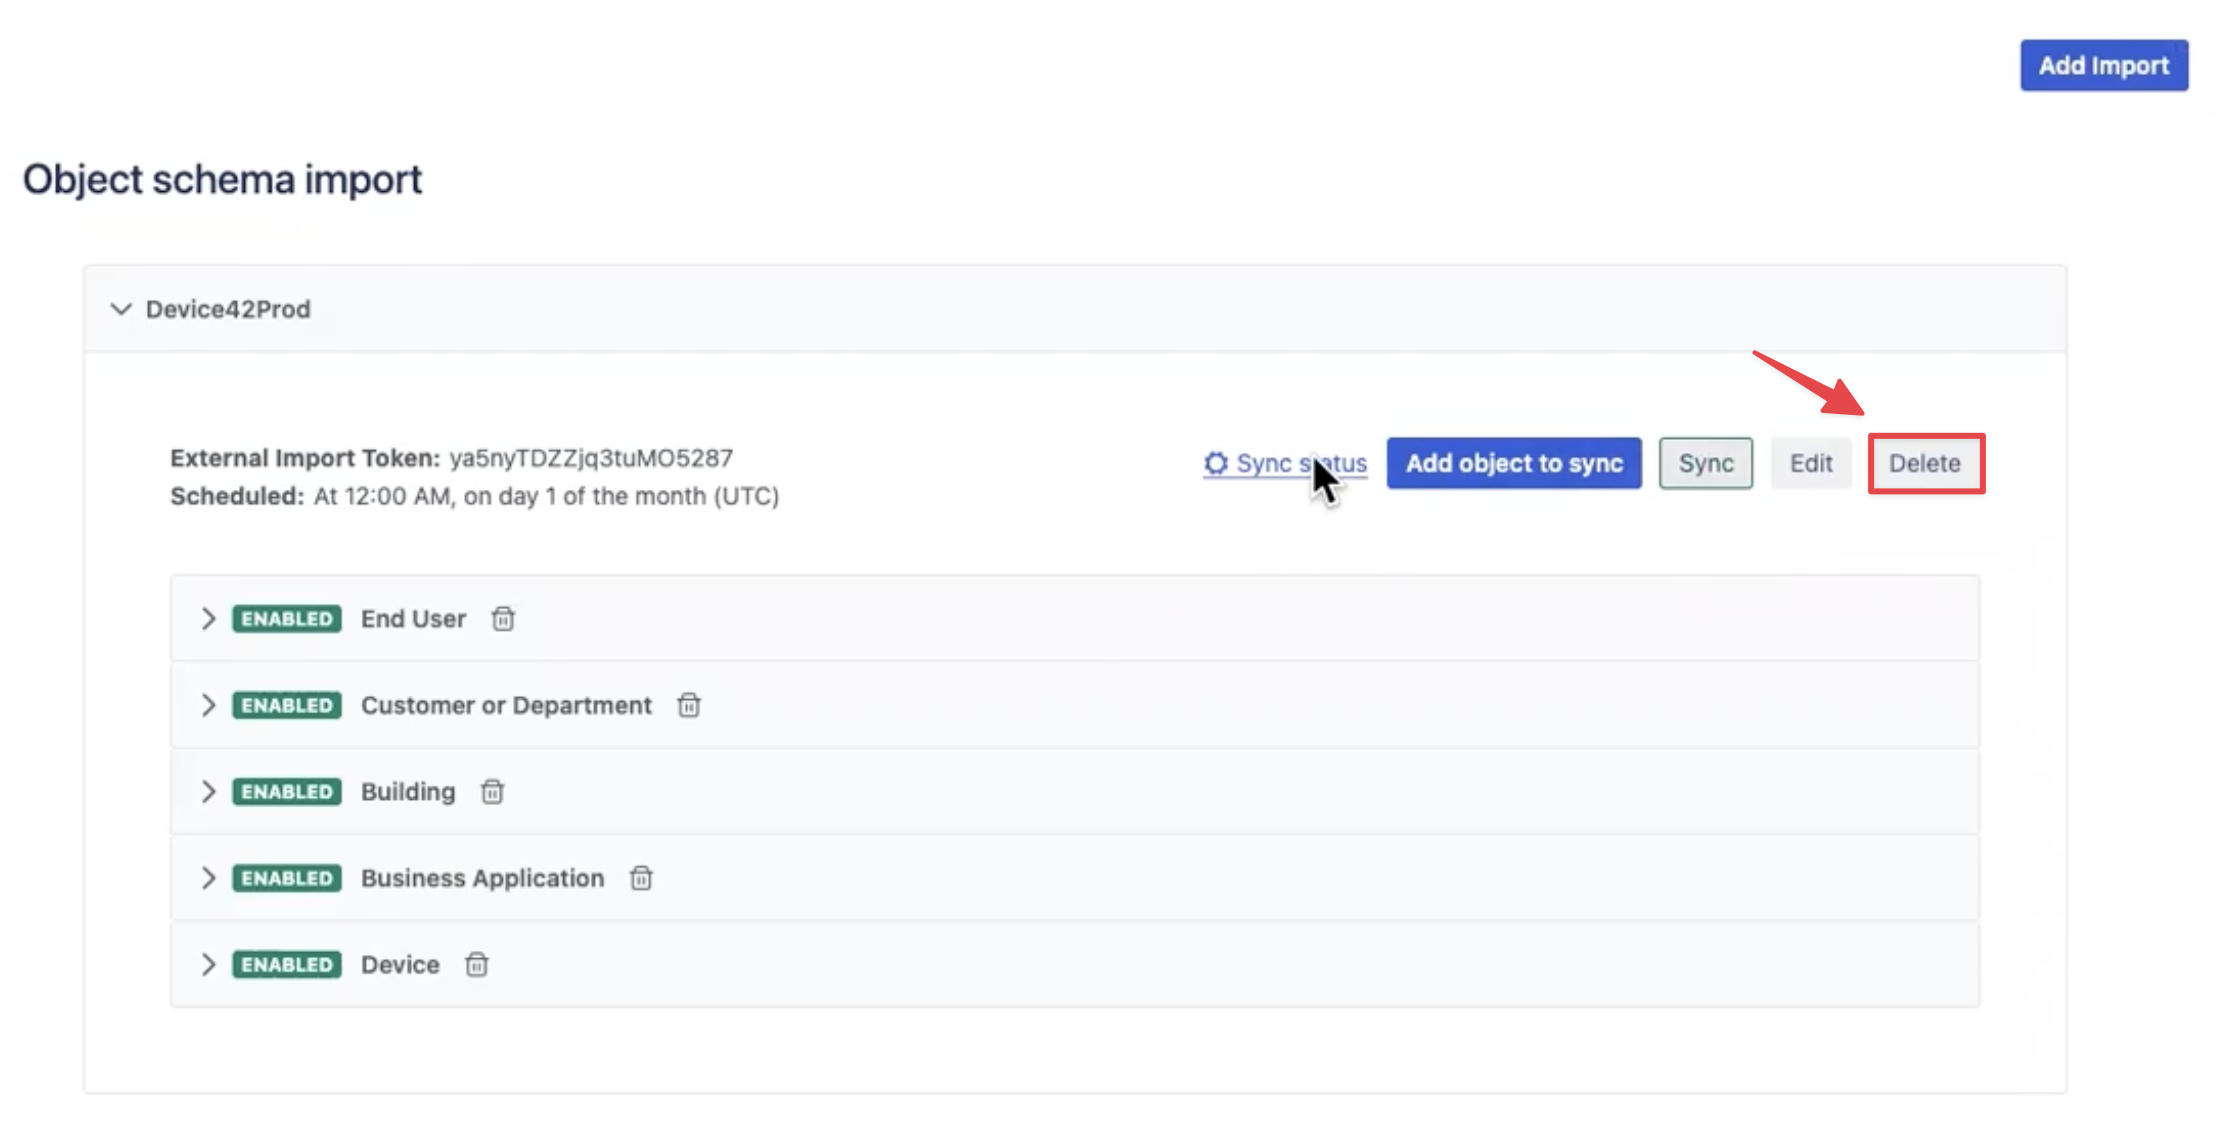
A confirmation window will appear, verifying that the object schema import has been deleted.
Add a New Object to an Object Schema
You can edit an object schema to include a new object to synchronize data from in the app and customize what data is synchronized to the app.
You will need the name of a Device42 Object Query Language (DOQL) query to complete the object creation form. The created DOQL object can be edited, disabled, and deleted from the object schema import sync.
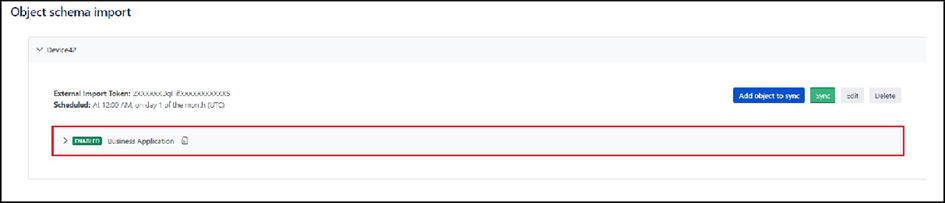
If you didn't select the Create with default schema option when you created a new object schema import, you can add data of selected asset types by adding a new object to sync.
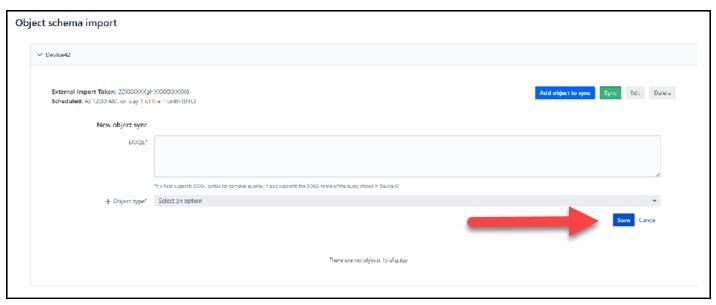
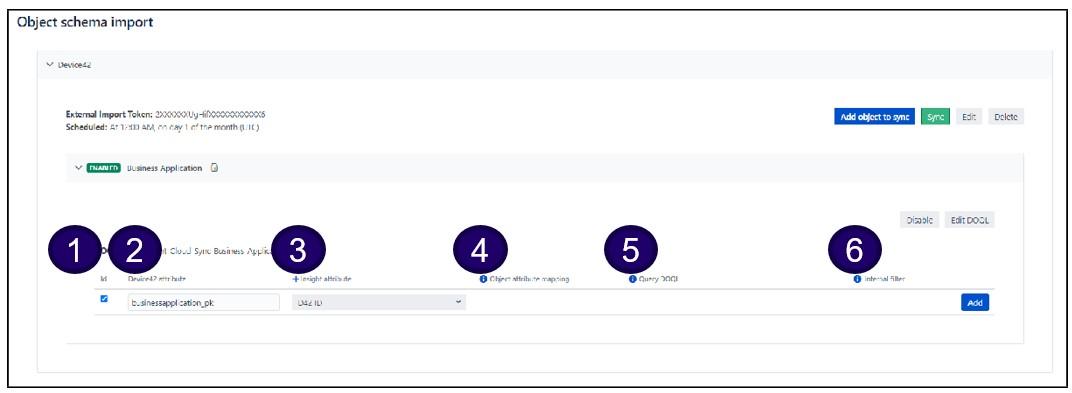
Click the Add object to sync button to open the new object sync form.
Complete the two required fields to add a new object to sync.
-
DOQL Add the DOQL name of the query stored in Device42 here. Read more about DOQL queries in our docs. This field supports DOQL syntax for complex queries, and you can edit the object DOQL later if you need to.
-
Object Type Name Select the object type from the list, or create a new object type by clicking + Object type.

If you're adding a new object type, two further required fields will open for you to complete.

When you're done, click the Save button to save the information.
Edit the DOQL of an Object
To edit the DOQL of an object, click the Edit DOQL button.
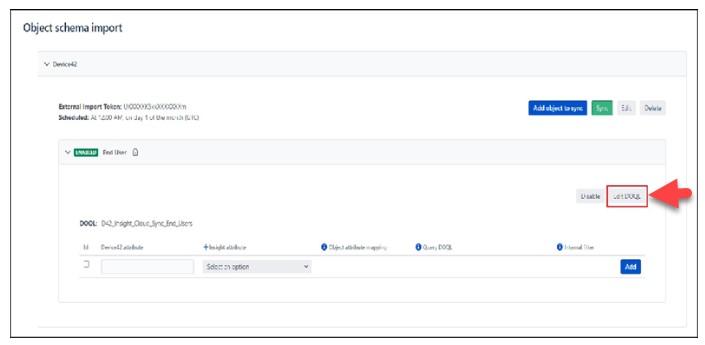
In the DOQL field that opens, add the name of the DOQL query stored in Device42. This field supports DOQL syntax for complex queries.
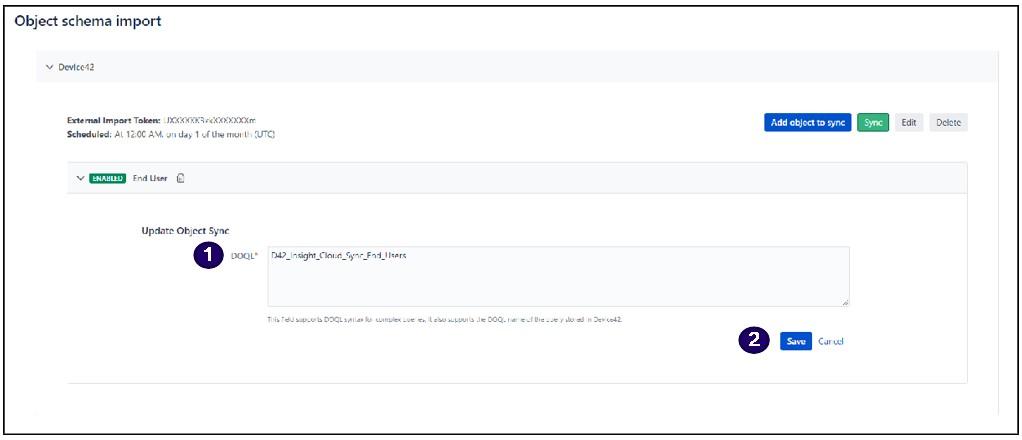
Click the Save button to save the DOQL query.
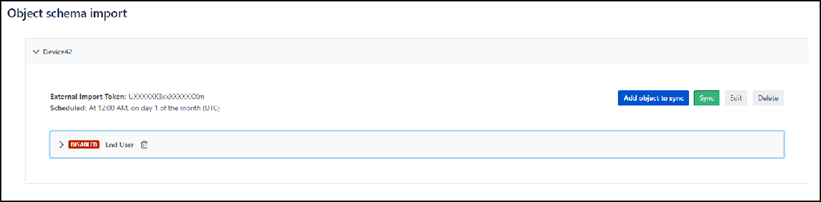
Disable an Object in the Object Schema
To disable an object, click the Disable button.
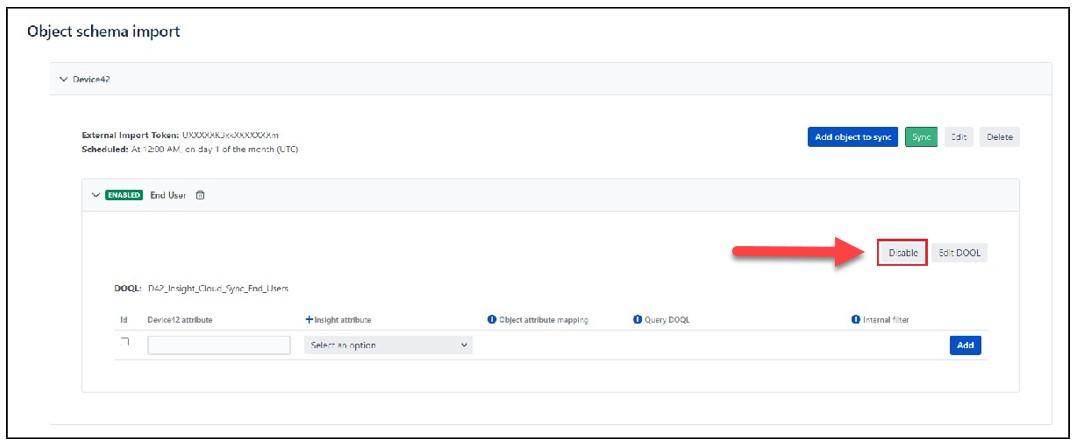
The state of the object will change to "Disabled" in the objects list.
Delete an Object from the Object Schema
To delete an object from an object schema, click the Delete button.
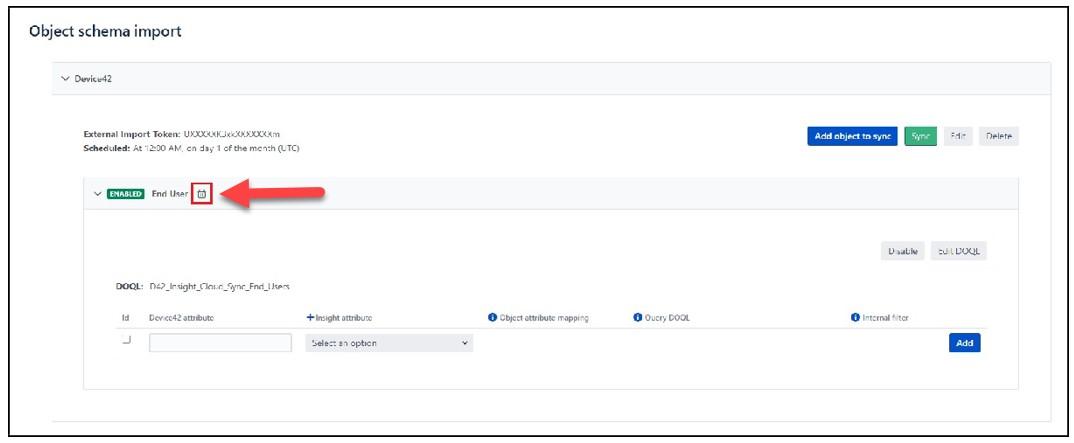
Confirm the object delete action in the window that appears.
Asset Type: Create a Field
To create a new field for an enabled asset type, click on the asset type.
A row of inputs will open for the asset type.
Fill in the following required information to create a new field for the given asset type:
- ID This option must be checked to associate the field with the ID of the selected object. There will only be one ID for the object.
- Device42 attribute This field is the name of the field for Device42 and must be the name of the existing attribute in the DOQL query.
- Insight attribute Select the Insight-registered field from the dropdown menu.
- Object attribute mapping This field is required if the Insight attribute has a reference object type. Select the attributes the object will be related to.
- Query DOQL This field is required if the Insight attribute has an unlimited reference. The value corresponds to a DOQL query or a saved DOQL, for example,
selectbusinessapplication_fk. Note: The ID you set in the mapping must be in the DOQL. - Internal filter This field is required when the Insight attribute has an unlimited reference. You can filter the DOQL results in this field, and it supports simple conditions, for example,
businessaplication_fk = ${businessaplication_pk}(note that${businessaplication_pk}will be replaced with each value the main DOQL query retrieves).
Asset Type: Remove a Field
To delete a field from an asset type, click the Remove button.
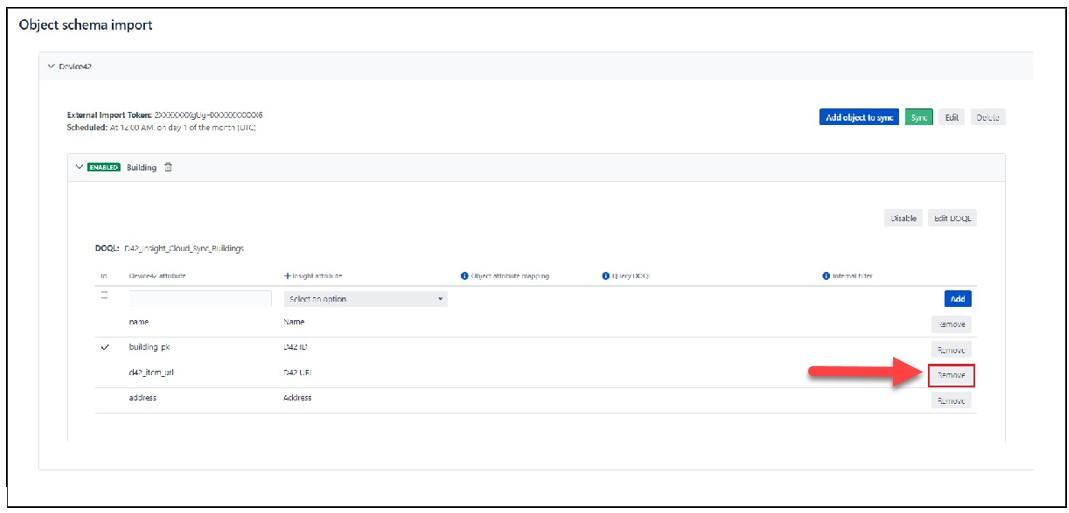
The field row will be deleted from the table but the ID field will persist.
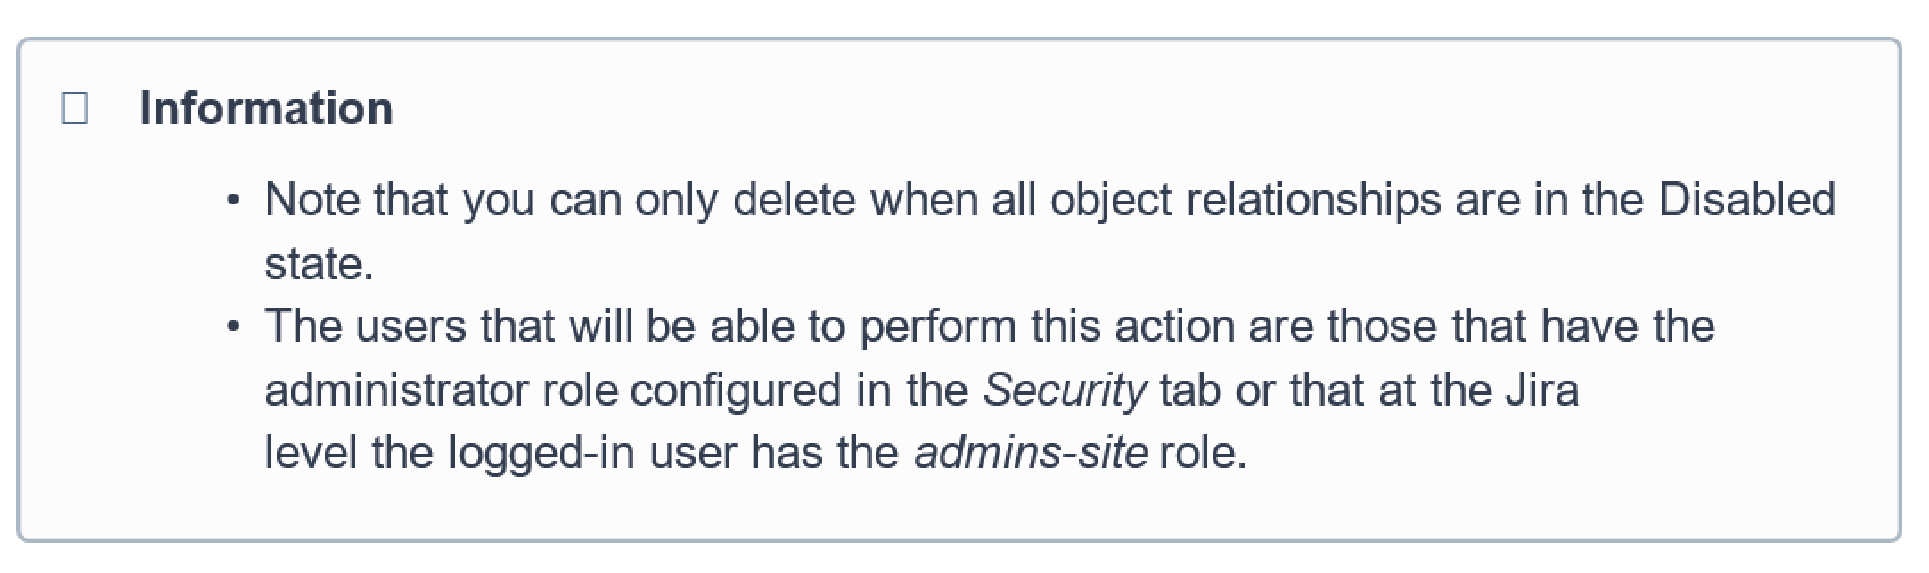
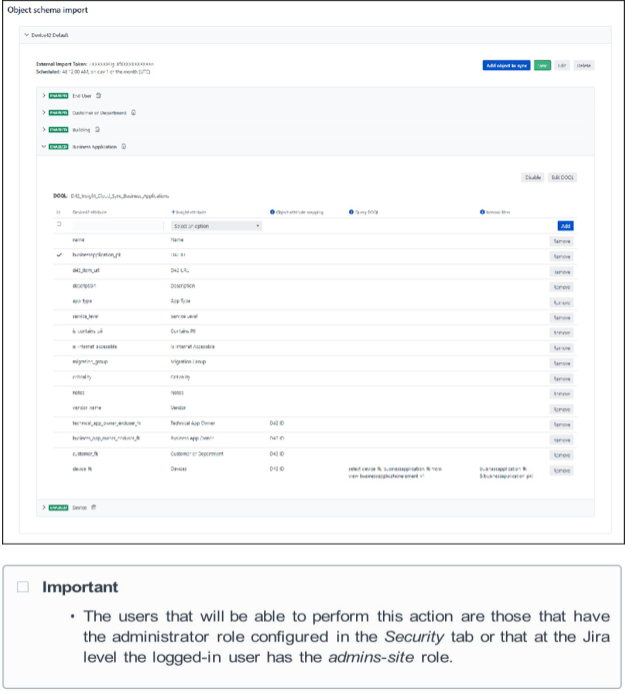
Set User Access to the App: The Security Tab
You can configure user access to the application in the Security tab.
Follow the steps below to assign roles to users with different permissions.
- Administrator role (Required) This field contains a dropdown list of all the existing roles in Jira. Select those roles that should be given administrative privileges. Users with these roles will be able to manage the object schema configurations.
- User role (Required) This field contains a dropdown list of all the existing roles in Jira. Select those roles that should be given basic user permissions. Users with these roles will be able to view the object schema configurations and perform manual syncs.
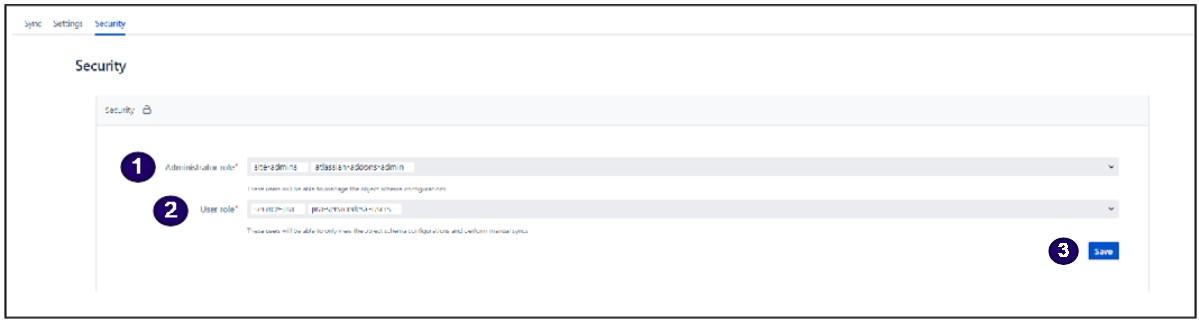
Click Save to save your access settings.
JSM Assets: Workflow Examples
Let's work through two examples to demonstrate adding an object type to the default object schema and adding an attribute to an object type in the default object schema.
Adding an Attribute to an Object Type in the Default Object Schema
This example will guide you through the steps to add a device custom field to the default object schema import, but note that the same process can be followed to add any field, column, or data point from Device42 that isn't included in the out-of-the-box schema import. Data with a one-to-one relationship cardinality to the object can be easily added in the Device42 for JSM app.
You might want to add a property to an object type in the default object schema import to, for example, include data from custom device fields in Device42 that are pulled from a VMware or Cloud Discovery job.
In this example, we'll modify the device import to include a custom field called "Application Owner".
Assumptions
This example assumes that:
- You checked the Create with default schema option when you added a new object schema import.
- In Device42, you have created a device custom field of type "text". In our example, the device custom field is called "Application Owner", and we have assigned values to it on a few devices.
Procedure
You will need to reference the custom field in a few places, so make note of the name.
First, add a new attribute to the "Device" object type as follows:
- From the Assets tab, select your object schema -> Device -> Attributes. You’ll see the list of all the attributes, like in the screenshot below:
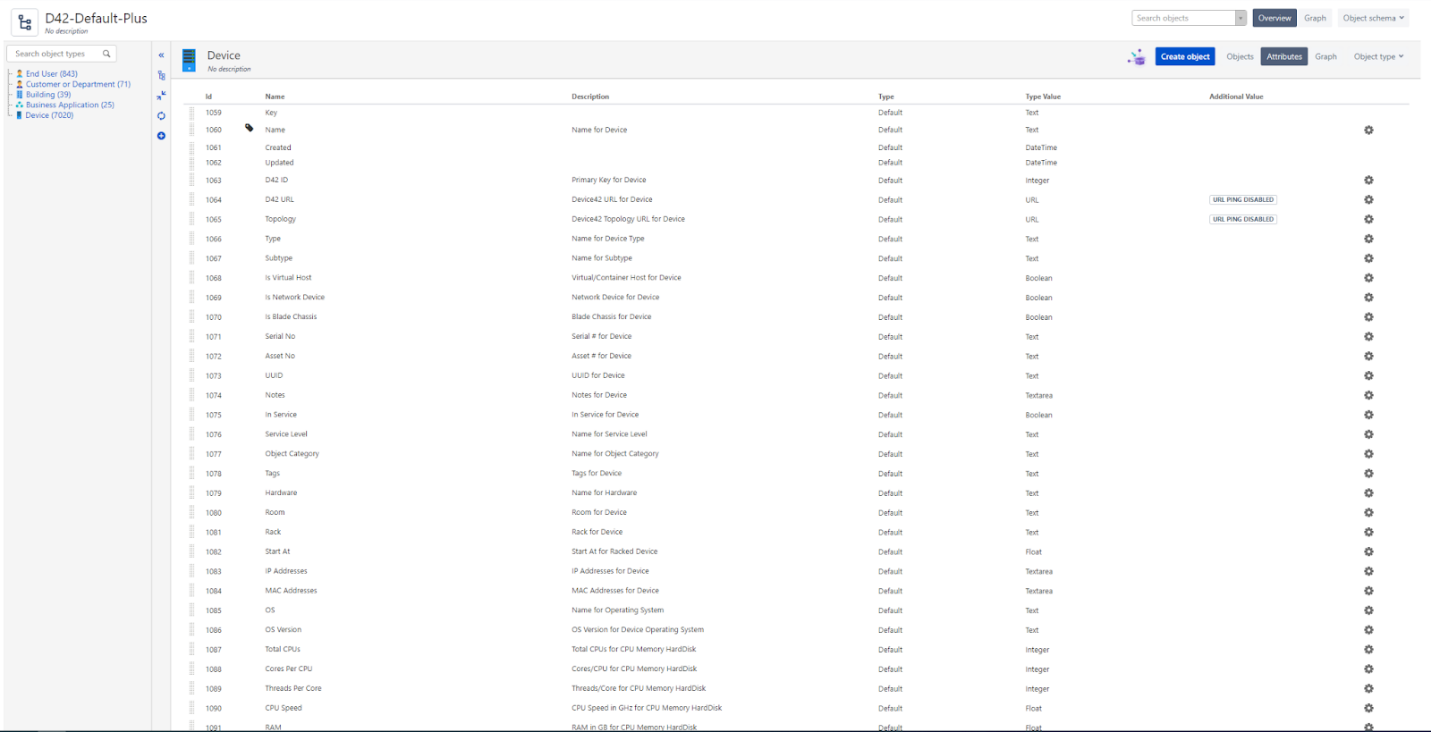
- Scroll to the bottom to see a toolbar for adding a new attribute.
![]()
-
Fill out the Name and Description fields and choose "Default" as the type and "Text" as the type value.
-
Click the Add button to commit the attribute to the schema.
Next, switch to your Device42 Main Appliance and navigate to Tools -> Saved DOQL Queries. Search for D42_Insight_Cloud_Sync_Devices. Note that this is a system-defined query, so you cannot edit this query but you can clone it.
-
Click on the query name and click the Clone DOQL Query button.
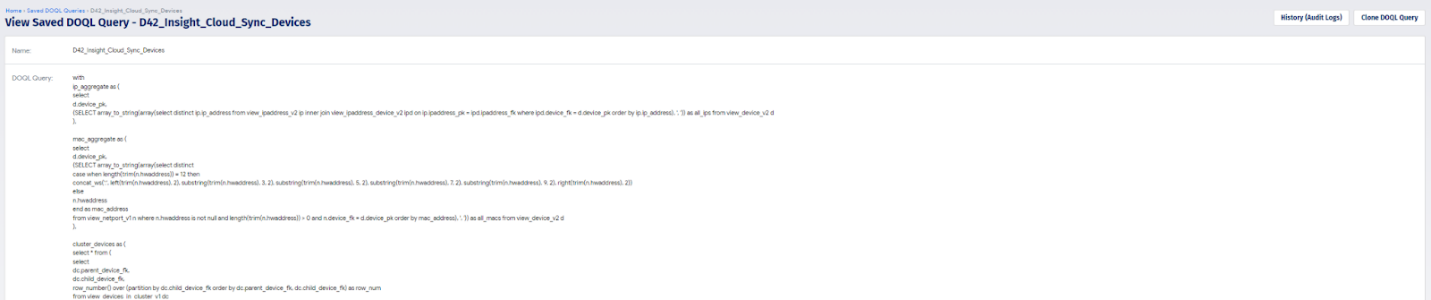
Give the query a unique name. In our example, we call it CF_D42_Insight_Cloud_Sync_Devices.
Click into the DOQL query textbox and select all the contents (Ctrl+A), copy them (Ctrl+C), and paste them (Ctrl+V) into a text editor.
To include the device custom field, we need to modify the query to add a left join to view_device_custom_fields_flat_v2 and the custom field to the body of the select statement.
Note that the full query isn't included here, only the necessary modifications.
First, copy and paste the following directly after the line view_device_v2 d:
left outer join view_device_custom_fields_flat_v2 dcf ON d.device_pk = dcf.device_fk
Next, copy and paste the following directly above the line view_device_v2 d:
dcf."Application Owner" AS application_owner
Remember to add a comma after the previous column or you will get a syntax error when trying to save the DOQL query.
Now you can copy and paste the query back into the Saved DOQL Query in Device42 and hit Save. Note that you won't be able to save invalid SQL. Click the Test SQL button to ensure the query is syntactically valid.
Return to JSM Cloud and navigate to Apps -> Device42 Insight Connect.
Expand the "Device" object import and click the Edit DOQL button.
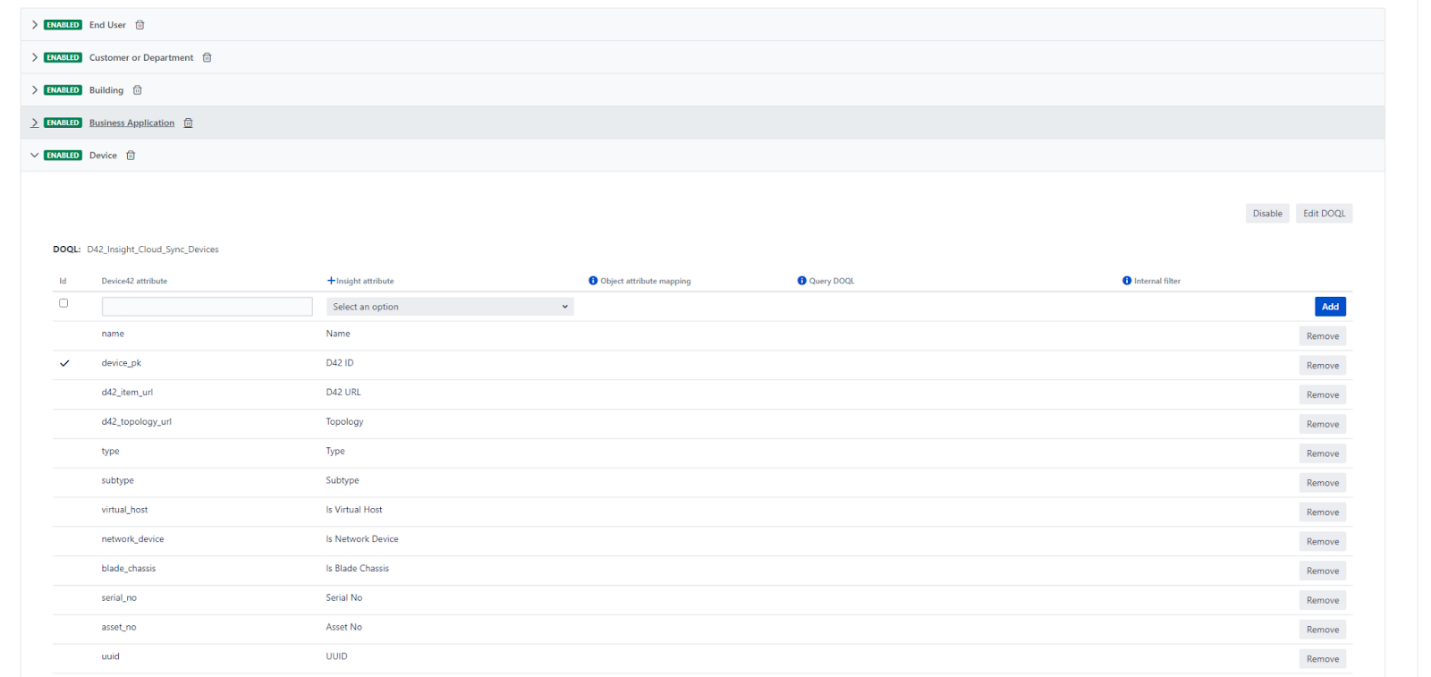
The text area should contain the value of D42_Insight_Cloud_Sync_Devices, which is the name of the default saved DOQL query that we cloned earlier.

Replace this query name with the name of the new saved DOQL query we just created called CF_D42_Insight_Cloud_Sync_Devices. Hit Save to update the query.
Now we can add the attribute to the import.
In the expanded "Device" view, click the dropdown box in the top row under Insight attribute and search for the attribute we defined earlier.
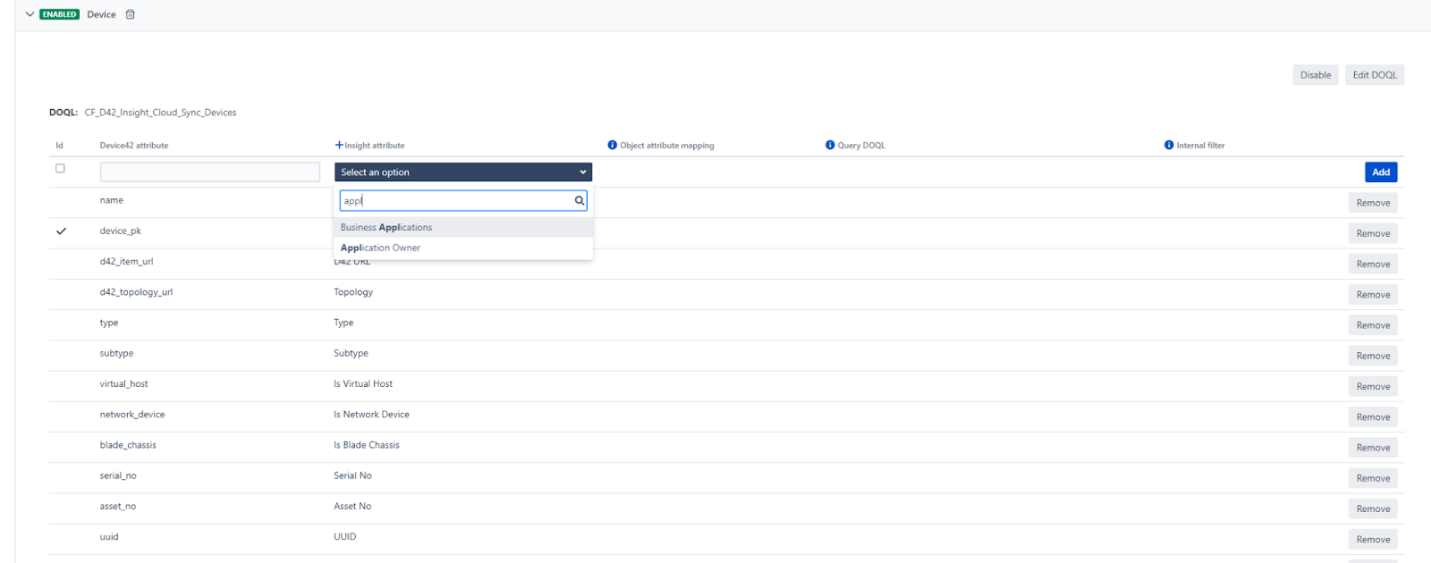
Select the attribute or hit Enter.
In the Device42 attribute text box, enter application_owner. This is the same name that we used for the column name or alias in the query in our example.

Click the Add button and you should get the message "The field was successfully registered".
Now you can run the sync. Scroll up and click the Sync button. You should get the message "Sync task was launched successfully". Check the status of the sync by clicking on Sync status.
When the sync is complete, navigate to the object schema in Assets and search for a device that has a value for the new custom field.
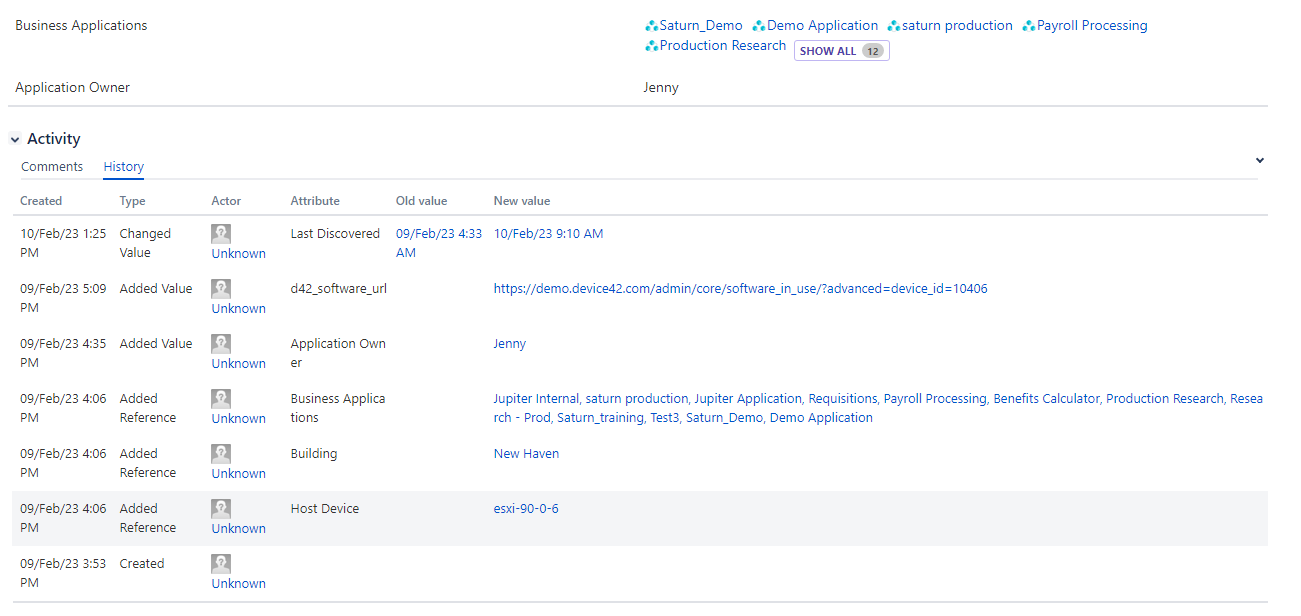
We can see our new attribute "Application Owner" and its value from the custom field in Device42.

We can also see the date and time the value for that field was added to our object in Assets.
You can modify this process to do nifty things like create additional URL fields or quick linkbacks to pages in Device42. For example, you could include an attribute called "D42 Software URL" that acts as a quick link to a filtered list of all software on the device. Do this by adding a column format('%s/admin/core/software_in_use/?advanced=device_id=%s', {d42_url}, d.device_pk) as d42_software_url to the query.
Adding an Object Type to the Default Object Schema
Now we'll show you how to add object types and attributes to the default object schema. This example demonstrates how you can add installed software and certificates discovered by Device42 to the existing assets data, but you can follow the same process to add any configuration item, object, or attribute that exists in Device42 that isn't created in the default object schema.
Assumptions
This example assumes that:
- You checked the Create with default schema option when you added a new object schema import.
- Device42 has discovered a device with installed software records.
Procedure
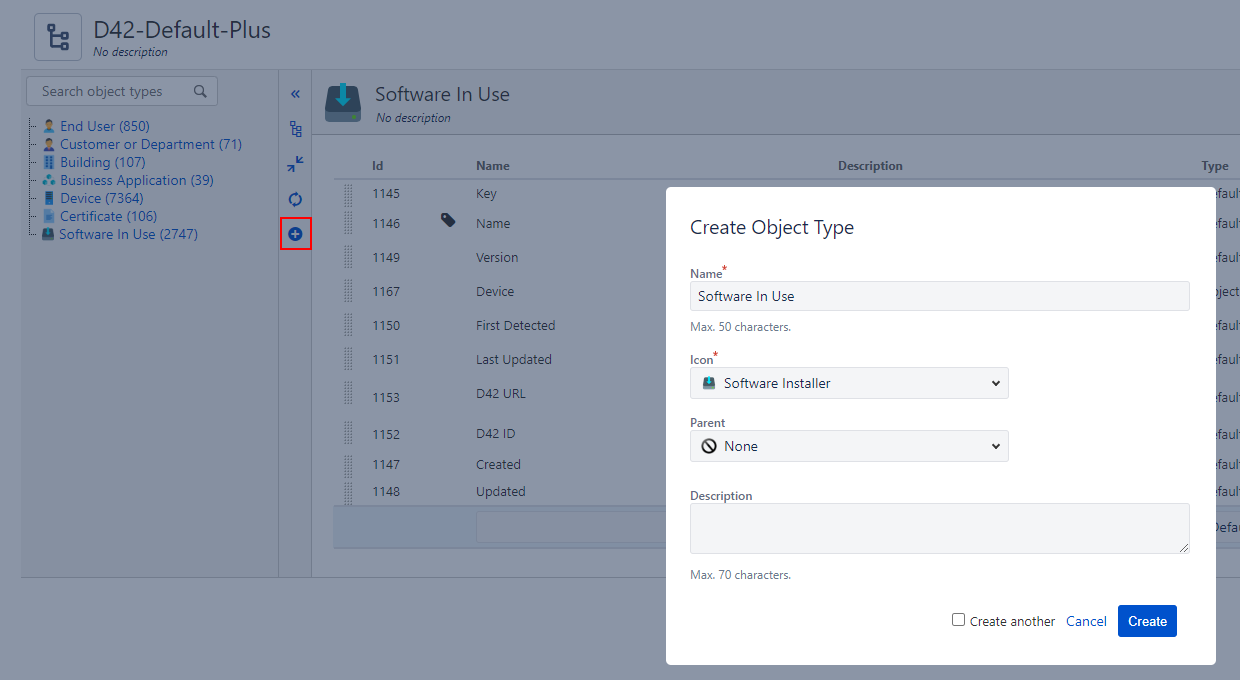
First, add a new object type in the Assets tab.
Click the + button to the right of the object type list and give the new object type a name. In this example, we call the new object type "Software In Use".
Click the Create button.
Now we’ll add attributes to the new "Software In Use" object type.
From the Assets tab, select your object schema -> Software In Use -> Attributes.
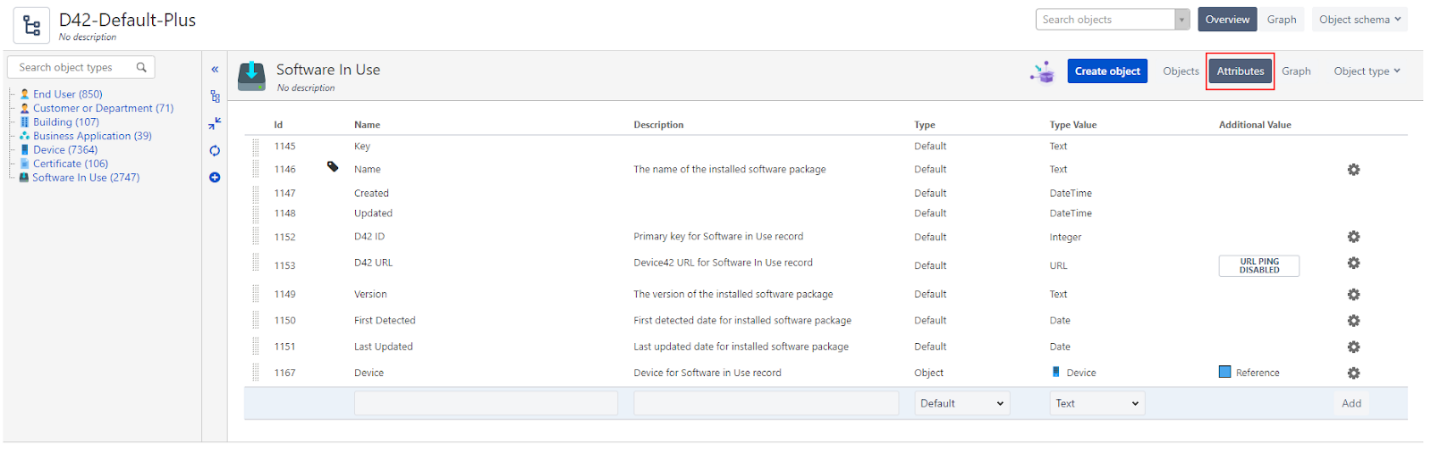
Create a list of attributes for your "Software In Use" object. Use the toolbar at the bottom to add each new attribute.
![]()
Add the Name, Description, Type, and Type Value of each attribute, then click the Add button to commit the attribute to the object schema.
The last attribute in the list is "Device". Set this attribute's Type to "Object", Type Value to "Device", and Additional Value to "Reference". These values will relate the "Software In Use" object (the installed software that is discovered) to the device object in JSM Assets. When you configure the reference, keep Cardinality set to "1" because the "Software In Use" record can only have one device related to it.
| Name | Description | Type | Type Value | Additional Value |
|---|---|---|---|---|
| Key | Default | Text | ||
| Name | Name for Software In Use | Default | Text | |
| Created | Default | DateTime | ||
| Updated | Default | DateTime | ||
| D42 ID | Primary Key for Software In Use | Default | Integer | |
| D42 URL | Device42 URL for Software In Use | Default | URL | URL PING DISABLED |
| Version | The version of the installed software package | Default | Text | |
| First Detected | First detected date for installed software package | Default | Date | |
| Last Updated | Last updated date for installed software package | Default | Date | |
| Device | Device for Software In Use record | Object | Device | Reference |
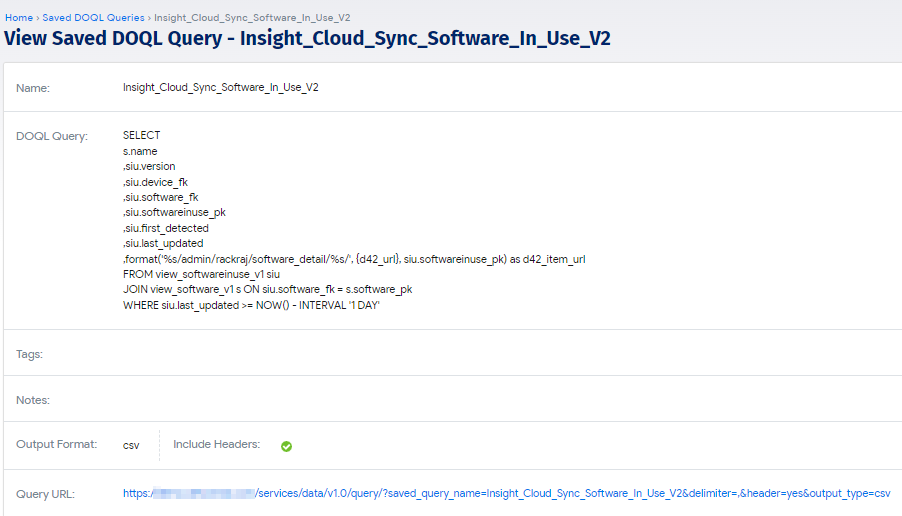
Switch to your Device42 Main Appliance and navigate to Tools -> Integrations -> Saved DOQL Queries. Notice that there are several System Defined queries you could leverage by selecting the query and then clicking the Clone DOQL Query button.
However, in this example, we will create a new query.
Click the Add Saved DOQL Query button at the top right.
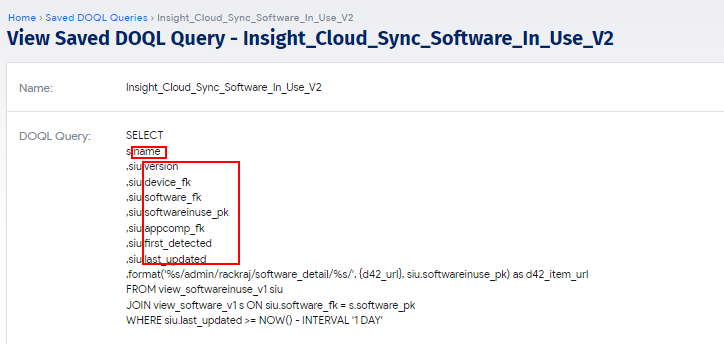
Type Insight_Cloud_Sync_Software_In_Use_V2 in the query Name field.
Copy the following query and paste it into the DOQL Query section:
SELECT
   s.name
   ,siu.version
   ,siu.device_fk
   ,siu.software_fk
   ,siu.softwareinuse_pk
   ,siu.first_detected
   ,siu.last_updated
   ,format('%s/admin/rackraj/software_detail/%s/', {d42_url}, siu.softwareinuse_pk) as d42_item_url
FROM view_softwareinuse_v1 siu
JOIN view_software_v1 s ON siu.software_fk = s.software_pk
WHERE siu.last_updated >= NOW() - INTERVAL '1 DAY'
The query specifies that we are looking at software on devices that we are currently running daily discoveries on that were updated within a 1 DAY interval.
Click the Test SQL button to validate that the query is correct and then click the Save button. You should see a summary of the saved query.
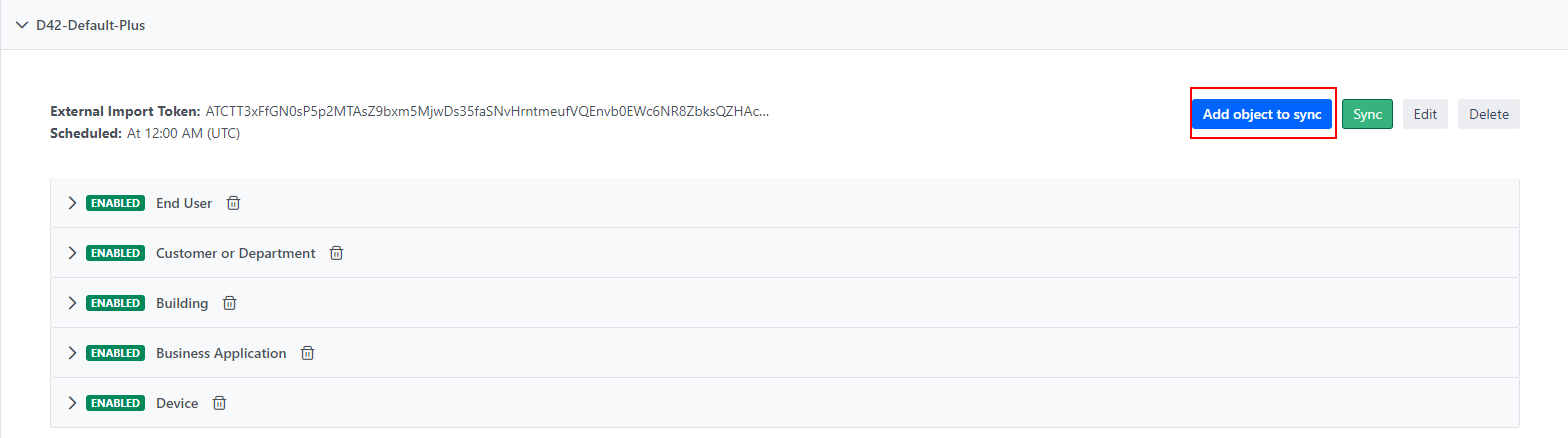
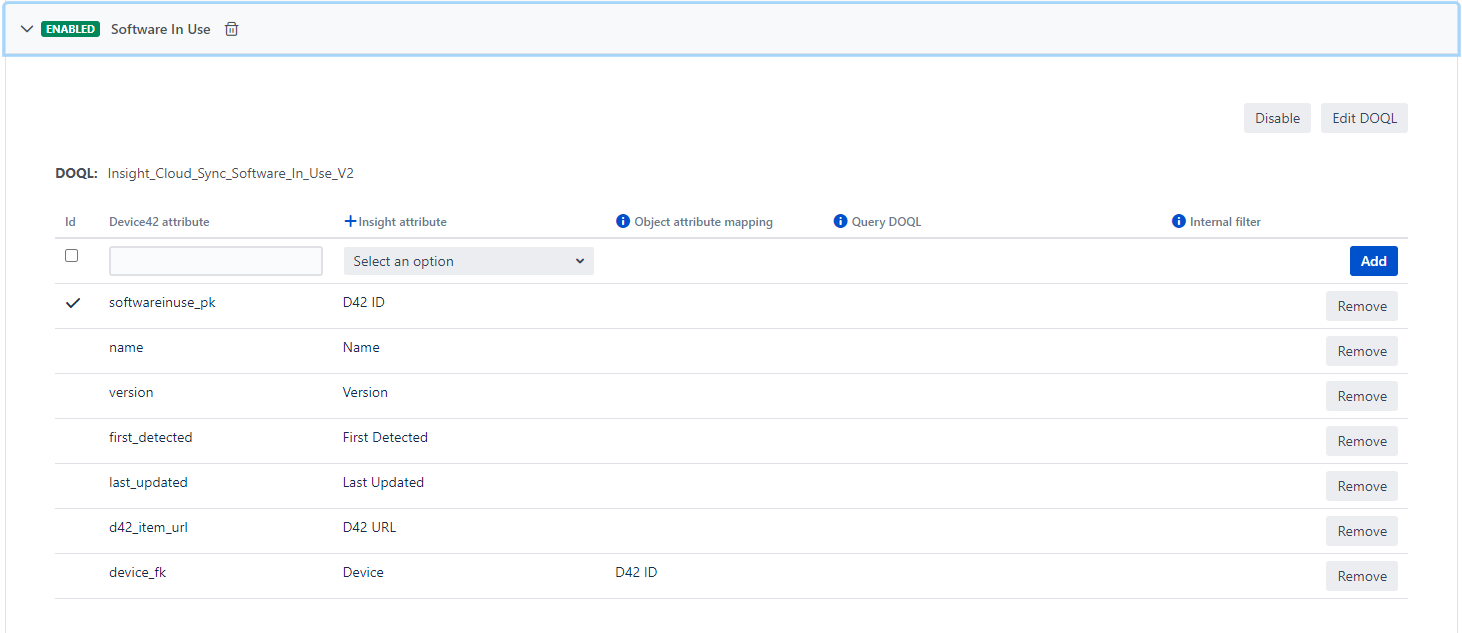
Return to the JSM app and navigate to the Sync tab. Click the Add object to sync button to sync the "Software In Use" data from Device42.
Now enter the name of the saved DOQL query in the DOQL text area and then select the new "Software In Use" object type we created.
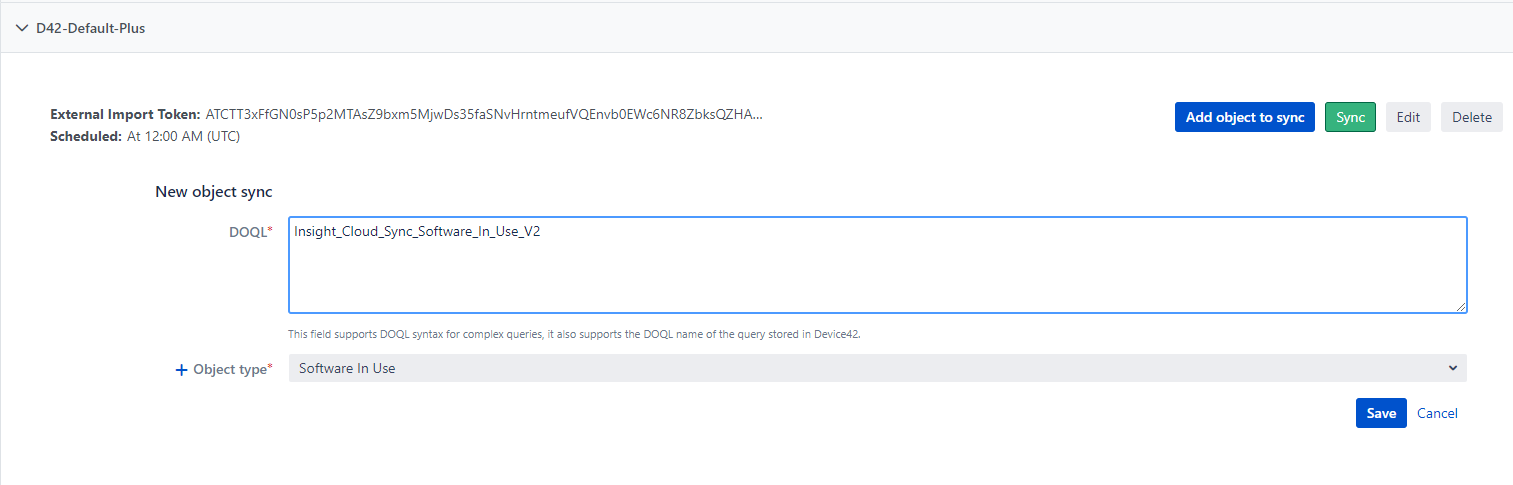
Click Save.
Next, you need the names of the Device42 attributes you referenced in your query.
Enter the name of each Device42 attribute and select the corresponding JSM attribute that the value will map to from the dropdown. Click Add to commit each attribute to the import.
When you add the first attribute, be sure to check the "ID" checkbox next to it to register the attribute or you will see the following error:

The last attribute to add is device_fk, which will map to the "Device" attribute in Insight. This is the only attribute that requires a value for "Object attribute mapping". Select "D42 ID" here to link the "Software In Use" object to the device.
Once you have entered all the attributes, it should look something like this:
Now you can scroll up and click on the Sync button. You should see the message "Sync task was launched successfully". Check on the status of the sync by clicking on the Sync status link.
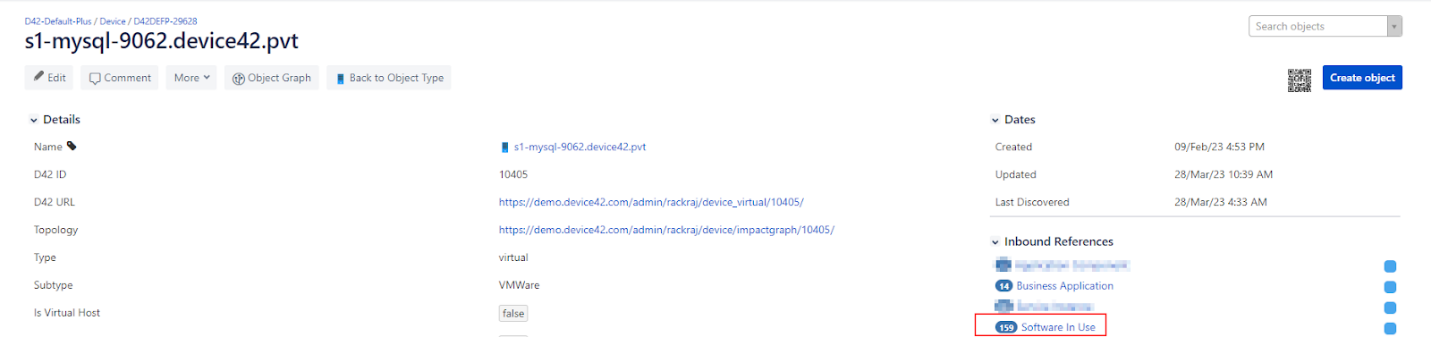
When the sync is complete, navigate to the object schema in the Assets tab and you should start to see values populating for "Software In Use".
If you look at a device with software on it, you should now see "Software In Use" for that device in the Inbound References section.
Additional Resources
Video: How to set up Jira Service Management assets integration with Device42